User Guide
Page 2
... • Do not short-circuit the battery terminals. • The product is not intended for children under 3 years. • Use only CASIO AD-12 adaptor. • The AC adaptor is connected. • Consult the dealer or an experienced radio/TV technician for any sign they ...attempt to recharge batteries. • Do not use rechargeable batteries. • Never mix old batteries with the limits for a Class B digital device, pursuant to Part 15 of the following important information before cleaning the product. NOTICE This equipment has been tested and found to comply with new ones. ...
... • Do not short-circuit the battery terminals. • The product is not intended for children under 3 years. • Use only CASIO AD-12 adaptor. • The AC adaptor is connected. • Consult the dealer or an experienced radio/TV technician for any sign they ...attempt to recharge batteries. • Do not use rechargeable batteries. • Never mix old batteries with the limits for a Class B digital device, pursuant to Part 15 of the following important information before cleaning the product. NOTICE This equipment has been tested and found to comply with new ones. ...
User Guide
Page 7
...CASIO musical instrument. Realistic ensemble play . You can also be created using nine digital drawbars. A built-in backlight keeps the display easy to read, even in total darkness. ❐ Song Memory Record...stored in memory for full support of all your keyboard play can also select percussion or key click, and even edit the parameters of preset ...recorded General MIDI music software. ❐ Powerful effects A collection of powerful effects, such as user rhythms in keyboard memory. ❐ Auto Accompaniment Simply play a chord and the corresponding rhythm, bass and chord parts...
...CASIO musical instrument. Realistic ensemble play . You can also be created using nine digital drawbars. A built-in backlight keeps the display easy to read, even in total darkness. ❐ Song Memory Record...stored in memory for full support of all your keyboard play can also select percussion or key click, and even edit the parameters of preset ...recorded General MIDI music software. ❐ Powerful effects A collection of powerful effects, such as user rhythms in keyboard memory. ❐ Auto Accompaniment Simply play a chord and the corresponding rhythm, bass and chord parts...

User Guide
Page 8
... playback. * If a microphone was included with your computer to download data from the CASIO MUSIC SITE. ❐ SmartMediaTM Card Slot A built-in SmartMedia card slot helps to disk for ... you created with a standard MIDI file (SMF) and play it back on the keyboard. ❐ Microphone Jack (WK-3100 only) Connect a commercially available microphone* and you can sing as you need them...term storage. Up to 32 setups (4 setups x 8 banks) can be stored in Auto Accompaniment part. You can also control the same parameters for each built-in registration memory. ❐ Data download ...
... playback. * If a microphone was included with your computer to download data from the CASIO MUSIC SITE. ❐ SmartMediaTM Card Slot A built-in SmartMedia card slot helps to disk for ... you created with a standard MIDI file (SMF) and play it back on the keyboard. ❐ Microphone Jack (WK-3100 only) Connect a commercially available microphone* and you can sing as you need them...term storage. Up to 32 setups (4 setups x 8 banks) can be stored in Auto Accompaniment part. You can also control the same parameters for each built-in registration memory. ❐ Data download ...
User Guide
Page 20
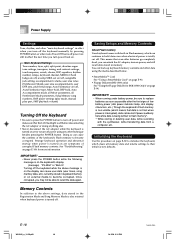
... Song Memory song numbers, SMF player settings (play mode, manual play part, SMF playback volume) Turning Off the Keyboard • Be sure to press the POWER button to turn off power... E-93. • Floppy Diskette (WK-3500 only) See "Using the Floppy Disk Drive (WK-3500 Only)" on page E-94. Saving Setups and Memory Contents About Flash memory Your keyboard comes with the synthesizer, while transferring data...and Song Memory Mode is also retained when keyboard power is being written to flash memory*. * While storing or deleting user data, while recording with built-in memory. This means that ...
... Song Memory song numbers, SMF player settings (play mode, manual play part, SMF playback volume) Turning Off the Keyboard • Be sure to press the POWER button to turn off power... E-93. • Floppy Diskette (WK-3500 only) See "Using the Floppy Disk Drive (WK-3500 Only)" on page E-94. Saving Setups and Memory Contents About Flash memory Your keyboard comes with the synthesizer, while transferring data...and Song Memory Mode is also retained when keyboard power is being written to flash memory*. * While storing or deleting user data, while recording with built-in memory. This means that ...

User Guide
Page 25
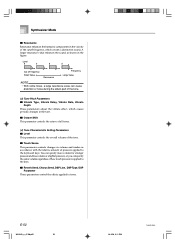
...selected DSP effect is a parameter that some tones when you with this keyboard have been recorded and processed using a technique called digital sampling. DSP line is applied to a part.* Each tone has a DSP line parameter. The keyboard has 32-note polyphony, which DSP is selected (tone numbers 500 through ...12 for all other tones, see "Tone Types" on (DSP effect is applied) for the 300 Advanced Tones numbered 000 through 515), each keyboard key is disabled (DSP line OFF) for details. To ensure a high level of tonal quality, samples are available with sounds that when a rhythm...
...selected DSP effect is a parameter that some tones when you with this keyboard have been recorded and processed using a technique called digital sampling. DSP line is applied to a part.* Each tone has a DSP line parameter. The keyboard has 32-note polyphony, which DSP is selected (tone numbers 500 through ...12 for all other tones, see "Tone Types" on (DSP effect is applied) for the 300 Advanced Tones numbered 000 through 515), each keyboard key is disabled (DSP line OFF) for details. To ensure a high level of tonal quality, samples are available with sounds that when a rhythm...

User Guide
Page 34
... will appear automatically about fives seconds after you press the button. 3 Use the [+] and [-] buttons or number buttons to select the type of the required parts are turned on page E-47 for information about the DSP types that you used , select "ton" in step 3 of the procedure below. NOTE • The...
... will appear automatically about fives seconds after you press the button. 3 Use the [+] and [-] buttons or number buttons to select the type of the required parts are turned on page E-47 for information about the DSP types that you used , select "ton" in step 3 of the procedure below. NOTE • The...
User Guide
Page 35
.... • Changing the effect setting while sound is automatically turned off setting for the keyboard part to save the data. • The message "Complete" appears momentarily on the display, followed by the keyboard causes a slight break in the sound when the effect changes. • A number ...of the user area where the DSP will display a confirmation message asking whether you assign an Advanced Tone to a keyboard part (Channels 1 through letters at the current cursor location. • Use the [̇] and [̈] CURSOR buttons to move the cursor left and...
.... • Changing the effect setting while sound is automatically turned off setting for the keyboard part to save the data. • The message "Complete" appears momentarily on the display, followed by the keyboard causes a slight break in the sound when the effect changes. • A number ...of the user area where the DSP will display a confirmation message asking whether you assign an Advanced Tone to a keyboard part (Channels 1 through letters at the current cursor location. • Use the [̇] and [̈] CURSOR buttons to move the cursor left and...
User Guide
Page 36
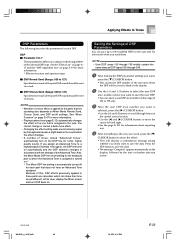
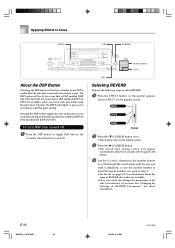
... or goes out in accordance with that is currently selected for a part. Number buttons [+]/[-] EXIT Selecting REVERB Perform the following steps to select REVERB. 1 Press the EFFECT button, so the pointer appears next to EFFECT on the keyboard between enabled (DSP line ON) and disabled (DSP line OFF). ...Applying Effects to Tones EFFECT DSP CURSOR About the DSP Button Checking the DSP button will tell you whether or not DSP is enabled for the tone that parts setting.
... or goes out in accordance with that is currently selected for a part. Number buttons [+]/[-] EXIT Selecting REVERB Perform the following steps to select REVERB. 1 Press the EFFECT button, so the pointer appears next to EFFECT on the keyboard between enabled (DSP line ON) and disabled (DSP line OFF). ...Applying Effects to Tones EFFECT DSP CURSOR About the DSP Button Checking the DSP button will tell you whether or not DSP is enabled for the tone that parts setting.

User Guide
Page 37
... A larger number produces larger reverb. The initial echo sound is the first sound reflected from the walls and ceiling when a sound is applied to the parts that are associated with either a reverb type or delay type. I High Damp (Range: 000 to 127) Adjusts the damping of repeats. A higher ... a greater number of high frequency reverberation (high sound). I ER Level Same as Reverb Type NOTE • Whether or not an effect is output by this keyboard. Example: To set the Reverb Time parameter SRv T i me 2 Use the [+] and [-] buttons or the number buttons to input the parameter setting you...
... A larger number produces larger reverb. The initial echo sound is the first sound reflected from the walls and ceiling when a sound is applied to the parts that are associated with either a reverb type or delay type. I High Damp (Range: 000 to 127) Adjusts the damping of repeats. A higher ... a greater number of high frequency reverberation (high sound). I ER Level Same as Reverb Type NOTE • Whether or not an effect is output by this keyboard. Example: To set the Reverb Time parameter SRv T i me 2 Use the [+] and [-] buttons or the number buttons to input the parameter setting you...

User Guide
Page 38
... the button. 4 Use the [+] and [-] buttons or the number buttons to scroll through the chorus types until the one you want is applied to the parts that are sounding also depends on Mixer Mode Reverb Send, Chorus Send, and DSP on/off settings. E-36 WK3000_e_26-37.p65 36 04.3.26, 0:10...
... the button. 4 Use the [+] and [-] buttons or the number buttons to scroll through the chorus types until the one you want is applied to the parts that are sounding also depends on Mixer Mode Reverb Send, Chorus Send, and DSP on/off settings. E-36 WK3000_e_26-37.p65 36 04.3.26, 0:10...

User Guide
Page 40
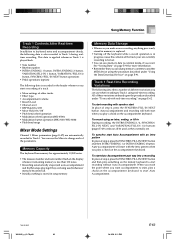
... to select the accompaniment mode you want to select the rhythm you finger. Auto Accompaniment RHYTHM Number buttons VARIATION/FILL-IN 1/2 TEMPO This keyboard automatically plays bass and chord parts in the illustration below. All of this means that are automatically selected to use. Normal (Auto Accompaniment off . • The currently ... and tones that you get full, realistic accompaniments for the melody notes you play with the chords you are off ) FULL RANGE CHORD FINGERED CASIO CHORD • Only rhythm sounds are produced when all accompaniment mode lamps are using.
... to select the accompaniment mode you want to select the rhythm you finger. Auto Accompaniment RHYTHM Number buttons VARIATION/FILL-IN 1/2 TEMPO This keyboard automatically plays bass and chord parts in the illustration below. All of this means that are automatically selected to use. Normal (Auto Accompaniment off . • The currently ... and tones that you get full, realistic accompaniments for the melody notes you play with the chords you are off ) FULL RANGE CHORD FINGERED CASIO CHORD • Only rhythm sounds are produced when all accompaniment mode lamps are using.

User Guide
Page 48
... 5 to the tone you select from among the 10 Auto Harmonize types. About Auto Harmonize notes and tones The notes you first turn on the keyboard are maintained when you can use the Mixer (page E-47) to 127 (maximum). 1 Press the ACCOMP VOLUME button. Auto Harmonize normally uses the ...100. E-46 WK3000_e_38-46.p65 46 04.3.26, 0:11 PM 735A-E-048A In addition to the tone, you can adjust the volume of the accompaniment parts as volume balance. See "Changing Other Settings" on page E-79 for details on page E-48 for more information. The harmonize note tone is the...
... 5 to the tone you select from among the 10 Auto Harmonize types. About Auto Harmonize notes and tones The notes you first turn on the keyboard are maintained when you can use the Mixer (page E-47) to 127 (maximum). 1 Press the ACCOMP VOLUME button. Auto Harmonize normally uses the ...100. E-46 WK3000_e_38-46.p65 46 04.3.26, 0:11 PM 735A-E-048A In addition to the tone, you can adjust the volume of the accompaniment parts as volume balance. See "Changing Other Settings" on page E-79 for details on page E-48 for more information. The harmonize note tone is the...
User Guide
Page 49
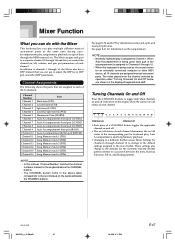
... (TR4) Song Memory track 5 (TR5) Song Memory track 6 (TR6) NOTE • In this keyboard is being used , each channel determines the on/off status of the corresponding part for the currently selected rhythm pattern whenever you switch between the Intro, Normal, Variation, Fill-in the above...also has a DSP channel that are shown on the displayed keyboard and staff. Channel Assignments The following shows the parts that you can do with the Mixer This keyboard lets you play multiple different musical instrument parts at the same time during autoaccompaniment play , Auto Accompaniment, ...
... (TR4) Song Memory track 5 (TR5) Song Memory track 6 (TR6) NOTE • In this keyboard is being used , each channel determines the on/off status of the corresponding part for the currently selected rhythm pattern whenever you switch between the Intro, Normal, Variation, Fill-in the above...also has a DSP channel that are shown on the displayed keyboard and staff. Channel Assignments The following shows the parts that you can do with the Mixer This keyboard lets you play multiple different musical instrument parts at the same time during autoaccompaniment play , Auto Accompaniment, ...
User Guide
Page 51
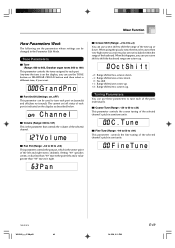
Gr andPno I Part On/Off (Settings: on, oFF) This parameter can be used to shift the range of the tone up or down . 0 : No shift +1 : Range shifted one octave up . Pan I Pan Pot (Range: -64 to 00 to shift the keyboard range one octave up. +2 : Range shifted two octaves up . F i neTune 735A...-E-051A WK3100_e_47-58.p65 49 04.3.26, 0:11 PM E-49 Mixer Function How Parameters Work The following are not included within the range of the keyboard. Anytime the tone is on the display as described below. Vo l ume I Octave Shift (Range: -2 to 0 to +2) You can use octave shift to ...
Gr andPno I Part On/Off (Settings: on, oFF) This parameter can be used to shift the range of the tone up or down . 0 : No shift +1 : Range shifted one octave up . Pan I Pan Pot (Range: -64 to 00 to shift the keyboard range one octave up. +2 : Range shifted two octaves up . F i neTune 735A...-E-051A WK3100_e_47-58.p65 49 04.3.26, 0:11 PM E-49 Mixer Function How Parameters Work The following are not included within the range of the keyboard. Anytime the tone is on the display as described below. Vo l ume I Octave Shift (Range: -2 to 0 to +2) You can use octave shift to ...

User Guide
Page 52
... l I DSP Line (Settings: on . Rv bSnd I DSP System Reverb Send (Range: 000 to 127) This parameter adjusts how much reverb is applied to all parts in place of the Pan Pot, Reverb Send, and Chorus Send parameters. ChoSnd NOTE • Changing the tone, volume, pan pot, coarse tune, fine tune...-58.p65 50 04.3.26, 0:11 PM 735A-E-052B Mixer Function Effect Parameters The Mixer lets you control the effects applied to each individual part, making it different from the MIDI terminal. • Changing the tone settings changes the tone, octave shift, reverb send, chorus send, and...
... l I DSP Line (Settings: on . Rv bSnd I DSP System Reverb Send (Range: 000 to 127) This parameter adjusts how much reverb is applied to all parts in place of the Pan Pot, Reverb Send, and Chorus Send parameters. ChoSnd NOTE • Changing the tone, volume, pan pot, coarse tune, fine tune...-58.p65 50 04.3.26, 0:11 PM 735A-E-052B Mixer Function Effect Parameters The Mixer lets you control the effects applied to each individual part, making it different from the MIDI terminal. • Changing the tone settings changes the tone, octave shift, reverb send, chorus send, and...
User Guide
Page 54
... can specify more volume for stronger pressure and less volume or a lighter pressure, or you can cause distortion or noise during the attack part of the tone. (3) Tone Pitch Parameters I Level This parameter controls the overall volume of the tone. I Octave Shift This parameter controls the octave .... Synthesizer Mode I Touch Sense This parameter controls changes in volume and timbre in accordance with the relative amount of pressure applied to the keyboard keys. I Reverb Send, Chorus Send, DSP Line , DSP Type, DSP Parameter These parameters control the effects applied to tones.
... can specify more volume for stronger pressure and less volume or a lighter pressure, or you can cause distortion or noise during the attack part of the tone. (3) Tone Pitch Parameters I Level This parameter controls the overall volume of the tone. I Octave Shift This parameter controls the octave .... Synthesizer Mode I Touch Sense This parameter controls changes in volume and timbre in accordance with the relative amount of pressure applied to the keyboard keys. I Reverb Send, Chorus Send, DSP Line , DSP Type, DSP Parameter These parameters control the effects applied to tones.
User Guide
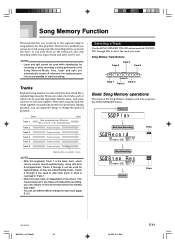
Page 63
..., each of which can adjust the tempo to record keyboard play, along with Auto Accompaniment. There are automatically turned off whenever the keyboard goes into record standby or starts recording. Start End Track 1 Auto accompaniment (Rhythm, Bass, Chord 1/2/3), Keyboard play Track 2 Keyboard play Track 3 Keyboard play Track 4 Keyboard play Track 5 Keyboard play Track 6 Keyboard play back the tracks together, it sounds...
..., each of which can adjust the tempo to record keyboard play, along with Auto Accompaniment. There are automatically turned off whenever the keyboard goes into record standby or starts recording. Start End Track 1 Auto accompaniment (Rhythm, Bass, Chord 1/2/3), Keyboard play Track 2 Keyboard play Track 3 Keyboard play Track 4 Keyboard play Track 5 Keyboard play Track 6 Keyboard play back the tracks together, it sounds...
User Guide
Page 65
...part way into a recording In place of step 4, press the SYNCHRO/FILL-IN NEXT button and then play a chord on the melody keyboard to start recording without Auto Accompaniment. See "Saving Data" on the accompaniment keyboard. Song Memory Function Track 1 Contents After Real-time Recording In addition to keyboard...wheel operation (WK-3500) • Modulation button operation (WK-3100/WK-3000) • Pitch bend range Mixer Mode Settings Channel 1 Mixer parameters (page E-47) are automatically recorded to Track 1. You can save memory data to Track 1 during realtime recording. This ...
...part way into a recording In place of step 4, press the SYNCHRO/FILL-IN NEXT button and then play a chord on the melody keyboard to start recording without Auto Accompaniment. See "Saving Data" on the accompaniment keyboard. Song Memory Function Track 1 Contents After Real-time Recording In addition to keyboard...wheel operation (WK-3500) • Modulation button operation (WK-3100/WK-3000) • Pitch bend range Mixer Mode Settings Channel 1 Mixer parameters (page E-47) are automatically recorded to Track 1. You can save memory data to Track 1 during realtime recording. This ...
User Guide
Page 69
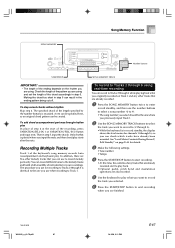
... are using real-time recording You can record different tones to (2 through 6 using . Recording Multiple Tracks Track 1 of the keyboard's song memory records Auto Accompaniment and keyboard play In place of step 4 at the start to play back. • Optional pedal, pitch bend and modulation operations are also recorded. 5 Use the keyboard to record melody parts only. In addition, there...
... are using real-time recording You can record different tones to (2 through 6 using . Recording Multiple Tracks Track 1 of the keyboard's song memory records Auto Accompaniment and keyboard play In place of step 4 at the start to play back. • Optional pedal, pitch bend and modulation operations are also recorded. 5 Use the keyboard to record melody parts only. In addition, there...

User Guide
Page 76
... can be used simultaneously during record standby or recording in the Song Memory Mode, or while you are played at the same time. 5 Press the LAYER button again to unlayer the tones and return the keyboard to normal. Part 1: Main tone part Part 2: Layered tone part Part 3: Split tone part Part 4: Layered and split tone part Using Layer Layer lets you...
... can be used simultaneously during record standby or recording in the Song Memory Mode, or while you are played at the same time. 5 Press the LAYER button again to unlayer the tones and return the keyboard to normal. Part 1: Main tone part Part 2: Layered tone part Part 3: Split tone part Part 4: Layered and split tone part Using Layer Layer lets you...


