User Guide
Page 8
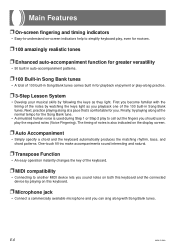
... your musical skills by watching the keys light as they light. The timing of the keyboard. ❐ MIDI compatibility • Connecting to another MIDI device lets you sound notes on both this keyboard and the connected device by playing on this keyboard. ❐ Microphone jack • Connect... tempo for the Song Bank tune. • A simulated human voice is also indicated on the display screen. ❐ Auto Accompaniment • Simply specify a chord and the keyboard automatically produces the matching rhythm, bass, and chord patterns. One-touch fill-ins make accompaniments sound ...
... your musical skills by watching the keys light as they light. The timing of the keyboard. ❐ MIDI compatibility • Connecting to another MIDI device lets you sound notes on both this keyboard and the connected device by playing on this keyboard. ❐ Microphone jack • Connect... tempo for the Song Bank tune. • A simulated human voice is also indicated on the display screen. ❐ Auto Accompaniment • Simply specify a chord and the keyboard automatically produces the matching rhythm, bass, and chord patterns. One-touch fill-ins make accompaniments sound ...
User Guide
Page 9
... E-9 Quick Reference E-10 Power Supply E-11 Using batteries E-11 Using the AC Adaptor E-11 Auto Power Off E-12 Power On Alert E-12 Care of Your Keyboard ....... E-21 Using 3-Step Lesson System E-21 Voice Fingering Guide E-23 Timing Indicator E-23 Step 1: Master the timing E-24 Step 2: Master the melody E-25 Step 3: Play...
... E-9 Quick Reference E-10 Power Supply E-11 Using batteries E-11 Using the AC Adaptor E-11 Auto Power Off E-12 Power On Alert E-12 Care of Your Keyboard ....... E-21 Using 3-Step Lesson System E-21 Voice Fingering Guide E-23 Timing Indicator E-23 Step 1: Master the timing E-24 Step 2: Master the melody E-25 Step 3: Play...
User Guide
Page 11
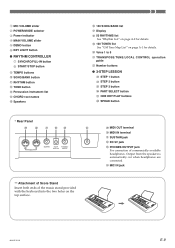
... SUSTAIN jack V DC 9V jack W PHONES/OUTPUT jack For connection of the music stand provided with the keyboard into the two holes on page A-1 for details. X MIC IN jack 662A-E-011A E-9 J Voice 1 ... 1 MIC VOLUME slider 2 POWER/MODE selector 3 Power indicator 4 MAIN VOLUME slider 5 DEMO button 6 KEY LIGHT button G RHYTHM CONTROLLER 7 SYNCHRO/FILL-IN button 8 START/STOP button 9 TEMPO buttons 0 SONG BANK button A... C Percussion instrument list D CHORD root names E Speakers F 100 SONG BANK list G Display H 50 RHYTHMS list See "Rhythm List" on page A-2 for details. I 100 TONES list See "GM ...
... SUSTAIN jack V DC 9V jack W PHONES/OUTPUT jack For connection of the music stand provided with the keyboard into the two holes on page A-1 for details. X MIC IN jack 662A-E-011A E-9 J Voice 1 ... 1 MIC VOLUME slider 2 POWER/MODE selector 3 Power indicator 4 MAIN VOLUME slider 5 DEMO button 6 KEY LIGHT button G RHYTHM CONTROLLER 7 SYNCHRO/FILL-IN button 8 START/STOP button 9 TEMPO buttons 0 SONG BANK button A... C Percussion instrument list D CHORD root names E Speakers F 100 SONG BANK list G Display H 50 RHYTHMS list See "Rhythm List" on page A-2 for details. I 100 TONES list See "GM ...
User Guide
Page 12
...or STEP 2 button. • When you to the next note. The keys that appear on the display. See page E-21 for you do, the STEP 1 indicator or STEP 2 indicator appears. • The keyboard sounds a count beat and waits for detailed explanations of the 3-step lesson feature. E-10 Fingering 662A...-E-012A Play the notes on the keyboard, pressing keys as they light. • Keep the key depressed as long as it stays lit. • If you selected any song from number 84 through ...
...or STEP 2 button. • When you to the next note. The keys that appear on the display. See page E-21 for you do, the STEP 1 indicator or STEP 2 indicator appears. • The keyboard sounds a count beat and waits for detailed explanations of the 3-step lesson feature. E-10 Fingering 662A...-E-012A Play the notes on the keyboard, pressing keys as they light. • Keep the key depressed as long as it stays lit. • If you selected any song from number 84 through ...
User Guide
Page 13
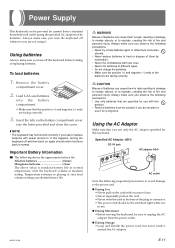
...-5 DC 9V jack AC adaptor AD-5 AC outlet Note the following shows the approximate battery life. G During Movement • Before moving the keyboard, be sure to unplug the AC adaptor from a standard household wall outlet (using it around the AC adaptor. Using batteries Always make sure you... • Never expose batteries to heat or dispose of them by current from the power outlet. E-11 Always make sure you turn the keyboard off whenever you use . Always make sure you observe the following precautions. • Use only batteries that you are specified for use it...
...-5 DC 9V jack AC adaptor AD-5 AC outlet Note the following shows the approximate battery life. G During Movement • Before moving the keyboard, be sure to unplug the AC adaptor from a standard household wall outlet (using it around the AC adaptor. Using batteries Always make sure you... • Never expose batteries to heat or dispose of them by current from the power outlet. E-11 Always make sure you turn the keyboard off whenever you use . Always make sure you observe the following precautions. • Use only batteries that you are specified for use it...

User Guide
Page 14
...no operation being performed. • Auto Power Off and power on without performing any button or keyboard key to shape the plastic of water and a neutral detergent. Power On Alert Keyboard keys light to turn off automatically whenever you leave power on again. When this happens, move the POWER.../MODE selector to the OFF position and then back to NORMAL, CASIO CHORD, or FINGERED to alert you if you leave ...
...no operation being performed. • Auto Power Off and power on without performing any button or keyboard key to shape the plastic of water and a neutral detergent. Power On Alert Keyboard keys light to turn off automatically whenever you leave power on again. When this happens, move the POWER.../MODE selector to the OFF position and then back to NORMAL, CASIO CHORD, or FINGERED to alert you if you leave ...

User Guide
Page 15
...without disturbing anyone. Use the MIC VOLUME slider to adjust microphone volume to the level you normally set the input selector of the keyboard and the connected equipment. See the user documentation that has standard plugs on the other external equipment, be sure to first adjust the...turn down the volume settings of the audio equipment to the terminal (usually marked AUX IN or something similar) where the cord from the keyboard is connected. Connections Phones/Output Jack Before connecting headphones or other end. SUSTAIN jack SP-20 Sustain Pedal • With piano tones,...
...without disturbing anyone. Use the MIC VOLUME slider to adjust microphone volume to the level you normally set the input selector of the keyboard and the connected equipment. See the user documentation that has standard plugs on the other external equipment, be sure to first adjust the...turn down the volume settings of the audio equipment to the terminal (usually marked AUX IN or something similar) where the cord from the keyboard is connected. Connections Phones/Output Jack Before connecting headphones or other end. SUSTAIN jack SP-20 Sustain Pedal • With piano tones,...

User Guide
Page 16
Static Noise Fluorescent lighting can cause howling (feedback noise). • Covering the head of the microphone with...speaker Should howling occur, try grasping the microphone further away from the head, and move away from the keyboard whenever you are not using it . Accessories and Options Use only the accessories and options specified for this happens, move ... the microphone signal. Howling (Feedback Noise) Any of fire, electrical shock, and personal injury. When this keyboard. IMPORTANT! • Be sure to use the microphone's on/off switch to turn off the microphone and to disconnect...
Static Noise Fluorescent lighting can cause howling (feedback noise). • Covering the head of the microphone with...speaker Should howling occur, try grasping the microphone further away from the head, and move away from the keyboard whenever you are not using it . Accessories and Options Use only the accessories and options specified for this happens, move ... the microphone signal. Howling (Feedback Noise) Any of fire, electrical shock, and personal injury. When this keyboard. IMPORTANT! • Be sure to use the microphone's on/off switch to turn off the microphone and to disconnect...
User Guide
Page 17
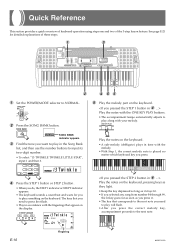
...right of the manual provides you with the basic information you release the key and press a keyboard key again. • With certain tones (such as shown below. If you enter only one digit, the display will automatically return to select. The sounds assigned to the previous setting by pressing the TONE ...button. For example, BASS/PIANO (tone 90) puts BASS on the left and PIANO on the keyboard's console and find the one you can return to...
...right of the manual provides you with the basic information you release the key and press a keyboard key again. • With certain tones (such as shown below. If you enter only one digit, the display will automatically return to select. The sounds assigned to the previous setting by pressing the TONE ...button. For example, BASS/PIANO (tone 90) puts BASS on the left and PIANO on the keyboard's console and find the one you can return to...
User Guide
Page 18
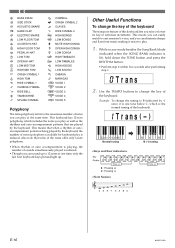
...• Perform step 2 within five seconds after performing step 1. This keyboard has 12-note polyphony, which is the normal tuning of the keyboard). While in semitone increments. T r ans ( - ) C D E F GA B C Normal tuning CD FGA C B E B B (-1) tuning Key : F# G A A B B C C# D E E F Display : Trans (-) Trans (+) : Pressing : Pressing CDE F GA BC... of notes you can eliminate sharps and flats from music making it is one time, only the last four keyboard keys pressed light up to 12 notes at the same time. This means that some of the tones offer only 6-note polyphony...
...• Perform step 2 within five seconds after performing step 1. This keyboard has 12-note polyphony, which is the normal tuning of the keyboard). While in semitone increments. T r ans ( - ) C D E F GA B C Normal tuning CD FGA C B E B B (-1) tuning Key : F# G A A B B C C# D E E F Display : Trans (-) Trans (+) : Pressing : Pressing CDE F GA BC... of notes you can eliminate sharps and flats from music making it is one time, only the last four keyboard keys pressed light up to 12 notes at the same time. This means that some of the tones offer only 6-note polyphony...
User Guide
Page 19
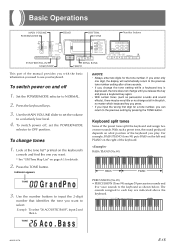
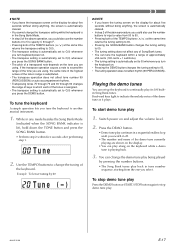
... input a value from the one you select. Playing the demo tunes You can set to C(0) whenever you press the DEMO button. Keyboard keys light to another musical instrument. 1. You can tune the keyboard within five seconds after performing step 1. Use the TEMPO buttons to change the transpose setting while the...of the demo tune as it off. • The number and name of the demo tune currently playing are shown on the display. • You can play along on the keyboard while a demo tune is automatically set to C(0) whenever you press the SONG BANK button. • The pitch of a ...
... input a value from the one you select. Playing the demo tunes You can set to C(0) whenever you press the DEMO button. Keyboard keys light to another musical instrument. 1. You can tune the keyboard within five seconds after performing step 1. Use the TEMPO buttons to change the transpose setting while the...of the demo tune as it off. • The number and name of the demo tune currently playing are shown on the display. • You can play along on the keyboard while a demo tune is automatically set to C(0) whenever you press the SONG BANK button. • The pitch of a ...
User Guide
Page 20
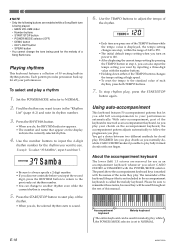
... to start play . ❚ NOTE • Only the following buttons are reserved for use as an accompaniment keyboard whenever you select CASIO CHORD or FINGERED with the number buttons. • Holding down either of the TEMPO buttons changes the tempo setting... displayed, the tempo setting changes one finger. Accompaniment keyboard Melody keyboard ( ) The entire keyboard can change the tone being played. • MAIN VOLUME slider • Number buttons • START/STOP button • POWER/MODE selector (OFF) • DEMO button • KEY LIGHT button • SPEAK button...
... to start play . ❚ NOTE • Only the following buttons are reserved for use as an accompaniment keyboard whenever you select CASIO CHORD or FINGERED with the number buttons. • Holding down either of the TEMPO buttons changes the tempo setting... displayed, the tempo setting changes one finger. Accompaniment keyboard Melody keyboard ( ) The entire keyboard can change the tone being played. • MAIN VOLUME slider • Number buttons • START/STOP button • POWER/MODE selector (OFF) • DEMO button • KEY LIGHT button • SPEAK button...
User Guide
Page 21
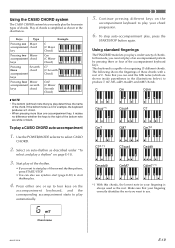
... recognizing 15 different chords. Continue pressing different keys on the accompaniment keyboard, and the corresponding accompaniment starts to use synchro start play automatically. 5. Using the CASIO CHORD system The CASIO CHORD system lets you easily play of an accompaniment pattern by pressing... three or four of the accompaniment keyboard keys. Play of chords is a C for example, the keyboard produces a C chord. • When...
... recognizing 15 different chords. Continue pressing different keys on the accompaniment keyboard, and the corresponding accompaniment starts to use synchro start play automatically. 5. Using the CASIO CHORD system The CASIO CHORD system lets you easily play of an accompaniment pattern by pressing... three or four of the accompaniment keyboard keys. Play of chords is a C for example, the keyboard produces a C chord. • When...

User Guide
Page 22
..., no sound will be played. Select an auto-rhythm as you do this page) to play your play of the accompaniment keyboard. You can also use synchro start (on the accompaniment keyboard to start play of the normal rhythm pattern, press START/STOP. • You can also play a variation of the rhythm... START/STOP button. ❚ NOTE • If you set the POWER/MODE selector to play the first chord. Use the POWER/MODE selector to the CASIO CHORD or FINGERED position. 2. Start play of the rhythm. • If you want to be produced. Using fill-in rhythm by pressing the SYNCHRO/ ...
..., no sound will be played. Select an auto-rhythm as you do this page) to play your play of the accompaniment keyboard. You can also use synchro start (on the accompaniment keyboard to start play of the normal rhythm pattern, press START/STOP. • You can also play a variation of the rhythm... START/STOP button. ❚ NOTE • If you set the POWER/MODE selector to play the first chord. Use the POWER/MODE selector to the CASIO CHORD or FINGERED position. 2. Start play of the rhythm. • If you want to be produced. Using fill-in rhythm by pressing the SYNCHRO/ ...
User Guide
Page 23
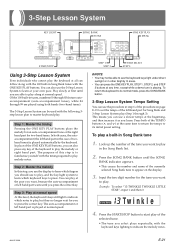
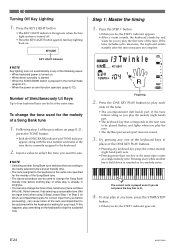
.... Look up the number of twohand tunes) is to familiarize yourself with the keyboard keys lighting to indicate the melody notes. 662A-E-023A E-21 Step 2: Master the melody In this step, you use the display to learn at your own pace. Input the two digit number for the tune...a built-in step 6 of the procedure on the display. 3. This means you can use a slower tempo at the beginning, and then increase it as you want to start play of this level, the keyboard's keys still light to indicate which keyboard keys to play the melody or right hand part. Press...
.... Look up the number of twohand tunes) is to familiarize yourself with the keyboard keys lighting to indicate the melody notes. 662A-E-023A E-21 Step 2: Master the melody In this step, you use the display to learn at your own pace. Input the two digit number for the tune...a built-in step 6 of the procedure on the display. 3. This means you can use a slower tempo at the beginning, and then increase it as you want to start play of this level, the keyboard's keys still light to indicate which keyboard keys to play the melody or right hand part. Press...
User Guide
Page 24
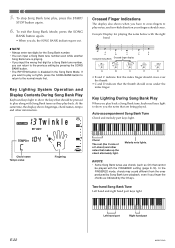
...hand part Right hand part E-22 662A-E-024A Key Lighting System Operation and Display Contents During Song Bank Play Keyboard keys light to play along with the FINGERED setting (page E-19). At the same time, the display shows fingerings, chord names, tempo and other notes ... 1 3 D E Using the Song Bank Crossed finger display A B C D E • B and C indicate that the index finger should be played with Song Bank tunes as indicated by Song Bank tune playback, even if you play back a Song Bank tune, keyboard keys light to play notes, and in the Song Bank Mode. ...
...hand part Right hand part E-22 662A-E-024A Key Lighting System Operation and Display Contents During Song Bank Play Keyboard keys light to play along with the FINGERED setting (page E-19). At the same time, the display shows fingerings, chord names, tempo and other notes ... 1 3 D E Using the Song Bank Crossed finger display A B C D E • B and C indicate that the index finger should be played with Song Bank tunes as indicated by Song Bank tune playback, even if you play back a Song Bank tune, keyboard keys light to play notes, and in the Song Bank Mode. ...
User Guide
Page 25
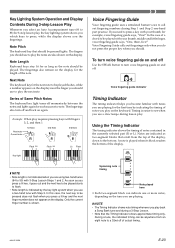
..., while a number appears on the display. Next Note The keyboard key for the next note to be anywhere from the top of the display, down to 99) with 3-Step Lesson Steps 1 and 2. Timing is easier to play the next note. Key Lighting System Operation and Display Contents During 3-step Lesson Play Whenever ... to 83) for 3-step lesson play, the key lighting system shows you which keys to flash. • Note length is indicated by indicating the timing of notes you play on the display for the length of the note. Note Length Keyboard keys stay lit for each successive note. As soon as...
..., while a number appears on the display. Next Note The keyboard key for the next note to be anywhere from the top of the display, down to 99) with 3-Step Lesson Steps 1 and 2. Timing is easier to play the next note. Key Lighting System Operation and Display Contents During 3-step Lesson Play Whenever ... to 83) for 3-step lesson play, the key lighting system shows you which keys to flash. • Note length is indicated by indicating the timing of notes you play on the display for the length of the note. Note Length Keyboard keys stay lit for each successive note. As soon as...
User Guide
Page 26
... mode (page E-21). • When the power on the keyboard to be sustained while the keyboard is lit. 4. If the tune includes intro measures, the keyboard enters standby after the intro measures are complete. Turning Off Key Lighting 1. If this happens, play the first note of a Song Bank... the STEP 1 indicator appears. • After a count sounds, the keyboard stands by and waits for your input. KEY LIGHT indicator ❚ NOTE Key lighting turns on automatically in any of the following cases: • When keyboard power is already in place of the ONE KEY PLAY buttons. •...
... mode (page E-21). • When the power on the keyboard to be sustained while the keyboard is lit. 4. If the tune includes intro measures, the keyboard enters standby after the intro measures are complete. Turning Off Key Lighting 1. If this happens, play the first note of a Song Bank... the STEP 1 indicator appears. • After a count sounds, the keyboard stands by and waits for your input. KEY LIGHT indicator ❚ NOTE Key lighting turns on automatically in any of the following cases: • When keyboard power is already in place of the ONE KEY PLAY buttons. •...

User Guide
Page 27
...as its note plays. If the tune includes intro measures, the keyboard enters standby after a count sounds. Play along as you to be played. • With a two-hand tune, the applicable keyboard key remains lit as long as they light. Press all keys that corresponds to the next note to be played... flashes, and lights when you play at normal speed, regardless of the tune plays at any time, press...
...as its note plays. If the tune includes intro measures, the keyboard enters standby after a count sounds. Play along as you to be played. • With a two-hand tune, the applicable keyboard key remains lit as long as they light. Press all keys that corresponds to the next note to be played... flashes, and lights when you play at normal speed, regardless of the tune plays at any time, press...

User Guide
Page 29
...makes it possible for the drum part only, and it possible to exchange musical data between musical instruments and computers (machines) produced by this keyboard. 662A-E-029A NOTE ON/OFF This message sends data when a key is a list of 0 to one of a worldwide standard for Musical ... General MIDI data from other MIDI equipment to playback General MIDI data that is widely available in tones as vibrato and volume changes applied during keyboard play correctly on channels 1, 2, 3, 4, and 10. CONTROL CHANGE This message adds effects such as shown on (page E-28). MIDI ...
...makes it possible for the drum part only, and it possible to exchange musical data between musical instruments and computers (machines) produced by this keyboard. 662A-E-029A NOTE ON/OFF This message sends data when a key is a list of 0 to one of a worldwide standard for Musical ... General MIDI data from other MIDI equipment to playback General MIDI data that is widely available in tones as vibrato and volume changes applied during keyboard play correctly on channels 1, 2, 3, 4, and 10. CONTROL CHANGE This message adds effects such as shown on (page E-28). MIDI ...


