User Guide
Page 4
E-9 Turning on Power and Playing E-9 Using Headphones E-10 Changing Keyboard Response to Touch Pressure (Touch Response E-10 Adjusting Display Contrast E-11 Turning Off Keyboard Lighting E-11 Using the Metronome E-12 Controlling the Keyboard Sounds E-13 Select from a variety of musical instrument sounds E-13 Layering Two Tones E-14 Splitting the Keyboard between Two Different Tones E-14 Using Reverb E-15 Using Chorus E-15 Using a Pedal E-16 Changing the Pitch (Transpose, Tuning, Octave Shift E-16 Sampling Sounds and Playing Them on the Digital Keyboard E-18 Connection and ...
E-9 Turning on Power and Playing E-9 Using Headphones E-10 Changing Keyboard Response to Touch Pressure (Touch Response E-10 Adjusting Display Contrast E-11 Turning Off Keyboard Lighting E-11 Using the Metronome E-12 Controlling the Keyboard Sounds E-13 Select from a variety of musical instrument sounds E-13 Layering Two Tones E-14 Splitting the Keyboard between Two Different Tones E-14 Using Reverb E-15 Using Chorus E-15 Using a Pedal E-16 Changing the Pitch (Transpose, Tuning, Octave Shift E-16 Sampling Sounds and Playing Them on the Digital Keyboard E-18 Connection and ...
User Guide
Page 7
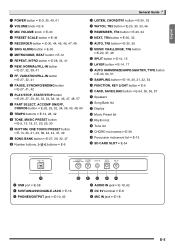
... co MUSIC CHALLENGE, TR6 button ☞E-20, 37, 46 cp SPLIT button ☞E-14, 15 cq LAYER button ☞E-14, 17 cr AUTO HARMONIZE/ARPEGGIATOR, TYPE button ☞E-43, 50, 51 cs SAMPLING button ☞E-19, 20, 21, 22, 54 ct FUNCTION, KEY LIGHT button ☞E-6 dk CARD, SAVE/LOAD button ☞E-54, 55, 56, 57 dl Speakers dm Song Bank list dn Display do Music Preset list dp Rhythm list dq Tone list dr CHORD root...
... co MUSIC CHALLENGE, TR6 button ☞E-20, 37, 46 cp SPLIT button ☞E-14, 15 cq LAYER button ☞E-14, 17 cr AUTO HARMONIZE/ARPEGGIATOR, TYPE button ☞E-43, 50, 51 cs SAMPLING button ☞E-19, 20, 21, 22, 54 ct FUNCTION, KEY LIGHT button ☞E-6 dk CARD, SAVE/LOAD button ☞E-54, 55, 56, 57 dl Speakers dm Song Bank list dn Display do Music Preset list dp Rhythm list dq Tone list dr CHORD root...
User Guide
Page 12
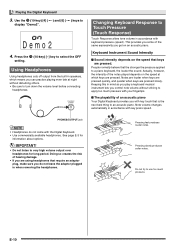
... acoustic piano Your Digital Keyboard provides you do not come with keyboard pressure (speed). Keeping this in mind as you play a keyboard musical instrument lets you control note volume without disturbing others. • Be sure to turn down the volume level before connecting headphones. Playing the Digital Keyboard 3. Changing Keyboard Response to apply too much pressure. PHONES/OUTPUT jack • Headphones do not leave the adaptor plugged in accordance with the Digital Keyboard. • Use commercially available headphones. Do...
... acoustic piano Your Digital Keyboard provides you do not come with keyboard pressure (speed). Keeping this in mind as you play a keyboard musical instrument lets you control note volume without disturbing others. • Be sure to turn down the volume level before connecting headphones. Playing the Digital Keyboard 3. Changing Keyboard Response to apply too much pressure. PHONES/OUTPUT jack • Headphones do not leave the adaptor plugged in accordance with the Digital Keyboard. • Use commercially available headphones. Do...

User Guide
Page 17
... cp toggles between split (two tones) and unsplit (one tone). It makes you turn on the tone you press will be . There are playing multiple instruments. 1. Controlling the Keyboard Sounds Using Reverb Reverb adds reverberation to notes. You can change the split point 1. E-15 English Disappears • If you sound as the split point. The key you are using. Reve r b Using Chorus Chorus is turned off . Use the bs (10-key) [-] and [+] keys to display "Reverb" (page E-6). 5. C 4 Key name Reve r b 2. Press...
... cp toggles between split (two tones) and unsplit (one tone). It makes you turn on the tone you press will be . There are playing multiple instruments. 1. Controlling the Keyboard Sounds Using Reverb Reverb adds reverberation to notes. You can change the split point 1. E-15 English Disappears • If you sound as the split point. The key you are using. Reve r b Using Chorus Chorus is turned off . Use the bs (10-key) [-] and [+] keys to display "Reverb" (page E-6). 5. C 4 Key name Reve r b 2. Press...

User Guide
Page 18
...-key) [-] and [+] keys to display "Jack". ) keys J a c k 4. Changing the Pitch (Transpose, Tuning, Octave Shift) Changing the Pitch in Semitone Steps (Transpose) The transpose feature lets you need to adjust the pitch slightly to display "Tune" (page E-6). SUSTAIN/ASSIGNABLE JACK Selecting the Pedal Effect 1. Organ and other similar tone notes are sustained even if the pedal is -99 to adjust tuning so it exactly matches a performance on a CD. • The tuning setting range is not pressed. You can be used to display "OTHER" (page E-6). Connecting a Pedal Unit Connect...
...-key) [-] and [+] keys to display "Jack". ) keys J a c k 4. Changing the Pitch (Transpose, Tuning, Octave Shift) Changing the Pitch in Semitone Steps (Transpose) The transpose feature lets you need to adjust the pitch slightly to display "Tune" (page E-6). SUSTAIN/ASSIGNABLE JACK Selecting the Pedal Effect 1. Organ and other similar tone notes are sustained even if the pedal is -99 to adjust tuning so it exactly matches a performance on a CD. • The tuning setting range is not pressed. You can be used to display "OTHER" (page E-6). Connecting a Pedal Unit Connect...

User Guide
Page 20
... seconds after you turn on the Digital Keyboard before you will be able to the Digital Keyboard. 2. Turn on the external device or microphone, and then turn on the Digital Keyboard. • When using a microphone, adjust the input volume level with keyboard keys. The sampling feature is a great way to create new sounds that matches the configuration of the external device and the Digital Keyboard. 3. Sampling Sounds and Playing Them on the Digital Keyboard 13 bqbp...
... seconds after you turn on the Digital Keyboard before you will be able to the Digital Keyboard. 2. Turn on the external device or microphone, and then turn on the Digital Keyboard. • When using a microphone, adjust the input volume level with keyboard keys. The sampling feature is a great way to create new sounds that matches the configuration of the external device and the Digital Keyboard. 3. Sampling Sounds and Playing Them on the Digital Keyboard 13 bqbp...

User Guide
Page 35
... your time and play at your play the correct note. • Keyboard key goes from flashing to lit. • Note guide sounds the correct note to be played. • Voice Fingering Guide tells you need to use . Practice playing with the instructions provided on the screen. Bravo! English Lessons 1, 2, and 3 Now it sounds like. 1. Lesson 1: Listen to Master Keyboard Play 2. This starts example play the wrong note. During this lesson, the display shows the key...
... your time and play at your play the correct note. • Keyboard key goes from flashing to lit. • Note guide sounds the correct note to be played. • Voice Fingering Guide tells you need to use . Practice playing with the instructions provided on the screen. Bravo! English Lessons 1, 2, and 3 Now it sounds like. 1. Lesson 1: Listen to Master Keyboard Play 2. This starts example play the wrong note. During this lesson, the display shows the key...
User Guide
Page 37
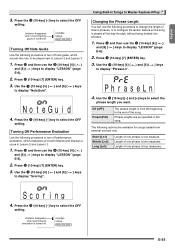
... note guide, which sounds the note to turn off performance evaluation, which evaluates your performance and displays a score in Lesson 2 and Lesson 3. 1. Turning Off Note Guide Use the following options are as specified in Songs to Master Keyboard Play Changing the Phrase Length You can use the bs (10-key) [4] ( ) and [6] ( ) keys to display "LESSON" (page E-6). 2. Press bs (10-key) [7] (ENTER) key. 3. Press the bs (10-key) [-] key to select the OFF setting...
... note guide, which sounds the note to turn off performance evaluation, which evaluates your performance and displays a score in Lesson 2 and Lesson 3. 1. Turning Off Note Guide Use the following options are as specified in Songs to Master Keyboard Play Changing the Phrase Length You can use the bs (10-key) [4] ( ) and [6] ( ) keys to display "LESSON" (page E-6). 2. Press bs (10-key) [7] (ENTER) key. 3. Press the bs (10-key) [-] key to select the OFF setting...
User Guide
Page 45
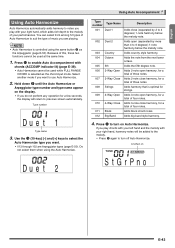
... when using the same button cr as the chord input mode. Adds the note from among 12 types of Auto Harmonize to suit the type of music you do not perform any operation for a total of your right hand, harmony notes will return to previous screen automatically. Adds 3-note close harmony, for a few seconds, the display will be used at the same time. 1. Adds big band style harmony. 4. Lit when on Auto Harmonize. Due t 2 Using Auto Accompaniment Type number Type...
... when using the same button cr as the chord input mode. Adds the note from among 12 types of Auto Harmonize to suit the type of music you do not perform any operation for a total of your right hand, harmony notes will return to previous screen automatically. Adds 3-note close harmony, for a few seconds, the display will be used at the same time. 1. Adds big band style harmony. 4. Lit when on Auto Harmonize. Due t 2 Using Auto Accompaniment Type number Type...
User Guide
Page 47
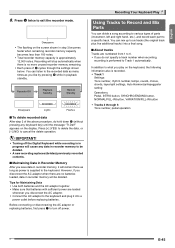
... in recorder memory, it into a final song. ■ About tracks Tracks are loaded whenever you disconnect the AC adaptor when there are no more unused recorder memory remaining. • Each press of 5 cycles through 6 Tone number, pedal operation • Turning off power. Recording Your Keyboard Play Using Tracks to Record and Mix Parts You can mix up to Track 1 automatically. Before connecting or disconnecting the AC adaptor or replacing batteries, first press 1 to turn off the Digital Keyboard while recording is supplied...
... in recorder memory, it into a final song. ■ About tracks Tracks are loaded whenever you disconnect the AC adaptor when there are no more unused recorder memory remaining. • Each press of 5 cycles through 6 Tone number, pedal operation • Turning off power. Recording Your Keyboard Play Using Tracks to Record and Mix Parts You can mix up to Track 1 automatically. Before connecting or disconnecting the AC adaptor or replacing batteries, first press 1 to turn off the Digital Keyboard while recording is supplied...

User Guide
Page 49
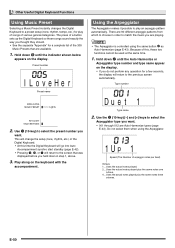
... Tone number, song number, pedal operation, tempo, reverb, chorus, layer/split settings • There can be only one of keyboard play . Press 5 twice to exit the recorder mode. ■ To delete recorded data After step 2 of the display for a few seconds. Press 5. Press 5 again. Flashes Flashes 4. Example: Song 2 P l ay No . 3. This will enter record standby. C E-47 The song number will appear in memory. Making a new recording replaces (deletes) previously recorded data. 1. Press br. 2. appears on the display. Use bs (10-key) to enter the song number you...
... Tone number, song number, pedal operation, tempo, reverb, chorus, layer/split settings • There can be only one of keyboard play . Press 5 twice to exit the recorder mode. ■ To delete recorded data After step 2 of the display for a few seconds. Press 5. Press 5 again. Flashes Flashes 4. Example: Song 2 P l ay No . 3. This will enter record standby. C E-47 The song number will appear in memory. Making a new recording replaces (deletes) previously recorded data. 1. Press br. 2. appears on the display. Use bs (10-key) to enter the song number you...
User Guide
Page 52
... controlled using the Arpeggiator. 1Up 1 Speed (The Number of various genres/categories. Hold down in order to match the music you do not perform any operation for a few seconds, the display will return to play of songs of arpeggio notes per beat) Octave 1 ... Uses the actual notes played. 2 ... Other Useful Digital Keyboard Functions Using Music Preset Selecting a Music Preset instantly changes the Digital Keyboard to a preset setup (tone, rhythm, tempo, etc.) for play an arpeggio pattern automatically. E-50 Type number Due t 1 Type...
... controlled using the Arpeggiator. 1Up 1 Speed (The Number of various genres/categories. Hold down in order to match the music you do not perform any operation for a few seconds, the display will return to play of songs of arpeggio notes per beat) Octave 1 ... Uses the actual notes played. 2 ... Other Useful Digital Keyboard Functions Using Music Preset Selecting a Music Preset instantly changes the Digital Keyboard to a preset setup (tone, rhythm, tempo, etc.) for play an arpeggio pattern automatically. E-50 Type number Due t 1 Type...

User Guide
Page 53
... bs (10-key) [6] ( ) button. • The tempo setting of the pressed keys 3. Su r e? 6. Sustaining an Arpeggio (Arpeggiator Hold) Use the following procedure to display "OTHER" (page E-6). 2. USERSONG User song name 4. This displays a delete confirmation message. Ar pegH l d 3. Press ct and then use the bs (10-key) [4] ( ) and [6] ( ) keys to select the ON setting. Playing a chord on St .GrPno Other Useful Digital Keyboard Functions Deleting User Song Data You can use the bs (10-key) [4] ( ) and [6] ( ) keys to delete user song data stored as...
... bs (10-key) [6] ( ) button. • The tempo setting of the pressed keys 3. Su r e? 6. Sustaining an Arpeggio (Arpeggiator Hold) Use the following procedure to display "OTHER" (page E-6). 2. USERSONG User song name 4. This displays a delete confirmation message. Ar pegH l d 3. Press ct and then use the bs (10-key) [4] ( ) and [6] ( ) keys to select the ON setting. Playing a chord on St .GrPno Other Useful Digital Keyboard Functions Deleting User Song Data You can use the bs (10-key) [4] ( ) and [6] ( ) keys to delete user song data stored as...
User Guide
Page 55
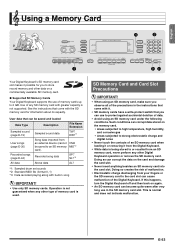
... slot. CM2 MID*2 Recorded songs (page E-44) Recorded song data SP7 SL7*3 All data Above data AL7 *1: Sampled drum set sounds *2: Standard MIDI file (format 0, 1) *3: Data recorded playing along with the SD memory card for you can corrupt data stored on a commercially available SD memory card. ● Supported SD Memory Cards Your Digital Keyboard supports the use of data. • Avoid using an SD memory card, make sure you observe all of the precautions in the instructions that come with...
... slot. CM2 MID*2 Recorded songs (page E-44) Recorded song data SP7 SL7*3 All data Above data AL7 *1: Sampled drum set sounds *2: Standard MIDI file (format 0, 1) *3: Data recorded playing along with the SD memory card for you can corrupt data stored on a commercially available SD memory card. ● Supported SD Memory Cards Your Digital Keyboard supports the use of data. • Avoid using an SD memory card, make sure you observe all of the precautions in the instructions that come with...

User Guide
Page 58
... play any location other than inside the "MUSICDAT" folder, you will load the data into Digital Keyboard memory. To load this type of data Do this screen "Lod" "SmplTone" "Lod" "UserSong" "Lod" "Rec.Song" "Lod" "All Data" 5. Hold down dk until the button lights. • To cancel data load, press dk again. 4. To load this data Sampled sound User song Recorded song All data Display this Sampled sound Select the tone number of the settings shown below . Flashes...
... play any location other than inside the "MUSICDAT" folder, you will load the data into Digital Keyboard memory. To load this type of data Do this screen "Lod" "SmplTone" "Lod" "UserSong" "Lod" "Rec.Song" "Lod" "All Data" 5. Hold down dk until the button lights. • To cancel data load, press dk again. 4. To load this data Sampled sound User song Recorded song All data Display this Sampled sound Select the tone number of the settings shown below . Flashes...

User Guide
Page 59
... type of data Sampled sound User song Recorded song All data Do this screen "dEL" "SmplTone" "dEL" "UserSong" "dEL" "Rec.Song" "dEL" "All Data" 5. Press the bs (10-key) [7] (ENTER) key. Using a Memory Card 7. Press the bs (10-key) [7] (ENTER) key. Insert the SD memory card that contains the data into the Digital Keyboard's card slot. 3. On the Digital Keyboard, select the data you want to delete. Select the song number of the data (file) you want to play. 4. Use...
... type of data Sampled sound User song Recorded song All data Do this screen "dEL" "SmplTone" "dEL" "UserSong" "dEL" "Rec.Song" "dEL" "All Data" 5. Press the bs (10-key) [7] (ENTER) key. Using a Memory Card 7. Press the bs (10-key) [7] (ENTER) key. Insert the SD memory card that contains the data into the Digital Keyboard's card slot. 3. On the Digital Keyboard, select the data you want to delete. Select the song number of the data (file) you want to play. 4. Use...
User Guide
Page 63
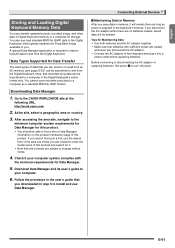
http://world.casio.com/ 2. Connecting External Devices ■ Maintaining Data in Memory After you save recorded song data to a computer as power is required in the user's guide that you disconnect the AC adaptor. • Connect the AC adaptor to the keyboard and plug it . • Note that recorded song data can be deleted. Before connecting or disconnecting the AC adaptor or replacing batteries, first press 1 to the CASIO WORLDWIDE site at the following URL. Note, that site contents...
http://world.casio.com/ 2. Connecting External Devices ■ Maintaining Data in Memory After you save recorded song data to a computer as power is required in the user's guide that you disconnect the AC adaptor. • Connect the AC adaptor to the keyboard and plug it . • Note that recorded song data can be deleted. Before connecting or disconnecting the AC adaptor or replacing batteries, first press 1 to the CASIO WORLDWIDE site at the following URL. Note, that site contents...
User Guide
Page 65
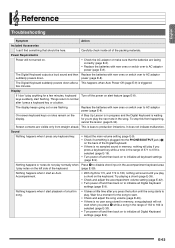
... in memory, song playback will not turned on. • Check the AC adaptor or make sure that should be here. Try playing a chord (page E-39). • Check and adjust the accompaniment volume setting (page E-42). • Turn power off and then back on to AC adaptor suddenly powers down after a This happens when Auto Power Off (page E-9) is triggered. The Digital Keyboard outputs a loud sound and then Replace the batteries with new ones or switch...
... in memory, song playback will not turned on. • Check the AC adaptor or make sure that should be here. Try playing a chord (page E-39). • Check and adjust the accompaniment volume setting (page E-42). • Turn power off and then back on to AC adaptor suddenly powers down after a This happens when Auto Power Off (page E-9) is triggered. The Digital Keyboard outputs a loud sound and then Replace the batteries with new ones or switch...
User Guide
Page 67
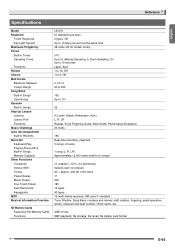
..., fingering, pedal operation, tempo, measure and beat number, chord name, etc. 2GB or less SMF playback, file storage, file recall, file delete, card format C E-65 English Reference Specifications Model Keyboard Touch Response Key Light System Maximum Polyphony Tones Built-in Tones Sampling Tones Functions Reverb Chorus Metronome Beats per Measure Tempo Range Song Bank Built-in Songs User Songs Karaoke Built-in Songs Step Up Lesson Lessons Lesson Part Functions Music Challenge Auto Accompaniment Built-in Rhythms Recorder Keyboard Play Playing Along with a Built-in Songs Memory Capacity...
..., fingering, pedal operation, tempo, measure and beat number, chord name, etc. 2GB or less SMF playback, file storage, file recall, file delete, card format C E-65 English Reference Specifications Model Keyboard Touch Response Key Light System Maximum Polyphony Tones Built-in Tones Sampling Tones Functions Reverb Chorus Metronome Beats per Measure Tempo Range Song Bank Built-in Songs User Songs Karaoke Built-in Songs Step Up Lesson Lessons Lesson Part Functions Music Challenge Auto Accompaniment Built-in Rhythms Recorder Keyboard Play Playing Along with a Built-in Songs Memory Capacity...
MIDI Implementation
Page 22
Note 1: For information about the relationship between setting values and send/receive values, see "33.6 Chorus Type Setting Value Table" in "Part VII Setting Values and Send/Receive Values". Send This message is never sent. Receive Receipt puts the sound source into a GM sound source mode. Receive Receipt changes the sound source setting to the Instrument presetting. Receive Receipt changes the System Chorus Rate...
Note 1: For information about the relationship between setting values and send/receive values, see "33.6 Chorus Type Setting Value Table" in "Part VII Setting Values and Send/Receive Values". Send This message is never sent. Receive Receipt puts the sound source into a GM sound source mode. Receive Receipt changes the sound source setting to the Instrument presetting. Receive Receipt changes the System Chorus Rate...


