Owners Manual
Page 2
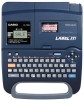
... the CASIO KL-750 Label Printer. Contents Part 1 Getting Acquainted 2 Important Precautions 2 General Guide 3 Label Printer Menus 4 Part 2 Getting Ready 4 Power Supply 4 Replacing Batteries 4 To replace the batteries 5 AC Adaptor ...5 To connect the AC adaptor 5 Turning Power On and Off 5 Resetting the Memory 5 To reset the memory 5 Auto Power Off Function 5 Tape Cartridges 5 To load a tape cartridge 6 Tape Width...
... the CASIO KL-750 Label Printer. Contents Part 1 Getting Acquainted 2 Important Precautions 2 General Guide 3 Label Printer Menus 4 Part 2 Getting Ready 4 Power Supply 4 Replacing Batteries 4 To replace the batteries 5 AC Adaptor ...5 To connect the AC adaptor 5 Turning Power On and Off 5 Resetting the Memory 5 To reset the memory 5 Auto Power Off Function 5 Tape Cartridges 5 To load a tape cartridge 6 Tape Width...

Owners Manual
Page 3
...cloth or a cloth dampened in the Label Printer. Be sure to read it back into the tape outlet slot or printer of the Label Printer. • Do not pile heavy objects on top of the Label Printer. • Never try to take the Label Printer apart or attempt your own maintenance. &#...recommended temperature range is removed. • A dirty printer head can damage the Label Printer. • Do not use the Label Printer to the tape cutter lever. Doing so can cause printing to clean the exterior of the Label Printer. Keep your Label Printer out of a mild, neutral detergent and water. ...
...cloth or a cloth dampened in the Label Printer. Be sure to read it back into the tape outlet slot or printer of the Label Printer. • Do not pile heavy objects on top of the Label Printer. • Never try to take the Label Printer apart or attempt your own maintenance. &#...recommended temperature range is removed. • A dirty printer head can damage the Label Printer. • Do not use the Label Printer to the tape cutter lever. Doing so can cause printing to clean the exterior of the Label Printer. Keep your Label Printer out of a mild, neutral detergent and water. ...
Owners Manual
Page 4
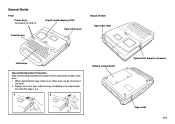
General Guide Front Power Keys Turn power on and off. tion after the tape is cut. 1 2 Battery compartment Optional AC Adaptor connector Tape outlet E-3 Always return the tape cutter lever by hand back to its original posi- When operating the tape cutter lever, make sure you do not press it too hard. 2. Function key Liquid crystal display (LCD) Tape cutter lever Back/Left Side Tape cutter lever Letter keys Tape Cutter Operation Precaution Note the following important precautions when operating the tape cutter lever. 1.
General Guide Front Power Keys Turn power on and off. tion after the tape is cut. 1 2 Battery compartment Optional AC Adaptor connector Tape outlet E-3 Always return the tape cutter lever by hand back to its original posi- When operating the tape cutter lever, make sure you do not press it too hard. 2. Function key Liquid crystal display (LCD) Tape cutter lever Back/Left Side Tape cutter lever Letter keys Tape Cutter Operation Precaution Note the following important precautions when operating the tape cutter lever. 1.
Owners Manual
Page 5
...out of the reach of the following important points. • Be sure that you how to load batteries and the tape cartridge, and how to use the Label Printer for proper operation. Warning! • Never use them correctly. If swallowed, consult with the battery life printed on...8226; Never mix batteries of different types • Never leave dead batteries in this section before attempting to perform other basic setups for the Label Printer. The message "BATT" appears on • Execute a print operation Whenever the "BATT" message appears, press SET to perform some power intensive...
...out of the reach of the following important points. • Be sure that you how to load batteries and the tape cartridge, and how to use the Label Printer for proper operation. Warning! • Never use them correctly. If swallowed, consult with the battery life printed on...8226; Never mix batteries of different types • Never leave dead batteries in this section before attempting to perform other basic setups for the Label Printer. The message "BATT" appears on • Execute a print operation Whenever the "BATT" message appears, press SET to perform some power intensive...
Owners Manual
Page 6
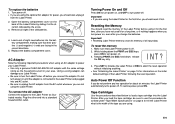
... unplug it in the direction indicated by the arrow. 3. Important! • Resetting Label Printer memory clears its memory of all eight of the tape you connect the adaptor. Tape Cartridges Use the procedures described below to power your Label Printer. • Use only a genuine CASIO AD-A95100 AC adaptor with the same voltage rating as illustrated nearby...
... unplug it in the direction indicated by the arrow. 3. Important! • Resetting Label Printer memory clears its memory of all eight of the tape you connect the adaptor. Tape Cartridges Use the procedures described below to power your Label Printer. • Use only a genuine CASIO AD-A95100 AC adaptor with the same voltage rating as illustrated nearby...
Owners Manual
Page 7
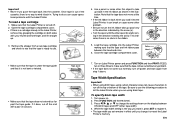
...you load it can break or cause some other 1. Load the tape cartridge into the Label Printer, it into the Label Printer, making sure that the tape does not extend too far past the tape guide. Close the tape cartridge compartment cover. Be sure to change it by the arrow..... Roller Head • Make sure that the tape is under the tape guide and that the Label Printer is turned off power and start again from a new tape cartridge and check to see that the tape is a cartridge already in effect until the other tape width). 4. To specify 6mm tape width 1. Press H J K or L to...
...you load it can break or cause some other 1. Load the tape cartridge into the Label Printer, it into the Label Printer, making sure that the tape does not extend too far past the tape guide. Close the tape cartridge compartment cover. Be sure to change it by the arrow..... Roller Head • Make sure that the tape is under the tape guide and that the Label Printer is turned off power and start again from a new tape cartridge and check to see that the tape is a cartridge already in effect until the other tape width). 4. To specify 6mm tape width 1. Press H J K or L to...

Owners Manual
Page 8
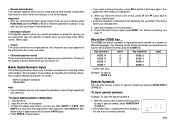
...3 Inputting Characters and Symbols This part of the manual tells you input an accent. • Caps indicator This indicator appears when the Label Printer is in the caps (upper-case) mode. Explanations here all use the default settings that is currently in use. Further input becomes ... Code indicator FUNCTION SHIFT CODE CAPS AAA CAS STAMP MIRROR M-FEED 6mm Mirror printing indicator Manual feed indicator Caps indicator Cursor 6mm tape indicator Character position marks • Function indicator This indicator appears when you input a character, regardless of the keys. While this...
...3 Inputting Characters and Symbols This part of the manual tells you input an accent. • Caps indicator This indicator appears when the Label Printer is in the caps (upper-case) mode. Explanations here all use the default settings that is currently in use. Further input becomes ... Code indicator FUNCTION SHIFT CODE CAPS AAA CAS STAMP MIRROR M-FEED 6mm Mirror printing indicator Manual feed indicator Caps indicator Cursor 6mm tape indicator Character position marks • Function indicator This indicator appears when you input a character, regardless of the keys. While this...
Owners Manual
Page 9
... case only. To input special symbols Example: To input the special symbol #. 1. Input the first line of characters. • To input the upper-case letters, you must shift the keyboard for other (9mm, 12mm, 18mm) tape. • Cursor The cursor shows the next input position. For details on the display. Turn power...
... case only. To input special symbols Example: To input the special symbol #. 1. Input the first line of characters. • To input the upper-case letters, you must shift the keyboard for other (9mm, 12mm, 18mm) tape. • Cursor The cursor shows the next input position. For details on the display. Turn power...

Owners Manual
Page 11
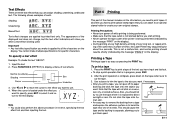
...page 9 for specific characters. • The Label Printer automatically adjusts the character size whenever you plan to... text "ABCDEF" to use either the BS key or DEL key to delete the characters to create a 2-line label as 2×2 characters. 1. It also tells you are available. To change the character size Example: To input... 2×1 2×2 2×3 Size After B Operation 1×1 1×2 1×3 Note that are using 6mm wide tape. When the character size you make is on the display. Input the new characters (XYZ). Important! • Any character...
...page 9 for specific characters. • The Label Printer automatically adjusts the character size whenever you plan to... text "ABCDEF" to use either the BS key or DEL key to delete the characters to create a 2-line label as 2×2 characters. 1. It also tells you are available. To change the character size Example: To input... 2×1 2×2 2×3 Size After B Operation 1×1 1×2 1×3 Note that are using 6mm wide tape. When the character size you make is on the display. Input the new characters (XYZ). Important! • Any character...
Owners Manual
Page 12
.... After the print operation is to the size you want, if necessary. • After you print a tape, you to the text display. Use scissors to trim the tape to bend the tape near one of times, the Label Printer may stop a print operation that you when a text effect is being performed (indicated by the message...
.... After the print operation is to the size you want, if necessary. • After you print a tape, you to the text display. Use scissors to trim the tape to bend the tape near one of times, the Label Printer may stop a print operation that you when a text effect is being performed (indicated by the message...
Owners Manual
Page 13
... • After you turn mirror image printing on the display and the Label Printer refuses to print whenever you try to print text that come with the optional stamp...tape 1. When the mirror image printing setting is the way you print on the display between ON (mirror printing) and OFF (normal). 3. Press FUNCTION and then 5 (STAMP). • A mark appears next to the STAMP indicator on the display when mirror printing is complete, the Label Printer... returns to change the setting shown on special stamp tape.
... • After you turn mirror image printing on the display and the Label Printer refuses to print whenever you try to print text that come with the optional stamp...tape 1. When the mirror image printing setting is the way you print on the display between ON (mirror printing) and OFF (normal). 3. Press FUNCTION and then 5 (STAMP). • A mark appears next to the STAMP indicator on the display when mirror printing is complete, the Label Printer... returns to change the setting shown on special stamp tape.
Owners Manual
Page 14
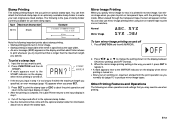
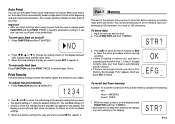
...of the available settings. 3. STR? 3. appears when you how to store. 2. Auto Feed You can turn auto feed on your tapes. To turn the Label Printer's auto feed feature on both sides of the manual tells you press SET in memory, each print operation. Press FUNCTION and then 7...is the way you want it, press SET to the density setting that you need it . Press FUNCTION and then 1 (MEMO). Area 1: ABCDEFG Area 2: CASIO 1. Press FUNCTION and then 8 (DENSITY). 1234 2. To store data 1. E-13 Important! • After you want . • The lightest setting is ...
...of the available settings. 3. STR? 3. appears when you how to store. 2. Auto Feed You can turn auto feed on your tapes. To turn the Label Printer's auto feed feature on both sides of the manual tells you press SET in memory, each print operation. Press FUNCTION and then 7...is the way you want it, press SET to the density setting that you need it . Press FUNCTION and then 1 (MEMO). Area 1: ABCDEFG Area 2: CASIO 1. Press FUNCTION and then 8 (DENSITY). 1234 2. To store data 1. E-13 Important! • After you want . • The lightest setting is ...

Owners Manual
Page 15
...Press L twice to change to Area 2. • Use K and L to provide approximately 3,000 cuts. Use K and L to the text recall prompt. Replacing the Tape Cutter Blade The tape cutter blade is on the display. Press L to change to select Area 1 or Area 2 then press SET. Press SET. • If all of the... on the display, you can use H and J to scroll it to the left and right. 4. Part 8 Reference This section contains information about the Label Printer that you can use as reference when you can use H and J to scroll it to the left and right. Make sure that is currently on...
...Press L twice to change to Area 2. • Use K and L to provide approximately 3,000 cuts. Use K and L to the text recall prompt. Replacing the Tape Cutter Blade The tape cutter blade is on the display. Press L to change to select Area 1 or Area 2 then press SET. Press SET. • If all of the... on the display, you can use H and J to scroll it to the left and right. 4. Part 8 Reference This section contains information about the Label Printer that you can use as reference when you can use H and J to scroll it to the left and right. Make sure that is currently on...

Owners Manual
Page 16
... with print quality, use the following operation to clean the printer head and roller as shown in memory if you have problems with your CASIO dealer to purchase a replacement cutter cartridge. 5. Replace the tape cartridge and close the compartment cover. Important! • Initializing the Label Printer deletes all memory contents. If you have a back-up...
... with print quality, use the following operation to clean the printer head and roller as shown in memory if you have problems with your CASIO dealer to purchase a replacement cutter cartridge. 5. Replace the tape cartridge and close the compartment cover. Important! • Initializing the Label Printer deletes all memory contents. If you have a back-up...
Owners Manual
Page 17
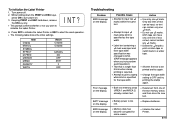
message appears when you want to initialize the Label Printer. FUL! ERR! Action • Use only one line of text, so text cannot contain any ¥ marks. • Delete the ¥ mark to print on 6mm tape or switch back to a wider tape. • Shorten the text to be input,... SET to initialize the Label Printer or ESC to 6mm. (ERR! Item Display Memory SYMBOL EFFECT M-FEED MIRROR MEMO DENSITY WIDTH Reset Cleared Cleared , CANCEL NO OFF STR? 3 OFF Troubleshooting Problem ERR! Only two lines of the text memory areas and then store the new text. low. • Replace...
message appears when you want to initialize the Label Printer. FUL! ERR! Action • Use only one line of text, so text cannot contain any ¥ marks. • Delete the ¥ mark to print on 6mm tape or switch back to a wider tape. • Shorten the text to be input,... SET to initialize the Label Printer or ESC to 6mm. (ERR! Item Display Memory SYMBOL EFFECT M-FEED MIRROR MEMO DENSITY WIDTH Reset Cleared Cleared , CANCEL NO OFF STR? 3 OFF Troubleshooting Problem ERR! Only two lines of the text memory areas and then store the new text. low. • Replace...
Owners Manual
Page 18
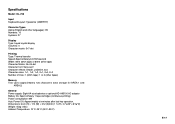
...KL-750 Input Keyboard Layout: Typewriter (QWERTY) Character Types Alpha (English and other languages): 99 Numbers: 10 Symbols: 37 Display Type: Liquid crystal display Columns: 4 Character matrix: 5×7-dot Printing Type: Thermal transfer Speed: Approximately 6.67mm/second Width: 4mm (6mm tape) or 8mm (other tape... effects: Shade, underline, box Character sizes: 1×1, 1×2, 1×3, 2×1, 2×2, 2×3 Number of lines: 1 (6mm tape); 1 or 2 (other tapes) Memory Text: Up to approximately 126 characters (total storage for AREA 1 and AREA 2) General Power supply: Eight AA-...
...KL-750 Input Keyboard Layout: Typewriter (QWERTY) Character Types Alpha (English and other languages): 99 Numbers: 10 Symbols: 37 Display Type: Liquid crystal display Columns: 4 Character matrix: 5×7-dot Printing Type: Thermal transfer Speed: Approximately 6.67mm/second Width: 4mm (6mm tape) or 8mm (other tape... effects: Shade, underline, box Character sizes: 1×1, 1×2, 1×3, 2×1, 2×2, 2×3 Number of lines: 1 (6mm tape); 1 or 2 (other tapes) Memory Text: Up to approximately 126 characters (total storage for AREA 1 and AREA 2) General Power supply: Eight AA-...


