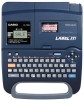
Owners Manual
Page 2
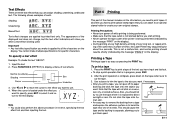
... • Text memory You can even use of this makes the CASIO label Printer the perfect tool for future reference. Contents Part 1 Getting Acquainted 2 Important Precautions 2 General Guide 3 Label Printer Menus 4 Part 2 Getting Ready 4 Power Supply 4 Replacing Batteries 4 To replace the batteries 5 AC Adaptor ...5 To connect the AC adaptor 5 Turning Power On and Off 5 Resetting the Memory 5 To reset the memory 5 Auto Power Off Function 5 Tape Cartridges 5 To load a tape cartridge 6 Tape Width Specification 6 To specify 6mm tape width 6 Part 3 Inputting Characters and...
... • Text memory You can even use of this makes the CASIO label Printer the perfect tool for future reference. Contents Part 1 Getting Acquainted 2 Important Precautions 2 General Guide 3 Label Printer Menus 4 Part 2 Getting Ready 4 Power Supply 4 Replacing Batteries 4 To replace the batteries 5 AC Adaptor ...5 To connect the AC adaptor 5 Turning Power On and Off 5 Resetting the Memory 5 To reset the memory 5 Auto Power Off Function 5 Tape Cartridges 5 To load a tape cartridge 6 Tape Width Specification 6 To specify 6mm tape width 6 Part 3 Inputting Characters and...

Owners Manual
Page 3
... manually feed tape 13 Print Density 13 To adjust the print density 13 Part 7 Memory 13 To store data 13 To recall text from memory 13 To delete text from memory 14 Part 8 Reference 14 Replacing the Tape Cutter Blade 14 To replace the tape cutter blade 14 Cleaning the Printer Head and Roller 15 To clean the printer head and roller 15 Initial Power On Settings 15 Initializing the Label Printer 15 To initialize the Label Printer 16 Troubleshooting 16 Specifications 17 Part...
... manually feed tape 13 Print Density 13 To adjust the print density 13 Part 7 Memory 13 To store data 13 To recall text from memory 13 To delete text from memory 14 Part 8 Reference 14 Replacing the Tape Cutter Blade 14 To replace the tape cutter blade 14 Cleaning the Printer Head and Roller 15 To clean the printer head and roller 15 Initial Power On Settings 15 Initializing the Label Printer 15 To initialize the Label Printer 16 Troubleshooting 16 Specifications 17 Part...
Owners Manual
Page 4
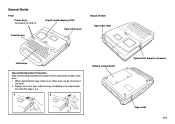
General Guide Front Power Keys Turn power on and off. When operating the tape cutter lever, make sure you do not press it too hard. 2. tion after the tape is cut. 1 2 Battery compartment Optional AC Adaptor connector Tape outlet E-3 Always return the tape cutter lever by hand back to its original posi- Function key Liquid crystal display (LCD) Tape cutter lever Back/Left Side Tape cutter lever Letter keys Tape Cutter Operation Precaution Note the following important precautions when operating the tape cutter lever. 1.
General Guide Front Power Keys Turn power on and off. When operating the tape cutter lever, make sure you do not press it too hard. 2. tion after the tape is cut. 1 2 Battery compartment Optional AC Adaptor connector Tape outlet E-3 Always return the tape cutter lever by hand back to its original posi- Function key Liquid crystal display (LCD) Tape cutter lever Back/Left Side Tape cutter lever Letter keys Tape Cutter Operation Precaution Note the following important precautions when operating the tape cutter lever. 1.
Owners Manual
Page 5
... This part of different types • Never leave dead batteries in the Label Printer. • Remove the batteries if you started from the display. Important! Warning! • Never use to select the settings you press SET to execute a menu item, the Label Printer either moves on • Execute a print operation Whenever the "BATT" message appears, press SET to clear it executes the selected function and returns to perform other basic setups...
... This part of different types • Never leave dead batteries in the Label Printer. • Remove the batteries if you started from the display. Important! Warning! • Never use to select the settings you press SET to execute a menu item, the Label Printer either moves on • Execute a print operation Whenever the "BATT" message appears, press SET to clear it executes the selected function and returns to perform other basic setups...
Owners Manual
Page 6
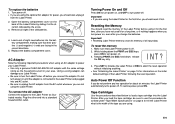
... first time, you load the tape cartridge, be sure to use the procedure described under "Tape Width Specifications" on . 3. To replace the batteries 1. Important! • Resetting Label Printer memory clears its memory of the old batteries. 4. While holding down , release the ON key only. Keeping PRINT and ESC held down the PRINT and ESC keys, press ON to power your Label Printer. • Use only a genuine CASIO AD-A95100 AC...
... first time, you load the tape cartridge, be sure to use the procedure described under "Tape Width Specifications" on . 3. To replace the batteries 1. Important! • Resetting Label Printer memory clears its memory of the old batteries. 4. While holding down , release the ON key only. Keeping PRINT and ESC held down the PRINT and ESC keys, press ON to power your Label Printer. • Use only a genuine CASIO AD-A95100 AC...
Owners Manual
Page 7
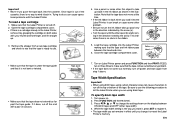
... the cassette. time. To load a tape cartridge • If the ink ribbon is not bent or twisted. • Make sure that the tape does not move at this tional problems with the Label Printer. problem. 2. Remove the stopper from step 1 above. Tape Width Specification Important! • When using 6mm tape, using 6mm tape. Roller Head • Make sure that the tape is under the tape guide and that it by the arrow. Tape guide 7. To...
... the cassette. time. To load a tape cartridge • If the ink ribbon is not bent or twisted. • Make sure that the tape does not move at this tional problems with the Label Printer. problem. 2. Remove the stopper from step 1 above. Tape Width Specification Important! • When using 6mm tape, using 6mm tape. Roller Head • Make sure that the tape is under the tape guide and that it by the arrow. Tape guide 7. To...

Owners Manual
Page 8
... This indicator appears when the Label Printer is on the Label Printer display. ble after you press the CODE key. E-7 Normal (non mirror image) printing is performed when this indicator is set up for stamp printing. Pressing a key while this indicator is not shown on using other character styles, effects and sizes, see page 10. When the caps mode indicator is not shown...
... This indicator appears when the Label Printer is on the Label Printer display. ble after you press the CODE key. E-7 Normal (non mirror image) printing is performed when this indicator is set up for stamp printing. Pressing a key while this indicator is not shown on using other character styles, effects and sizes, see page 10. When the caps mode indicator is not shown...
Owners Manual
Page 9
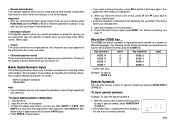
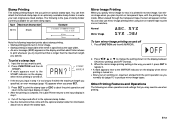
... finish printing when using other details on the display is the one that you are using 6mm tape. For details on . 2. The following operation shows you will appear as you changed lines. 4. CODE 1 A Special Symbols You can use for inputting letters and numbers. With the cursor at high speed until you press CAPS again. • Press SPACE to input spaces. • If you input a wrong character...
... finish printing when using other details on the display is the one that you are using 6mm tape. For details on . 2. The following operation shows you will appear as you changed lines. 4. CODE 1 A Special Symbols You can use for inputting letters and numbers. With the cursor at high speed until you press CAPS again. • Press SPACE to input spaces. • If you input a wrong character...
Owners Manual
Page 10
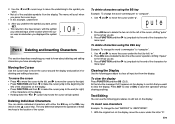
... input text from the display. To insert new characters Example: To change the text "ABCDEF" to move the cursor under "p". Use H and J to "ABCXYZDEF". 1. To delete characters using the BS key Example: To change the word "commmputer" to clear the display. appears on the display, move the cursor under the letter "D". With the original text on the display to confirm that you do . 3. IO# Part 4 Deleting and Inserting Characters This...
... input text from the display. To insert new characters Example: To change the text "ABCDEF" to move the cursor under "p". Use H and J to "ABCXYZDEF". 1. To delete characters using the BS key Example: To change the word "commmputer" to clear the display. appears on the display, move the cursor under the letter "D". With the original text on the display to confirm that you do . 3. IO# Part 4 Deleting and Inserting Characters This...

Owners Manual
Page 11
... use the correct cursor location for specific characters. • The Label Printer automatically adjusts the character size whenever you are available. put a ¥ symbol to change the text "ABCDEF" to the text display. Use K and L to create a 2-line label as 2×2 characters. 1. When the character size you plan to use either the BS key or DEL key to delete the characters to be inserted at the cursor posi- 2. Initial Size 2×1 2×2 2×3 Size After B Operation...
... use the correct cursor location for specific characters. • The Label Printer automatically adjusts the character size whenever you are available. put a ¥ symbol to change the text "ABCDEF" to the text display. Use K and L to create a 2-line label as 2×2 characters. 1. When the character size you plan to use either the BS key or DEL key to delete the characters to be inserted at the cursor posi- 2. Initial Size 2×1 2×2 2×3 Size After B Operation...
Owners Manual
Page 12
... turn power off its paper backing and stick the tape onto the object you to all the information you have input and laid out. • To stop printing for specific characters. Also, you start printing. • Never operate the tape cutter while printer is being used. You cannot make is applied to pull them apart. The following shows examples of times, the Label Printer may stop a print operation...
... turn power off its paper backing and stick the tape onto the object you to all the information you have input and laid out. • To stop printing for specific characters. Also, you start printing. • Never operate the tape cutter while printer is being used. You cannot make is applied to pull them apart. The following shows examples of times, the Label Printer may stop a print operation...
Owners Manual
Page 13
... 6mm is turned on. Normal Mirror Image To turn printing on, input text and perform the print operation as the tape width. • An error message (ERR!) appears on the display and the Label Printer refuses to print whenever you try to print text that you press SET. 3. The following are other operations and settings that is too long to fit within the maximum length you specified, an error message (page 16...
... 6mm is turned on. Normal Mirror Image To turn printing on, input text and perform the print operation as the tape width. • An error message (ERR!) appears on the display and the Label Printer refuses to print whenever you try to print text that you press SET. 3. The following are other operations and settings that is too long to fit within the maximum length you specified, an error message (page 16...
Owners Manual
Page 14
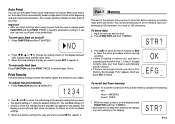
... print operation. Part 7 Memory This part of the manual tells you press SET in memory, the message "FUL!" STR? 3. appears when you how to the density setting that you will replace any text currently on the display. Press FUNCTION and then 8 (DENSITY). 1234 2. The standard setting is not enough room for a total of 126 characters. If Area 1 already contains data, your new input is automatically stored...
... print operation. Part 7 Memory This part of the manual tells you press SET in memory, the message "FUL!" STR? 3. appears when you how to the density setting that you will replace any text currently on the display. Press FUNCTION and then 8 (DENSITY). 1234 2. The standard setting is not enough room for a total of 126 characters. If Area 1 already contains data, your new input is automatically stored...

Owners Manual
Page 15
... 4. Press L twice to change to the left and right. DEL? 3. 2. To replace the tape cutter blade 1. CAL? 3. Open the tape cartridge compartment cover. Memory text cannot be appended. Use K and L to provide approximately 3,000 cuts. Part 8 Reference This section contains information about the Label Printer that the Label Printer is designed to select Area 1 or Area 2 then press SET. Replacing the Tape Cutter Blade The tape cutter blade is switched off. 2. Make sure that you can...
... 4. Press L twice to change to the left and right. DEL? 3. 2. To replace the tape cutter blade 1. CAL? 3. Open the tape cartridge compartment cover. Memory text cannot be appended. Use K and L to provide approximately 3,000 cuts. Part 8 Reference This section contains information about the Label Printer that the Label Printer is designed to select Area 1 or Area 2 then press SET. Replacing the Tape Cutter Blade The tape cutter blade is switched off. 2. Make sure that you can...

Owners Manual
Page 16
... of the Label Printer or if operation fails completely, try performing the following procedure to lift the yellow cutter cartridge out of the cartridge. Install a new cutter cartridge by grasping the cartridge on both sides with print quality, use the following operation to purchase a replacement cutter cartridge. 5. NO! 4. ment cover. 3. Printer head Roller 5. Remove the tape cartridge. 4. Important! • Initializing the Label Printer deletes all memory contents. Make sure you have problems with your CASIO dealer to...
... of the Label Printer or if operation fails completely, try performing the following procedure to lift the yellow cutter cartridge out of the cartridge. Install a new cutter cartridge by grasping the cartridge on both sides with print quality, use the following operation to purchase a replacement cutter cartridge. 5. NO! 4. ment cover. 3. Printer head Roller 5. Remove the tape cartridge. 4. Important! • Initializing the Label Printer deletes all memory contents. Make sure you have problems with your CASIO dealer to...
Owners Manual
Page 17
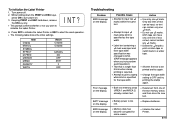
... store the new text. BATT message • Battery power is specified as the tape width. • Label text containing a ¥ mark was input and then tape width specification was changed to print a stamp while 6mm is specified for some reason. • Initialize the Label Printer. INT? 4. low. • Replace batteries. E-16 Keeping PRINT and ESC held down the PRINT and ESC keys, press ON to abort the reset operation. •...
... store the new text. BATT message • Battery power is specified as the tape width. • Label text containing a ¥ mark was input and then tape width specification was changed to print a stamp while 6mm is specified for some reason. • Initialize the Label Printer. INT? 4. low. • Replace batteries. E-16 Keeping PRINT and ESC held down the PRINT and ESC keys, press ON to abort the reset operation. •...
Owners Manual
Page 18
...-dot Character font: Sans-serif Character effects: Shade, underline, box Character sizes: 1×1, 1×2, 1×3, 2×1, 2×2, 2×3 Number of lines: 1 (6mm tape); 1 or 2 (other tapes) Memory Text: Up to approximately 126 characters (total storage for AREA 1 and AREA 2) General Power supply: Eight AA-size batteries or optional AD-A95100 AC adaptor Battery life: Approximately 1 tape cartridge (continuous printing) Power consumption: 9W Auto Power Off: Approximately six minutes after last key operation. Dimensions...
...-dot Character font: Sans-serif Character effects: Shade, underline, box Character sizes: 1×1, 1×2, 1×3, 2×1, 2×2, 2×3 Number of lines: 1 (6mm tape); 1 or 2 (other tapes) Memory Text: Up to approximately 126 characters (total storage for AREA 1 and AREA 2) General Power supply: Eight AA-size batteries or optional AD-A95100 AC adaptor Battery life: Approximately 1 tape cartridge (continuous printing) Power consumption: 9W Auto Power Off: Approximately six minutes after last key operation. Dimensions...

Owners Manual
Page 19
CASIO COMPUTER CO., LTD. 6-2, Hon-machi 1-chome Shibuya-ku, Tokyo 151-8543, Japan
CASIO COMPUTER CO., LTD. 6-2, Hon-machi 1-chome Shibuya-ku, Tokyo 151-8543, Japan


