

Owners Manual
Page 7
...Camera Memory 116 ❚ Viewing User Documentation PDF Files) . . 118 ❚ User Registration 118 Using the Camera with a Macintosh 119 ❚ Connecting the Camera... Layout P Display) . 127 Adjusting Monitor Screen Brightness Screen) . 127 Configuring Camera Sound Settings Sounds) . 128 Configuring a Startup Image Startup) . 128 Specifying ... Time) . 130 Time Stamping Snapshots Timestamp) . 131 Setting the Camera's Clock Adjust) . 132 Specifying the Date Style Date Style) .... or a Memory Card Format) . 136 Resetting the Camera to Factory Defaults Reset) . 136 ❚❙...
...Camera Memory 116 ❚ Viewing User Documentation PDF Files) . . 118 ❚ User Registration 118 Using the Camera with a Macintosh 119 ❚ Connecting the Camera... Layout P Display) . 127 Adjusting Monitor Screen Brightness Screen) . 127 Configuring Camera Sound Settings Sounds) . 128 Configuring a Startup Image Startup) . 128 Specifying ... Time) . 130 Time Stamping Snapshots Timestamp) . 131 Setting the Camera's Clock Adjust) . 132 Specifying the Date Style Date Style) .... or a Memory Card Format) . 136 Resetting the Camera to Factory Defaults Reset) . 136 ❚❙...

Owners Manual
Page 8
❚ Battery Precautions 149 ❚ Using the Camera in another Country 149 Using a Memory Card 150 ❚ To replace the memory card 150 Computer System Requirements for Bundled Software 152 General Guide 153 Monitor Screen Contents 154 Reset Initial Default Settings 156 When things don't go right 159 ❚ Troubleshooting 159 ❚ Display Messages 163 Number of Snapshots and Movie Recording Time 165 Specifications 167 8 Contents
❚ Battery Precautions 149 ❚ Using the Camera in another Country 149 Using a Memory Card 150 ❚ To replace the memory card 150 Computer System Requirements for Bundled Software 152 General Guide 153 Monitor Screen Contents 154 Reset Initial Default Settings 156 When things don't go right 159 ❚ Troubleshooting 159 ❚ Display Messages 163 Number of Snapshots and Movie Recording Time 165 Specifications 167 8 Contents

Owners Manual
Page 12
...For information about how to replace the battery, 1 see page 148. Load the battery. Close the battery cover. 2 Close the battery cover and then shift the slider towards OPEN and then open it in place. Recording is not possible when is low. Charge the battery immediately. • The ... the Auto Power Off and the Sleep features to turn off the camera (pages 133, 134). 12 Quick Start Basics With the EXILIM logo on the monitor screen indicates remaining power as possible. Stopper Battery 3. Battery Power Conservation Tips • When you switch between the REC mode ...
...For information about how to replace the battery, 1 see page 148. Load the battery. Close the battery cover. 2 Close the battery cover and then shift the slider towards OPEN and then open it in place. Recording is not possible when is low. Charge the battery immediately. • The ... the Auto Power Off and the Sleep features to turn off the camera (pages 133, 134). 12 Quick Start Basics With the EXILIM logo on the monitor screen indicates remaining power as possible. Stopper Battery 3. Battery Power Conservation Tips • When you switch between the REC mode ...
Owners Manual
Page 14
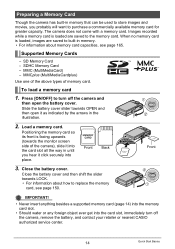
... (MultiMediaCardplus) Use one of the above types of the camera), slide it into the card slot all the way in until you probably will want to replace the memory 1 card, see page 165. Close the battery cover. 2 Close the battery cover and then shift the slider towards the monitor screen ... slot. • Should water or any foreign object ever get into the card slot, immediately turn off the camera, remove the battery, and contact your retailer or nearest CASIO authorized service center. 14 Quick Start Basics When no memory card is loaded are saved to the memory card. Press...
... (MultiMediaCardplus) Use one of the above types of the camera), slide it into the card slot all the way in until you probably will want to replace the memory 1 card, see page 165. Close the battery cover. 2 Close the battery cover and then shift the slider towards the monitor screen ... slot. • Should water or any foreign object ever get into the card slot, immediately turn off the camera, remove the battery, and contact your retailer or nearest CASIO authorized service center. 14 Quick Start Basics When no memory card is loaded are saved to the memory card. Press...

Owners Manual
Page 141
... or the specified device to very high temperatures • Never place the camera on an unstable surface, on a high shelf, etc. Never use with a CASIO Digital Camera only. Memory Protection • Whenever replacing the battery, be deleted in camera memory. . Never carry or store the battery together with a hammer, step on a heated carpet, in areas exposed to direct...
... or the specified device to very high temperatures • Never place the camera on an unstable surface, on a high shelf, etc. Never use with a CASIO Digital Camera only. Memory Protection • Whenever replacing the battery, be deleted in camera memory. . Never carry or store the battery together with a hammer, step on a heated carpet, in areas exposed to direct...

Owners Manual
Page 148
... normal temperature. With the monitor screen side of the camera. 2. Remove the battery from the power outlet or charger. Power Supply Charging If the [CHARGE] lamp does not light red... To replace the battery 1. Contact your nearest CASIO authorized service center. The battery is faulty or the battery is faulty. If contacts become dirty, wipe them clean...
... normal temperature. With the monitor screen side of the camera. 2. Remove the battery from the power outlet or charger. Power Supply Charging If the [CHARGE] lamp does not light red... To replace the battery 1. Contact your nearest CASIO authorized service center. The battery is faulty or the battery is faulty. If contacts become dirty, wipe them clean...

Owners Manual
Page 149
... 240V AC, 50/60Hz. Outside this temperature range charging can discharge and go dead, which will require some time, fully use the camera. • Store batteries in the range of the power cord plug depends on a trip in your destination(s). • Do not connect the charger to 95...°F). Before taking the camera and charger along extra fully charged batteries (NP-40) is charged can lead to use up its service life. Replace the battery with travel agent about the power supply requirements in order to avoid not being ...
... 240V AC, 50/60Hz. Outside this temperature range charging can discharge and go dead, which will require some time, fully use the camera. • Store batteries in the range of the power cord plug depends on a trip in your destination(s). • Do not connect the charger to 95...°F). Before taking the camera and charger along extra fully charged batteries (NP-40) is charged can lead to use up its service life. Replace the battery with travel agent about the power supply requirements in order to avoid not being ...

Owners Manual
Page 159
Power will not turn on . 2)The battery may be dead. Charge the battery (page 11). Purchase a separately available CASIO NP-40 rechargeable lithium ion battery. 1)Auto Power Off may have activated because camera temperature is too high. Turn off the camera and wait until it cools down . Try shooting with Auto Focus (page... a tripod. 5)You may not be pressing the shutter button all the way without waiting for Auto Focus to be moving the camera when shooting. Charge the battery (page 11). 3)The camera's protection function may be replaced. When things don't go right...
Power will not turn on . 2)The battery may be dead. Charge the battery (page 11). Purchase a separately available CASIO NP-40 rechargeable lithium ion battery. 1)Auto Power Off may have activated because camera temperature is too high. Turn off the camera and wait until it cools down . Try shooting with Auto Focus (page... a tripod. 5)You may not be pressing the shutter button all the way without waiting for Auto Focus to be moving the camera when shooting. Charge the battery (page 11). 3)The camera's protection function may be replaced. When things don't go right...


