Owners Manual
Page 5
... 145 Specifying the Metering Mode 146 Reducing the Effects of Overexposure and Underexposure 147 Enhancing Human Skin Textures 148 Using the Camera's Color Filter Effects 149 Controlling Image Sharpness 149 Controlling Color Saturation 150 Adjusting Image Contrast 150 Date Stamping Snapshots 151 Using... Audio Snapshot 161 Viewing a Movie 162 ■ Playing Back a Movie with Anti Shake 164 Playing a Slideshow on the Camera 164 Viewing Camera Images on a TV 170 Zooming the Displayed Image 173 Using the 12-image Screen 174 Using the Calendar Screen 175 CONTENTS 5
... 145 Specifying the Metering Mode 146 Reducing the Effects of Overexposure and Underexposure 147 Enhancing Human Skin Textures 148 Using the Camera's Color Filter Effects 149 Controlling Image Sharpness 149 Controlling Color Saturation 150 Adjusting Image Contrast 150 Date Stamping Snapshots 151 Using... Audio Snapshot 161 Viewing a Movie 162 ■ Playing Back a Movie with Anti Shake 164 Playing a Slideshow on the Camera 164 Viewing Camera Images on a TV 170 Zooming the Displayed Image 173 Using the 12-image Screen 174 Using the Calendar Screen 175 CONTENTS 5
Owners Manual
Page 12
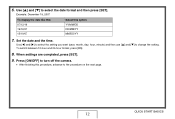
Example: December 19, 2007 To display the date like this: 07/12/19 19/12/07 12/19/07 Select this procedure, advance to turn off the camera. • After finishing this option: YY/MM/DD DD/MM/YY MM/DD/YY 7. Use [W] and [X] to select the setting you want (year, month, day, ...hour, minute) and then use [S] and [T] to select the date format and then press [SET]. QUICK START BASICS 12 When settings are...
Example: December 19, 2007 To display the date like this: 07/12/19 19/12/07 12/19/07 Select this procedure, advance to turn off the camera. • After finishing this option: YY/MM/DD DD/MM/YY MM/DD/YY 7. Use [W] and [X] to select the setting you want (year, month, day, ...hour, minute) and then use [S] and [T] to select the date format and then press [SET]. QUICK START BASICS 12 When settings are...
Owners Manual
Page 35
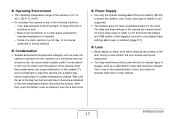
...extreme temperature or humidity - Note that , open for the clock. If this camera. To avoid condensation, place the camera into a plastic bag before removing the camera. The date and time settings of the camera are cleared about 12 hours after power is restored (page 211). ■ Lens • Never...areas subjected to reconfigure these settings after power is totally cut off (from the outdoors on the interior and the exterior of the camera. In an area exposed to power this happens, be straight. After that condensation can scratch the lens surface and cause malfunction. ...
...extreme temperature or humidity - Note that , open for the clock. If this camera. To avoid condensation, place the camera into a plastic bag before removing the camera. The date and time settings of the camera are cleared about 12 hours after power is restored (page 211). ■ Lens • Never...areas subjected to reconfigure these settings after power is totally cut off (from the outdoors on the interior and the exterior of the camera. In an area exposed to power this happens, be straight. After that condensation can scratch the lens surface and cause malfunction. ...
Owners Manual
Page 41
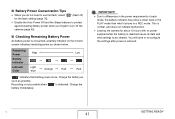
... Off and the Sleep features to protect against wasting battery power when you do not need to use the flash, select " " (flash off the camera (page 45). ■ Checking Remaining Battery Power As battery power is consumed, a battery indicator on the monitor screen indicates remaining power as possible. ... cause its date and time settings to be cleared. ■ Battery Power Conservation Tips • When you forget to turn off ) for about 12 hours with no power supplied while the battery is dead will have to re-configure the settings after power is restored. Charge the battery as...
... Off and the Sleep features to protect against wasting battery power when you do not need to use the flash, select " " (flash off the camera (page 45). ■ Checking Remaining Battery Power As battery power is consumed, a battery indicator on the monitor screen indicates remaining power as possible. ... cause its date and time settings to be cleared. ■ Battery Power Conservation Tips • When you forget to turn off ) for about 12 hours with no power supplied while the battery is dead will have to re-configure the settings after power is restored. Charge the battery as...

Owners Manual
Page 73
... to shoot. Shooting with Zoom Your camera provides you with 3X optical zoom (which changes the lens focal distance), which digitally process the center portion of the image to enlarge it) for total zoom capabilities of 12 - 45.2X. Press the shutter button to change the zoom factor. Wide Angle Telephoto 3. Enter a REC mode. [ ][ ] Zoom controller 2. SHOOTING A SNAPSHOT...
... to shoot. Shooting with Zoom Your camera provides you with 3X optical zoom (which changes the lens focal distance), which digitally process the center portion of the image to enlarge it) for total zoom capabilities of 12 - 45.2X. Press the shutter button to change the zoom factor. Wide Angle Telephoto 3. Enter a REC mode. [ ][ ] Zoom controller 2. SHOOTING A SNAPSHOT...

Owners Manual
Page 96
... to select " Edit Family" and then press [SET]. Press [S] ( ) once. 3. Use [W] and [X] to select a name, and then press [T]. • You can select any one of 12 preset names to face data. 6. This display the face data editing screen. 4. Use [W] and [X] to edit, and then press [SET]. 5. Selecting " " (Disabled) will disable face...
... to select " Edit Family" and then press [SET]. Press [S] ( ) once. 3. Use [W] and [X] to select a name, and then press [T]. • You can select any one of 12 preset names to face data. 6. This display the face data editing screen. 4. Use [W] and [X] to edit, and then press [SET]. 5. Selecting " " (Disabled) will disable face...

Owners Manual
Page 151
... stamped in the lower right corner of images. - To do this: Select this setting: Display the date only (2007/12/24) Date Display the date and time (2007/ Date&Time 12/24 1:25pm) Display nothing Off IMPORTANT! • Even if you do so later using the DPOF function and the printing...: December 24, 2007, 1:25 p.m. Date Stamping Snapshots You can do not stamp the date and/or time with the camera's clock settings (pages 11, 211) when the snapshot is recorded. • Digital zoom is not supported while date stamping is turned on. • Date stamping is stamped in a print, it cannot be ...
... stamped in the lower right corner of images. - To do this: Select this setting: Display the date only (2007/12/24) Date Display the date and time (2007/ Date&Time 12/24 1:25pm) Display nothing Off IMPORTANT! • Even if you do so later using the DPOF function and the printing...: December 24, 2007, 1:25 p.m. Date Stamping Snapshots You can do not stamp the date and/or time with the camera's clock settings (pages 11, 211) when the snapshot is recorded. • Digital zoom is not supported while date stamping is turned on. • Date stamping is stamped in a print, it cannot be ...
Owners Manual
Page 174
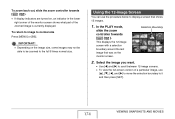
... and then press [SET]. 174 VIEWING SNAPSHOTS AND MOVIES To return to image to scroll between 12-image screens. • To view the full-screen version of the zoomed image is currently displayed. Using the 12-image Screen You can use [S], [T], [W], and [X] to move the selection boundary to the... on the monitor screen. Select the image you want. • Use [W] and [X] to normal size Press [MENU] or [BS]. This displays the 12-image screen with a selection boundary around the last image that shows 12 images. 1. To zoom back out, slide the zoom controller towards [ ] ( ).
... and then press [SET]. 174 VIEWING SNAPSHOTS AND MOVIES To return to image to scroll between 12-image screens. • To view the full-screen version of the zoomed image is currently displayed. Using the 12-image Screen You can use [S], [T], [W], and [X] to move the selection boundary to the... on the monitor screen. Select the image you want. • Use [W] and [X] to normal size Press [MENU] or [BS]. This displays the 12-image screen with a selection boundary around the last image that shows 12 images. 1. To zoom back out, slide the zoom controller towards [ ] ( ).

Owners Manual
Page 182
... then edit the date and time. • You can specify any date in this : Change the value at the cursor location Move the cursor between 12-hour and 24-hour Press [BS]. Editing the Date and Time of an Image Use the procedure in the range of a previously recorded image. 1. To...
... then edit the date and time. • You can specify any date in this : Change the value at the cursor location Move the cursor between 12-hour and 24-hour Press [BS]. Editing the Date and Time of an Image Use the procedure in the range of a previously recorded image. 1. To...

Owners Manual
Page 183
...press [MENU]. To rotate a protected snapshot, first remove its original orientation, if you can be displayed on the camera's monitor screen. 1. Use [S] and [T] to select "Rotate" and then press [SET]. • Each press... [X]. • This operation can return it to its protection (page 199). • Zoomed images cannot be rotated. • The original (unrotated) version of [SET] will be performed only while a... snapshot is displayed on the 12-image screen and the calendar screen. 183 EDITING IMAGES It simply alters how the ...
...press [MENU]. To rotate a protected snapshot, first remove its original orientation, if you can be displayed on the camera's monitor screen. 1. Use [S] and [T] to select "Rotate" and then press [SET]. • Each press... [X]. • This operation can return it to its protection (page 199). • Zoomed images cannot be rotated. • The original (unrotated) version of [SET] will be performed only while a... snapshot is displayed on the 12-image screen and the calendar screen. 183 EDITING IMAGES It simply alters how the ...

Owners Manual
Page 212
To do this: Move the cursor between settings Change the setting at the cursor location Toggle between 12-hour and 24-hour format Do this format: YY/MM/DD DD/MM/YY MM/DD/YY 212 OTHER SETTINGS Use [S] and [T] to exit the ...]. Press [MENU]. 2. Press [MENU]. 2. ■ Setting the Date and Time for the date. 1. Example: December 19, 2007 To display the date like this: 07/12/19 19/12/07 12/19/07 Select this : Press [W] or [X] Press [S] or [T] Press [BS] 4. On the "Set Up" tab, select "Adjust" and then press [X]. 3. On the "Set...
To do this: Move the cursor between settings Change the setting at the cursor location Toggle between 12-hour and 24-hour format Do this format: YY/MM/DD DD/MM/YY MM/DD/YY 212 OTHER SETTINGS Use [S] and [T] to exit the ...]. Press [MENU]. 2. Press [MENU]. 2. ■ Setting the Date and Time for the date. 1. Example: December 19, 2007 To display the date like this: 07/12/19 19/12/07 12/19/07 Select this : Press [W] or [X] Press [S] or [T] Press [BS] 4. On the "Set Up" tab, select "Adjust" and then press [X]. 3. On the "Set...

Owners Manual
Page 223
... image you want . Printing will appear on the monitor screen. If you want to select. • To toggle date stamping on the monitor screen. 12. Pressing any camera button will cause the printing status message to select "Print" and then press [SET]. Use [S] and [T] to re-appear. will start and the message... still being performed. 11. If you want . 13. The date stamp will disappear after a short while, even though printing is indicated on and off the camera. 223 PRINTING
... image you want . Printing will appear on the monitor screen. If you want to select. • To toggle date stamping on the monitor screen. 12. Pressing any camera button will cause the printing status message to select "Print" and then press [SET]. Use [S] and [T] to re-appear. will start and the message... still being performed. 11. If you want . 13. The date stamp will disappear after a short while, even though printing is indicated on and off the camera. 223 PRINTING

Owners Manual
Page 267
■ Snapshot Playback Mode 12 3 4 bq 5 6 bp 7 8 9 bo bnbmblbk 1 File Type (page 160) bn Recording Mode (page 62) 2 Protect Indicator (page 199) bo Battery Level Indicator 3 Folder Name/File Name (... 66) 9 Date/Time (page 211) bk Metering Mode (page 146) bl White Balance Setting (page 142) bm Flash Mode (page 76) ■ Movie Playback Mode 12 3 7 1 File Type (page 162) 2 Protect Indicator (page 199) 3 Folder Name/File Name (page 198) 4 Movie Recording Time (page 162) 5 Movie Image Quality (page 101) 6 Date...
■ Snapshot Playback Mode 12 3 4 bq 5 6 bp 7 8 9 bo bnbmblbk 1 File Type (page 160) bn Recording Mode (page 62) 2 Protect Indicator (page 199) bo Battery Level Indicator 3 Folder Name/File Name (... 66) 9 Date/Time (page 211) bk Metering Mode (page 146) bl White Balance Setting (page 142) bm Flash Mode (page 76) ■ Movie Playback Mode 12 3 7 1 File Type (page 162) 2 Protect Indicator (page 199) 3 Folder Name/File Name (page 198) 4 Movie Recording Time (page 162) 5 Movie Image Quality (page 101) 6 Date...
Owners Manual
Page 282
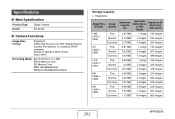
... images 579 images 5M (2560 × 1920) Fine Normal Economy 2.99 MB 1.62 MB 1.12 MB 3 images 7 images 10 images 323 images 597 images 863 images 282 APPENDIX DCF (Design Rule for Camera File System) 1.0 standard; Specifications ■ Main Specification Product Type Model Digital Camera EX-Z1200 ■ Camera Functions Image Files Format Snapshots: JPEG (Exif Version 2.2);
... images 579 images 5M (2560 × 1920) Fine Normal Economy 2.99 MB 1.62 MB 1.12 MB 3 images 7 images 10 images 323 images 597 images 863 images 282 APPENDIX DCF (Design Rule for Camera File System) 1.0 standard; Specifications ■ Main Specification Product Type Model Digital Camera EX-Z1200 ■ Camera Functions Image Files Format Snapshots: JPEG (Exif Version 2.2);

Owners Manual
Page 284
... * The number of image values is approximate and are provided for 35 mm film) 7 lenses in 5 groups, with aspherical lans Zoom 3X optical zoom; 4X digital zoom (Image Size: 12M (4000 × 3000 pixels)) (12X in the table by the appropriate value. * Each movie can be ...mode, manual focus AF Area: Spot, Multi or Tracking; Delete Single-file, all files (with protection) Effective Pixels 12.1 million Imaging Element 1/1.7-inch square pixel color CCD (Total pixels: 12.39 million) Lens/Focal Distance Lenses: F2.8 (W) to change. f=7.9 (W) to 23.7 mm (T) (equivalent to approximately...
... * The number of image values is approximate and are provided for 35 mm film) 7 lenses in 5 groups, with aspherical lans Zoom 3X optical zoom; 4X digital zoom (Image Size: 12M (4000 × 3000 pixels)) (12X in the table by the appropriate value. * Each movie can be ...mode, manual focus AF Area: Spot, Multi or Tracking; Delete Single-file, all files (with protection) Effective Pixels 12.1 million Imaging Element 1/1.7-inch square pixel color CCD (Total pixels: 12.39 million) Lens/Focal Distance Lenses: F2.8 (W) to change. f=7.9 (W) to 23.7 mm (T) (equivalent to approximately...