
User Guide
Page 5
E-112 Minimum Computer System Requirements....E-112 Storing and Loading Digital Keyboard Memory Data E-113 Reference E-114 Troubleshooting E-114 Specifications E-116 Operating Precautions E-118 DSP Effect List E-119 Fingering Guide E-124 Supported Input Characters E-124 Chord Example List E-125 Assigning a MIDI Channel to a Computer .... Using a ...
E-112 Minimum Computer System Requirements....E-112 Storing and Loading Digital Keyboard Memory Data E-113 Reference E-114 Troubleshooting E-114 Specifications E-116 Operating Precautions E-118 DSP Effect List E-119 Fingering Guide E-124 Supported Input Characters E-124 Chord Example List E-125 Assigning a MIDI Channel to a Computer .... Using a ...
User Guide
Page 9
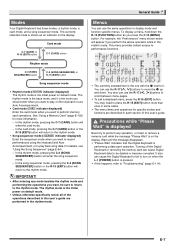
...as you want , be deleted or become corrupted. It also can cause the Digital Keyboard to fail to turn on default mode. • Unless otherwise specifically noted, all of this happens, refer to press the R-15 (EXIT) button more information. - You can use the R-17 (u, i) buttons to ... L-1 (POWER) button is pressed. • If this user's guide. , Precautions while "Please Wait" is displayed Never try to display mode and function specific menus. For details, see "Using the Song Sequencer" (page E-64). - Turning off the Digital Keyboard or removing the memory card can use the same...
...as you want , be deleted or become corrupted. It also can cause the Digital Keyboard to fail to turn on default mode. • Unless otherwise specifically noted, all of this happens, refer to press the R-15 (EXIT) button more information. - You can use the R-17 (u, i) buttons to ... L-1 (POWER) button is pressed. • If this user's guide. , Precautions while "Please Wait" is displayed Never try to display mode and function specific menus. For details, see "Using the Song Sequencer" (page E-64). - Turning off the Digital Keyboard or removing the memory card can use the same...
User Guide
Page 22
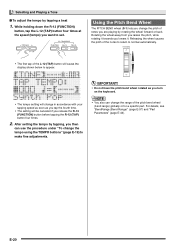
... a beat 1. Using the Pitch Bend Wheel The PITCH BEND wheel (S-1) lets you change the pitch of the pitch bend wheel (bend range) globally or for a specific part. Selecting and Playing a Tone ■ To adjust the tempo by rotating the wheel forward or back. Releasing the wheel causes the pitch of the...
... a beat 1. Using the Pitch Bend Wheel The PITCH BEND wheel (S-1) lets you change the pitch of the pitch bend wheel (bend range) globally or for a specific part. Selecting and Playing a Tone ■ To adjust the tempo by rotating the wheel forward or back. Releasing the wheel causes the pitch of the...
User Guide
Page 41
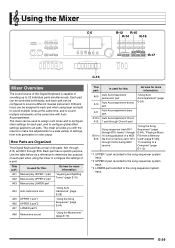
... 32 individual parts simultaneously. Different tones can be assigned to each part, and to configure global effect settings applied to all parts. Each part has a specific purpose.
... 32 individual parts simultaneously. Different tones can be assigned to each part, and to configure global effect settings applied to all parts. Each part has a specific purpose.

User Guide
Page 46
... when it is 127. 0 to 40* to 127 Specifies how much reverb is turned on ) or not output (oFF). When a part is applied to play a specific part only. Equal temperament is applied at the same time. No chorus is applied to 127 Specifies whether scale (page E-21) settings should be applied...
... when it is 127. 0 to 40* to 127 Specifies how much reverb is turned on ) or not output (oFF). When a part is applied to play a specific part only. Equal temperament is applied at the same time. No chorus is applied to 127 Specifies whether scale (page E-21) settings should be applied...

User Guide
Page 48
... to create your user tone. 2. See "To select a tone" (page E-14). You can recall a stored user tone by cutting any frequency that is higher than a specific frequency. Press the C-6 (TONE EDITOR) button. • This displays the tone editor screen. Use the dial or R-14 (-, +) buttons to change . • For information about...
... to create your user tone. 2. See "To select a tone" (page E-14). You can recall a stored user tone by cutting any frequency that is higher than a specific frequency. Press the C-6 (TONE EDITOR) button. • This displays the tone editor screen. Use the dial or R-14 (-, +) buttons to change . • For information about...

User Guide
Page 60
... edited ("Append Chord", under "To perform menu operations", page E-61) • Delete existing chords in order to edit in a specific measure ("Delete Measure", under "To perform menu operations", page E-61) • Insert blank measures at cursor position 5. Data being ... Preset Settings" (page E-52). 3. Chord Progression Editing Flow 1. Cursor Data before and after data being edited Data type name at a specific location ("Insert Measure", under "To perform menu operations", page E-61) • Insert another music preset chord progression following chord progression editing ...
... edited ("Append Chord", under "To perform menu operations", page E-61) • Delete existing chords in order to edit in a specific measure ("Delete Measure", under "To perform menu operations", page E-61) • Insert blank measures at cursor position 5. Data being ... Preset Settings" (page E-52). 3. Chord Progression Editing Flow 1. Cursor Data before and after data being edited Data type name at a specific location ("Insert Measure", under "To perform menu operations", page E-61) • Insert another music preset chord progression following chord progression editing ...

User Guide
Page 63
... Deletes all existing chords (Key Shift) 1. Insert another music preset chord progression following the chord progression data of data with a C-chord at a specific location (Insert Measure)*2 1. Use the R-17 (t, y) buttons to move the 0 to specify how much you want to "InsertMeas." While holding ...perform menu operations 1. Use the R-17 (t, y) buttons to move the 0 to specify the start measure of measures you performed in a specific measure (Delete Measure)*3 1. and then press the R-16 (ENTER) button. 2. After everything is on the display if the process takes time...
... Deletes all existing chords (Key Shift) 1. Insert another music preset chord progression following the chord progression data of data with a C-chord at a specific location (Insert Measure)*2 1. Use the R-17 (t, y) buttons to move the 0 to specify how much you want to "InsertMeas." While holding ...perform menu operations 1. Use the R-17 (t, y) buttons to move the 0 to specify the start measure of measures you performed in a specific measure (Delete Measure)*3 1. and then press the R-16 (ENTER) button. 2. After everything is on the display if the process takes time...

User Guide
Page 75
... recorded in the song sequencer mode. • Play a song. • Fast forward, fast backward, pause, unpause. • Play a specific part in progress or playback standby, you can still perform fast forward playback by holding down the L-15 (dFF) button or fast backward playback ...(A04 to play a recorded song 1. Releasing either button goes back into pause. • While playback is in a song. • Repeat play a specific section of parts A05 (UPPER 1), A06 (UPPER 2), and A07 (LOWER). • The above settings are supported during playback. Press the L-17 (START...
... recorded in the song sequencer mode. • Play a song. • Fast forward, fast backward, pause, unpause. • Play a specific part in progress or playback standby, you can still perform fast forward playback by holding down the L-15 (dFF) button or fast backward playback ...(A04 to play a recorded song 1. Releasing either button goes back into pause. • While playback is in a song. • Repeat play a specific section of parts A05 (UPPER 1), A06 (UPPER 2), and A07 (LOWER). • The above settings are supported during playback. Press the L-17 (START...

User Guide
Page 76
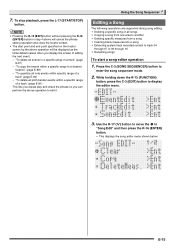
Using the Song Sequencer To play a specific phrase 1. Specify a measure as the end point of a song. Press the R-15 (EXIT) button to display the mixer screen. 4. Press the C-5 (MIXER) button to exit ...
Using the Song Sequencer To play a specific phrase 1. Specify a measure as the end point of a song. Press the R-15 (EXIT) button to display the mixer screen. 4. Press the C-5 (MIXER) button to exit ...
User Guide
Page 77
... editor operation 1. Use the R-17 (y) button to move the 0 to enter the song sequencer mode. 2. "To delete all pitch bender events within a specific range to track 04 through 07 or 09 through 16 • Renaming songs To start point and end point specified on the locator screen by... the editor menu. 3. While holding down the R-13 (FUNCTION) button, press the C-3 (EDIT) button to edit it. "To copy the events within a specific range of a track" (page E-90) - "To delete all events in step 4 above will be displayed as the initial default values when you display the...
... editor operation 1. Use the R-17 (y) button to move the 0 to enter the song sequencer mode. 2. "To delete all pitch bender events within a specific range to track 04 through 07 or 09 through 16 • Renaming songs To start point and end point specified on the locator screen by... the editor menu. 3. While holding down the R-13 (FUNCTION) button, press the C-3 (EDIT) button to edit it. "To copy the events within a specific range of a track" (page E-90) - "To delete all events in step 4 above will be displayed as the initial default values when you display the...

User Guide
Page 79
To delete a specific measure from which you want the insert to start a song editor operation" on page E-75 to display the song editor menu. 2. Use the R-17 (t, y) button ...
To delete a specific measure from which you want the insert to start a song editor operation" on page E-75 to display the song editor menu. 2. Use the R-17 (t, y) button ...

User Guide
Page 83
... to match a reference note. • For information about each operation are supported during event editing. • Deleting events • Inserting events • Copying events within a specific range to use the event editor screen, see "Event Types and Screen Content" (page E-82). 4. While holding down the R-13 (FUNCTION) button, press the C-13...
... to match a reference note. • For information about each operation are supported during event editing. • Deleting events • Inserting events • Copying events within a specific range to use the event editor screen, see "Event Types and Screen Content" (page E-82). 4. While holding down the R-13 (FUNCTION) button, press the C-13...

User Guide
Page 89
..., and then use the dial or R-14 (-, +) buttons to change the setting in the thick brackets (%) to "Locator". • This displays a range specification screen like the one shown below. • If you want to cancel. Using the Song Sequencer 3. Use the R-17 (u, i) button to move the 0... to display the event editor menu. 3. message that range will not be displayed on the range specification screen. 4. message that appears, press the R-14 (YES) button to delete or the R-14 (NO) button to delete. • See "To select a...
..., and then use the dial or R-14 (-, +) buttons to change the setting in the thick brackets (%) to "Locator". • This displays a range specification screen like the one shown below. • If you want to cancel. Using the Song Sequencer 3. Use the R-17 (u, i) button to move the 0... to display the event editor menu. 3. message that range will not be displayed on the range specification screen. 4. message that appears, press the R-14 (YES) button to delete or the R-14 (NO) button to delete. • See "To select a...

User Guide
Page 90
... R-16 (ENTER) button. • This causes the cursor to a desired location 1. To specify a dotted quarter note, for editing" (page E-85). 2. To copy the events within a specific range to stop flashing. Use the R-17 (t, y) buttons to move the cursor, and then use the dial or R-14 (-, +) buttons to change operation. • For...
... R-16 (ENTER) button. • This causes the cursor to a desired location 1. To specify a dotted quarter note, for editing" (page E-85). 2. To copy the events within a specific range to stop flashing. Use the R-17 (t, y) buttons to move the cursor, and then use the dial or R-14 (-, +) buttons to change operation. • For...

User Guide
Page 91
... - end point) 4. Use the dial or R-14 (-, +) buttons to the event editor screen. To specify this time, the "2 Copy destination position" value on the range specification screen. 3. Press the C-10 (COPY) button. • This displays the "Copy" screen. • If you want , press the R-16 (ENTER) button. • This performs quantization...
... - end point) 4. Use the dial or R-14 (-, +) buttons to the event editor screen. To specify this time, the "2 Copy destination position" value on the range specification screen. 3. Press the C-10 (COPY) button. • This displays the "Copy" screen. • If you want , press the R-16 (ENTER) button. • This performs quantization...

User Guide
Page 92
... E-85). 2. Perform step 5 under "To quantize an individual note event" on page E-89. 7. message that range will be displayed on the range specification screen. If required, you can perform a song playback operation at this time to check the range you want to change the value at the cursor.... • Note that appears, press the R-14 (YES) button to quantize or the R-14 (NO) button to "Locator". • This displays a range specification screen like the one shown below. • If you want to cancel. Perform step 5 under "To quantize an individual note event" on page E-89. 5....
... E-85). 2. Perform step 5 under "To quantize an individual note event" on page E-89. 7. message that range will be displayed on the range specification screen. If required, you can perform a song playback operation at this time to check the range you want to change the value at the cursor.... • Note that appears, press the R-14 (YES) button to quantize or the R-14 (NO) button to "Locator". • This displays a range specification screen like the one shown below. • If you want to cancel. Perform step 5 under "To quantize an individual note event" on page E-89. 5....

User Guide
Page 93
... (S-1)) operations for "RecType" when recording to the system track, you will be able to overdub pitch bender operations after deleting pitch bender events from a specific range in a track. • To delete individual pitch bender events, perform the operation under "To insert an event" (page E-88) to insert... pitch bender events. ■ To delete all pitch bender events within a specific range of the track whose pitch bender events you want to delete all pitch bender events from a track or from the system track. You can...
... (S-1)) operations for "RecType" when recording to the system track, you will be able to overdub pitch bender operations after deleting pitch bender events from a specific range in a track. • To delete individual pitch bender events, perform the operation under "To insert an event" (page E-88) to insert... pitch bender events. ■ To delete all pitch bender events within a specific range of the track whose pitch bender events you want to delete all pitch bender events from a track or from the system track. You can...

User Guide
Page 94
... you want to adjust and then advance to step 3. To adjust this: Individual note event All note events in a track Note events within a specific range Locator in the thick brackets (%). and then press the R-16 (ENTER) button. • This displays the "Velocity Modify" screen. 5. message..., perform one shown below . To adjust this: Select this mode: Individual note event Cursor All note events in a track All Note events within a specific range in the "Setting Range" column are enabled only when the "oFF" is greater than 127. (Current velocity) X (Rate setting) + (Offset...
... you want to adjust and then advance to step 3. To adjust this: Individual note event All note events in a track Note events within a specific range Locator in the thick brackets (%). and then press the R-16 (ENTER) button. • This displays the "Velocity Modify" screen. 5. message..., perform one shown below . To adjust this: Select this mode: Individual note event Cursor All note events in a track All Note events within a specific range in the "Setting Range" column are enabled only when the "oFF" is greater than 127. (Current velocity) X (Rate setting) + (Offset...

User Guide
Page 98
... function menu operations. Example: Performance group (2) Use the R-17 (t, y, u, i) buttons to move the 0 to the function menu, press the R-15 (EXIT) button. 2. For details about specific function menu items, see "Function Menu Settings" (page E-97). The setting items from "Performance" and below . It also includes some memory card operations (format, etc...
... function menu operations. Example: Performance group (2) Use the R-17 (t, y, u, i) buttons to move the 0 to the function menu, press the R-15 (EXIT) button. 2. For details about specific function menu items, see "Function Menu Settings" (page E-97). The setting items from "Performance" and below . It also includes some memory card operations (format, etc...
