
User Guide
Page 6
... panel's glass to oil smoke. • Near air conditioning equipment, on top of microphone input • Dim power supply indicator when a microphone is selected • Abnormal rhythm pattern and Song Bank play • Loss of power, sound distortion, or low volume when playing from it . When using batteries, be sure to replace them or shift to one of the alternate power sources whenever you release a key • A tone...
... panel's glass to oil smoke. • Near air conditioning equipment, on top of microphone input • Dim power supply indicator when a microphone is selected • Abnormal rhythm pattern and Song Bank play • Loss of power, sound distortion, or low volume when playing from it . When using batteries, be sure to replace them or shift to one of the alternate power sources whenever you release a key • A tone...

User Guide
Page 7
... functions. ❐ 100 tones • Choose from the TV or radio. If this happens, move the instrument away from among orchestral sounds, synthesized sounds, and more. ❐ 100 rhythms • 100 versatile rhythms help to add plenty of life to all your keyboard performances. ❐ Auto Accompaniment • Simply play a chord and the corresponding rhythm, bass and chord parts play automatically. ❐ 100-tune Song Bank • A wide selection of this keyboard. NOTE...
... functions. ❐ 100 tones • Choose from the TV or radio. If this happens, move the instrument away from among orchestral sounds, synthesized sounds, and more. ❐ 100 rhythms • 100 versatile rhythms help to add plenty of life to all your keyboard performances. ❐ Auto Accompaniment • Simply play a chord and the corresponding rhythm, bass and chord parts play automatically. ❐ 100-tune Song Bank • A wide selection of this keyboard. NOTE...

User Guide
Page 8
... a Song Bank Tune ... E-5 Contents E-6 General Guide E-8 Using the Display E-10 Song Bank Quick Reference E-11 Playing Back a Song Bank Tune E-11 Power Supply E-13 Using batteries E-13 Using the AC Adaptor E-14 Auto Power Off E-14 Settings E-14 Connections E-15 Phones/Output Terminal E-15 Sustain jack Terminal E-15 Accessories and Options E-15 Basic Operations E-16 Playing the Keyboard E-16 Selecting a Tone E-16 Using the Microphone Jack E-17 Auto Accompaniment ......... E-26 Looking Up a Chord Using the Chord Book E-27 Keyboard Settings E-29 Transposing the Keyboard...
... a Song Bank Tune ... E-5 Contents E-6 General Guide E-8 Using the Display E-10 Song Bank Quick Reference E-11 Playing Back a Song Bank Tune E-11 Power Supply E-13 Using batteries E-13 Using the AC Adaptor E-14 Auto Power Off E-14 Settings E-14 Connections E-15 Phones/Output Terminal E-15 Sustain jack Terminal E-15 Accessories and Options E-15 Basic Operations E-16 Playing the Keyboard E-16 Selecting a Tone E-16 Using the Microphone Jack E-17 Auto Accompaniment ......... E-26 Looking Up a Chord Using the Chord Book E-27 Keyboard Settings E-29 Transposing the Keyboard...

User Guide
Page 11
... V SUSTAIN jack terminal W DC 9V terminal X PHONES/OUTPUT terminal *Attachment of the Score Stand Insert both ends of chord specification data when using [+] and [-] to increase and decrease the displayed value. General Guide • Illustrations in this User's Guide shows the CTK-496. 1 MIC VOLUME knob 2 Power indicator 3 MAIN VOLUME buttons 4 SYNCHRO/FILL-IN button 5 START/STOP button 6 POWER/MODE switch 7 TEMPO buttons 8 ACCOMP VOLUME button 9 TRANSPOSE/TUNE/MIDI button 0 Percussion instrument list A CHORD root names B Speaker C MIC IN jack D Rhythm list E Tone list F Song Bank list...
... V SUSTAIN jack terminal W DC 9V terminal X PHONES/OUTPUT terminal *Attachment of the Score Stand Insert both ends of chord specification data when using [+] and [-] to increase and decrease the displayed value. General Guide • Illustrations in this User's Guide shows the CTK-496. 1 MIC VOLUME knob 2 Power indicator 3 MAIN VOLUME buttons 4 SYNCHRO/FILL-IN button 5 START/STOP button 6 POWER/MODE switch 7 TEMPO buttons 8 ACCOMP VOLUME button 9 TRANSPOSE/TUNE/MIDI button 0 Percussion instrument list A CHORD root names B Speaker C MIC IN jack D Rhythm list E Tone list F Song Bank list...

User Guide
Page 13
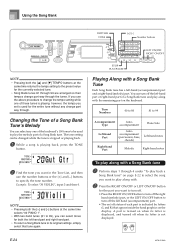
... the fingering indicators), musical notes (on the staff), and chord names. Playing Back a Song Bank Tune To play back a Song Bank tune 1 Set the POWER/MODE switch to NORMAL. 2 Use the MAIN VOLUME buttons to lower the keyboard volume to play along on the keyboard. PLAY/PAUSE 4 Use the Song Bank list to find the tune you to a relatively low level. Fingers used Chord name Staff display 627A-E-013A E-11 Appears when SONG BANK button is pressed Keyboard key used 3 Press the SONG BANK button to input the tune's two-digit number. Example: To select...
... the fingering indicators), musical notes (on the staff), and chord names. Playing Back a Song Bank Tune To play back a Song Bank tune 1 Set the POWER/MODE switch to NORMAL. 2 Use the MAIN VOLUME buttons to lower the keyboard volume to play along on the keyboard. PLAY/PAUSE 4 Use the Song Bank list to find the tune you to a relatively low level. Fingers used Chord name Staff display 627A-E-013A E-11 Appears when SONG BANK button is pressed Keyboard key used 3 Press the SONG BANK button to input the tune's two-digit number. Example: To select...

User Guide
Page 15
... (using it for a long time. Temperature extremes or playing at high volume • Continued sound output even after you observe the following occurs. • Dim power indicator • Instrument does not turn off whenever you load or replace batteries with power turned on • Display that is flickering, dim, or difficult to read • Abnormally low speaker/headphone volume • Distortion of sound output • Occasional interruption of sound when playing...
... (using it for a long time. Temperature extremes or playing at high volume • Continued sound output even after you observe the following occurs. • Dim power indicator • Instrument does not turn off whenever you load or replace batteries with power turned on • Display that is flickering, dim, or difficult to read • Abnormally low speaker/headphone volume • Distortion of sound output • Occasional interruption of sound when playing...

User Guide
Page 16
... of fire and electric shock. IMPORTANT! • Make sure that is built up in the area around the prongs of the AC adaptor. To disable Auto Power Off Hold down the TONE button while turning on the keyboard to become damaged, contact your original retailer or authorized CASIO Service Provider. • Never touch the AC adaptor while your hands are using battery power, keyboard power turns off automatically no...
... of fire and electric shock. IMPORTANT! • Make sure that is built up in the area around the prongs of the AC adaptor. To disable Auto Power Off Hold down the TONE button while turning on the keyboard to become damaged, contact your original retailer or authorized CASIO Service Provider. • Never touch the AC adaptor while your hands are using battery power, keyboard power turns off automatically no...

User Guide
Page 17
... the SUSTAIN jack terminal to sound until the pedal is connected. See "MIDI" on the other external equipment, be a stereo plug, otherwise you are complete. [Rear Panel] PHONES/OUTPUT terminal Audio connection 3 Keyboard amp, guitar amp, etc. 1 Stereo standard plug White Red PIN plug 2 LEFT RIGHT AUX IN or similar terminal of the keyboard and the connected equipment. Sustain jack Terminal You can also connect the keyboard's MIDI terminal to first turn down the volume settings...
... the SUSTAIN jack terminal to sound until the pedal is connected. See "MIDI" on the other external equipment, be a stereo plug, otherwise you are complete. [Rear Panel] PHONES/OUTPUT terminal Audio connection 3 Keyboard amp, guitar amp, etc. 1 Stereo standard plug White Red PIN plug 2 LEFT RIGHT AUX IN or similar terminal of the keyboard and the connected equipment. Sustain jack Terminal You can also connect the keyboard's MIDI terminal to first turn down the volume settings...

User Guide
Page 19
... to disconnect the microphone from a MIDI device. Using the Microphone Jack Connecting a commercially available microphone to the MIC IN jack makes it is selected available sound types are taken in volume or sound quality for full details. See the "Percussion Instrument List" on the octave where the key you play at different positions on the microphone's ON/OFF switch. 3 Use the MIC VOLUME knob to adjust microphone volume to the keyboard.
... to disconnect the microphone from a MIDI device. Using the Microphone Jack Connecting a commercially available microphone to the MIC IN jack makes it is selected available sound types are taken in volume or sound quality for full details. See the "Percussion Instrument List" on the octave where the key you play at different positions on the microphone's ON/OFF switch. 3 Use the MIC VOLUME knob to adjust microphone volume to the keyboard.

User Guide
Page 20
... "Rhythm List" on keyboard power. • You can select using . The bass and chord parts are played using sounds and tones that are shown on the rhythm list printed on the keyboard console. Example: To select "64 WALTZ", input 6 and then 4. To play with the chords you turn on page A-7. 2 Press the RHYTHM button. Appears when RHYTHM button is the initial default rhythm setting whenever you finger. Auto Accompaniment POWER/MODE RHYTHM Number buttons START/STOP TEMPO This keyboard automatically plays bass and chord parts in the RHYTHM List and note its rhythm number...
... "Rhythm List" on keyboard power. • You can select using . The bass and chord parts are played using sounds and tones that are shown on the rhythm list printed on the keyboard console. Example: To select "64 WALTZ", input 6 and then 4. To play with the chords you turn on page A-7. 2 Press the RHYTHM button. Appears when RHYTHM button is the initial default rhythm setting whenever you finger. Auto Accompaniment POWER/MODE RHYTHM Number buttons START/STOP TEMPO This keyboard automatically plays bass and chord parts in the RHYTHM List and note its rhythm number...

User Guide
Page 21
... adjust the tempo 1 Use the TEMPO buttons (̆ / ̄) to use and set the tempo of the currently selected rhythm. CASIO CHORD This page FINGERED Page E-20 Chord name NOTE • Pressing both TEMPO buttons (̆ and ̄) at the same time resets the tempo to the default value of the rhythm to the value you should use Auto Accompaniment 1 Set the POWER/MODE switch to CASIO CHORD or FINGERED. 2 Press the START/STOP button to play CASIO CHORDs. Refer to use the keyboard's Auto Accompaniment feature. Beat Tempo value Graphic metronome Using Auto Accompaniment...
... adjust the tempo 1 Use the TEMPO buttons (̆ / ̄) to use and set the tempo of the currently selected rhythm. CASIO CHORD This page FINGERED Page E-20 Chord name NOTE • Pressing both TEMPO buttons (̆ and ̄) at the same time resets the tempo to the default value of the rhythm to the value you should use Auto Accompaniment 1 Set the POWER/MODE switch to CASIO CHORD or FINGERED. 2 Press the START/STOP button to play CASIO CHORDs. Refer to use the keyboard's Auto Accompaniment feature. Beat Tempo value Graphic metronome Using Auto Accompaniment...

User Guide
Page 23
... in feature. NOTE • If the POWER/MODE switch is set to play the accompaniment on the accompaniment keyboard. • To cancel synchro start standby. Flash 2 Play a chord on the accompaniment keyboard and the rhythm pattern starts to NORMAL, only the rhythm plays (without a chord) when you play method you play automatically. Synchro Starting Accompaniment with Rhythm Play You can adjust the volume of the accompaniment parts as a value in pattern for the rhythm you want to 9. 1 Press the ACCOMP VOLUME button. To use synchro start...
... in feature. NOTE • If the POWER/MODE switch is set to play the accompaniment on the accompaniment keyboard. • To cancel synchro start standby. Flash 2 Play a chord on the accompaniment keyboard and the rhythm pattern starts to NORMAL, only the rhythm plays (without a chord) when you play method you play automatically. Synchro Starting Accompaniment with Rhythm Play You can adjust the volume of the accompaniment parts as a value in pattern for the rhythm you want to 9. 1 Press the ACCOMP VOLUME button. To use synchro start...

User Guide
Page 25
... 1 While playback is programmed for the tune are automatically selected. NOTE • Each time you select a new Song Bank tune, the tone, tempo, and rhythm that is in progress, hold down the REW button. Keyboard keys used • Beeps sound during playback, but you cannot change the rhythm. • You can also adjust the accompaniment volume (page E-21) for Songs 81 through 80. The tempo setting can be adjusted while the tune is in progress. The...
... 1 While playback is programmed for the tune are automatically selected. NOTE • Each time you select a new Song Bank tune, the tone, tempo, and rhythm that is in progress, hold down the REW button. Keyboard keys used • Beeps sound during playback, but you cannot change the rhythm. • You can also adjust the accompaniment volume (page E-21) for Songs 81 through 80. The tempo setting can be adjusted while the tune is in progress. The...
User Guide
Page 26
... selected tune. • Song Bank tunes 81 through 99 are arranged so their tempos change part way through the tunes. Type accompaniment Piano Solo Left-hand Part Autoaccompaniment (percussion, bass, chords) Left-hand notes Right-hand Part Melody Right-hand notes 2 Find the tone you set is used to play along with a Song Bank Tune Each Song Bank tune has a left hand (accompaniment) part. • The on when its letter is indicated by letters (L and R) that tune again. The tone setting can turn...
... selected tune. • Song Bank tunes 81 through 99 are arranged so their tempos change part way through the tunes. Type accompaniment Piano Solo Left-hand Part Autoaccompaniment (percussion, bass, chords) Left-hand notes Right-hand Part Melody Right-hand notes 2 Find the tone you set is used to play along with a Song Bank Tune Each Song Bank tune has a left hand (accompaniment) part. • The on when its letter is indicated by letters (L and R) that tune again. The tone setting can turn...

User Guide
Page 27
... tune only. 627A-E-027A E-25 Playing Back All Song Bank Tunes in Succession 1 Use the TONE or RHYTHM button to change to any mode other part on the keyboard. Re-starting from tune 00. 3 To stop playback by pressing the STOP button. • The accompaniment volume setting (page E-21) affects auto-accompaniment tunes (00 to 80) only. • Chord names are indicated on the display's graphic keyboard. • You can play the other than the Song Bank Mode. • Make...
... tune only. 627A-E-027A E-25 Playing Back All Song Bank Tunes in Succession 1 Use the TONE or RHYTHM button to change to any mode other part on the keyboard. Re-starting from tune 00. 3 To stop playback by pressing the STOP button. • The accompaniment volume setting (page E-21) affects auto-accompaniment tunes (00 to 80) only. • Chord names are indicated on the display's graphic keyboard. • You can play the other than the Song Bank Mode. • Make...

User Guide
Page 30
... the chord fingerings that appear on the display are formed using only the keys within the accompaniment keyboard, inverted chord forms (page E-26) are often suggested. Chords that cannot be formed using the keys within this range are useful to help you can also scroll through chord names using the [+] and [-] buttons. • Chord fingerings that appear on the display are selected to allow chord play chord variations that make it...
... the chord fingerings that appear on the display are formed using only the keys within the accompaniment keyboard, inverted chord forms (page E-26) are often suggested. Chords that cannot be formed using the keys within this range are useful to help you can also scroll through chord names using the [+] and [-] buttons. • Chord fingerings that appear on the display are selected to allow chord play chord variations that make it...

User Guide
Page 31
.... • The tuning setting also affects Auto Accompaniment. • Playing back a Song Bank tune automatically returns the tuning setting to +5. • The default transpose setting is "0" when keyboard power is turned on. • If you are using . 627A-E-031B NOTE • The keyboard can transpose within a range of -6 to its standard default of the keyboard. To transpose the keyboard 1 Press the TRANSPOSE/TUNE/MIDI button until the transpose screen appears on the tone you are using . Example: To lower the tuning by 20...
.... • The tuning setting also affects Auto Accompaniment. • Playing back a Song Bank tune automatically returns the tuning setting to +5. • The default transpose setting is "0" when keyboard power is turned on. • If you are using . 627A-E-031B NOTE • The keyboard can transpose within a range of -6 to its standard default of the keyboard. To transpose the keyboard 1 Press the TRANSPOSE/TUNE/MIDI button until the transpose screen appears on the tone you are using . Example: To lower the tuning by 20...
User Guide
Page 32
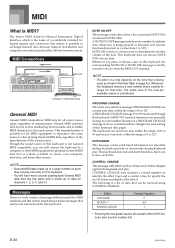
... tone in the Note Table on the tone that makes it possible for smoothly sliding the pitch upwards or downwards during keyboard play . This keyboard can send tone data within the range of 00 to reproduce the same nuances when playing General MIDI data, regardless of the manufacturer of the effect). Effect VOLUME HOLD1 * MODULATION Control Number 7 64 1 * Pressing the foot pedal causes the sustain effect (HOLD1) to 127). A PROGRAM CHANGE...
... tone in the Note Table on the tone that makes it possible for smoothly sliding the pitch upwards or downwards during keyboard play . This keyboard can send tone data within the range of 00 to reproduce the same nuances when playing General MIDI data, regardless of the manufacturer of the effect). Effect VOLUME HOLD1 * MODULATION Control Number 7 64 1 * Pressing the foot pedal causes the sustain effect (HOLD1) to 127). A PROGRAM CHANGE...

User Guide
Page 34
... sound Auto accompaniment volume is set to NORMAL. Use of the microphone in the CASIO CHORD or FINGERED position. The POWER/MODE switch is connected. Correctly attach the AC adaptor, make sure that is selected • Abnormal rhythm pattern and Song Bank play is set to 0. Left-hand or right-hand part is turned off switch is set to see if the indicator for one octave too low. Adjust accompaniment volume. Page E-24 Page E-21 Page E-30 Change TONE...
... sound Auto accompaniment volume is set to NORMAL. Use of the microphone in the CASIO CHORD or FINGERED position. The POWER/MODE switch is connected. Correctly attach the AC adaptor, make sure that is selected • Abnormal rhythm pattern and Song Bank play is set to 0. Left-hand or right-hand part is turned off switch is set to see if the indicator for one octave too low. Adjust accompaniment volume. Page E-24 Page E-21 Page E-30 Change TONE...

User Guide
Page 35
...Model: Keyboard: Tones: Polyphony: Auto Accompaniment Rhythm Patterns: Tempo: Chords: Rhythm Controller: Accomp Volume: Song Bank Tunes: Controllers: Display Name display: Tempo: Chord: Fingering: Song Bank Status: Staff: Keyboard: MIDI: Other Functions Transpose: Tuning: Volume: Terminals MIDI Terminals: Sustain Terminal: Phones/Output Terminal: Power Supply Terminal: Microphone In: Power Supply: Batteries: Battery Life: AC Adaptor: Auto Power Off: Speaker Output: Power Consumption: Dimensions: Weight: CTK-496/CTK-700 61 standard-size keys, 5 octaves 100 12 notes maximum (6 for certain tones...
...Model: Keyboard: Tones: Polyphony: Auto Accompaniment Rhythm Patterns: Tempo: Chords: Rhythm Controller: Accomp Volume: Song Bank Tunes: Controllers: Display Name display: Tempo: Chord: Fingering: Song Bank Status: Staff: Keyboard: MIDI: Other Functions Transpose: Tuning: Volume: Terminals MIDI Terminals: Sustain Terminal: Phones/Output Terminal: Power Supply Terminal: Microphone In: Power Supply: Batteries: Battery Life: AC Adaptor: Auto Power Off: Speaker Output: Power Consumption: Dimensions: Weight: CTK-496/CTK-700 61 standard-size keys, 5 octaves 100 12 notes maximum (6 for certain tones...


