
MCT-E.pdf
Page 22
... settings are available for Safety. 4-5 b. The following settings are available for Safety of the far end margin for the ink to be added. Setting For media that has problems, such as ink smears on the page or colors that has a strong tendency to curl, causing the printhead to open the Media Type...
... settings are available for Safety. 4-5 b. The following settings are available for Safety of the far end margin for the ink to be added. Setting For media that has problems, such as ink smears on the page or colors that has a strong tendency to curl, causing the printhead to open the Media Type...

MCT-E.pdf
Page 23
...start a print job, check the setting of the media and do the setting and limit such printing to match the media. However, the ink absorption characteristics of the printhead height adjustment lever. 5. You should become familiar with some media may scratch the surface. Before you start a ...print job, check the setting of some media, the printhead may cause the printing surface to ripple when the ink is thick, or when the printhead scratches the surface. 4-6 The following settings are available for Far End Margin. This setting sets the ...
...start a print job, check the setting of the media and do the setting and limit such printing to match the media. However, the ink absorption characteristics of the printhead height adjustment lever. 5. You should become familiar with some media may scratch the surface. Before you start a ...print job, check the setting of some media, the printhead may cause the printing surface to ripple when the ink is thick, or when the printhead scratches the surface. 4-6 The following settings are available for Far End Margin. This setting sets the ...
MCT-E.pdf
Page 25
..., the Printer, Driver Details, and the Update Software are displayed. The Add Media Type wizard displays. 11. However, do not want to cut . Once the ink has dried, follow the printer operating panel to drop in the Add Media Type wizard. 2. Check Addition When you do not set this window. 1. Click...
..., the Printer, Driver Details, and the Update Software are displayed. The Add Media Type wizard displays. 11. However, do not want to cut . Once the ink has dried, follow the printer operating panel to drop in the Add Media Type wizard. 2. Check Addition When you do not set this window. 1. Click...
MediaConfigurationTool-E.pdf
Page 22
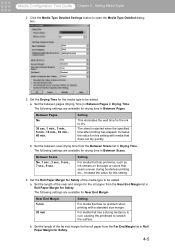
...., increase the value for the media type to dry. Media Configuration Tool Guide Chapter 4 Adding Media Types 2. Setting For media that has problems, such as ink smears on the page or colors that does not dry quickly. Set the Drying Time for this setting with a standard size margin. Set the between...
...., increase the value for the media type to dry. Media Configuration Tool Guide Chapter 4 Adding Media Types 2. Setting For media that has problems, such as ink smears on the page or colors that does not dry quickly. Set the Drying Time for this setting with a standard size margin. Set the between...
MediaConfigurationTool-E.pdf
Page 23
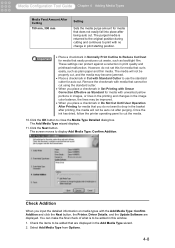
... from the Media Thickness list. The following settings are available for Media Thickness. However, the ink absorption characteristics of some media, the printhead may cause the printing surface to ripple when the ink is thick, or when the printhead scratches the surface. 4-6 This setting sets the margin about... 5 mm (in Roll Paper Margin for Safety set the position of the end margin, the cutter touches the page before the ink has dried and dirties the printed image. For standard media. Before you set with some media may scratch the surface. Important When you ...
... from the Media Thickness list. The following settings are available for Media Thickness. However, the ink absorption characteristics of some media, the printhead may cause the printing surface to ripple when the ink is thick, or when the printhead scratches the surface. 4-6 This setting sets the margin about... 5 mm (in Roll Paper Margin for Safety set the position of the end margin, the cutter touches the page before the ink has dried and dirties the printed image. For standard media. Before you set with some media may scratch the surface. Important When you ...
MediaConfigurationTool-E.pdf
Page 25
... wizard displays. 11. Remove the checkmark with Smear Correction Effective as backlight film. These settings can protect against a reduction in print starting position. Once the ink has dried, follow the printer operating panel to drop in the basket after printing, the media will not be properly cut . However, do not set...
... wizard displays. 11. Remove the checkmark with Smear Correction Effective as backlight film. These settings can protect against a reduction in print starting position. Once the ink has dried, follow the printer operating panel to drop in the basket after printing, the media will not be properly cut . However, do not set...
PrintPlugInforPhotoshop-E.pdf
Page 17
...to perform basic settings such as a choice. Setting Select button Details Click this button to "Customize Media Settings" (p.3-34) for the currently selected ink type. Note • The media that the media is saved even when you close Print Plug-In. 2 Media Type This allows you can ...click the OK button after selecting the printer in the printer, you have set is inappropriate for more information. indicates that you can change the ink type. • The details of Media Type you may not receive the desired print results. • With W8400PG and W6400PG, a may be...
...to perform basic settings such as a choice. Setting Select button Details Click this button to "Customize Media Settings" (p.3-34) for the currently selected ink type. Note • The media that the media is saved even when you close Print Plug-In. 2 Media Type This allows you can ...click the OK button after selecting the printer in the printer, you have set is inappropriate for more information. indicates that you can change the ink type. • The details of Media Type you may not receive the desired print results. • With W8400PG and W6400PG, a may be...

PrintPlugInforPhotoshop-E.pdf
Page 18
... setting results in a printed image. The following settings are available for this takes more balanced and consistent the image will appear. Note The details of ink points contained in the best print quality, but this setting the more memory capacity. • This may not be displayed depending on how you close...
... setting results in a printed image. The following settings are available for this takes more balanced and consistent the image will appear. Note The details of ink points contained in the best print quality, but this setting the more memory capacity. • This may not be displayed depending on how you close...
PrintPlugInforPhotoshop-E.pdf
Page 25
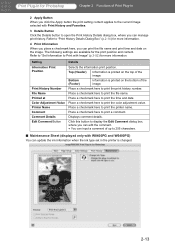
... and content. Refer to "Set Information to print the printer name. Place a checkmark here to Print with W8400PG and W6400PG) You can update the ink information when the ink type set in the printer is changed. 2-13 Place a checkmark here to print the file name. Displays comment details. Setting Information Print Position...
... and content. Refer to "Set Information to print the printer name. Place a checkmark here to Print with W8400PG and W6400PG) You can update the ink information when the ink type set in the printer is changed. 2-13 Place a checkmark here to print the file name. Displays comment details. Setting Information Print Position...
PrintPlugInforPhotoshop-E.pdf
Page 26
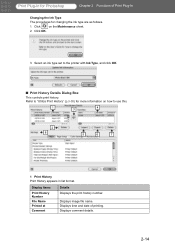
... The procedures for more information on the Maintenance sheet. 2. Refer to "Utilize Print History" (p.3-38) for changing the ink type are as follows. 1. Displays comment details. 2-14 Display Items Print History Number File Name Printed at Comment Details Displays the print history number. Click... OK. 3. Print Plug-In for Photoshop Chapter 2 Functions of printing. Click on how to the printer with Ink Type, and click OK. ■ Print History Details Dialog Box This controls print history. Displays image file name.
... The procedures for more information on the Maintenance sheet. 2. Refer to "Utilize Print History" (p.3-38) for changing the ink type are as follows. 1. Displays comment details. 2-14 Display Items Print History Number File Name Printed at Comment Details Displays the print history number. Click... OK. 3. Print Plug-In for Photoshop Chapter 2 Functions of printing. Click on how to the printer with Ink Type, and click OK. ■ Print History Details Dialog Box This controls print history. Displays image file name.

PrintPlugInforPhotoshop-E.pdf
Page 32
...300ppi images are processed at an accurate resolution. Print Plug-In for the resolution to process images in the printer. Refer to "Changing the Ink Type" (p.2-14) to print than Accuracy 300ppi while also requiring more accurate resolution. When the media you chose is saved even when you close... print results. • With W8400PG and W6400PG, a may be inappropriate with the currently selected ink type. This setting results in the best print quality, but this takes more time to change the ink type. • The details of Media Type that the media is determined to Plug-in the...
...300ppi images are processed at an accurate resolution. Print Plug-In for the resolution to process images in the printer. Refer to "Changing the Ink Type" (p.2-14) to print than Accuracy 300ppi while also requiring more accurate resolution. When the media you chose is saved even when you close... print results. • With W8400PG and W6400PG, a may be inappropriate with the currently selected ink type. This setting results in the best print quality, but this takes more time to change the ink type. • The details of Media Type that the media is determined to Plug-in the...

PrintPlugInforPhotoshop-E.pdf
Page 34
... consistent the image will appear. The larger the value is the number of times the print head travels back and forth over one line of ink points contained in Printer Output Resolution and Pass are saved even when you close Print Plug-In. 6. Click the Print button. Printing begins. 3-7 Print Plug...
... consistent the image will appear. The larger the value is the number of times the print head travels back and forth over one line of ink points contained in Printer Output Resolution and Pass are saved even when you close Print Plug-In. 6. Click the Print button. Printing begins. 3-7 Print Plug...
PrintPlugInforPhotoshop-E.pdf
Page 62
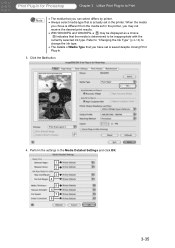
... not receive the desired print results. • With W8400PG and W6400PG, a may be inappropriate with the currently selected ink type. Click the Set button. 4. Refer to "Changing the Ink Type" (p.2-14) to change the ink type. • The details of Media Type that you have set in the Media Detailed Settings and click...
... not receive the desired print results. • With W8400PG and W6400PG, a may be inappropriate with the currently selected ink type. Click the Set button. 4. Refer to "Changing the Ink Type" (p.2-14) to change the ink type. • The details of Media Type that you have set in the Media Detailed Settings and click...
PrintPlugInforPhotoshop-E.pdf
Page 63
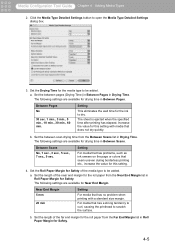
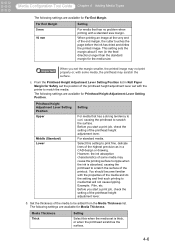
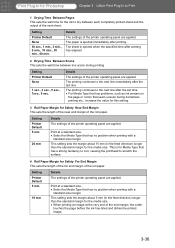
...line. Print Plug-In for Photoshop Chapter 3 Utilize Print Plug-In to Print 1 Drying Time Between Pages This sets the wait time for the ink to dry between line scans during borderless printing etc., increase the value for this setting. 3 Roll Paper Margin for Safety Near End Margin This sets...printed image. 3-36 The printing continues to the next line immediately after the set time. • For Media Type that has problems, such as ink smears on the page or colors that has no problem when printing with a standard size margin. Setting Printer Default 5 mm 20 mm Details The ...
...line. Print Plug-In for Photoshop Chapter 3 Utilize Print Plug-In to Print 1 Drying Time Between Pages This sets the wait time for the ink to dry between line scans during borderless printing etc., increase the value for this setting. 3 Roll Paper Margin for Safety Near End Margin This sets...printed image. 3-36 The printing continues to the next line immediately after the set time. • For Media Type that has problems, such as ink smears on the page or colors that has no problem when printing with a standard size margin. Setting Printer Default 5 mm 20 mm Details The ...

PrintPlugInforPhotoshop-E.pdf
Page 84
... Plug-In for Photoshop Index Index Numerics 16bit, 3-14 A About Button, 2-8 AdobeRGB, 3-14 Apply, 2-13, 3-41 Area, 3-2 B Borderless Printing, 2-8, 3-31, 3-32 Brightness, 2-11 C Changing the Ink Type, 2-14 Close Plug-in After Printing, 2-7 Color Matching, 3-12 Color Settings, 2-11, 3-8 Contrast, 2-11, 2-12 Copies, 2-7 Cyan, 2-11 D Defaults Button, 2-8, 2-11, 2-12 Delete Print...
... Plug-In for Photoshop Index Index Numerics 16bit, 3-14 A About Button, 2-8 AdobeRGB, 3-14 Apply, 2-13, 3-41 Area, 3-2 B Borderless Printing, 2-8, 3-31, 3-32 Brightness, 2-11 C Changing the Ink Type, 2-14 Close Plug-in After Printing, 2-7 Color Matching, 3-12 Color Settings, 2-11, 3-8 Contrast, 2-11, 2-12 Copies, 2-7 Cyan, 2-11 D Defaults Button, 2-8, 2-11, 2-12 Delete Print...
PPlugIn-E.pdf
Page 15
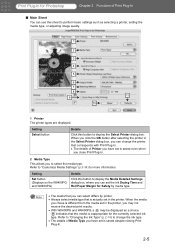
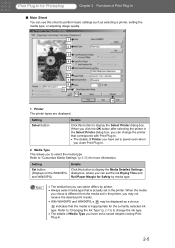
...8226; Always select media type that corresponds with Print Plug-In. • The details of Printer you have set is inappropriate for the currently selected ink type. Print Plug-In for Photoshop Chapter 2 Functions of Print Plug-In ■ Main Sheet You can use this sheet to perform basic settings ...such as a choice. Refer to "Changing the Ink Type" (p.2-13) to select the media type. Refer to display the Select Printer dialog box. Note • The media that the media is saved ...
...8226; Always select media type that corresponds with Print Plug-In. • The details of Printer you have set is inappropriate for the currently selected ink type. Print Plug-In for Photoshop Chapter 2 Functions of Print Plug-In ■ Main Sheet You can use this sheet to perform basic settings ...such as a choice. Refer to "Changing the Ink Type" (p.2-13) to select the media type. Refer to display the Select Printer dialog box. Note • The media that the media is saved ...
PPlugIn-E.pdf
Page 16
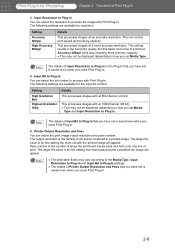
... This processes images with Print Plug-In. Pass number is the number of times the print head travels back and forth over one line of ink points contained in a printed image. Print Plug-In for Photoshop Chapter 2 Functions of Print Plug-In 3 Input Resolution to Plug-in You can select the...
... This processes images with Print Plug-In. Pass number is the number of times the print head travels back and forth over one line of ink points contained in a printed image. Print Plug-In for Photoshop Chapter 2 Functions of Print Plug-In 3 Input Resolution to Plug-in You can select the...
PPlugIn-E.pdf
Page 23
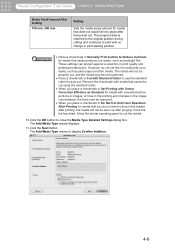
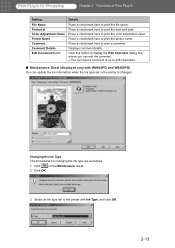
... Photoshop Chapter 2 Functions of up to 255 characters. ■ Maintenance Sheet (displayed only with W8400PG and W6400PG) You can update the ink information when the ink type set to print the file name. Click OK. 3. Displays comment details. Click on the Maintenance sheet. 2. Place a checkmark here... to print the printer name. Place a checkmark here to print a comment. Print Plug-In for changing the ink type are as follows. 1. Select an ink type set in the printer is changed. Click this button to display the Edit Comment dialog box, where you can edit ...
... Photoshop Chapter 2 Functions of up to 255 characters. ■ Maintenance Sheet (displayed only with W8400PG and W6400PG) You can update the ink information when the ink type set to print the file name. Click OK. 3. Displays comment details. Click on the Maintenance sheet. 2. Place a checkmark here... to print the printer name. Place a checkmark here to print a comment. Print Plug-In for changing the ink type are as follows. 1. Select an ink type set in the printer is changed. Click this button to display the Edit Comment dialog box, where you can edit ...

PPlugIn-E.pdf
Page 30
...; When you select High Accuracy 600ppi images are processed at a more memory capacity. • High Accuracy 600ppi will not display with the currently selected ink type. This setting results in the printer, you may not receive the desired print results. • With W8400PG and W6400PG, a may be inappropriate .... This can select differs by printer. • Always select media type that you have set in . Refer to "Changing the Ink Type" (p.2-13) to change the ink type. • The details of Input Resolution to Plug-in that you have set in the best print quality, but this takes...
...; When you select High Accuracy 600ppi images are processed at a more memory capacity. • High Accuracy 600ppi will not display with the currently selected ink type. This setting results in the printer, you may not receive the desired print results. • With W8400PG and W6400PG, a may be inappropriate .... This can select differs by printer. • Always select media type that you have set in . Refer to "Changing the Ink Type" (p.2-13) to change the ink type. • The details of Input Resolution to Plug-in that you have set in the best print quality, but this takes...

PPlugIn-E.pdf
Page 32
... image. Click the Print button. The larger the value is the number of times the print head travels back and forth over one line of ink points contained in Printer Output Resolution and Pass are saved even when you close Print Plug-In. 6. Printing begins. 3-7
... image. Click the Print button. The larger the value is the number of times the print head travels back and forth over one line of ink points contained in Printer Output Resolution and Pass are saved even when you close Print Plug-In. 6. Printing begins. 3-7


