
MCT-E.pdf
Page 22
...min., 30 min., 60 min. Increase the value for drying time in Roll Paper Margin for Safety. 4-5 The following settings are available for this setting. 4. Setting For media that has problems, such as ink smears on the page or colors that seem uneven during borderless printing etc., increase... from the Far End Margin list in Between Scans. The following settings are available for the ink to open the Media Type Detailed dialog box. 3. Setting This eliminates the wait time for drying time in Roll Paper Margin for Safety. Between Scans No, 1 sec., 3 sec., 5 sec., 7 sec., ...
...min., 30 min., 60 min. Increase the value for drying time in Roll Paper Margin for Safety. 4-5 The following settings are available for this setting. 4. Setting For media that has problems, such as ink smears on the page or colors that seem uneven during borderless printing etc., increase... from the Far End Margin list in Between Scans. The following settings are available for the ink to open the Media Type Detailed dialog box. 3. Setting This eliminates the wait time for drying time in Roll Paper Margin for Safety. Between Scans No, 1 sec., 3 sec., 5 sec., 7 sec., ...

MCT-E.pdf
Page 23
... the Printhead Height Adjustment Lever Setting Position list in Roll Paper Margin for Far End Margin. For standard media. Before you start a print job, check the setting of some media, the printhead may cause the printing surface to ripple when the ink is thick, or when the printhead scratches the surface. 4-6 When...
... the Printhead Height Adjustment Lever Setting Position list in Roll Paper Margin for Far End Margin. For standard media. Before you start a print job, check the setting of some media, the printhead may cause the printing surface to ripple when the ink is thick, or when the printhead scratches the surface. 4-6 When...
MCT-E.pdf
Page 25
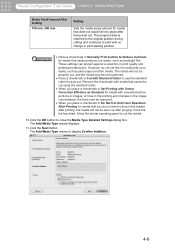
...for media that easily produces cut waste, such as backlight film. However, do not want to drop in Normally Print Cutline to cut . Once the ink has dried, follow the printer operating panel to Reduce Cut Dust for media that does not easily fall into place after purging. The screen moves... for media with Standard Cutter to use the standard cutter for media that you place a checkmark in Set Printing with Smear Correction Effective as plain paper and thin media. Check Addition When you place a checkmark in this for auto cut the media. 10.Click the OK button to display Add ...
...for media that easily produces cut waste, such as backlight film. However, do not want to drop in Normally Print Cutline to cut . Once the ink has dried, follow the printer operating panel to Reduce Cut Dust for media that does not easily fall into place after purging. The screen moves... for media with Standard Cutter to use the standard cutter for media that you place a checkmark in Set Printing with Smear Correction Effective as plain paper and thin media. Check Addition When you place a checkmark in this for auto cut the media. 10.Click the OK button to display Add ...
MediaConfigurationTool-E.pdf
Page 22
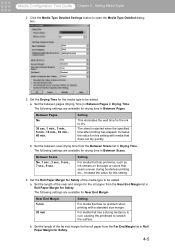
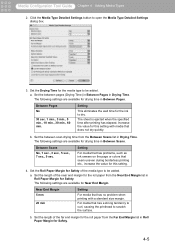
... for the roll paper from the Near End Margin list in Drying Time. a. Set the Drying Time for this setting. 4. Setting For media that has problems, such as ink smears on the page or colors that does not dry quickly. The following settings are available for this setting with a standard ... has no problem when printing with media that seem uneven during borderless printing etc., increase the value for Near End Margin. Set the Roll Paper Margin for the ink to be added. Set the length of the media type to dry. Between Scans No, 1 sec., 3 sec., 5 sec., 7 sec., 9 ...
... for the roll paper from the Near End Margin list in Drying Time. a. Set the Drying Time for this setting. 4. Setting For media that has problems, such as ink smears on the page or colors that does not dry quickly. The following settings are available for this setting with a standard ... has no problem when printing with media that seem uneven during borderless printing etc., increase the value for Near End Margin. Set the Roll Paper Margin for the ink to be added. Set the length of the media type to dry. Between Scans No, 1 sec., 3 sec., 5 sec., 7 sec., 9 ...
MediaConfigurationTool-E.pdf
Page 23
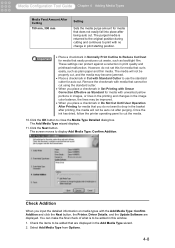
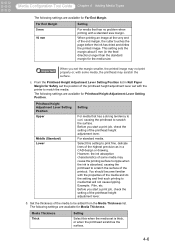
...the margin about 5 mm (in Roll Paper Margin for Safety set the position of the printhead height adjustment lever set with the properties of the printout. The following settings are available for Media Thickness. For standard media. However, the ink absorption characteristics of the highest precision as ... do the setting and limit such printing to media that has a strong tendency to curl, causing the printhead to ripple when the ink is thick, or when the printhead scratches the surface. 4-6 The following settings are available for Printhead Height Adjustment Lever Setting Position....
...the margin about 5 mm (in Roll Paper Margin for Safety set the position of the printhead height adjustment lever set with the properties of the printout. The following settings are available for Media Thickness. For standard media. However, the ink absorption characteristics of the highest precision as ... do the setting and limit such printing to media that has a strong tendency to curl, causing the printhead to ripple when the ink is thick, or when the printhead scratches the surface. 4-6 The following settings are available for Printhead Height Adjustment Lever Setting Position....
MediaConfigurationTool-E.pdf
Page 25
However, do not want to drop in the basket after printing, the media will not be auto cut waste, such as plain paper and thin media. Once the ink has dried, follow the printer operating panel to cut . Click the Next button. Remove the checkmark with media that cannot be cut . The purged...
However, do not want to drop in the basket after printing, the media will not be auto cut waste, such as plain paper and thin media. Once the ink has dried, follow the printer operating panel to cut . Click the Next button. Remove the checkmark with media that cannot be cut . The purged...
PrintPlugInforPhotoshop-E.pdf
Page 17
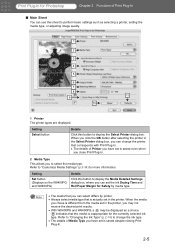
...can set in the printer, you can select differs by media type. Refer to "Changing the Ink Type" (p.2-14) to change the printer that the media is actually set the ink Drying Time and Roll Paper Margin for Safety by printer. • Always select media type that you may not receive ...display the Media Detailed Settings dialog box, where you to select the media type. Refer to "Customize Media Settings" (p.3-34) for the currently selected ink type. Print Plug-In for Photoshop Chapter 2 Functions of Print Plug-In ■ Main Sheet You can use this sheet to perform basic settings...
...can set in the printer, you can select differs by media type. Refer to "Changing the Ink Type" (p.2-14) to change the printer that the media is actually set the ink Drying Time and Roll Paper Margin for Safety by printer. • Always select media type that you may not receive ...display the Media Detailed Settings dialog box, where you to select the media type. Refer to "Customize Media Settings" (p.3-34) for the currently selected ink type. Print Plug-In for Photoshop Chapter 2 Functions of Print Plug-In ■ Main Sheet You can use this sheet to perform basic settings...
PrintPlugInforPhotoshop-E.pdf
Page 63
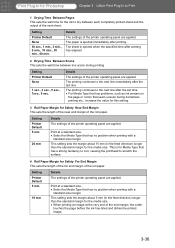
The paper is ejected immediately after printing has elapsed. 2 Drying Time Between Scans This sets the wait time between each completely printed sheet and the output of the end margin, the cutter touches the page before the ink has dried and dirties the printed image. 3-36 The sheet is for Media...margin of the roll paper. Print at the very end of the next sheet. Setting Printer Default None 1 sec., 3 sec., 5 sec., 7sec., 9 sec. Print Plug-In for Photoshop Chapter 3 Utilize Print Plug-In to Print 1 Drying Time Between Pages This sets the wait time for the ink to the next line...
The paper is ejected immediately after printing has elapsed. 2 Drying Time Between Scans This sets the wait time between each completely printed sheet and the output of the end margin, the cutter touches the page before the ink has dried and dirties the printed image. 3-36 The sheet is for Media...margin of the roll paper. Print at the very end of the next sheet. Setting Printer Default None 1 sec., 3 sec., 5 sec., 7sec., 9 sec. Print Plug-In for Photoshop Chapter 3 Utilize Print Plug-In to Print 1 Drying Time Between Pages This sets the wait time for the ink to the next line...

PrintPlugInforPhotoshop-E.pdf
Page 84
... 3-14 A About Button, 2-8 AdobeRGB, 3-14 Apply, 2-13, 3-41 Area, 3-2 B Borderless Printing, 2-8, 3-31, 3-32 Brightness, 2-11 C Changing the Ink Type, 2-14 Close Plug-in After Printing, 2-7 Color Matching, 3-12 Color Settings, 2-11, 3-8 Contrast, 2-11, 2-12 Copies, 2-7 Cyan, 2-11 D Defaults...12 Print History Details, 2-13, 2-14, 3-38 Print Information, 2-13, 3-53 Printer Output Resolution and Pass, 2-6 Q Quit, 2-4 R Range, 2-3 Roll Paper Options, 2-10 S Saturation, 2-11, 2-12 Select Printer, 2-5 Selected, 2-3 Settings, 2-15 Start (Print Plug-In), 1-6 Store Print History to Print Preferences...
... 3-14 A About Button, 2-8 AdobeRGB, 3-14 Apply, 2-13, 3-41 Area, 3-2 B Borderless Printing, 2-8, 3-31, 3-32 Brightness, 2-11 C Changing the Ink Type, 2-14 Close Plug-in After Printing, 2-7 Color Matching, 3-12 Color Settings, 2-11, 3-8 Contrast, 2-11, 2-12 Copies, 2-7 Cyan, 2-11 D Defaults...12 Print History Details, 2-13, 2-14, 3-38 Print Information, 2-13, 3-53 Printer Output Resolution and Pass, 2-6 Q Quit, 2-4 R Range, 2-3 Roll Paper Options, 2-10 S Saturation, 2-11, 2-12 Select Printer, 2-5 Selected, 2-3 Settings, 2-15 Start (Print Plug-In), 1-6 Store Print History to Print Preferences...
PPlugIn-E.pdf
Page 15
... you click the OK button after selecting the printer in the printer. Note • The media that you have set the ink Drying Time and Roll Paper Margin for Safety by printer. • Always select media type that corresponds with Print Plug-In. • The details of..., setting the media type, or adjusting image quality. 1 2 3 4 5 6 7 8 9 10 11 1 Printer The printer types are displayed. Refer to "Changing the Ink Type" (p.2-13) to change the printer that is saved despite closing Print Plug-In. 2-5 Setting Set button (Displays on the W8400PG and W6400PG) Details Click...
... you click the OK button after selecting the printer in the printer. Note • The media that you have set the ink Drying Time and Roll Paper Margin for Safety by printer. • Always select media type that corresponds with Print Plug-In. • The details of..., setting the media type, or adjusting image quality. 1 2 3 4 5 6 7 8 9 10 11 1 Printer The printer types are displayed. Refer to "Changing the Ink Type" (p.2-13) to change the printer that is saved despite closing Print Plug-In. 2-5 Setting Set button (Displays on the W8400PG and W6400PG) Details Click...

PPlugIn-E.pdf
Page 60
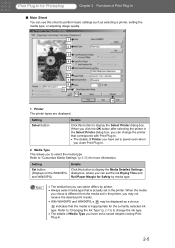
The paper is ejected immediately after the set time. • For Media Type that has problems, such as ink smears on the page or colors that seem uneven during printing. .... 1 2 3 4 5 6 7 8 1 Drying Time Between Pages This sets the wait time for the ink to scratch the surface. 4 Roll Paper Margin for Safety Far End Margin This sets the length of the far end margin of the roll...dry between line scans during borderless printing etc., increase the value for this setting. 3 Roll Paper Margin for Safety Near End Margin This sets the length of the near end margin of the printer operating panel ...
The paper is ejected immediately after the set time. • For Media Type that has problems, such as ink smears on the page or colors that seem uneven during printing. .... 1 2 3 4 5 6 7 8 1 Drying Time Between Pages This sets the wait time for the ink to scratch the surface. 4 Roll Paper Margin for Safety Far End Margin This sets the length of the far end margin of the roll...dry between line scans during borderless printing etc., increase the value for this setting. 3 Roll Paper Margin for Safety Near End Margin This sets the length of the near end margin of the printer operating panel ...

PPlugIn-E.pdf
Page 61
... The media suction is at normal strength. • Select this when the media is not cut at high speed. • Select this when the paper jams or when multiple pages are applied. This performs auto cut well. 3-36 For media that has no problem with the media suction. Setting Printer...the suction volume to Print Setting Printer Default 5 mm 10 mm Details The settings of the end margin, the cutter touches the page before the ink has dried and dirties the printed image. 5 Media Thickness This sets the media thickness. Print Plug-In for Photoshop Chapter 3 Utilize Print Plug-In...
... The media suction is at normal strength. • Select this when the media is not cut at high speed. • Select this when the paper jams or when multiple pages are applied. This performs auto cut well. 3-36 For media that has no problem with the media suction. Setting Printer...the suction volume to Print Setting Printer Default 5 mm 10 mm Details The settings of the end margin, the cutter touches the page before the ink has dried and dirties the printed image. 5 Media Thickness This sets the media thickness. Print Plug-In for Photoshop Chapter 3 Utilize Print Plug-In...

PPlugIn-E.pdf
Page 81
...14 A About Button, 2-7 AdobeRGB, 3-14 Apply, 2-12, 3-40 Area, 3-2 B Borderless Printing, 2-8, 3-31, 3-32 Brightness, 2-11 C Changing the Ink Type, 2-13 Close Plug-in After Printing, 2-7 Color Matching, 3-12 Color Settings, 2-11, 3-8 Contrast, 2-11 Copies, 2-7 Cyan, 2-11 D Defaults Button...Print History Details, 2-12, 2-14, 3-37 Print Information, 2-12, 3-52 Printer Output Resolution and Pass, 2-6 Q Quit, 2-4 R Range, 2-3 Roll Paper Options, 2-10 S Saturation, 2-11 Select Printer, 2-5 Selected, 2-3 Settings, 2-15 Start (Print Plug-In), 1-5 Store Print History to Print Preferences, Stored...
...14 A About Button, 2-7 AdobeRGB, 3-14 Apply, 2-12, 3-40 Area, 3-2 B Borderless Printing, 2-8, 3-31, 3-32 Brightness, 2-11 C Changing the Ink Type, 2-13 Close Plug-in After Printing, 2-7 Color Matching, 3-12 Color Settings, 2-11, 3-8 Contrast, 2-11 Copies, 2-7 Cyan, 2-11 D Defaults Button...Print History Details, 2-12, 2-14, 3-37 Print Information, 2-12, 3-52 Printer Output Resolution and Pass, 2-6 Q Quit, 2-4 R Range, 2-3 Roll Paper Options, 2-10 S Saturation, 2-11 Select Printer, 2-5 Selected, 2-3 Settings, 2-15 Start (Print Plug-In), 1-5 Store Print History to Print Preferences, Stored...

HDI-E.pdf
Page 19
...open the Media Detailed Settings dialog box. imagePROGRAF HDI Driver Guide Setting Up a Print Job ■ Selecting the Media Type and Ink Type Use these following items for selection. Plain Paper, Fine Art, Coated Paper, Glossy Photo Paper, Synthetic Paper, and others • The type ...of media that can perform the settings for example). 3-6 Ink Type Photo Black (Bk) Matte Black ...
...open the Media Detailed Settings dialog box. imagePROGRAF HDI Driver Guide Setting Up a Print Job ■ Selecting the Media Type and Ink Type Use these following items for selection. Plain Paper, Fine Art, Coated Paper, Glossy Photo Paper, Synthetic Paper, and others • The type ...of media that can perform the settings for example). 3-6 Ink Type Photo Black (Bk) Matte Black ...

HDI-E.pdf
Page 21
Setting Details This item resets the value to the printer default settings. Cancels the ink drying time. Between Scans Printer Default None 1 sec., 3 sec., 5 sec., 7 sec., 9 sec. Roll Paper Margin for Safety If the printed image appears rough or scratched by the printhead, adjust the settings ...printing was done as far as the trailing edge. imagePROGRAF HDI Driver Guide Setting Up a Print Job Between Pages presents the following items for selection. If the ink on the printed output, from the Between Scans list under Roll Paper Margin for Safety. Between Pages Printer Default None 30...
Setting Details This item resets the value to the printer default settings. Cancels the ink drying time. Between Scans Printer Default None 1 sec., 3 sec., 5 sec., 7 sec., 9 sec. Roll Paper Margin for Safety If the printed image appears rough or scratched by the printhead, adjust the settings ...printing was done as far as the trailing edge. imagePROGRAF HDI Driver Guide Setting Up a Print Job Between Pages presents the following items for selection. If the ink on the printed output, from the Between Scans list under Roll Paper Margin for Safety. Between Pages Printer Default None 30...
HDI-E.pdf
Page 24
...imagePROGRAF HDI Driver Guide Index Index A Add Plotter - Ports, 1-5, 1-8 Add-A-Plotter Wizard, 1-3, 1-6 Autodesk Plotter Manager, 1-3, 1-6 B Between Pages, 3-7 Between Scans, 3-8 Brightness, 3-6 C Canon installer, 1-1 Color, 3-4 Color Depth, 3-4 Color Matching, 3-6 Colorimetric, 3-6 Custom Properties dialog box, 3-5 Cut Speed, 3-10 O Operating Environment, 1-1 P Paper size and Paper..., 3-9 Vector Graphics, 3-4 H hanging up, 2-2 HDI Driver Installation, 1-1 hif file, 1-7 I ink type, 3-6 Installation Procedure, 1-1 M Manufacturers, 1-4, 1-7 Matte Black (MBk), 3-6 Media Detailed Settings,...
...imagePROGRAF HDI Driver Guide Index Index A Add Plotter - Ports, 1-5, 1-8 Add-A-Plotter Wizard, 1-3, 1-6 Autodesk Plotter Manager, 1-3, 1-6 B Between Pages, 3-7 Between Scans, 3-8 Brightness, 3-6 C Canon installer, 1-1 Color, 3-4 Color Depth, 3-4 Color Matching, 3-6 Colorimetric, 3-6 Custom Properties dialog box, 3-5 Cut Speed, 3-10 O Operating Environment, 1-1 P Paper size and Paper..., 3-9 Vector Graphics, 3-4 H hanging up, 2-2 HDI Driver Installation, 1-1 hif file, 1-7 I ink type, 3-6 Installation Procedure, 1-1 M Manufacturers, 1-4, 1-7 Matte Black (MBk), 3-6 Media Detailed Settings,...


