imageCLASS MF5770 Set-Up Instructions for Networking and Printing
Page 2
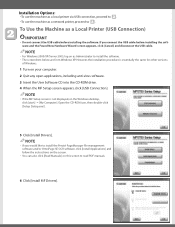
...printer via USB connection, proceed to . •To use the machine as Administrator to install the software. • The screenshots below are from Windows XP. NOTE • If you connect the USB cable before installing the software. If you would like to read PDF manuals. 6 Click [Install ...NOTE • If the MF Setup screen is essentially the same for other versions of Windows. 1 Turn on this screen to install the Presto! Open the CD-ROM icon, then double-click [Setup (Setup.exe)]. 5 Click [Install Drivers]. To Use the Machine as a Local Printer (USB Connection) IMPORTANT • Do...
...printer via USB connection, proceed to . •To use the machine as Administrator to install the software. • The screenshots below are from Windows XP. NOTE • If you connect the USB cable before installing the software. If you would like to read PDF manuals. 6 Click [Install ...NOTE • If the MF Setup screen is essentially the same for other versions of Windows. 1 Turn on this screen to install the Presto! Open the CD-ROM icon, then double-click [Setup (Setup.exe)]. 5 Click [Install Drivers]. To Use the Machine as a Local Printer (USB Connection) IMPORTANT • Do...

imageCLASS MF5770 Set-Up Instructions for Networking and Printing
Page 6
... click [Network Connection]. NOTE • If the MF Setup screen is essentially the same for other end of the machine. Connect the other versions of Windows. 1 Turn on the LCD ➝ press [Set]. 2 Press or to select ➝ press [Set]. 3 Press or to select the desired ...Set]. 4 Press [Stop/Reset] to return to install the software. • The screenshots below are from Windows XP. Installing Driver Software NOTE • For Windows 2000/XP/Server 2003, log on the Windows desktop, click [start] ➝ [My Computer]. However, the installation procedure is not displayed, on as ...
... click [Network Connection]. NOTE • If the MF Setup screen is essentially the same for other end of the machine. Connect the other versions of Windows. 1 Turn on the LCD ➝ press [Set]. 2 Press or to select ➝ press [Set]. 3 Press or to select the desired ...Set]. 4 Press [Stop/Reset] to return to install the software. • The screenshots below are from Windows XP. Installing Driver Software NOTE • For Windows 2000/XP/Server 2003, log on the Windows desktop, click [start] ➝ [My Computer]. However, the installation procedure is not displayed, on as ...
imageCLASS MF5770 Network Guide
Page 26
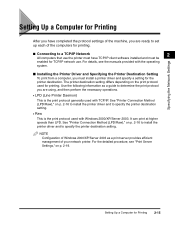
... for printing. ■ Connecting to a TCP/IP Network 2 All computers that use . See "Printer Connection Method (LPD/Raw)," on p. 2-19. NOTE Configuration of Windows 2000/XP/Server 2003 as a guide to specify the printer destination setting. • Raw This is the print protocol generally used with... TCP/IP. Specifying the Network Settings Setting Up a Computer for Printing After you have TCP/IP client software installed and must install a printer driver and specify a setting for the printer destination. For details, see "Print Server Settings," on p. 2-16 to install the printer...
... for printing. ■ Connecting to a TCP/IP Network 2 All computers that use . See "Printer Connection Method (LPD/Raw)," on p. 2-19. NOTE Configuration of Windows 2000/XP/Server 2003 as a guide to specify the printer destination setting. • Raw This is the print protocol generally used with... TCP/IP. Specifying the Network Settings Setting Up a Computer for Printing After you have TCP/IP client software installed and must install a printer driver and specify a setting for the printer destination. For details, see "Print Server Settings," on p. 2-16 to install the printer...
imageCLASS MF5770 Network Guide
Page 27
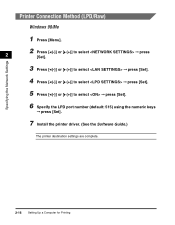
Specifying the Network Settings 3 Press [ (-)] or [ (+)] to select ➞ press [Set]. 4 Press [ (-)] or [ (+)] to select ➞ press [Set]. 5 Press [ (-)] or [ (+)] to select ➞ press [Set]. Printer Connection Method (LPD/Raw) Windows 98/Me 1 Press [Menu]. 2 2 Press [ (-)] or [ (+)] to select ➞ press [Set]. 6 Specify the LPD port number (default: 515) using the numeric keys ➞ press [Set]. 7 Install the printer driver. (See the Software Guide.) The printer destination settings are complete. 2-16 Setting Up a Computer for Printing
Specifying the Network Settings 3 Press [ (-)] or [ (+)] to select ➞ press [Set]. 4 Press [ (-)] or [ (+)] to select ➞ press [Set]. 5 Press [ (-)] or [ (+)] to select ➞ press [Set]. Printer Connection Method (LPD/Raw) Windows 98/Me 1 Press [Menu]. 2 2 Press [ (-)] or [ (+)] to select ➞ press [Set]. 6 Specify the LPD port number (default: 515) using the numeric keys ➞ press [Set]. 7 Install the printer driver. (See the Software Guide.) The printer destination settings are complete. 2-16 Setting Up a Computer for Printing
imageCLASS MF5770 Network Guide
Page 28
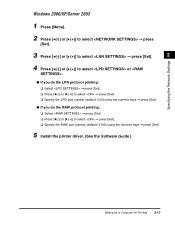
Specifying the Network Settings Windows 2000/XP/Server 2003 1 Press [Menu]. 2 Press [ (-)] or [ (+)] to select ➞ press [Set]. 3 Press [ (-)] or [ (+)] to select ➞ press [Set]. 2 4 Press [ (-)] or [ (+)] to select or . &#...; Press [ (-)] or [ (+)] to select ➞ press [Set]. ❑ Specify the RAW port number (default: 9100) using the numeric keys ➞ press [Set]. 5 Install the printer driver. (See the Software Guide.) Setting Up a Computer for Printing 2-17
Specifying the Network Settings Windows 2000/XP/Server 2003 1 Press [Menu]. 2 Press [ (-)] or [ (+)] to select ➞ press [Set]. 3 Press [ (-)] or [ (+)] to select ➞ press [Set]. 2 4 Press [ (-)] or [ (+)] to select or . &#...; Press [ (-)] or [ (+)] to select ➞ press [Set]. ❑ Specify the RAW port number (default: 9100) using the numeric keys ➞ press [Set]. 5 Install the printer driver. (See the Software Guide.) Setting Up a Computer for Printing 2-17

imageCLASS MF5770 Network Guide
Page 30
Also, by the print server. Once a print server is on the Windows task bar ➞ select [Printers and Faxes] (Windows 2000: [Start] ➞ [Settings] ➞ [Printers]). ❑ Right click the corresponding printer driver icon. ❑ On the pop-up a print server for more efficient management of network ... for Printing 2-19 Specifying the Network Settings Print Server Settings If Windows 2000/XP/Server 2003 is set up, print jobs can be managed by setting up an alternate driver for the print server, printer drivers can be installed in each computer via the network. 1 In ...
Also, by the print server. Once a print server is on the Windows task bar ➞ select [Printers and Faxes] (Windows 2000: [Start] ➞ [Settings] ➞ [Printers]). ❑ Right click the corresponding printer driver icon. ❑ On the pop-up a print server for more efficient management of network ... for Printing 2-19 Specifying the Network Settings Print Server Settings If Windows 2000/XP/Server 2003 is set up, print jobs can be managed by setting up an alternate driver for the print server, printer drivers can be installed in each computer via the network. 1 In ...

imageCLASS MF5700 Series Software Guide
Page 6
... Different Way from [Save 3-3 Setting Up [Start] in the [Settings] Dialog Box 3-4 Setting Up [Start] in the [Scanners and Cameras] Folder (Windows 98/2000: the [Scanners and Cameras Properties] Dialog Box). . . .3-5 Scanning with the MF Toolbox 3-7 MF Toolbox Settings 3-10 Scanner Settings 3-10 ... Output Settings 3-27 Image Settings 3-28 Color Settings 3-32 [Preferences] Dialog Box 3-40 Determining Resolution 3-44 Scanning with the WIA Driver (Windows XP Only 3-46 Scanning from the [Scanner and Camera Wizard] Dialog Box 3-46 Advanced Properties 3-52 Scanning from Two or more Pages...
... Different Way from [Save 3-3 Setting Up [Start] in the [Settings] Dialog Box 3-4 Setting Up [Start] in the [Scanners and Cameras] Folder (Windows 98/2000: the [Scanners and Cameras Properties] Dialog Box). . . .3-5 Scanning with the MF Toolbox 3-7 MF Toolbox Settings 3-10 Scanner Settings 3-10 ... Output Settings 3-27 Image Settings 3-28 Color Settings 3-32 [Preferences] Dialog Box 3-40 Determining Resolution 3-44 Scanning with the WIA Driver (Windows XP Only 3-46 Scanning from the [Scanner and Camera Wizard] Dialog Box 3-46 Advanced Properties 3-52 Scanning from Two or more Pages...
imageCLASS MF5700 Series Software Guide
Page 65
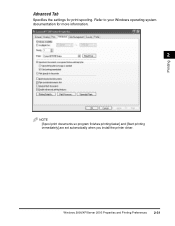
Windows 2000/XP/Server 2003 Properties and Printing Preferences 2-31 Refer to your Windows operating system documentation for print spooling. Printing Advanced Tab Specifies the settings for more information. 2 NOTE [Spool print documents so program finishes printing faster] and [Start printing immediately] are set automatically when you install the printer driver.
Windows 2000/XP/Server 2003 Properties and Printing Preferences 2-31 Refer to your Windows operating system documentation for print spooling. Printing Advanced Tab Specifies the settings for more information. 2 NOTE [Spool print documents so program finishes printing faster] and [Start printing immediately] are set automatically when you install the printer driver.
imageCLASS MF5700 Series Software Guide
Page 117
...varies depending on p. 3-46. To use the WIA driver, select [WIA Canon MF5730], [WIA Canon MF5750] or [WIA Canon MF5770]. 5 Specify the scanner settings ➞ click [Scan]. A document should be used. With Windows XP, you will appear in that the document is ...Canon MF5730], [Canon MF5750] or [Canon MF5770]. NOTE If white lines appear on the platen glass. or WIA- (Windows XP only) compliant application and use the image in the application's display area. For details, see "Setting Preferences and Scanning with ScanGear MF," on p. 3-19, or "Scanning with the WIA Driver (Windows...
...varies depending on p. 3-46. To use the WIA driver, select [WIA Canon MF5730], [WIA Canon MF5750] or [WIA Canon MF5770]. 5 Specify the scanner settings ➞ click [Scan]. A document should be used. With Windows XP, you will appear in that the document is ...Canon MF5730], [Canon MF5750] or [Canon MF5770]. NOTE If white lines appear on the platen glass. or WIA- (Windows XP only) compliant application and use the image in the application's display area. For details, see "Setting Preferences and Scanning with ScanGear MF," on p. 3-19, or "Scanning with the WIA Driver (Windows...

imageCLASS MF5700 Series Software Guide
Page 148
... front edge (i.e., the edge closest to open the [Scanners and Cameras] folder, see "Setting Up [Start] in the [Scanners and Cameras] Folder (Windows 98/2000: the [Scanners and Cameras Properties] Dialog Box)," on p. 3-5 2 Double-click the [WIA Canon MF5730], [WIA Canon MF5750] or [WIA Canon MF5770]. 3 Click [Next >]. 3-46 Scanning with the WIA Driver (Windows XP Only)
... front edge (i.e., the edge closest to open the [Scanners and Cameras] folder, see "Setting Up [Start] in the [Scanners and Cameras] Folder (Windows 98/2000: the [Scanners and Cameras Properties] Dialog Box)," on p. 3-5 2 Double-click the [WIA Canon MF5730], [WIA Canon MF5750] or [WIA Canon MF5770]. 3 Click [Next >]. 3-46 Scanning with the WIA Driver (Windows XP Only)
imageCLASS MF5700 Series Software Guide
Page 149
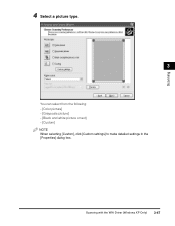
Scanning 4 Select a picture type. 3 You can select from the following: - [Color picture] - [Grayscale picture] - [Black and white picture or text] - [Custom] NOTE When selecting [Custom], click [Custom settings] to make detailed settings in the [Properties] dialog box. Scanning with the WIA Driver (Windows XP Only) 3-47
Scanning 4 Select a picture type. 3 You can select from the following: - [Color picture] - [Grayscale picture] - [Black and white picture or text] - [Custom] NOTE When selecting [Custom], click [Custom settings] to make detailed settings in the [Properties] dialog box. Scanning with the WIA Driver (Windows XP Only) 3-47
imageCLASS MF5700 Series Software Guide
Page 150
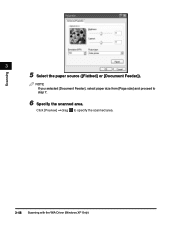
Click [Preview] ➞ drag to step 7. 6 Specify the scanned area. Scanning 3 5 Select the paper source ([Flatbed] or [Document Feeder]). NOTE If you selected [Document Feeder], select paper size from [Page size] and proceed to specify the scanned area. 3-48 Scanning with the WIA Driver (Windows XP Only)
Click [Preview] ➞ drag to step 7. 6 Specify the scanned area. Scanning 3 5 Select the paper source ([Flatbed] or [Document Feeder]). NOTE If you selected [Document Feeder], select paper size from [Page size] and proceed to specify the scanned area. 3-48 Scanning with the WIA Driver (Windows XP Only)
imageCLASS MF5700 Series Software Guide
Page 151
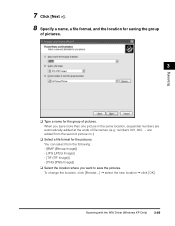
...: - [BMP (Bitmap Image)] - [JPG (JPEG Image)] - [TIF (TIF Image)] - [PNG (PNG Image)] ❑ Select the location where you save the pictures. Scanning with the WIA Driver (Windows XP Only) 3-49 are automatically added at the ends of file names. (e.g. Scanning 7 Click [Next >]. 8 Specify a name, a file format, and the location for saving the...
...: - [BMP (Bitmap Image)] - [JPG (JPEG Image)] - [TIF (TIF Image)] - [PNG (PNG Image)] ❑ Select the location where you save the pictures. Scanning with the WIA Driver (Windows XP Only) 3-49 are automatically added at the ends of file names. (e.g. Scanning 7 Click [Next >]. 8 Specify a name, a file format, and the location for saving the...
imageCLASS MF5700 Series Software Guide
Page 152
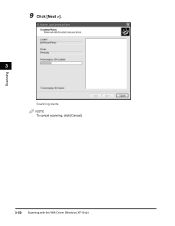
NOTE To cancel scanning, click [Cancel]. 3-50 Scanning with the WIA Driver (Windows XP Only) Scanning 9 Click [Next >]. 3 Scanning starts.
NOTE To cancel scanning, click [Cancel]. 3-50 Scanning with the WIA Driver (Windows XP Only) Scanning 9 Click [Next >]. 3 Scanning starts.

imageCLASS MF5700 Series Software Guide
Page 153
The location selected in step 8 will appear. For more information, see the Windows operating system documentation. 11 Click [Finish]. Scanning with the WIA Driver (Windows XP Only) 3-51 Scanning 10 Click [Next >]. 3 If you want to publish these pictures to a Web site or order printouts online, select the corresponding option.
The location selected in step 8 will appear. For more information, see the Windows operating system documentation. 11 Click [Finish]. Scanning with the WIA Driver (Windows XP Only) 3-51 Scanning 10 Click [Next >]. 3 If you want to publish these pictures to a Web site or order printouts online, select the corresponding option.
imageCLASS MF5700 Series Software Guide
Page 154
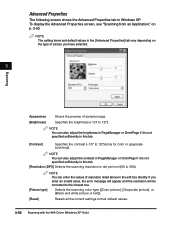
Specifies the brightness (-127 to their default values. 3-52 Scanning with the WIA Driver (Windows XP Only) NOTE You can enter the values of sample image. If you have selected. 3 Scanning Appearance [Brightness] Shows the preview of resolution listed ... or grayscale scanning). To display the Advanced Properties screen, see "Scanning from an Application," on p. 3-53 NOTE The setting items and default values in Windows XP. Advanced Properties The following screen shows the Advanced Properties tab in the [Advanced Properties] tab vary depending on the type of picture you enter...
Specifies the brightness (-127 to their default values. 3-52 Scanning with the WIA Driver (Windows XP Only) NOTE You can enter the values of sample image. If you have selected. 3 Scanning Appearance [Brightness] Shows the preview of resolution listed ... or grayscale scanning). To display the Advanced Properties screen, see "Scanning from an Application," on p. 3-53 NOTE The setting items and default values in Windows XP. Advanced Properties The following screen shows the Advanced Properties tab in the [Advanced Properties] tab vary depending on the type of picture you enter...

imageCLASS MF5700 Series Software Guide
Page 155
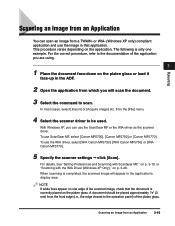
...approximately 1/8" (3 mm) from the following: - [Color picture] - [Grayscale picture] - [Black and white picture or text] - [Custom Settings] Scanning with the WIA Driver (Windows XP Only) 3-53 NOTE If you want to scan. Scanning Scanning from [Page size] and proceed to step 4. 2 Select the type of picture you selected... [Document Feeder], select paper size from an Application With the WIA driver dialog box open, follow the procedure below. NOTE If white lines appear on one edge of the scanned image, check that the document ...
...approximately 1/8" (3 mm) from the following: - [Color picture] - [Grayscale picture] - [Black and white picture or text] - [Custom Settings] Scanning with the WIA Driver (Windows XP Only) 3-53 NOTE If you want to scan. Scanning Scanning from [Page size] and proceed to step 4. 2 Select the type of picture you selected... [Document Feeder], select paper size from an Application With the WIA driver dialog box open, follow the procedure below. NOTE If white lines appear on one edge of the scanned image, check that the document ...

imageCLASS MF5700 Series Software Guide
Page 156
... size from the pull down menu. Scanning starts. The [Advanced Properties] dialog box appears. 4 Adjust the quality of the application. 3-54 Scanning with the WIA Driver (Windows XP Only) When the scanning is completed, the scanned image will appear in the display area of the image ➞ click [OK]. 3 If you want...
... size from the pull down menu. Scanning starts. The [Advanced Properties] dialog box appears. 4 Adjust the quality of the application. 3-54 Scanning with the WIA Driver (Windows XP Only) When the scanning is completed, the scanned image will appear in the display area of the image ➞ click [OK]. 3 If you want...
imageCLASS MF5700 Series Software Guide
Page 183
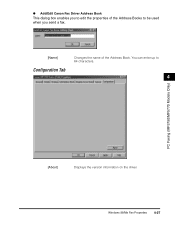
Windows 98/Me Fax Properties 4-27 You can enter up to be used when you send a fax. [Name] Changes the name of the Address Book. ● Add/Edit Canon Fax Driver Address Book This dialog box enables you to edit the properties of the Address Books to 64 characters. Configuration Tab 4 PC Faxing (MF5750/MF5770 Models Only) [About] Displays the version information on the driver.
Windows 98/Me Fax Properties 4-27 You can enter up to be used when you send a fax. [Name] Changes the name of the Address Book. ● Add/Edit Canon Fax Driver Address Book This dialog box enables you to edit the properties of the Address Books to 64 characters. Configuration Tab 4 PC Faxing (MF5750/MF5770 Models Only) [About] Displays the version information on the driver.
imageCLASS MF5700 Series Software Guide
Page 230
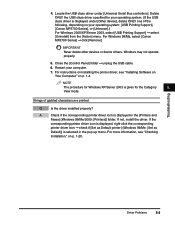
... your operating system: [USB Printing Support], [Canon MF5700 Series], or [Unknown].) For Windows 2000/XP/Server 2003, select [USB Printing Support] ➞ select [Uninstall] from the [Action] menu. Q Is the driver installed properly? For more information, see "Installing Software on Your Computer," on p. 1-4. Locate the USB class driver under [Other device], delete ONLY one...
... your operating system: [USB Printing Support], [Canon MF5700 Series], or [Unknown].) For Windows 2000/XP/Server 2003, select [USB Printing Support] ➞ select [Uninstall] from the [Action] menu. Q Is the driver installed properly? For more information, see "Installing Software on Your Computer," on p. 1-4. Locate the USB class driver under [Other device], delete ONLY one...


