Basic Guide
Page 8
...Unit 85 Cleaning the Platen Glass and Feeder 86 Check and Replace Toner Cartridges 87 Checking the Toner Level 87 Conserving the Toner to Extend the Life of Toner Cartridges 88 Replacing the Toner Cartridge 88 Manage Using the Report and List Functions 91 Configure Settings Using the... Message 100 Resolve an Error Code 101 Improve Output Quality 102 Resolve a Problem 104 FAQ 105 If a Power Failure Occurs 108 Recycling Used Cartridges 108 The Clean Earth Campaign 108 Important Safety Instructions 109 Legal Notices 111 Laser Safety 114 8 (→ p.106) You can see frequentely ...
...Unit 85 Cleaning the Platen Glass and Feeder 86 Check and Replace Toner Cartridges 87 Checking the Toner Level 87 Conserving the Toner to Extend the Life of Toner Cartridges 88 Replacing the Toner Cartridge 88 Manage Using the Report and List Functions 91 Configure Settings Using the... Message 100 Resolve an Error Code 101 Improve Output Quality 102 Resolve a Problem 104 FAQ 105 If a Power Failure Occurs 108 Recycling Used Cartridges 108 The Clean Earth Campaign 108 Important Safety Instructions 109 Legal Notices 111 Laser Safety 114 8 (→ p.106) You can see frequentely ...
Basic Guide
Page 12
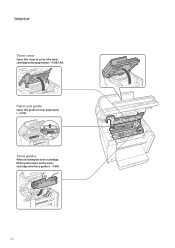
Toner guides When inserting the toner cartridge, fit the protrusions on the toner cartridge into these guides (→P.88). 12 Interior Toner cover Open this guide to access the toner cartridge or clear paper jams (→P.88, P.96). Paper exit guide Open this cover to clear paper jams (→P.96).
Toner guides When inserting the toner cartridge, fit the protrusions on the toner cartridge into these guides (→P.88). 12 Interior Toner cover Open this guide to access the toner cartridge or clear paper jams (→P.88, P.96). Paper exit guide Open this cover to clear paper jams (→P.96).
Basic Guide
Page 83
Clean the Machine 84 Cleaning the Exterior and Interior 84 Cleaning the Fixing Unit 85 Cleaning the Platen Glass and Feeder 86 Check and Replace Toner Cartridges 87 Checking the Toner Level 87 Conserving the Toner to clean the machine, replace the toner cartridge, and explains the report and list functions used for managing the machine. Maintenance and Management This chapter describes how to Extend the Life of Toner Cartridges 88 Replacing the Toner Cartridge 88 Manage Using the Report and List Functions 91 Configure Settings Using the Remote UI 92 83
Clean the Machine 84 Cleaning the Exterior and Interior 84 Cleaning the Fixing Unit 85 Cleaning the Platen Glass and Feeder 86 Check and Replace Toner Cartridges 87 Checking the Toner Level 87 Conserving the Toner to clean the machine, replace the toner cartridge, and explains the report and list functions used for managing the machine. Maintenance and Management This chapter describes how to Extend the Life of Toner Cartridges 88 Replacing the Toner Cartridge 88 Manage Using the Report and List Functions 91 Configure Settings Using the Remote UI 92 83

Basic Guide
Page 84
... from the machine. 2 Remove any documents from the platen glass or feeder. 3 Lift the scanning platform, open the toner cover, and then remove the toner cartridge. 84 IMPORTANT For safety, be sure to dry completely. 5 Reconnect all cables from the machine before reconnecting the power cord, and then turn ON the...
... from the machine. 2 Remove any documents from the platen glass or feeder. 3 Lift the scanning platform, open the toner cover, and then remove the toner cartridge. 84 IMPORTANT For safety, be sure to dry completely. 5 Reconnect all cables from the machine before reconnecting the power cord, and then turn ON the...
Basic Guide
Page 85
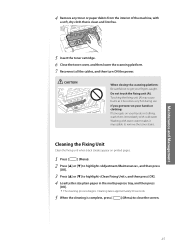
... the screen. 85 Do not touch the fixing unit (A). Cleaning takes approximately 90 seconds. 5 When the cleaning is clean and lint-free. 5 Insert the toner cartridge. 6 Close the toner cover, and then lower the scanning platform. 7 Reconnect all the cables, and then turn ON the power. Cleaning the Fixing Unit Clean...
... the screen. 85 Do not touch the fixing unit (A). Cleaning takes approximately 90 seconds. 5 When the cleaning is clean and lint-free. 5 Insert the toner cartridge. 6 Close the toner cover, and then lower the scanning platform. 7 Reconnect all the cables, and then turn ON the power. Cleaning the Fixing Unit Clean...

Basic Guide
Page 87
...toner level will be light or blurred. Toner is not improved, replace the toner cartridge (→p.88). When message still appears in the memory without printing. Gently shake the toner cartridge 5-6 times to evenly distribute the toner (→p.88). See the bottom of this... , and then press [OK]. Density: +-0 Original Type: Text... Density: +-0 Original Type: Text... Check the toner level, and replace the toner cartridge if necessary. When the toner has almost run out, a message appears in the display and streaks may be stored in display, or print result is...
...toner level will be light or blurred. Toner is not improved, replace the toner cartridge (→p.88). When message still appears in the memory without printing. Gently shake the toner cartridge 5-6 times to evenly distribute the toner (→p.88). See the bottom of this... , and then press [OK]. Density: +-0 Original Type: Text... Density: +-0 Original Type: Text... Check the toner level, and replace the toner cartridge if necessary. When the toner has almost run out, a message appears in the display and streaks may be stored in display, or print result is...
Basic Guide
Page 88
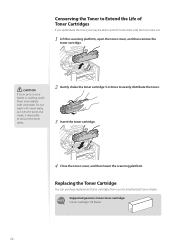
..., and then remove the toner cartridge. Conserving the Toner to Extend the Life of Toner Cartridges If you redistribute the toner, you may be able to evenly distribute the toner. 3 Insert the toner cartridge. 4 Close the toner cover, and then lower the scanning platform. Supported genuine Canon toner cartridge: Canon Cartridge 128 Starter 88 CAUTION If toner...
..., and then remove the toner cartridge. Conserving the Toner to Extend the Life of Toner Cartridges If you redistribute the toner, you may be able to evenly distribute the toner. 3 Insert the toner cartridge. 4 Close the toner cover, and then lower the scanning platform. Supported genuine Canon toner cartridge: Canon Cartridge 128 Starter 88 CAUTION If toner...
Basic Guide
Page 89
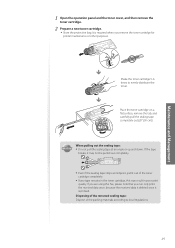
... carefully pull the sealing tape completely out (20" (50 cm)). If you are using the Fax, please note that you remove the toner cartridge for printer maintenance or other purposes. It is required when you can only print the received data once, because the received data is printed. ... sealing tape stops at an angle or up and down. 1 Open the operation panel and the toner cover, and then remove the toner cartridge. 2 Prepare a new toner cartridge. • Store the protective bag. IMPORTANT When pulling out the sealing tape: • Do not pull the sealing tape at midpoint,...
... carefully pull the sealing tape completely out (20" (50 cm)). If you are using the Fax, please note that you remove the toner cartridge for printer maintenance or other purposes. It is required when you can only print the received data once, because the received data is printed. ... sealing tape stops at an angle or up and down. 1 Open the operation panel and the toner cover, and then remove the toner cartridge. 2 Prepare a new toner cartridge. • Store the protective bag. IMPORTANT When pulling out the sealing tape: • Do not pull the sealing tape at midpoint,...
Basic Guide
Page 90
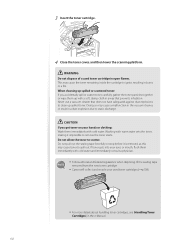
...spilled or scattered toner: If you get toner on your used toner cartridge in a way that does not have safeguards against dust explosions to... regulations when disposing of a used toner cartridges (→p.108). • For more details about handling toner cartridges, see [Handling Toner Cartridges] in burns or a fire. Never ... inhalation. Doing so may cause the toner remaining inside the cartridge to static discharge. This may cause a malfunction in the ... this may cause toner to scatter. 3 Insert the toner cartridge. 4 Close the toner cover, and then lower the scanning platform. ...
...spilled or scattered toner: If you get toner on your used toner cartridge in a way that does not have safeguards against dust explosions to... regulations when disposing of a used toner cartridges (→p.108). • For more details about handling toner cartridges, see [Handling Toner Cartridges] in burns or a fire. Never ... inhalation. Doing so may cause the toner remaining inside the cartridge to static discharge. This may cause a malfunction in the ... this may cause toner to scatter. 3 Insert the toner cartridge. 4 Close the toner cover, and then lower the scanning platform. ...
Basic Guide
Page 96
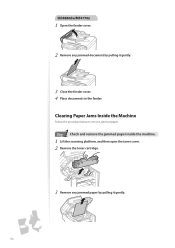
Clearing Paper Jams Inside the Machine Follow the procedure below to remove jammed paper. 1 Step Check and remove the jammed paper inside the machine. 1 Lift the scanning platform, and then open the toner cover. 2 Remove the toner cartridge. 3 Remove any jammed document by pulling it gently. 3 Close the feeder cover. 4 Place documents in the feeder. MF4880dw/MF4770n 1 Open the feeder cover. 2 Remove any jammed paper by pulling it gently. 96
Clearing Paper Jams Inside the Machine Follow the procedure below to remove jammed paper. 1 Step Check and remove the jammed paper inside the machine. 1 Lift the scanning platform, and then open the toner cover. 2 Remove the toner cartridge. 3 Remove any jammed document by pulling it gently. 3 Close the feeder cover. 4 Place documents in the feeder. MF4880dw/MF4770n 1 Open the feeder cover. 2 Remove any jammed paper by pulling it gently. 96
Basic Guide
Page 99
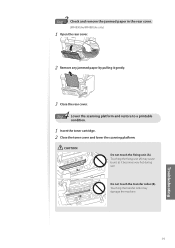
Troubleshooting 99 CAUTION ʢ"ʣ Do not touch the fixing unit (A). 3 Step Check and remove the jammed paper in the rear cover. (MF4890dw/MF4880dw only) 1 Open the rear cover. 2 Remove any jammed paper by pulling it becomes very hot during use. ʢ"#ʣ Do not touch the transfer ... transfer roller may cause burns as it gently. 3 Close the rear cover. 4 Step Lower the scanning platform and restore to a printable condition. 1 Insert the toner cartridge. 2 Close the toner cover and lower the scanning platform. Touching the fixing unit (A) may damage the machine.
Troubleshooting 99 CAUTION ʢ"ʣ Do not touch the fixing unit (A). 3 Step Check and remove the jammed paper in the rear cover. (MF4890dw/MF4880dw only) 1 Open the rear cover. 2 Remove any jammed paper by pulling it becomes very hot during use. ʢ"#ʣ Do not touch the transfer ... transfer roller may cause burns as it gently. 3 Close the rear cover. 4 Step Lower the scanning platform and restore to a printable condition. 1 Insert the toner cartridge. 2 Close the toner cover and lower the scanning platform. Touching the fixing unit (A) may damage the machine.
Basic Guide
Page 100
... resolution and try to be stored in the memory without being printed. If Canon genuine toner cartridge is displayed while receiving a fax, the incoming fax will be replaced soon. Message Action • The toner cartridge needs to the size of messages related to the toner, memory, and paper.... We recommend Canon genuine toner cartridges as the paper type displayed on the computer is evenly distributed inside the cartridge, it can appear. If this message is not used for some of the loaded paper (→p....
... resolution and try to be stored in the memory without being printed. If Canon genuine toner cartridge is displayed while receiving a fax, the incoming fax will be replaced soon. Message Action • The toner cartridge needs to the size of messages related to the toner, memory, and paper.... We recommend Canon genuine toner cartridges as the paper type displayed on the computer is evenly distributed inside the cartridge, it can appear. If this message is not used for some of the loaded paper (→p....
Basic Guide
Page 103
... being used (→p.22). • Print a test page with new paper. • If the machine is not in use for a long time after the toner cartridge has been replaced, change the settings from the operation panel. • When copying, change the settings from the operation panel. • When faxing, change the...
... being used (→p.22). • Print a test page with new paper. • If the machine is not in use for a long time after the toner cartridge has been replaced, change the settings from the operation panel. • When copying, change the settings from the operation panel. • When faxing, change the...
Basic Guide
Page 108
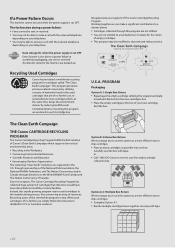
...Scientific Research and Education • Encouraging Outdoors Appreciation The remaining "Clean Earth" initiatives are enclosed in the U.S. Recycling Used Cartridges Canon has instituted a worldwide recycling program for when the power supply is cut OFF. This program preserves precious natural resources by ...Failure Occurs The machine cannot be used while the power supply is easy. The Clean Earth Campaign THE Canon CARTRIDGE RECYCLING PROGRAM The Canon Cartridge Recycling Program fulfills the first initiative of no further use , simply follow the instructions detailed for the return...
...Scientific Research and Education • Encouraging Outdoors Appreciation The remaining "Clean Earth" initiatives are enclosed in the U.S. Recycling Used Cartridges Canon has instituted a worldwide recycling program for when the power supply is cut OFF. This program preserves precious natural resources by ...Failure Occurs The machine cannot be used while the power supply is easy. The Clean Earth Campaign THE Canon CARTRIDGE RECYCLING PROGRAM The Canon Cartridge Recycling Program fulfills the first initiative of no further use , simply follow the instructions detailed for the return...
Basic Guide
Page 109
...responsible for all damages caused by failure to follow the directions provided herein, using the device for any purpose for every cartridge collected, Canon Canada donates $1, shared equally between World Wildlife Fund Canada and the Nature Conservancy of property, always pay attention to these ...as alcohol-based products or paint thinners. This donation is a long-standing Canon interest. Defective cartridges under warranty should be sure that Canon pays the postage. • Deliver to any of empty cartridges into the machine, turn off the power to the machine immediately and ...
...responsible for all damages caused by failure to follow the directions provided herein, using the device for any purpose for every cartridge collected, Canon Canada donates $1, shared equally between World Wildlife Fund Canada and the Nature Conservancy of property, always pay attention to these ...as alcohol-based products or paint thinners. This donation is a long-standing Canon interest. Defective cartridges under warranty should be sure that Canon pays the postage. • Deliver to any of empty cartridges into the machine, turn off the power to the machine immediately and ...

Basic Guide
Page 110
...inside the machine, this can result in the output area. Continued use may result in serious personal injury. • Please contact an authorized Canon dealer if the machine makes an unusual noise, emits an unusual smell, or emits smoke or excessive heat. Avoid contact with cold water ...small children. Doing so may result in electrical shock. • Do not use flammable sprays near open flames. A location exposed to disassemble the toner cartridge. Failure to do so may result in a fire or electrical shock. • Do not allow children to walls, bed, shaggy rug, and other...
...inside the machine, this can result in the output area. Continued use may result in serious personal injury. • Please contact an authorized Canon dealer if the machine makes an unusual noise, emits an unusual smell, or emits smoke or excessive heat. Avoid contact with cold water ...small children. Doing so may result in electrical shock. • Do not use flammable sprays near open flames. A location exposed to disassemble the toner cartridge. Failure to do so may result in a fire or electrical shock. • Do not allow children to walls, bed, shaggy rug, and other...

Starter Guide
Page 2
...Canon Authorized Service Facilities or the Canon Customer Care Center. Have cables or a hub ready as needed. • Please use to scan over a network) as well as an e-mail attachment file, and store it on the hard disk. Telephone Cable Starter Guide Sta Wireless LAN Setting Guide (MF4890dw... *1 See "Using the e-Manual" (P.31). *2 Windows 7/Vista/XP only. If an item is already installed. Supplied Toner Cartridge • The included "Canon Cartridge 128 Starter" can print an average yield of commands for support. • When connecting the machine to a 100BASE-TX Ethernet ...
...Canon Authorized Service Facilities or the Canon Customer Care Center. Have cables or a hub ready as needed. • Please use to scan over a network) as well as an e-mail attachment file, and store it on the hard disk. Telephone Cable Starter Guide Sta Wireless LAN Setting Guide (MF4890dw... *1 See "Using the e-Manual" (P.31). *2 Windows 7/Vista/XP only. If an item is already installed. Supplied Toner Cartridge • The included "Canon Cartridge 128 Starter" can print an average yield of commands for support. • When connecting the machine to a 100BASE-TX Ethernet ...
Starter Guide
Page 6
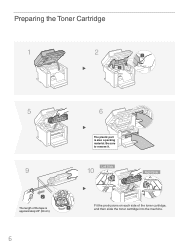
Preparing the Toner Cartridge 1 2 1 2 5 6 The plastic part is 1 approximately 20" (50 cm). Left Side 9 10 Protrusions Right Side Protrusions 2 The length of the toner cartridge, and then slide the toner cartridge into the machine. 6 Be sure to remove it. Fit the protrusions on each side of the tape is also a packing material.
Preparing the Toner Cartridge 1 2 1 2 5 6 The plastic part is 1 approximately 20" (50 cm). Left Side 9 10 Protrusions Right Side Protrusions 2 The length of the toner cartridge, and then slide the toner cartridge into the machine. 6 Be sure to remove it. Fit the protrusions on each side of the tape is also a packing material.
Starter Guide
Page 7
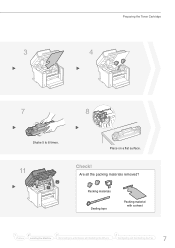
Preparing the Toner Cartridge 3 4 7 8 Shake 5 to a Computer and Installing the Drivers Configuring and Connecting the Fax 7 Check! Packing materials Sealing tape Packing material with a sheet 1 2 3 4 Preface Installing the Machine Connecting to 6 times. 11 2 1 Place on a flat surface. Are all the packing materials removed?
Preparing the Toner Cartridge 3 4 7 8 Shake 5 to a Computer and Installing the Drivers Configuring and Connecting the Fax 7 Check! Packing materials Sealing tape Packing material with a sheet 1 2 3 4 Preface Installing the Machine Connecting to 6 times. 11 2 1 Place on a flat surface. Are all the packing materials removed?
Starter Guide
Page 11
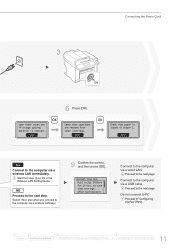
Next Check that tape/tabs are removed from step 3 on P.4 in Drawer 1. Start from toner cartridge. Current Time Set. Connect to the computer via a wireless LAN later. 9 Confirm the screen, and then press [OK]. Select also when you connect ...
Next Check that tape/tabs are removed from step 3 on P.4 in Drawer 1. Start from toner cartridge. Current Time Set. Connect to the computer via a wireless LAN later. 9 Confirm the screen, and then press [OK]. Select also when you connect ...


