Quick Start Guide
Page 4
... was compiled from publicly available information. and other countries. • IrDA Feature Trademark and IrDA Logo are owned by Canon, Inc. Canon PIXMA iP90 Photo Printer Quick Start Guide Copyright This manual is copyrighted by the Bluetooth SIG, Inc. has reviewed this manual thoroughly in the U.S. Under the copyright laws, this ...
... was compiled from publicly available information. and other countries. • IrDA Feature Trademark and IrDA Logo are owned by Canon, Inc. Canon PIXMA iP90 Photo Printer Quick Start Guide Copyright This manual is copyrighted by the Bluetooth SIG, Inc. has reviewed this manual thoroughly in the U.S. Under the copyright laws, this ...
Quick Start Guide
Page 6
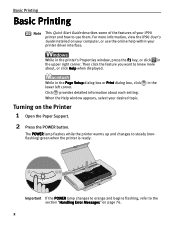
... flashing, refer to steady (nonflashing) green when the printer is ready. For more about each setting. When the Help window appears, select your iP90 printer and how to know more information, view the iP90 User's Guide installed on the Printer 1 Open the Paper Support. 2 Press the POWER button.... While in the printer's Properties window, press the F1 key, or click in the...
... flashing, refer to steady (nonflashing) green when the printer is ready. For more about each setting. When the Help window appears, select your iP90 printer and how to know more information, view the iP90 User's Guide installed on the Printer 1 Open the Paper Support. 2 Press the POWER button.... While in the printer's Properties window, press the F1 key, or click in the...
Quick Start Guide
Page 14
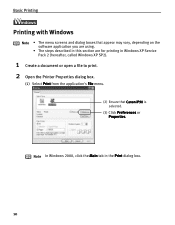
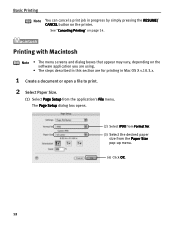
Note In Windows 2000, click the Main tab in Windows XP Service Pack 2 (hereafter, called Windows XP SP2). 1 Create a document or open a file to print. 2 Open the Printer Properties dialog box. (1) Select Print from the application's File menu. (2) Ensure that appear may vary, depending on the software application you are using. • The steps described in this section are for printing in the Print dialog box. 10 Basic Printing l Printing with Windows Note • The menu screens and dialog boxes that Canon iP90 is selected. (3) Click Preferences or Properties.
Note In Windows 2000, click the Main tab in Windows XP Service Pack 2 (hereafter, called Windows XP SP2). 1 Create a document or open a file to print. 2 Open the Printer Properties dialog box. (1) Select Print from the application's File menu. (2) Ensure that appear may vary, depending on the software application you are using. • The steps described in this section are for printing in the Print dialog box. 10 Basic Printing l Printing with Windows Note • The menu screens and dialog boxes that Canon iP90 is selected. (3) Click Preferences or Properties.
Quick Start Guide
Page 16
... for . (3) Select the desired paper size from the application's File menu. The Page Setup dialog box opens. (2) Select iP90 from Format for printing in progress by simply pressing the RESUME/ CANCEL button on the printer. Basic Printing Note You can cancel a print job in Mac OS X v.10.3.x. 1 Create a document or open a file...
... for . (3) Select the desired paper size from the application's File menu. The Page Setup dialog box opens. (2) Select iP90 from Format for printing in progress by simply pressing the RESUME/ CANCEL button on the printer. Basic Printing Note You can cancel a print job in Mac OS X v.10.3.x. 1 Create a document or open a file...
Quick Start Guide
Page 18
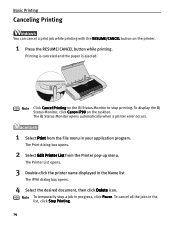
...list, click Stop Printing. 14 Note To temporarily stop printing. The Printer List opens. 3 Double-click the printer name displayed in progress, click Pause. To display the BJ Status Monitor, click Canon iP90 on the printer. 1 Press the RESUME/CANCEL button while printing. To cancel all the... jobs in your application program. The BJ Status Monitor opens automatically when a printer error occurs. 1 Select Print from the Printer pop-up menu. Basic Printing ...
...list, click Stop Printing. 14 Note To temporarily stop printing. The Printer List opens. 3 Double-click the printer name displayed in progress, click Pause. To display the BJ Status Monitor, click Canon iP90 on the printer. 1 Press the RESUME/CANCEL button while printing. To cancel all the... jobs in your application program. The BJ Status Monitor opens automatically when a printer error occurs. 1 Select Print from the Printer pop-up menu. Basic Printing ...
Quick Start Guide
Page 20
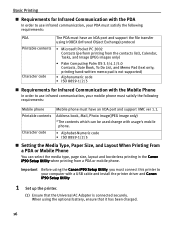
... for Infrared Communication with a USB cable and install the printer driver and Canon iP90 Setup Utility. 1 Set up the printer. (1) Ensure that it has been charged. 16 Important Before using the Canon iP90 Setup Utility, you must connect this printer to your computer with the PDA In order to use..., Mail, Photo image(JPEG image only) *The contents which can select the media type, page size, layout and borderless printing in the Canon iP90 Setup Utility when printing from the contacts list), Calendar, Tasks, and Image (JPEG images only) • Palm Computing Palm OS 3.5/4.1/5.0 Contacts...
... for Infrared Communication with a USB cable and install the printer driver and Canon iP90 Setup Utility. 1 Set up the printer. (1) Ensure that it has been charged. 16 Important Before using the Canon iP90 Setup Utility, you must connect this printer to your computer with the PDA In order to use..., Mail, Photo image(JPEG image only) *The contents which can select the media type, page size, layout and borderless printing in the Canon iP90 Setup Utility when printing from the contacts list), Calendar, Tasks, and Image (JPEG images only) • Palm Computing Palm OS 3.5/4.1/5.0 Contacts...
Quick Start Guide
Page 21
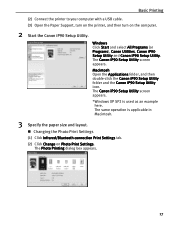
...layout. Macintosh Open the Applications folder, and then double-click the Canon iP90 Setup Utility folder and the Canon iP90 Setup Utility icon. The Photo Printing dialog box appears. 17 Basic Printing (2) Connect the printer to your computer with a USB cable. (3) Open the Paper Support..., turn on the printer, and then turn on Photo Print Settings. Windows Click Start and select All Programs (or Programs), Canon Utilities, Canon iP90 Setup Utility and Canon iP90 Setup Utility. Changing the Photo Print Settings (1) Click Infrared/Bluetooth ...
...layout. Macintosh Open the Applications folder, and then double-click the Canon iP90 Setup Utility folder and the Canon iP90 Setup Utility icon. The Photo Printing dialog box appears. 17 Basic Printing (2) Connect the printer to your computer with a USB cable. (3) Open the Paper Support..., turn on the printer, and then turn on Photo Print Settings. Windows Click Start and select All Programs (or Programs), Canon Utilities, Canon iP90 Setup Utility and Canon iP90 Setup Utility. Changing the Photo Print Settings (1) Click Infrared/Bluetooth ...
Quick Start Guide
Page 30
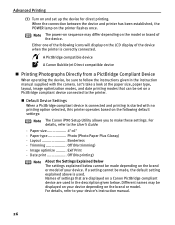
...are used in the instruction manual supplied with no printing option selected, this printer operates based on the following icons will display on the LCD display of the following default settings: Note The Canon iP90 Setup Utility allows you to make these settings. Image optimize .......... Either one... of the device when the printer is started with the camera. Advanced Printing (3) Turn on and set on a ...
...are used in the instruction manual supplied with no printing option selected, this printer operates based on the following icons will display on the LCD display of the following default settings: Note The Canon iP90 Setup Utility allows you to make these settings. Image optimize .......... Either one... of the device when the printer is started with the camera. Advanced Printing (3) Turn on and set on a ...
Quick Start Guide
Page 33
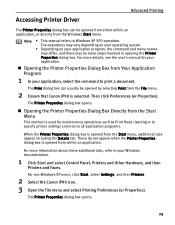
... from either within an application. For non-Windows XP users, click Start, select Settings, and then Printers. 2 Select the Canon iP90 icon. 3 Open the File menu and select Printing Preferences (or Properties). Accessing Printer Driver Advanced Printing The Printer Properties dialog box can usually be opened from the Start menu, additional tabs appear including the...
... from either within an application. For non-Windows XP users, click Start, select Settings, and then Printers. 2 Select the Canon iP90 icon. 3 Open the File menu and select Printing Preferences (or Properties). Accessing Printer Driver Advanced Printing The Printer Properties dialog box can usually be opened from the Start menu, additional tabs appear including the...
Quick Start Guide
Page 34
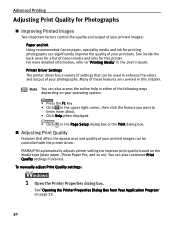
... Program" on ). PIXMA iP90 automatically adjusts printer settings to "Printing Media" in this printer. Advanced Printing Adjusting Print Quality for Photographs Improving Printed Images Two important factors control the quality and output of your printed images: Paper and Ink Using recommended Canon paper, speciality media ...and ink for this chapter. See inside the back cover for a list of your photographs. Note You can be used to enhance the colors and output of Canon media and inks for printing photographs...
... Program" on ). PIXMA iP90 automatically adjusts printer settings to "Printing Media" in this printer. Advanced Printing Adjusting Print Quality for Photographs Improving Printed Images Two important factors control the quality and output of your printed images: Paper and Ink Using recommended Canon paper, speciality media ...and ink for this chapter. See inside the back cover for a list of your photographs. Note You can be used to enhance the colors and output of Canon media and inks for printing photographs...
Quick Start Guide
Page 47
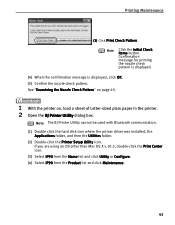
..., and then the Utilities folder. (2) Double-click the Printer Setup Utility icon. Note Click the Initial Check Items button. If you are using an OS other than Mac OS X v.10.3, double-click the Print Center icon. (3) Select iP90 from the Name list and click Utility or Configure. (4)... Select iP90 from the Product list and click Maintenance. 43 See "Examining the Nozzle Check Pattern" on page 45. 1 With the printer on, load a sheet of Letter-sized plain paper in the printer. 2 Open the BJ Printer Utility dialog box. Printing Maintenance (3) Click ...
..., and then the Utilities folder. (2) Double-click the Printer Setup Utility icon. Note Click the Initial Check Items button. If you are using an OS other than Mac OS X v.10.3, double-click the Print Center icon. (3) Select iP90 from the Name list and click Utility or Configure. (4)... Select iP90 from the Product list and click Maintenance. 43 See "Examining the Nozzle Check Pattern" on page 45. 1 With the printer on, load a sheet of Letter-sized plain paper in the printer. 2 Open the BJ Printer Utility dialog box. Printing Maintenance (3) Click ...
Quick Start Guide
Page 53
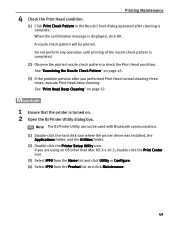
..." on page 45. (3) If the problem persists after cleaning is displayed, click OK. 4 Check the Print Head condition. Note The BJ Printer Utility cannot be printed. Printing Maintenance (1) Click Print Check Pattern in the Nozzle Check dialog appeared after you are using an OS other than Mac... OS X v.10.3, double-click the Print Center icon. (3) Select iP90 from the Name list and click Utility or Configure. (4) Select iP90 from the Product list and click Maintenance. 49 When the confirmation message is complete.
..." on page 45. (3) If the problem persists after cleaning is displayed, click OK. 4 Check the Print Head condition. Note The BJ Printer Utility cannot be printed. Printing Maintenance (1) Click Print Check Pattern in the Nozzle Check dialog appeared after you are using an OS other than Mac... OS X v.10.3, double-click the Print Center icon. (3) Select iP90 from the Name list and click Utility or Configure. (4) Select iP90 from the Product list and click Maintenance. 49 When the confirmation message is complete.
Quick Start Guide
Page 58
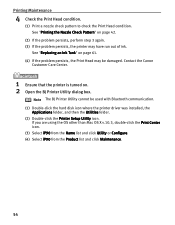
... v.10.3, double-click the Print Center icon. (3) Select iP90 from the Name list and click Utility or Configure. (4) Select iP90 from the Product list and click Maintenance. 54 Contact the Canon Customer Care Center. 1 Ensure that the printer is turned on page 42. (2) If the problem persists,... perform step 3 again. (3) If the problem persists, the printer may be used with Bluetooth ...
... v.10.3, double-click the Print Center icon. (3) Select iP90 from the Name list and click Utility or Configure. (4) Select iP90 from the Product list and click Maintenance. 54 Contact the Canon Customer Care Center. 1 Ensure that the printer is turned on page 42. (2) If the problem persists,... perform step 3 again. (3) If the problem persists, the printer may be used with Bluetooth ...
Quick Start Guide
Page 63
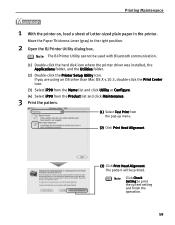
... (2) Double-click the Printer Setup Utility icon. Move the Paper Thickness Lever (gray) to print the current setting and finish the operation. 59 If you are using an OS other than Mac OS X v.10.3, double-click the Print Center icon. (3) Select iP90 from the Name list ... Select iP90 from the Product list and click Maintenance. 3 Print the pattern. (1) Select Test Print from the pop-up menu. (2) Click Print Head Alignment. (3) Click Print Head Alignment. Printing Maintenance 1 With the printer on, load a sheet of Letter-sized plain paper in the printer. Note The BJ Printer Utility ...
... (2) Double-click the Printer Setup Utility icon. Move the Paper Thickness Lever (gray) to print the current setting and finish the operation. 59 If you are using an OS other than Mac OS X v.10.3, double-click the Print Center icon. (3) Select iP90 from the Name list ... Select iP90 from the Product list and click Maintenance. 3 Print the pattern. (1) Select Test Print from the pop-up menu. (2) Click Print Head Alignment. (3) Click Print Head Alignment. Printing Maintenance 1 With the printer on, load a sheet of Letter-sized plain paper in the printer. Note The BJ Printer Utility ...
Quick Start Guide
Page 69
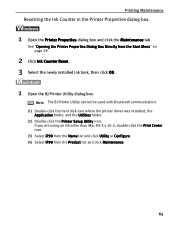
... dialog box 1 Open the Printer Properties dialog box and click the Maintenance tab. If you are using an OS other than Mac OS X v.10.3, double-click the Print Center icon. (3) Select iP90 from the Name list and click Utility or Configure. (4) Select iP90 from the Start Menu" on page 29 2 Click ...Ink Counter Reset. 3 Select the newly installed ink tank, then click OK. 1 Open the BJ Printer Utility dialog box.
... dialog box 1 Open the Printer Properties dialog box and click the Maintenance tab. If you are using an OS other than Mac OS X v.10.3, double-click the Print Center icon. (3) Select iP90 from the Name list and click Utility or Configure. (4) Select iP90 from the Start Menu" on page 29 2 Click ...Ink Counter Reset. 3 Select the newly installed ink tank, then click OK. 1 Open the BJ Printer Utility dialog box.
Quick Start Guide
Page 78
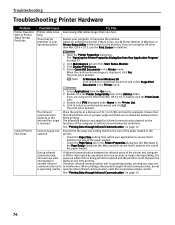
...units like a television remote control. Note In Windows Me or Windows 98 Click to environmental conditions. Double-click iP90 displayed under Name in the Printer menu. 1. The allowable distance and angle for Macintosh) to select an undesired document and click . See "...Printing Data through Infrared Communication" on page 15. 74 Troubleshooting Troubleshooting Printer Hardware Problem Printer Does Not Start or Printer Stops During Print Jobs Possible Cause Printer cable is too long There may solve the problem. Select Applications from Your Application ...
...units like a television remote control. Note In Windows Me or Windows 98 Click to environmental conditions. Double-click iP90 displayed under Name in the Printer menu. 1. The allowable distance and angle for Macintosh) to select an undesired document and click . See "...Printing Data through Infrared Communication" on page 15. 74 Troubleshooting Troubleshooting Printer Hardware Problem Printer Does Not Start or Printer Stops During Print Jobs Possible Cause Printer cable is too long There may solve the problem. Select Applications from Your Application ...
Quick Start Guide
Page 82
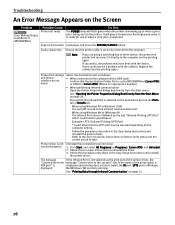
... or when a print job is not installed properly Uninstall then reinstall the printer driver. 1. Faulty connection Ensure that the Infrared Port is set to MPUSBPRNnn (Canon iP90) or USBnnn (Canon iP90) (Where nn represents a number) • When performing infrared communication Open the Printer Properties dialog box directly from the Start Menu" on how to verify status...
... or when a print job is not installed properly Uninstall then reinstall the printer driver. 1. Faulty connection Ensure that the Infrared Port is set to MPUSBPRNnn (Canon iP90) or USBnnn (Canon iP90) (Where nn represents a number) • When performing infrared communication Open the Printer Properties dialog box directly from the Start Menu" on how to verify status...
Quick Start Guide
Page 83
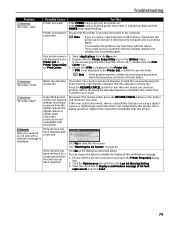
... folder. Before the waste ink absorber becomes completely full, contact the Customer Care Center. Click No on page 64. Ensure that iP90 is displayed in the Printer List. There could also be a problem with the device. If the error is still unresolved, there is a possibility that you... video camcorder that is initializing. You can continue printing. Replace the cable(s) and try printing again. If iP90 is not displayed in the 2. A specified period of this printer. Clear the check box of Display a confirmation message of If you can choose the option to hold the...
... folder. Before the waste ink absorber becomes completely full, contact the Customer Care Center. Click No on page 64. Ensure that iP90 is displayed in the Printer List. There could also be a problem with the device. If the error is still unresolved, there is a possibility that you... video camcorder that is initializing. You can continue printing. Replace the cable(s) and try printing again. If iP90 is not displayed in the 2. A specified period of this printer. Clear the check box of Display a confirmation message of If you can choose the option to hold the...
Quick Start Guide
Page 84
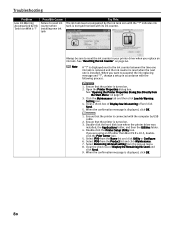
...turned on page 29 3. See "Resetting the Ink Counter" on . 3. Open the Printer Properties dialog box. Ensure that the printer is displayed, click OK. 1. If you replace an ink tank. Select iP90 from the Name list and click Utility or Configure. 6. Possible Cause Failure to the... Ink Warning Setting icon. 4. When the confirmation message is connected with the following process. 1. Select iP90 from the Product list and click Maintenance. 7. Note A "?" Double-click the Printer Setup Utility icon. Clear the check box of Display low ink warning off and click Send. 5. ...
...turned on page 29 3. See "Resetting the Ink Counter" on . 3. Open the Printer Properties dialog box. Ensure that the printer is displayed, click OK. 1. If you replace an ink tank. Select iP90 from the Name list and click Utility or Configure. 6. Possible Cause Failure to the... Ink Warning Setting icon. 4. When the confirmation message is connected with the following process. 1. Select iP90 from the Product list and click Maintenance. 7. Note A "?" Double-click the Printer Setup Utility icon. Clear the check box of Display low ink warning off and click Send. 5. ...
Quick Start Guide
Page 85
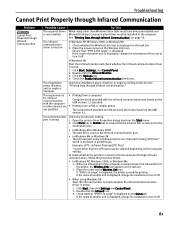
... Driver is active. 1. If "iP90 is in the computer. Double-click the Infrared icon. 3. The requirements • Printing from the Start menu. 2. The selected printer Check the printer port setting. Click Ports tab or Details tab to ensure that "iP90 is the range" is displayed, ...change its orientation or turn it off . Click the Options tab. 4. Open the printer driver Properties dialog box from a computer ...
... Driver is active. 1. If "iP90 is in the computer. Double-click the Infrared icon. 3. The requirements • Printing from the Start menu. 2. The selected printer Check the printer port setting. Click Ports tab or Details tab to ensure that "iP90 is the range" is displayed, ...change its orientation or turn it off . Click the Options tab. 4. Open the printer driver Properties dialog box from a computer ...


