
iP8500 Easy Setup Instructions
Page 1
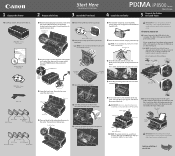
...Remove the print head from the printer. Tear at a slight angle. NOTE: Do not touch the print head nozzles and the electrical contacts. 2 Plug the power cord into the back of the printer and connect the other to the color guide on the printer. Protective Tape 5 Lower the print head lock lever...and slide it clicks into place. Wait until the ink tank clicks into place. PIXMA iP8500 Series Photo Printer Photo Printer Series Quick Start Guide Documentation and Software Kit PIXMA iP8500 Series Print Head Power Cord Ink Tanks BCI-6R Red BCI-6G Green BCI-6PM Photo Magenta ...
...Remove the print head from the printer. Tear at a slight angle. NOTE: Do not touch the print head nozzles and the electrical contacts. 2 Plug the power cord into the back of the printer and connect the other to the color guide on the printer. Protective Tape 5 Lower the print head lock lever...and slide it clicks into place. Wait until the ink tank clicks into place. PIXMA iP8500 Series Photo Printer Photo Printer Series Quick Start Guide Documentation and Software Kit PIXMA iP8500 Series Print Head Power Cord Ink Tanks BCI-6R Red BCI-6G Green BCI-6PM Photo Magenta ...

iP8500 Easy Setup Instructions
Page 2
... your CD-ROM again. 6 Windows® Printer Driver Installation and Print Head Alignment 6 Macintosh® Printer Driver Installation and Print Head Alignment Windows 1 Be sure to TURN THE PRINTER OFF before continuing. 2 Double-click the CD-ROM icon, then the Mac OS X folder, then the Printer Driver folder. 3 Double-click the PIXMA iP8500 300.pkg icon, then follow the on...
... your CD-ROM again. 6 Windows® Printer Driver Installation and Print Head Alignment 6 Macintosh® Printer Driver Installation and Print Head Alignment Windows 1 Be sure to TURN THE PRINTER OFF before continuing. 2 Double-click the CD-ROM icon, then the Mac OS X folder, then the Printer Driver folder. 3 Double-click the PIXMA iP8500 300.pkg icon, then follow the on...


