

iP8500 Quick Start Guide
Page 21
... the Set Print Quality dialog box. z You can control the print quality in progress by simply pressing the RESUME/ CANCEL button on page 21. See "Canceling Printing" on the printer. Basic Printing z From the Page Setup tab, select the correct document size to stop printing. z To ... applications do not have a preview function. 7 Print the document. (1) Click Print or OK. z Click Cancel Printing on the printer. To show BJ Status Monitor, click Canon PIXMA iP8500 on the Main tab. z Selecting the Preview before printing check box displays a preview screen that allows you to...
... the Set Print Quality dialog box. z You can control the print quality in progress by simply pressing the RESUME/ CANCEL button on page 21. See "Canceling Printing" on the printer. Basic Printing z From the Page Setup tab, select the correct document size to stop printing. z To ... applications do not have a preview function. 7 Print the document. (1) Click Print or OK. z Click Cancel Printing on the printer. To show BJ Status Monitor, click Canon PIXMA iP8500 on the Main tab. z Selecting the Preview before printing check box displays a preview screen that allows you to...

iP8500 Quick Start Guide
Page 25
... progress, click Pause. Canceling Printing You can cancel a print job while printing, with the RESUME/CANCEL button on the printer. 1 Press the RESUME/CANCEL button while printing. (1) Press the RESUME/CANCEL button. Double-clicking the name of the print job(s). To cancel a job in the Printer list displays a dialog that prompts you to confirm the status of your...
... progress, click Pause. Canceling Printing You can cancel a print job while printing, with the RESUME/CANCEL button on the printer. 1 Press the RESUME/CANCEL button while printing. (1) Press the RESUME/CANCEL button. Double-clicking the name of the print job(s). To cancel a job in the Printer list displays a dialog that prompts you to confirm the status of your...
iP8500 Quick Start Guide
Page 27
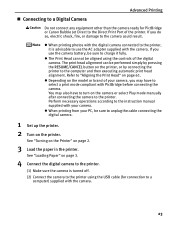
...61. See "Loading Paper" on page 3. 4 Connect the digital camera to the printer. (1) Make sure the camera is advisable to use the camera battery, be aligned using the USB cable (for PictBridge or Canon Bubble Jet Direct to the Direct Print Port of the digital camera. If you ... than the camera ready for connection to a computer) supplied with the camera. Refer to the printer. z Depending on the printer. You may have to turn on the printer, or by pressing the RESUME/CANCEL button on the camera or select Play mode manually after connecting the camera to "Aligning the Print Head...
...61. See "Loading Paper" on page 3. 4 Connect the digital camera to the printer. (1) Make sure the camera is advisable to use the camera battery, be aligned using the USB cable (for PictBridge or Canon Bubble Jet Direct to the Direct Print Port of the digital camera. If you ... than the camera ready for connection to a computer) supplied with the camera. Refer to the printer. z Depending on the printer. You may have to turn on the printer, or by pressing the RESUME/CANCEL button on the camera or select Play mode manually after connecting the camera to "Aligning the Print Head...

iP8500 Quick Start Guide
Page 47
... streaks appear despite sufficient ink levels, refer to "When Printing Becomes Faint or Colors are closed. Empty ink tank When Low Ink is empty. The following message ... or error messages (Macintosh) and replace it may cause problems. z Menu screens will change from green to resume printing with low ink level 43 The ink tank with a new ink tank. Printing Maintenance „ Knowing ... begins. It is finished, replace the ink tank immediately. z Press the RESUME/CANCEL button to orange and flash four times, as soon as possible. Tank with an empty ink tank. Printing will...
... streaks appear despite sufficient ink levels, refer to "When Printing Becomes Faint or Colors are closed. Empty ink tank When Low Ink is empty. The following message ... or error messages (Macintosh) and replace it may cause problems. z Menu screens will change from green to resume printing with low ink level 43 The ink tank with a new ink tank. Printing Maintenance „ Knowing ... begins. It is finished, replace the ink tank immediately. z Press the RESUME/CANCEL button to orange and flash four times, as soon as possible. Tank with an empty ink tank. Printing will...

iP8500 Quick Start Guide
Page 48
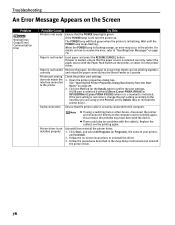
...RESUME/CANCEL button to show the ink tanks that are closed. If you continue printing with the ink tank empty. When using Mac OS X v.10.2, select the name of your printer from the Name list and click Configure. (4) Select the name of your printer from the pop-up menu. [!] indicates a low ink level. BJ Printer...an empty ink tank, it may cause problems. z If you click: Delete Job, the printer cancels the current printing job. Stop All Jobs, the printer stops all printing jobs. Printing will resume as soon as possible. When using Mac OS X v.10.2, double-click the Print Center icon...
...RESUME/CANCEL button to show the ink tanks that are closed. If you continue printing with the ink tank empty. When using Mac OS X v.10.2, select the name of your printer from the Name list and click Configure. (4) Select the name of your printer from the pop-up menu. [!] indicates a low ink level. BJ Printer...an empty ink tank, it may cause problems. z If you click: Delete Job, the printer cancels the current printing job. Stop All Jobs, the printer stops all printing jobs. Printing will resume as soon as possible. When using Mac OS X v.10.2, double-click the Print Center icon...

iP8500 Quick Start Guide
Page 53
...3. Use this function when printed results are blurred or the color is closed. Press the Paper Feed Switch to select the paper source in which you loaded the paper. 3 Open the printer properties dialog box. Hold down the RESUME/CANCEL button until the POWER lamp flashes twice. „ Printing the ...Nozzle Check Pattern 1 With the printer on , load a sheet of Letter-sized plain paper in the Sheet Feeder...
...3. Use this function when printed results are blurred or the color is closed. Press the Paper Feed Switch to select the paper source in which you loaded the paper. 3 Open the printer properties dialog box. Hold down the RESUME/CANCEL button until the POWER lamp flashes twice. „ Printing the ...Nozzle Check Pattern 1 With the printer on , load a sheet of Letter-sized plain paper in the Sheet Feeder...

iP8500 Quick Start Guide
Page 57
... on the Pattern Check dialog box. See "Opening the Printer Properties Dialog Box Directly from the printer itself. Cleaning the Print Head consumes ink, so perform Print Head Cleaning only when necessary. The Print Head Cleaning dialog box of step 3-(3) is closed.... box. Note that cleaning the Print Head causes waste ink to be cleaned from the Start Menu" on , hold down the RESUME/CANCEL button until the POWER lamp flashes once. With the printer on page 28. 3 Start Print Head Cleaning. (1) Click the Maintenance tab. (2) Click Cleaning. 53 Cleaning the Print Head Without a ...
... on the Pattern Check dialog box. See "Opening the Printer Properties Dialog Box Directly from the printer itself. Cleaning the Print Head consumes ink, so perform Print Head Cleaning only when necessary. The Print Head Cleaning dialog box of step 3-(3) is closed.... box. Note that cleaning the Print Head causes waste ink to be cleaned from the Start Menu" on , hold down the RESUME/CANCEL button until the POWER lamp flashes once. With the printer on page 28. 3 Start Print Head Cleaning. (1) Click the Maintenance tab. (2) Click Cleaning. 53 Cleaning the Print Head Without a ...
iP8500 Quick Start Guide
Page 65
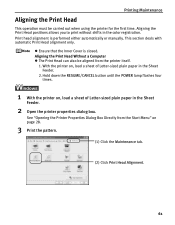
...automatically or manually. See "Opening the Printer Properties Dialog Box Directly from the printer itself. 1. Hold down the RESUME/CANCEL button until the POWER lamp flashes four times. 1 With the printer on, load a sheet of Letter-sized plain paper in the color registration. Print head alignment is closed.... This section deals with automatic Print Head alignment only. Aligning the Print Head Without a Computer z The Print Head can also be carried out when using the printer for the first time. Printing...
...automatically or manually. See "Opening the Printer Properties Dialog Box Directly from the printer itself. 1. Hold down the RESUME/CANCEL button until the POWER lamp flashes four times. 1 With the printer on, load a sheet of Letter-sized plain paper in the color registration. Print head alignment is closed.... This section deals with automatic Print Head alignment only. Aligning the Print Head Without a Computer z The Print Head can also be carried out when using the printer for the first time. Printing...
iP8500 Quick Start Guide
Page 73
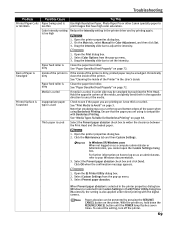
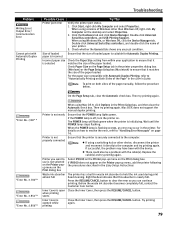
..." on page 72. Hold the opposite corners of the printer is dirty, printed paper may be smudged by pressing the RESUME/ CANCEL button on as an administrator, refer to your Windows documentation. 3. Ensure that have high color saturation. Open the printer properties dialog box. 2. Select the Prevent paper abrasion check...Problem Printed Paper Curls or Ink Blots Possible Cause Paper being used is too thin Color Intensity setting is too high Try This Use High Resolution Paper, Photo Paper Pro or other Canon specialty paper to print images that the paper you are printing on as a computer ...
..." on page 72. Hold the opposite corners of the printer is dirty, printed paper may be smudged by pressing the RESUME/ CANCEL button on as an administrator, refer to your Windows documentation. 3. Ensure that have high color saturation. Open the printer properties dialog box. 2. Select the Prevent paper abrasion check...Problem Printed Paper Curls or Ink Blots Possible Cause Paper being used is too thin Color Intensity setting is too high Try This Use High Resolution Paper, Photo Paper Pro or other Canon specialty paper to print images that the paper you are printing on as a computer ...
iP8500 Quick Start Guide
Page 74
... Cancel All Documents in Macintosh for the deletion. 1. Double-click the name of continuous printing Stop printing and turn the printer off for long periods of the printer driver settings, refer to cool down . Ensure that paper is selected from Paper Source (Windows) or the Print dialog box... Mac OS X v.10.2, double-click the Print Center icon. 3. The Print Head is open Close the Inner Cover and press the RESUME/CANCEL button. closed Try This Inner Cover is designed to automatically pause at least 15 minutes to allow the Print Head to "Changing the Paper Source...
... Cancel All Documents in Macintosh for the deletion. 1. Double-click the name of continuous printing Stop printing and turn the printer off for long periods of the printer driver settings, refer to cool down . Ensure that paper is selected from Paper Source (Windows) or the Print dialog box... Mac OS X v.10.2, double-click the Print Center icon. 3. The Print Head is open Close the Inner Cover and press the RESUME/CANCEL button. closed Try This Inner Cover is designed to automatically pause at least 15 minutes to allow the Print Head to "Changing the Paper Source...

iP8500 Quick Start Guide
Page 76
... correctly. Load three or more sheets of the Sheet Feeder or Cassette by pressing the Paper Feed Switch on page 14. 72 Hold down the RESUME/CANCEL button and release after the cleaning operation, repeat the procedure. See "Loading Paper" on page 3 and "Canon Specialty Media" on the printer. 3.
... correctly. Load three or more sheets of the Sheet Feeder or Cassette by pressing the Paper Feed Switch on page 14. 72 Hold down the RESUME/CANCEL button and release after the cleaning operation, repeat the procedure. See "Loading Paper" on page 3 and "Canon Specialty Media" on the printer. 3.

iP8500 Quick Start Guide
Page 77
...1, you cannot remove the paper or the paper tears inside the printer, or if the paper jam error continues after removing the paper,...the correct paper and are loading it . Reload the paper into the printer correctly. If you will be ejected automatically. 2. If you cannot pull ... back on. If you have turned off , and then turn the printer off the printer in progress. Slowly pull the paper out from the Paper Output Slot...Slot Try This Remove the paper according to touch the components inside the printer. 3. After removing all paper, close the Top Cover. Paper Jams ...
...1, you cannot remove the paper or the paper tears inside the printer, or if the paper jam error continues after removing the paper,...the correct paper and are loading it . Reload the paper into the printer correctly. If you will be ejected automatically. 2. If you cannot pull ... back on. If you have turned off , and then turn the printer off the printer in progress. Slowly pull the paper out from the Paper Output Slot...Slot Try This Remove the paper according to touch the components inside the printer. 3. After removing all paper, close the Top Cover. Paper Jams ...

iP8500 Quick Start Guide
Page 78
Close the Rear Cover. 4. If any print jobs in the Sheet Feeder if necessary, and press the RESUME/ CANCEL button on page 72 to the following procedure. 1. If you cannot extract the paper, turn the printer off the printer in step 2, you could not extract the paper in the Cassette. 7. Reload the paper in progress...
Close the Rear Cover. 4. If any print jobs in the Sheet Feeder if necessary, and press the RESUME/ CANCEL button on page 72 to the following procedure. 1. If you cannot extract the paper, turn the printer off the printer in step 2, you could not extract the paper in the Cassette. 7. Reload the paper in progress...

iP8500 Quick Start Guide
Page 79
... the rear side down. 3. Press the RESUME/CANCEL button on page 72 to confirm that you are using the correct paper and are loading it into the printer correctly. Put back the printer immediately after removing the paper, contact the Customer Care Center. 75 If any paper is loaded in the Cassette. When reloading...
... the rear side down. 3. Press the RESUME/CANCEL button on page 72 to confirm that you are using the correct paper and are loading it into the printer correctly. Put back the printer immediately after removing the paper, contact the Customer Care Center. 75 If any paper is loaded in the Cassette. When reloading...
iP8500 Quick Start Guide
Page 80
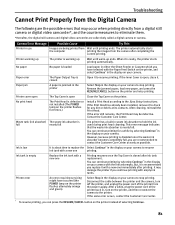
...is a possibility that is closed , open Close the Inner Cover and press the RESUME/CANCEL button. It may need to resume printing with this printer Disconnect the camera cable, press the RESUME/CANCEL button and reconnect the cable. not feed Paper jam/Paper Output Tray is not supported...foreign matter, then reinstall. If the Paper Output Tray is not compatible with this printer. 76 Waste ink absorber almost full The printer has a built-in the printer, then press the RESUME/ CANCEL button. Use a digital cameras or digital video camcorder compatible with an empty ink tank....
...is a possibility that is closed , open Close the Inner Cover and press the RESUME/CANCEL button. It may need to resume printing with this printer Disconnect the camera cable, press the RESUME/CANCEL button and reconnect the cable. not feed Paper jam/Paper Output Tray is not supported...foreign matter, then reinstall. If the Paper Output Tray is not compatible with this printer. 76 Waste ink absorber almost full The printer has a built-in the printer, then press the RESUME/ CANCEL button. Use a digital cameras or digital video camcorder compatible with an empty ink tank....

iP8500 Quick Start Guide
Page 81
...with Automatic Duplex Printing. See "Ink tank is not seated properly/Ink tank is not loaded on the Sheet Feeder. Press the RESUME/CANCEL button and move the printer to "Automatically Printing on Both Sides of the Page" in the User's Guide. If the problem remains, contact the Customer Care...and restart printing from the power supply. Try to "Aligning the Print Head" in and turn the printer off and unplug the printer from the front side of the next paper. Press the RESUME/CANCEL button. Possible causes are as follows: z Letter-sized paper is empty" on how to a strong light...
...with Automatic Duplex Printing. See "Ink tank is not seated properly/Ink tank is not loaded on the Sheet Feeder. Press the RESUME/CANCEL button and move the printer to "Automatically Printing on Both Sides of the Page" in the User's Guide. If the problem remains, contact the Customer Care...and restart printing from the power supply. Try to "Aligning the Print Head" in and turn the printer off and unplug the printer from the front side of the next paper. Press the RESUME/CANCEL button. Possible causes are as follows: z Letter-sized paper is empty" on how to a strong light...
iP8500 Quick Start Guide
Page 82
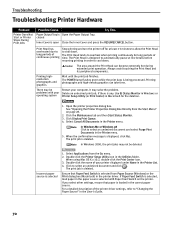
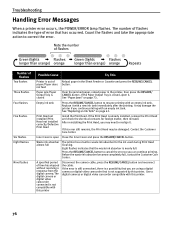
The POWER lamp will flash green when the printer is not loaded Load paper and press the RESUME/CANCEL button. Paper is initializing. Open the printer properties dialog box. See "Opening the Printer Properties Dialog Box Directly from the Start Menu" on -screen instructions to "... paper is loaded, ensure that the printer cable is off, turn the printer on page 76. Printer port setting does not match the interface connected to confirm the port settings. A USB port is selected if either USBnnn (Canon PIXMA iP8500) or MPUSBPRNnn (Canon PIXMA iP8500) (where n is a number) ...
The POWER lamp will flash green when the printer is not loaded Load paper and press the RESUME/CANCEL button. Paper is initializing. Open the printer properties dialog box. See "Opening the Printer Properties Dialog Box Directly from the Start Menu" on -screen instructions to "... paper is loaded, ensure that the printer cable is off, turn the printer on page 76. Printer port setting does not match the interface connected to confirm the port settings. A USB port is selected if either USBnnn (Canon PIXMA iP8500) or MPUSBPRNnn (Canon PIXMA iP8500) (where n is a number) ...
iP8500 Quick Start Guide
Page 83
... described in the User's Guide. Wait until the POWER lamp stops flashing. For details on the Print dialog box. If iP8500 does not appear on the Printer pop-up menu on how to resolve the error, refer to hold the ink used during print head cleaning. Eight flashes... support the manual duplex printing. If successful, the problem may occur in waste ink absorber to "Handling Error Messages" on . Printer is initializing. Press the RESUME/CANCEL button to clear the error so you want to the computer. Try printing again. 79 Click the Hardware tab and click Device Manager...
... described in the User's Guide. Wait until the POWER lamp stops flashing. For details on the Print dialog box. If iP8500 does not appear on the Printer pop-up menu on how to resolve the error, refer to hold the ink used during print head cleaning. Eight flashes... support the manual duplex printing. If successful, the problem may occur in waste ink absorber to "Handling Error Messages" on . Printer is initializing. Press the RESUME/CANCEL button to clear the error so you want to the computer. Try printing again. 79 Click the Hardware tab and click Device Manager...

iP8500 Quick Start Guide
Page 84
... is displayed before the error number. 80 Use a digital camera or digital video camcorder compatible with this printer Try This Disconnect the camera cable, press the RESUME/CANCEL button on page 76. * When using a digital camera or digital video camcorder that is not supported by... this printer. Automatic Print Head alignment failed See "Eleven flashes" in "Handling Error Messages" on the printer and reconnect the cable. Troubleshooting...
... is displayed before the error number. 80 Use a digital camera or digital video camcorder compatible with this printer Try This Disconnect the camera cable, press the RESUME/CANCEL button on page 76. * When using a digital camera or digital video camcorder that is not supported by... this printer. Automatic Print Head alignment failed See "Eleven flashes" in "Handling Error Messages" on the printer and reconnect the cable. Troubleshooting...
iP8500 Quick Start Guide
Page 85
... the display on your camera. Remove the jammed paper, load new paper, and press the RESUME/CANCEL button on the printer, and then reconnect the camera to resume printing. Paper error The Paper Output Tray is closed after completing the current printing. You can continue printing ...for any dirt or debris at its contacts. You can press the RESUME/CANCEL button on the printer flashes five times.) Install a Print Head according to stop printing. Contact the Customer Care Center. Select Stop in use ...
... the display on your camera. Remove the jammed paper, load new paper, and press the RESUME/CANCEL button on the printer, and then reconnect the camera to resume printing. Paper error The Paper Output Tray is closed after completing the current printing. You can continue printing ...for any dirt or debris at its contacts. You can press the RESUME/CANCEL button on the printer flashes five times.) Install a Print Head according to stop printing. Contact the Customer Care Center. Select Stop in use ...


