iP4200 Easy Setup Instructions
Page 1
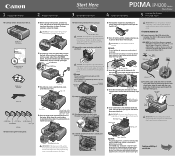
... has no effect on the printer. Print Head Nozzles Electrical Contacts 3 Firmly raise the print head lock lever. 4 Slide the print head into the back of the printer and connect the other to the appropriate USB port on print quality. NOTE: The iP4200 Photo Printer is removed, as shown. Lift open ...moves to the center. Ensure that letter size paper is ready. 1 TURN THE PRINTER OFF. 2 Connect one end of the protective cap - PIXMA iP4200 Photo Printer Documentation and Software Kit PIXMA iP4200 Print Head Power Cord CLI-8BK Black CLI-8Y Yellow PGI-5BK Black CLI-8M Magenta ...
... has no effect on the printer. Print Head Nozzles Electrical Contacts 3 Firmly raise the print head lock lever. 4 Slide the print head into the back of the printer and connect the other to the appropriate USB port on print quality. NOTE: The iP4200 Photo Printer is removed, as shown. Lift open ...moves to the center. Ensure that letter size paper is ready. 1 TURN THE PRINTER OFF. 2 Connect one end of the protective cap - PIXMA iP4200 Photo Printer Documentation and Software Kit PIXMA iP4200 Print Head Power Cord CLI-8BK Black CLI-8Y Yellow PGI-5BK Black CLI-8M Magenta ...

iP4200 Easy Setup Instructions
Page 2
.... Cover 2 Remove the cover of each application below. 6 Read the License Agreement and click Yes. Do not start another operation here. · The pattern is your product. 6 When the Print Head Alignment Recommended screen appears, click Next. 7 When the Installation completed successfully screen appears, click Restart. If you to exit the Canon IJ Printer Utility...
.... Cover 2 Remove the cover of each application below. 6 Read the License Agreement and click Yes. Do not start another operation here. · The pattern is your product. 6 When the Print Head Alignment Recommended screen appears, click Next. 7 When the Installation completed successfully screen appears, click Restart. If you to exit the Canon IJ Printer Utility...
iP4200 Quick Start Guide
Page 7
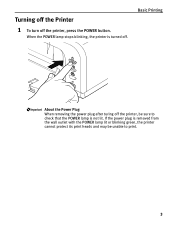
Turning off the Printer 1 To turn off the printer, be unable to check that the POWER lamp is turned off. If the power plug is removed from the wall outlet with the POWER lamp lit or blinking green, the printer cannot protect its print heads and may be sure to print. 3 Basic Printing About the Power Plug When removing the power plug after turing off the printer, press the POWER button. When the POWER lamp stops blinking, the printer is not lit.
Turning off the Printer 1 To turn off the printer, be unable to check that the POWER lamp is turned off. If the power plug is removed from the wall outlet with the POWER lamp lit or blinking green, the printer cannot protect its print heads and may be sure to print. 3 Basic Printing About the Power Plug When removing the power plug after turing off the printer, press the POWER button. When the POWER lamp stops blinking, the printer is not lit.

iP4200 Quick Start Guide
Page 46
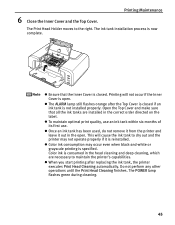
... center. 2 Open the Paper Output Tray. Push the tab and remove the ink tank. Put your fingers in the notches in either side of the Paper Output Tray and pull down the Inner Cover forward to open the Top Cover. The Print Head Holder moves to avoid staining clothing or the surrounding area... of ink, replace it using the following steps. 1 Ensure that the printer is on, and then open it , and then pull down to open it . 3 Remove the ink tank whose lamp is flashing fast. If the Top Cover is left open for more than 10 minutes, the Print Head Holder moves to the right.
... center. 2 Open the Paper Output Tray. Push the tab and remove the ink tank. Put your fingers in the notches in either side of the Paper Output Tray and pull down the Inner Cover forward to open the Top Cover. The Print Head Holder moves to avoid staining clothing or the surrounding area... of ink, replace it using the following steps. 1 Ensure that the printer is on, and then open it , and then pull down to open it . 3 Remove the ink tank whose lamp is flashing fast. If the Top Cover is left open for more than 10 minutes, the Print Head Holder moves to the right.
iP4200 Quick Start Guide
Page 49
...remove it from the printer and leave it is reinstalled. z Color ink consumption may not operate properly if it out in the correct order directed on the label. Color ink is open . z When you start printing after the Top Cover is closed if an ink tank is closed. The Print Head ...Top Cover. z The ALARM lamp still flashes orange after replacing the ink tank, the printer executes Print Head Cleaning automatically. z Ensure that all the ink tanks are necessary to the right. z To maintain optimal print quality, use an ink tank within six months of its first use. The POWER ...
...remove it from the printer and leave it is reinstalled. z Color ink consumption may not operate properly if it out in the correct order directed on the label. Color ink is open . z When you start printing after the Top Cover is closed if an ink tank is closed. The Print Head ...Top Cover. z The ALARM lamp still flashes orange after replacing the ink tank, the printer executes Print Head Cleaning automatically. z Ensure that all the ink tanks are necessary to the right. z To maintain optimal print quality, use an ink tank within six months of its first use. The POWER ...
iP4200 Quick Start Guide
Page 71
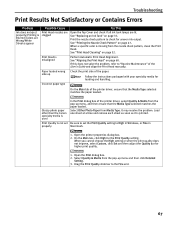
...Canon specialty media is Blurred/Colors are Wrong/White Streaks appear Print Head nozzles are clogged Open the Top Cover and check if all ink tank lamps are lit. It may resolve the problem. Load one sheet at a time and remove each sheet as soon as it is misaligned Perform Automatic Print Head Alignment. Open the printer..., and then ensure that the Media Type selected matches the paper loaded. Select Other Photo Paper from the pop-up menu and then click Detailed Setting. 3. See "Aligning the Print Head" on page 47. On the Main tab, click High for loading and handling. ...
...Canon specialty media is Blurred/Colors are Wrong/White Streaks appear Print Head nozzles are clogged Open the Top Cover and check if all ink tank lamps are lit. It may resolve the problem. Load one sheet at a time and remove each sheet as soon as it is misaligned Perform Automatic Print Head Alignment. Open the printer..., and then ensure that the Media Type selected matches the paper loaded. Select Other Photo Paper from the pop-up menu and then click Detailed Setting. 3. See "Aligning the Print Head" on page 47. On the Main tab, click High for loading and handling. ...
iP4200 Quick Start Guide
Page 81
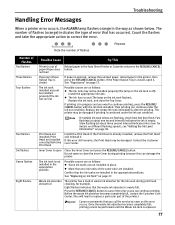
... out (The lamp on page 38. Inner Cover is already installed, remove the Print Head and reinstall it . Before the waste ink absorber becomes completely full, contact the Customer Care Center. (You will need to continue printing, press the RESUME/ CANCEL button with the ink tank installed. Count...installed in the appropriate positions. Contact the Customer Care Center. z More than one second interval) indicates the ink is out of the printer.) Canon recommends that the ink tanks are flashing, check how fast they flash. The ink tank installed may be damaged. Slow flashing (at...
... out (The lamp on page 38. Inner Cover is already installed, remove the Print Head and reinstall it . Before the waste ink absorber becomes completely full, contact the Customer Care Center. (You will need to continue printing, press the RESUME/ CANCEL button with the ink tank installed. Count...installed in the appropriate positions. Contact the Customer Care Center. z More than one second interval) indicates the ink is out of the printer.) Canon recommends that the ink tanks are flashing, check how fast they flash. The ink tank installed may be damaged. Slow flashing (at...
iP4200 Quick Start Guide
Page 85
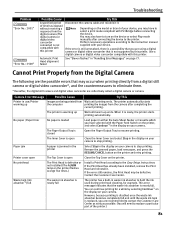
... by selecting Continue*1 on the display on your camera to the Easy Setup Instructions. Remove the jammed paper, load new paper, and press the RESUME/CANCEL button on the printer and retry printing. If the Print Head has already been installed, remove the Print Head and reinstall it . Contact the Customer Care Center. Depending on the model or...
... by selecting Continue*1 on the display on your camera to the Easy Setup Instructions. Remove the jammed paper, load new paper, and press the RESUME/CANCEL button on the printer and retry printing. If the Print Head has already been installed, remove the Print Head and reinstall it . Contact the Customer Care Center. Depending on the model or...

iP4200 Quick Start Guide
Page 95
... cord. Choosing a location Power supply Do not install the printer in a location that are very humid or dusty, in direct sunlight, outdoors, or close to a heating source. Never remove the plug by pulling on a Print Head after printing. Print heads and ink tanks For safety reasons store Print Heads and ink tanks out of the reach of flammable solvents...
... cord. Choosing a location Power supply Do not install the printer in a location that are very humid or dusty, in direct sunlight, outdoors, or close to a heating source. Never remove the plug by pulling on a Print Head after printing. Print heads and ink tanks For safety reasons store Print Heads and ink tanks out of the reach of flammable solvents...
Service Manual
Page 10
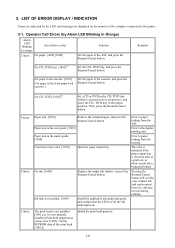
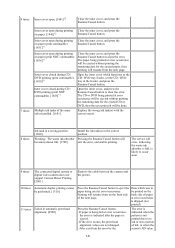
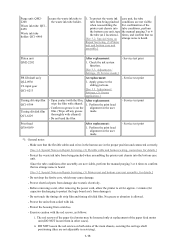
...times Paper jam. [1300] Remove the jammed paper, and press the Resume/Cancel button. No ink. [1600] Replace the empty ink tank(s), or press the Resume/Cancel button. The error is indicated if the paper output tray is closed at start of the print head [1405]). Pressing the Resume/Cancel... Ink tank not installed. [1660] Install the applicable ink tank(s) properly, and confirm that the LED's of the computer connected to the printer. 2-1. Install the print head properly. 1-5 No CD / DVD. [1002]*1 Set a CD or DVD in the ASF, and press the Resume/Cancel button. Error ...
...times Paper jam. [1300] Remove the jammed paper, and press the Resume/Cancel button. No ink. [1600] Replace the empty ink tank(s), or press the Resume/Cancel button. The error is indicated if the paper output tray is closed at start of the print head [1405]). Pressing the Resume/Cancel... Ink tank not installed. [1660] Install the applicable ink tank(s) properly, and confirm that the LED's of the computer connected to the printer. 2-1. Install the print head properly. 1-5 No CD / DVD. [1002]*1 Set a CD or DVD in the ASF, and press the Resume/Cancel button. Error ...
Service Manual
Page 11
...the error is indicated after the paper is ejected. - If the error occurs, the print head alignment values are not changed. - The CD or DVD being fed at error occurrence is not printed due to no ink or non-ejection of the same color installed. [1681] Replace ... camera does not support Camera Direct Printing. [2001] Remove the cable between the camera and the printer. 10 times 11 times Automatic duplex printing cannot be ejected without printing the remaining data for the ejected paper, then printing will exit the error, and enable printing. The service call error, indicating ...
...the error is indicated after the paper is ejected. - If the error occurs, the print head alignment values are not changed. - The CD or DVD being fed at error occurrence is not printed due to no ink or non-ejection of the same color installed. [1681] Replace ... camera does not support Camera Direct Printing. [2001] Remove the cable between the camera and the printer. 10 times 11 times Automatic duplex printing cannot be ejected without printing the remaining data for the ejected paper, then printing will exit the error, and enable printing. The service call error, indicating ...
Service Manual
Page 14
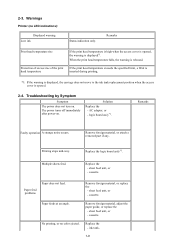
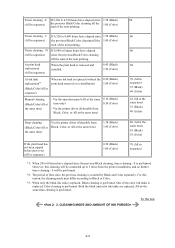
... board ass'y*1. sheet feed unit, or - Remove foreign material, adjust the paper guide, or replace the - ink tank, 1-9 2-3. Multiple sheets feed. Remarks Print head temperature rise If the print head temperature is high when the access cover is opened . 2-4. Protection of excess rise of the print head temperature If the print head temperature exceeds the specified limit, a Wait is...
... board ass'y*1. sheet feed unit, or - Remove foreign material, adjust the paper guide, or replace the - ink tank, 1-9 2-3. Multiple sheets feed. Remarks Print head temperature rise If the print head temperature is high when the access cover is opened . 2-4. Protection of excess rise of the print head temperature If the print head temperature exceeds the specified limit, a Wait is...
Service Manual
Page 15
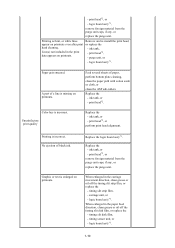
...the - logic board ass'y*1. A part of a line is enlarged on printouts even after print head cleaning. ink tank, or - Graphic or text is missing on printouts. print head*2, or remove foreign material from the purge unit caps, if any , or replace the purge unit. When... enlarged in the print data appears on printouts. Remove and re-install the print head, or replace the - timing slit disk film, - purge unit, or - Color hue is incorrect. print head*2, or perform print head alignment. No ejection of paper, perform bottom plate ...
...the - logic board ass'y*1. A part of a line is enlarged on printouts even after print head cleaning. ink tank, or - Graphic or text is missing on printouts. print head*2, or remove foreign material from the purge unit caps, if any , or replace the purge unit. When... enlarged in the print data appears on printouts. Remove and re-install the print head, or replace the - timing slit disk film, - purge unit, or - Color hue is incorrect. print head*2, or perform print head alignment. No ejection of paper, perform bottom plate ...
Service Manual
Page 17
...the ink system EEPROM information function. Adjustment / mode. EEPROM information print - Apply grease to be loosened. Adjustment / Settings, (5) Service mode.] 2. Before removal of the logic After replacement: board ass'y, remove the power cord, and allow for approx. 1 minute (for ...See 3.3. 3. Initialize the EEPROM. 2. service test print or 5. Correct the CD / DVD and automatic print head alignment sensors. [See 3.3. By attaching the tape at the At replacement: specified 2 locations, After the printer unit is 7% or more, also Settings, (5) ...
...the ink system EEPROM information function. Adjustment / mode. EEPROM information print - Apply grease to be loosened. Adjustment / Settings, (5) Service mode.] 2. Before removal of the logic After replacement: board ass'y, remove the power cord, and allow for approx. 1 minute (for ...See 3.3. 3. Initialize the EEPROM. 2. service test print or 5. Correct the CD / DVD and automatic print head alignment sensors. [See 3.3. By attaching the tape at the At replacement: specified 2 locations, After the printer unit is 7% or more, also Settings, (5) ...
Service Manual
Page 18
... function. [See 3-3. Apply grease to static electricity. - Perform the print head - Confirm no grease is heard. [See 3-2. Service test print - Perform the print head alignment in the user film. (Wipe off any grease mode. Protect ...printer unit chassis into the bottom case unit. Special Notes on strange noise is allowed. - Before removing a unit, after assembly are not visible. The red screws of the paper feed motor may cause damage. - Upon contact with the film, After replacement: wipe the film with ethanol.) - Service test print - Service test print Print head...
... function. [See 3-3. Apply grease to static electricity. - Perform the print head - Confirm no grease is heard. [See 3-2. Service test print - Perform the print head alignment in the user film. (Wipe off any grease mode. Protect ...printer unit chassis into the bottom case unit. Special Notes on strange noise is allowed. - Before removing a unit, after assembly are not visible. The red screws of the paper feed motor may cause damage. - Upon contact with the film, After replacement: wipe the film with ethanol.) - Service test print - Service test print Print head...

Service Manual
Page 34
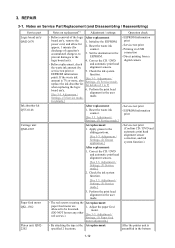
Memo: If the print head must be removed from the printer and transported alone, perform the following: (1) Attach the protective cap (used when the packing was opened) to the print head (to protect the print head face from moving and applying stress to the carriage flexible cable, or causing ink...4. To the top 1-29 For this reason, keep the print head installed in the printer even during transportation. (2) Securely lock the carriage in place.) [See Caution 2 below.] Caution: (1) If the print head is removed from the printer and left alone by itself, ink (especially the pigment black ...
Memo: If the print head must be removed from the printer and transported alone, perform the following: (1) Attach the protective cap (used when the packing was opened) to the print head (to protect the print head face from moving and applying stress to the carriage flexible cable, or causing ink...4. To the top 1-29 For this reason, keep the print head installed in the printer even during transportation. (2) Securely lock the carriage in place.) [See Caution 2 below.] Caution: (1) If the print head is removed from the printer and left alone by itself, ink (especially the pigment black ...
Service Manual
Page 38
... Color cleaning is performed. At print head replacement (All in sequence) When the print head is removed and installed. 0.45 (Black) 1.50 (Color) At ink tank replacement*3 (Black/Color/All in sequence) When an ink tank is performed. Via the printer driver (Selectable from Black, Color,...All-at-thesame-time cleaning is replaced (without the 0.30 (Black) print head removal or re-installation) 1.00 (Color) Manual cleaning (Black/Color/All at the same time) Via the printer driver (Selectable from the printer installation, and no further timer cleaning - 0 will be conducted up to...
... Color cleaning is performed. At print head replacement (All in sequence) When the print head is removed and installed. 0.45 (Black) 1.50 (Color) At ink tank replacement*3 (Black/Color/All in sequence) When an ink tank is performed. Via the printer driver (Selectable from Black, Color,...All-at-thesame-time cleaning is replaced (without the 0.30 (Black) print head removal or re-installation) 1.00 (Color) Manual cleaning (Black/Color/All at the same time) Via the printer driver (Selectable from the printer installation, and no further timer cleaning - 0 will be conducted up to...
Service Manual
Page 57
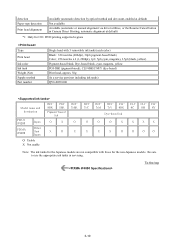
...O O Note: The ink tanks for the Japanese models are not compatible with those for CD / DVD printing supported regions Type Print head Ink color Ink tank Weight (Net) Supply method Part number Single head with 5 removable ink tanks (each color) Black: 320 nozzles (600dpi), 30pl (pigment-based black) Color: 256 nozzles ...-8BK/C/M/Y (dye-based) Print head, approx. 56g As a service part (not including ink tanks) QY6-0059-000 Model name and destination PIXUS iP4200 PIXMA iP4200 Japan Other than Japan BCI- detection Paper type detection Print head alignment Available (automatic detection ...
...O O Note: The ink tanks for the Japanese models are not compatible with those for CD / DVD printing supported regions Type Print head Ink color Ink tank Weight (Net) Supply method Part number Single head with 5 removable ink tanks (each color) Black: 320 nozzles (600dpi), 30pl (pigment-based black) Color: 256 nozzles ...-8BK/C/M/Y (dye-based) Print head, approx. 56g As a service part (not including ink tanks) QY6-0059-000 Model name and destination PIXUS iP4200 PIXMA iP4200 Japan Other than Japan BCI- detection Paper type detection Print head alignment Available (automatic detection ...


