
Service Manual
Page 4
...ink counter setting (4) User mode (5) Service mode Service test print, EEPROM initialization, Waste ink counter reset Destination settings 3-4. Verification Items (1) Service test print (2) EEPROM information print 4. Serial Number Location 2. Troubleshooting by Service Engineer 1-2. PRINTER TRANSPORTATION Part 2: TECHNICAL REFERENCE 1. FAQ (Problems Specific to the iP4000 and Corrective Actions) Part 3:... OF INK PURGED 3. II. LIST OF ERROR DISPLAY / INDICATION 2-1. BLOCK DIAGRAM 2. Logic Board Ass'y 2-2. Carriage Board (Print Head Connector) PIXMA iP4200 Specifications
...ink counter setting (4) User mode (5) Service mode Service test print, EEPROM initialization, Waste ink counter reset Destination settings 3-4. Verification Items (1) Service test print (2) EEPROM information print 4. Serial Number Location 2. Troubleshooting by Service Engineer 1-2. PRINTER TRANSPORTATION Part 2: TECHNICAL REFERENCE 1. FAQ (Problems Specific to the iP4000 and Corrective Actions) Part 3:... OF INK PURGED 3. II. LIST OF ERROR DISPLAY / INDICATION 2-1. BLOCK DIAGRAM 2. Logic Board Ass'y 2-2. Carriage Board (Print Head Connector) PIXMA iP4200 Specifications
Service Manual
Page 6
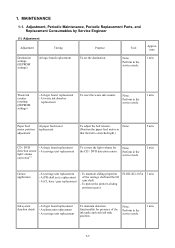
.... None. (Position the paper feed motor so that the belt is stretched tight.) 5 min. At carriage unit replacement - To protect the printer's sliding portions (gears). At logic board replacement - Perform in the service mode. 1 min. Perform in the service mode. 1 min. ... adjust the belt tension. 1. MAINTENANCE 1-1. time Destination settings (EEPROM settings) At logic board replacement To set the destination. Waste ink counter resetting (EEPROM settings) - Perform in the service mode. 2 min. None. Perform in the service mode. 1 min. At carriage unit replacement...
.... None. (Position the paper feed motor so that the belt is stretched tight.) 5 min. At carriage unit replacement - To protect the printer's sliding portions (gears). At logic board replacement - Perform in the service mode. 1 min. Perform in the service mode. 1 min. ... adjust the belt tension. 1. MAINTENANCE 1-1. time Destination settings (EEPROM settings) At logic board replacement To set the destination. Waste ink counter resetting (EEPROM settings) - Perform in the service mode. 2 min. None. Perform in the service mode. 1 min. At carriage unit replacement...
Service Manual
Page 17
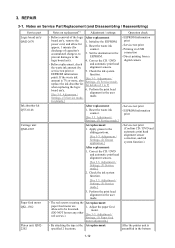
... screws securing the At replacement: paper feed motor are 1. By attaching the tape at the At replacement: specified 2 locations, After the printer unit is 7% or more, also Settings, (5) Service mode, replace the ink absorber kit for details of 1 to the 1. REPAIR ... 6. Direct printing from a digital camera After replacement: 1. EEPROM information print At replacement: 1. Adjustment / Settings, (1) Paper feed motor adjustment.] - Reset the waste ink counter. 3. If the waste ink [See 3-3. Adjustment / mode. Service test print (Confirm CD / DVD and automatic print head...
... screws securing the At replacement: paper feed motor are 1. By attaching the tape at the At replacement: specified 2 locations, After the printer unit is 7% or more, also Settings, (5) Service mode, replace the ink absorber kit for details of 1 to the 1. REPAIR ... 6. Direct printing from a digital camera After replacement: 1. EEPROM information print At replacement: 1. Adjustment / Settings, (1) Paper feed motor adjustment.] - Reset the waste ink counter. 3. If the waste ink [See 3-3. Adjustment / mode. Service test print (Confirm CD / DVD and automatic print head...
Service Manual
Page 27
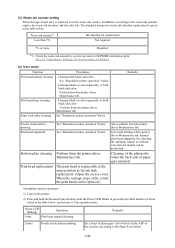
...Waste ink counter setting When the logic board ass'y is replaceable at the center, the print head can be replaced.) 1) Turn on the printer. 2) Press and hold the Resume/Cancel button until the Power LED blinks in green the specified number of times listed in the table below... User mode Function Print head manual cleaning Print head deep cleaning Paper feed roller cleaning Procedures - Bottom plate cleaning Perform from the printer driver Maintenance tab. - Print head replacement The print head is replaced, reset the waste ink counter. Cleaning both black and color: Perform from the...
...Waste ink counter setting When the logic board ass'y is replaceable at the center, the print head can be replaced.) 1) Turn on the printer. 2) Press and hold the Resume/Cancel button until the Power LED blinks in green the specified number of times listed in the table below... User mode Function Print head manual cleaning Print head deep cleaning Paper feed roller cleaning Procedures - Bottom plate cleaning Perform from the printer driver Maintenance tab. - Print head replacement The print head is replaced, reset the waste ink counter. Cleaning both black and color: Perform from the...

Service Manual
Page 28
... orange and Power in green, press the Resume/Cancel button the specified number of the sheet feeder unit will be raised. 1) With the printer power turned off, while pressing the Resume/Cancel button, press and hold the Power button. (DO NOT release the buttons. Note: At ...the end of A4 or letter size paper. Ink system function check result - USB serial number - CD / DVD correction value Waste ink counter reset See "Service mode operation procedures" below . CD / DVD sensor correction result Procedures See "Service mode operation procedures" below . The Power LED lights ...
... orange and Power in green, press the Resume/Cancel button the specified number of the sheet feeder unit will be raised. 1) With the printer power turned off, while pressing the Resume/Cancel button, press and hold the Power button. (DO NOT release the buttons. Note: At ...the end of A4 or letter size paper. Ink system function check result - USB serial number - CD / DVD correction value Waste ink counter reset See "Service mode operation procedures" below . CD / DVD sensor correction result Procedures See "Service mode operation procedures" below . The Power LED lights ...

Service Manual
Page 29
... the table below , and press the Power button. Verification Items, (2) EEPROM print information print. 3 times Orange (Alarm) EEPROM initialization 4 times Green (Power) Waste ink counter resetting 5 times Orange (Alarm) Destination settings After entering the destination settings mode, press the Resume/Cancel button the specified number of both black and color) 7 times...
... the table below , and press the Power button. Verification Items, (2) EEPROM print information print. 3 times Orange (Alarm) EEPROM initialization 4 times Green (Power) Waste ink counter resetting 5 times Orange (Alarm) Destination settings After entering the destination settings mode, press the Resume/Cancel button the specified number of both black and color) 7 times...


