
iP4000 Quick Start Guide
Page 8
...sized plain paper is useful for printing. When using both the Sheet Feeder and Cassette. See "Canon Specialty Media" on page 61. 4 Loading paper in the User's Guide. • Continuous printing on the printer driver settings, refer to "...paper in the Cassette and photo paper in the Sheet Feeder, changing the paper source allows you to install the printer in the Cassette allows you to print without removing and reloading paper. Basic Printing „ Using the ... the Sheet Feeder. This is convenient if you regularly print onto. See "Aligning the Print Head" on page 14.
...sized plain paper is useful for printing. When using both the Sheet Feeder and Cassette. See "Canon Specialty Media" on page 61. 4 Loading paper in the User's Guide. • Continuous printing on the printer driver settings, refer to "...paper in the Cassette and photo paper in the Sheet Feeder, changing the paper source allows you to install the printer in the Cassette allows you to print without removing and reloading paper. Basic Printing „ Using the ... the Sheet Feeder. This is convenient if you regularly print onto. See "Aligning the Print Head" on page 14.

iP4000 Quick Start Guide
Page 49
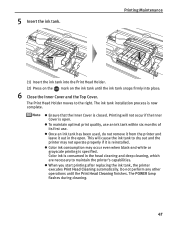
The Print Head Holder moves to replace ink tanks one by one when replacing more than one ink tank. 45 Be sure to the center. 3 Remove the empty ink tank. Push the tab and remove the ink tank. Printing Maintenance „ Replacing Ink Tanks When an ink tank runs out of ink, replace it ...using the following steps. 1 Ensure that the printer is on, and then push the upper center (...
The Print Head Holder moves to replace ink tanks one by one when replacing more than one ink tank. 45 Be sure to the center. 3 Remove the empty ink tank. Push the tab and remove the ink tank. Printing Maintenance „ Replacing Ink Tanks When an ink tank runs out of ink, replace it ...using the following steps. 1 Ensure that the printer is on, and then push the upper center (...
iP4000 Quick Start Guide
Page 51
...is reinstalled. z Once an ink tank has been used, do not remove it from the printer and leave it is open . z When you start printing after replacing the ink tank, the printer executes Print Head Cleaning automatically. z Color ink consumption may not operate properly if it ...out in the head cleaning and deep cleaning, which are necessary to the right. Printing Maintenance (1) Insert the ink tank into...
...is reinstalled. z Once an ink tank has been used, do not remove it from the printer and leave it is open . z When you start printing after replacing the ink tank, the printer executes Print Head Cleaning automatically. z Color ink consumption may not operate properly if it ...out in the head cleaning and deep cleaning, which are necessary to the right. Printing Maintenance (1) Insert the ink tank into...
iP4000 Quick Start Guide
Page 71
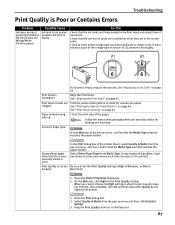
... the correct ink tanks are installed and that they are firmly seated in (2), remove it is used In the Print dialog box of the paper. See "Aligning the Print Head" on page 53. See "Print Head Cleaning" on page 61. Incorrect paper type On the Main tab of the ...the print side of the printer driver, select Quality & Media from the pop-up menu and then click Detailed Setting. 3. Glossy photo paper other than the Canon specialty media is printed. See "Replacing an Ink Tank" on page 49. Print Head is empty, replace the ink tank. Print Head nozzles are Print the...
... the correct ink tanks are installed and that they are firmly seated in (2), remove it is used In the Print dialog box of the paper. See "Aligning the Print Head" on page 53. See "Print Head Cleaning" on page 61. Incorrect paper type On the Main tab of the ...the print side of the printer driver, select Quality & Media from the pop-up menu and then click Detailed Setting. 3. Glossy photo paper other than the Canon specialty media is printed. See "Replacing an Ink Tank" on page 49. Print Head is empty, replace the ink tank. Print Head nozzles are Print the...
iP4000 Quick Start Guide
Page 79
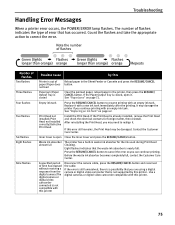
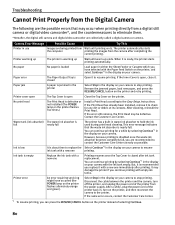
... Two flashes Three flashes Four flashes Five flashes Six flashes Eight flashes Nine flashes Possible Cause Try This Printer is already installed, remove the Print Head and check the electrical contacts for the ink used during Print Head Cleaning. See "Paper Jams" on page 42. See "Replacing an Ink Tank" on page 72. Press the RESUME...
... Two flashes Three flashes Four flashes Five flashes Six flashes Eight flashes Nine flashes Possible Cause Try This Printer is already installed, remove the Print Head and check the electrical contacts for the ink used during Print Head Cleaning. See "Paper Jams" on page 42. See "Replacing an Ink Tank" on page 72. Press the RESUME...
iP4000 Quick Start Guide
Page 84
... Print Head has already been installed, remove it to resume printing. Contact the Customer Care Center. The printer automatically starts the computer printing the images from the camera after printing. If the Inner Cover is open Close the Top Cover on the printer instead of selecting Continue. 80 After cleaning, reinstall the Print Head. If the error still remains, the Print Head...
... Print Head has already been installed, remove it to resume printing. Contact the Customer Care Center. The printer automatically starts the computer printing the images from the camera after printing. If the Inner Cover is open Close the Top Cover on the printer instead of selecting Continue. 80 After cleaning, reinstall the Print Head. If the error still remains, the Print Head...

iP4000 Quick Start Guide
Page 93
... Hz AC 220-240 V, 50/60 Hz Working around the power outlet is kept clear at all times so you purchased the printer. Do not place any object on a Print Head after printing. Do not place metal objects (paper clips, staples, etc.) or containers of flammable solvents (alcohol, thinners, etc.) on top...(41°F to a heating source. To avoid the risk of fire or electric shocks, install the printer in direct sunlight, outdoors, or close to 95°F) and humidity of small children. Never remove the plug by pulling on a thick rug or carpet. Ink may be very hot and could cause ...
... Hz AC 220-240 V, 50/60 Hz Working around the power outlet is kept clear at all times so you purchased the printer. Do not place any object on a Print Head after printing. Do not place metal objects (paper clips, staples, etc.) or containers of flammable solvents (alcohol, thinners, etc.) on top...(41°F to a heating source. To avoid the risk of fire or electric shocks, install the printer in direct sunlight, outdoors, or close to 95°F) and humidity of small children. Never remove the plug by pulling on a thick rug or carpet. Ink may be very hot and could cause ...

iP4000 Easy Setup Instructions
Page 1
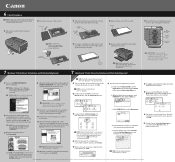
... auto sheet feeder, then slide the paper guide toward the left . PIXMA iP4000 Series Photo Printer 1 Remove all items from its package. Remove the shipping tape and lower the inner cover. Remove the protective tape. 4 Slide the print head into their assigned slots. Serial Number Location 5 Lower the print head lock lever and press it down until it to the left...
... auto sheet feeder, then slide the paper guide toward the left . PIXMA iP4000 Series Photo Printer 1 Remove all items from its package. Remove the shipping tape and lower the inner cover. Remove the protective tape. 4 Slide the print head into their assigned slots. Serial Number Location 5 Lower the print head lock lever and press it down until it to the left...
iP4000 Easy Setup Instructions
Page 2
...The software will take several minutes to Windows as an Administrator before continuing. 6 Start the print head alignment procedure. When the Printer List screen appears, select PIXMA iP4000, then click the Utility icon. 7 Ensure that letter size paper is loaded in the ...Print head alignment will extend beyond the bottom of paper. 6 Insert cassette completely into the printer until it clicks into place. QA7-3281-V01 © 2004 Canon U.S.A., Inc. Canon is now complete. 8 Access your printer and insert the "Setup Software & User's Guide" CD-ROM. P-iP4000-ESI-0304 Printed...
...The software will take several minutes to Windows as an Administrator before continuing. 6 Start the print head alignment procedure. When the Printer List screen appears, select PIXMA iP4000, then click the Utility icon. 7 Ensure that letter size paper is loaded in the ...Print head alignment will extend beyond the bottom of paper. 6 Insert cassette completely into the printer until it clicks into place. QA7-3281-V01 © 2004 Canon U.S.A., Inc. Canon is now complete. 8 Access your printer and insert the "Setup Software & User's Guide" CD-ROM. P-iP4000-ESI-0304 Printed...

Service Manual
Page 9
...1304] Paper jam in the rear guide. [1303] Front door closed (during printing on the monitor of paper at error occurrence. properly installed (EEPROM data of the print Or, with the print head installed, turn the printer off and on the front side of paper (plain paper, A4 or letter)....eject the paper being used at error occurrence is not Install the print head properly, and close the access cover. Remove the jammed paper, and press the Resume/Cancel button. head is properly printed (all ink ejected, no faint printing). - 2. Remarks Open the paper output tray. Replace the empty ...
...1304] Paper jam in the rear guide. [1303] Front door closed (during printing on the monitor of paper at error occurrence. properly installed (EEPROM data of the print Or, with the print head installed, turn the printer off and on the front side of paper (plain paper, A4 or letter)....eject the paper being used at error occurrence is not Install the print head properly, and close the access cover. Remove the jammed paper, and press the Resume/Cancel button. head is properly printed (all ink ejected, no faint printing). - 2. Remarks Open the paper output tray. Replace the empty ...

Service Manual
Page 11
...'y*1. print head*2. Warnings Printer (no color ejected. cassette. Unsatisfactory print quality Paper gets smeared. ink tank, - Remove foreign material, or replace the - Printing is displayed*1. ink tank, or - Faulty operation The print head does not move to the home position. Remove foreign material, or attach a removed part if any. Remove and re-install the print head, or replace the - cassette. Solution The print head is...
...'y*1. print head*2. Warnings Printer (no color ejected. cassette. Unsatisfactory print quality Paper gets smeared. ink tank, - Remove foreign material, or replace the - Printing is displayed*1. ink tank, or - Faulty operation The print head does not move to the home position. Remove foreign material, or attach a removed part if any. Remove and re-install the print head, or replace the - cassette. Solution The print head is...

Service Manual
Page 13
...remove the power cord, and allow for approx. 1 minute (for details.] Bottom case unit QM2-1205 Ink absorber QC1-4222 / 4223 / 4224 / 4263 / 4264 / 4864 / 4221 / 4257 Carriage unit QM2-1209 After replacement: 1. See 3.3. Direct printing from a digital camera [See 3-3. Adjustment / Settings, (6) Service mode.] - Service test print (Confirm CD-R and automatic print head...Settings, (6) Service mode, for details. Service test print - Correct the CD-R and automatic print head alignment sensors. [See 3.3. Printing via parallel or USB connection - The red screws ...
...remove the power cord, and allow for approx. 1 minute (for details.] Bottom case unit QM2-1205 Ink absorber QC1-4222 / 4223 / 4224 / 4263 / 4264 / 4864 / 4221 / 4257 Carriage unit QM2-1209 After replacement: 1. See 3.3. Direct printing from a digital camera [See 3-3. Adjustment / Settings, (6) Service mode.] - Service test print (Confirm CD-R and automatic print head...Settings, (6) Service mode, for details. Service test print - Correct the CD-R and automatic print head alignment sensors. [See 3.3. Printing via parallel or USB connection - The red screws ...

Service Manual
Page 14
... shaft positioning (they are in other cases). Service test print Print head QY6-0049 After replacement: 1. Adjustment / Settings, (3) Grease application.] Operation check - Make sure that the flexible cables and wires in the harness are not adjustable in - Before removing a unit, after removing the power cord, allow the printer to sit for approx. 1 minute (for details.] - Protect...
... shaft positioning (they are in other cases). Service test print Print head QY6-0049 After replacement: 1. Adjustment / Settings, (3) Grease application.] Operation check - Make sure that the flexible cables and wires in the harness are not adjustable in - Before removing a unit, after removing the power cord, allow the printer to sit for approx. 1 minute (for details.] - Protect...

Service Manual
Page 25
... the mode, and confirm that the user will not easily be removed from caught into the inside of the printer). Note: The tape should be similar to the polyester tape used when the packing was opened) to the print head (to protect the print head face from damage due to prevent the fixing tool from the...
... the mode, and confirm that the user will not easily be removed from caught into the inside of the printer). Note: The tape should be similar to the polyester tape used when the packing was opened) to the print head (to protect the print head face from damage due to prevent the fixing tool from the...

Service Manual
Page 28
Black: Pigment-based black Color: Dye-based black, cyan, magenta, yellow Condition On arrival of the printer (All in sequence) If 8,640 or longer hours have elapsed since the previous Black/Color cleaning till the start of paper (or after shipped ... 720 hours have elapsed since the previous Black/Color cleaning till the start of the next printing. CLEANING MODE AND AMOUNT OF INK PURGED To prevent printing problems due to bubbles, dust, or ink clogging, print head cleaning is removed and installed. 0.45 (Black) 1.50 (Color) At ink tank replacement (Black/Color) 0.30 (Black) 1....
Black: Pigment-based black Color: Dye-based black, cyan, magenta, yellow Condition On arrival of the printer (All in sequence) If 8,640 or longer hours have elapsed since the previous Black/Color cleaning till the start of paper (or after shipped ... 720 hours have elapsed since the previous Black/Color cleaning till the start of the next printing. CLEANING MODE AND AMOUNT OF INK PURGED To prevent printing problems due to bubbles, dust, or ink clogging, print head cleaning is removed and installed. 0.45 (Black) 1.50 (Color) At ink tank replacement (Black/Color) 0.30 (Black) 1....

Service Manual
Page 33
...paper distance, Supported camera direct printing device, Presence of CD-R, Supported paper size for CD-R printing supported regions Type Print head Ink color Ink tank Weight (Net) Supply method Part number Single head with 5 removable ink tanks (each color) Black...Print head, approx. 60g As a service part (not including ink tanks) QY6-0049-000 To the top 3 - 7 Highest print quality settings: Approx. 35dB - PIXMA iP4000 Specifications Type Paper feeding method Resolution Desktop serial color bubble jet printer Auto sheet feed (ASF, cassette, automatic duplex printing, CD-R printing...
...paper distance, Supported camera direct printing device, Presence of CD-R, Supported paper size for CD-R printing supported regions Type Print head Ink color Ink tank Weight (Net) Supply method Part number Single head with 5 removable ink tanks (each color) Black...Print head, approx. 60g As a service part (not including ink tanks) QY6-0049-000 To the top 3 - 7 Highest print quality settings: Approx. 35dB - PIXMA iP4000 Specifications Type Paper feeding method Resolution Desktop serial color bubble jet printer Auto sheet feed (ASF, cassette, automatic duplex printing, CD-R printing...


