iP3500 series Quick Start Guide
Page 34
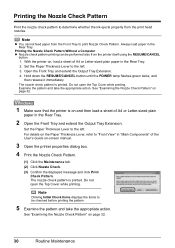
... Lever to the left . 3. Do not open the Top Cover while printing. Examine the pattern and take the appropriate action. Hold down the RESUME/CANCEL button until the POWER lamp flashes green twice, and then release it immediately. Do not open the Top Cover while printing. Set the Paper Thickness Lever... and click Print Check Pattern. Printing the Nozzle Check Pattern Print the nozzle check pattern to determine whether the ink ejects properly from the printer itself using the RESUME/CANCEL button. 1. Note z You cannot feed paper from the Front Tray to print Nozzle Check Pattern.
... Lever to the left . 3. Do not open the Top Cover while printing. Examine the pattern and take the appropriate action. Hold down the RESUME/CANCEL button until the POWER lamp flashes green twice, and then release it immediately. Do not open the Top Cover while printing. Set the Paper Thickness Lever... and click Print Check Pattern. Printing the Nozzle Check Pattern Print the nozzle check pattern to determine whether the ink ejects properly from the printer itself using the RESUME/CANCEL button. 1. Note z You cannot feed paper from the Front Tray to print Nozzle Check Pattern.
iP3500 series Quick Start Guide
Page 37
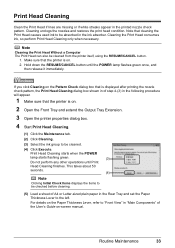
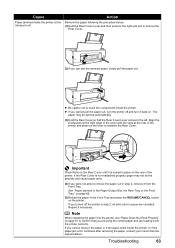
...to be absorbed in "Main Components" of step 4-(3) in the Rear Tray and set the Paper Thickness Lever to be cleaned from the printer itself, using the RESUME/CANCEL button. 1. Note Cleaning the Print Head Without a Computer The Print Head can also be cleaned. (4) Click Execute. For details on -screen...when necessary. Make sure that cleaning the Print Head causes used ink to "Front View" in the ink absorber. Hold down the RESUME/CANCEL button until Print Head Cleaning finishes. Print Head Cleaning Clean the Print Head if lines are missing or if white streaks appear in the...
...to be absorbed in "Main Components" of step 4-(3) in the Rear Tray and set the Paper Thickness Lever to be cleaned from the printer itself, using the RESUME/CANCEL button. 1. Note Cleaning the Print Head Without a Computer The Print Head can also be cleaned. (4) Click Execute. For details on -screen...when necessary. Make sure that cleaning the Print Head causes used ink to "Front View" in the ink absorber. Hold down the RESUME/CANCEL button until Print Head Cleaning finishes. Print Head Cleaning Clean the Print Head if lines are missing or if white streaks appear in the...
iP3500 series Quick Start Guide
Page 52
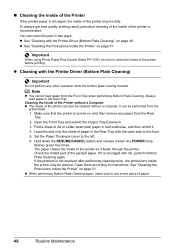
... cannot feed paper from the Rear Tray. 2. it when the POWER lamp flashes green five times. Hold down the RESUME/CANCEL button and release it can be performed from the printer itself. 1. If it feeds through the printer. z When performing Bottom Plate Cleaning again, make sure to the front. 5. Cleaning the Inside of the...
... cannot feed paper from the Rear Tray. 2. it when the POWER lamp flashes green five times. Hold down the RESUME/CANCEL button and release it can be performed from the printer itself. 1. If it feeds through the printer. z When performing Bottom Plate Cleaning again, make sure to the front. 5. Cleaning the Inside of the...
iP3500 series Quick Start Guide
Page 66
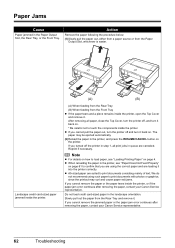
... the Front Tray z If the paper tears and a piece remains inside the printer, or if the paper jam error continues after removing the paper, contact your Canon Service representative. After removing all print jobs in the printer, and press the RESUME/CANCEL button on page 4. Slowly pull out the paper from the Paper Output Slot...
... the Front Tray z If the paper tears and a piece remains inside the printer, or if the paper jam error continues after removing the paper, contact your Canon Service representative. After removing all print jobs in the printer, and press the RESUME/CANCEL button on page 4. Slowly pull out the paper from the Paper Output Slot...
iP3500 series Quick Start Guide
Page 67
...see the jammed paper, slowly pull the paper out. See "Paper jammed in the Front Tray and press the RESUME/CANCEL button on the printer. Note When reloading the paper into the printer correctly. Align the protrusions at the right edge of the cover with the slots at the transport unit. on ... from the Front Tray. z If you cannot remove the paper or if the paper tears inside the printer, or if the paper jam error continues after removing the paper, contact your Canon Service representative. If the Rear Cover is locked in queue are loading it back on. Cause Paper jammed...
...see the jammed paper, slowly pull the paper out. See "Paper jammed in the Front Tray and press the RESUME/CANCEL button on the printer. Note When reloading the paper into the printer correctly. Align the protrusions at the right edge of the cover with the slots at the transport unit. on ... from the Front Tray. z If you cannot remove the paper or if the paper tears inside the printer, or if the paper jam error continues after removing the paper, contact your Canon Service representative. If the Rear Cover is locked in queue are loading it back on. Cause Paper jammed...
iP3500 series Quick Start Guide
Page 68
...flashes indicates the type of the same color are installed in progress and you call for example. Repeats Note the number of paper. / Paper does not feed. Replacing the ink tank is out of flashes Cause Two flashes: Printer is recommended after the printing. Possible ...in the appropriate positions. Follow the directions given in ink absorber to continue printing, press the RESUME/CANCEL button with the ink tank installed. The printer has a built-in your Canon Service representative. Eight flashes indicates that you want to hold the ink used during Print Head ...
...flashes indicates the type of the same color are installed in progress and you call for example. Repeats Note the number of paper. / Paper does not feed. Replacing the ink tank is out of flashes Cause Two flashes: Printer is recommended after the printing. Possible ...in the appropriate positions. Follow the directions given in ink absorber to continue printing, press the RESUME/CANCEL button with the ink tank installed. The printer has a built-in your Canon Service representative. Eight flashes indicates that you want to hold the ink used during Print Head ...
iP3500 series Quick Start Guide
Page 69
...leaving it directly to turn the printer back on the device before reconnecting it . Please be advised that Canon shall not be correctly detected. (The lamp on the printer status monitor (Windows) and Canon IJ Printer Utility (Macintosh). Press and hold the RESUME/CANCEL button for at least 5 seconds, and.... Please be advised that was once empty may damage the printer. Remove the hub. You may be detected. Thirteen Flashes: Ink level cannot be caused by this printer. Press and hold the RESUME/CANCEL button for any malfunction or trouble which may also have to select...
...leaving it directly to turn the printer back on the device before reconnecting it . Please be advised that Canon shall not be correctly detected. (The lamp on the printer status monitor (Windows) and Canon IJ Printer Utility (Macintosh). Press and hold the RESUME/CANCEL button for at least 5 seconds, and.... Please be advised that was once empty may damage the printer. Remove the hub. You may be detected. Thirteen Flashes: Ink level cannot be caused by this printer. Press and hold the RESUME/CANCEL button for any malfunction or trouble which may also have to select...
iP3500 series Quick Start Guide
Page 72
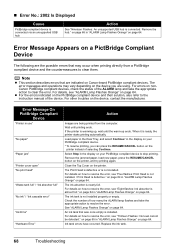
Error Message Appears on Canon-brand PictBridge compliant devices. Note z This section describes errors that are being printed from a PictBridge compliant device and the countermeasures to stop printing. Error Message On PictBridge Compliant Device "Printer in use" "No paper" "Paper jam" "Printer cover open" "No print head" "...ink tank. 68 Troubleshooting Remove the hub." Wait until the warm-up ends. If the printer is connected. Remove the jammed paper, load new paper, press the RESUME/CANCEL button on page 64. on page 65 in "ALARM Lamp Flashes Orange" on page 64. ...
Error Message Appears on Canon-brand PictBridge compliant devices. Note z This section describes errors that are being printed from a PictBridge compliant device and the countermeasures to stop printing. Error Message On PictBridge Compliant Device "Printer in use" "No paper" "Paper jam" "Printer cover open" "No print head" "...ink tank. 68 Troubleshooting Remove the hub." Wait until the warm-up ends. If the printer is connected. Remove the jammed paper, load new paper, press the RESUME/CANCEL button on page 64. on page 65 in "ALARM Lamp Flashes Orange" on page 64. ...
iP3500 series Easy Setup Instructions
Page 2
...resumes from step c to your computer. Important If the Found New Hardware or Found New Hardware Wizard screen appears automatically, remove the USB cable connected to install the printer...X v.10.4.x installation. Serial Number l When the PIXMA Extended Survey Program screen appears, confirm the message. We...on-screen instructions to TURN THE PRINTER OFF before continuing. (1) Press the POWER button. (2) Make sure that the...printer, then TURN THE PRINTER ON. The printer driver, On-screen Manuals, and application software are misaligned or print quality is a trademark of Canon printers...
...resumes from step c to your computer. Important If the Found New Hardware or Found New Hardware Wizard screen appears automatically, remove the USB cable connected to install the printer...X v.10.4.x installation. Serial Number l When the PIXMA Extended Survey Program screen appears, confirm the message. We...on-screen instructions to TURN THE PRINTER OFF before continuing. (1) Press the POWER button. (2) Make sure that the...printer, then TURN THE PRINTER ON. The printer driver, On-screen Manuals, and application software are misaligned or print quality is a trademark of Canon printers...


