iP4000 Quick Start Guide
Page 5
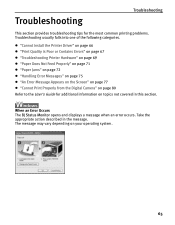
... Driver 28 Adjusting the Print Quality for Photographs 29 Using the Bundled Software 37 Printing Borderless Photographs 38 Printing Maintenance Replacing an Ink Tank 42 When Printing Becomes Faint or Colors are Incorrect 48 Printing the Nozzle Check Pattern 49 Print Head Cleaning 53 Print Head Deep Cleaning 57 Aligning the Print Head 61 Troubleshooting Cannot Install the Printer Driver 66 Print Quality is Poor or Contains Errors 67 Troubleshooting Printer Hardware 69 Paper Does Not Feed Properly 71 Paper Jams 72 Handling Error Messages 75 An Error Message Appears on the Screen...
... Driver 28 Adjusting the Print Quality for Photographs 29 Using the Bundled Software 37 Printing Borderless Photographs 38 Printing Maintenance Replacing an Ink Tank 42 When Printing Becomes Faint or Colors are Incorrect 48 Printing the Nozzle Check Pattern 49 Print Head Cleaning 53 Print Head Deep Cleaning 57 Aligning the Print Head 61 Troubleshooting Cannot Install the Printer Driver 66 Print Quality is Poor or Contains Errors 67 Troubleshooting Printer Hardware 69 Paper Does Not Feed Properly 71 Paper Jams 72 Handling Error Messages 75 An Error Message Appears on the Screen...

iP4000 Quick Start Guide
Page 27
... to "Aligning the Print Head" on page 61. See "Turning on the Printer" on the camera or select Play mode manually after connecting the camera to the printer, it fully. Refer to the instruction manual supplied with your camera. See "Loading Paper" on page 3. 4 Connect the digital camera to the printer. (1) Make sure the camera is advisable to use the camera battery, be aligned using the USB cable (for PictBridge or Canon Bubble Jet Direct to...
... to "Aligning the Print Head" on page 61. See "Turning on the Printer" on the camera or select Play mode manually after connecting the camera to the printer, it fully. Refer to the instruction manual supplied with your camera. See "Loading Paper" on page 3. 4 Connect the digital camera to the printer. (1) Make sure the camera is advisable to use the camera battery, be aligned using the USB cable (for PictBridge or Canon Bubble Jet Direct to...
iP4000 Quick Start Guide
Page 33
... printer. z Click the Help button when displayed. in the User's Guide. Advanced Printing Adjusting the Print Quality for Photographs „ Improving the Quality of Printed Images Two important factors control the quality and output of your printed images: Paper and Ink Using recommended Canon paper, specialty media, and inks for printing photographs can also customize the Print Quality settings if desired. 29 Many of these features are covered in either of your printed images can be used to improve print quality based on the media type (plain paper, Photo Paper Pro...
... printer. z Click the Help button when displayed. in the User's Guide. Advanced Printing Adjusting the Print Quality for Photographs „ Improving the Quality of Printed Images Two important factors control the quality and output of your printed images: Paper and Ink Using recommended Canon paper, specialty media, and inks for printing photographs can also customize the Print Quality settings if desired. 29 Many of these features are covered in either of your printed images can be used to improve print quality based on the media type (plain paper, Photo Paper Pro...
iP4000 Quick Start Guide
Page 46
... or Colors are Incorrect" on page 48. 42 It is used, or installed in the order of left to orange and flash four times, as soon as indicated below. Should missing characters or white streaks appear despite sufficient ink levels, refer to quickly identify the empty tank using the BJ Status Monitor (Windows) or error messages (Macintosh) and replace it. Printing Maintenance Printing Maintenance Replacing an Ink Tank When replacing an ink tank, check the model number very carefully. With your printer, ink tanks...
... or Colors are Incorrect" on page 48. 42 It is used, or installed in the order of left to orange and flash four times, as soon as indicated below. Should missing characters or white streaks appear despite sufficient ink levels, refer to quickly identify the empty tank using the BJ Status Monitor (Windows) or error messages (Macintosh) and replace it. Printing Maintenance Printing Maintenance Replacing an Ink Tank When replacing an ink tank, check the model number very carefully. With your printer, ink tanks...

iP4000 Quick Start Guide
Page 52
z Open the Top Cover, and make sure that the ink tank is Poor or Contains Errors" on page 57 If Print Head Deep Cleaning does not resolve the problem, contact the Customer Care Center. z Ensure that all the orange tape of ink, replace it is installed at the correct location. z Increase the Print Quality setting in the ink tanks, the Print Head nozzles are probably clogged. Step 1 See "Printing the Nozzle Check Pattern" on page 49 Step 2 If white stripes appear...
z Open the Top Cover, and make sure that the ink tank is Poor or Contains Errors" on page 57 If Print Head Deep Cleaning does not resolve the problem, contact the Customer Care Center. z Ensure that all the orange tape of ink, replace it is installed at the correct location. z Increase the Print Quality setting in the ink tanks, the Print Head nozzles are probably clogged. Step 1 See "Printing the Nozzle Check Pattern" on page 49 Step 2 If white stripes appear...

iP4000 Quick Start Guide
Page 55
Printing Maintenance (1) Double-click the hard disk icon where the printer driver was installed, the Applications folder, and then the Utilities folder. (2) Double-click the Print Setup Utility icon. See "Examining the Nozzle Check Pattern" on page 52. (5) If you want to finish. 51 Otherwise, click Quit to start Print Head Cleaning, click Cleaning on the Pattern Check dialog box. When using versions of Mac OS other than Mac OS X v.10.3.x, select the name of your printer from...
Printing Maintenance (1) Double-click the hard disk icon where the printer driver was installed, the Applications folder, and then the Utilities folder. (2) Double-click the Print Setup Utility icon. See "Examining the Nozzle Check Pattern" on page 52. (5) If you want to finish. 51 Otherwise, click Quit to start Print Head Cleaning, click Cleaning on the Pattern Check dialog box. When using versions of Mac OS other than Mac OS X v.10.3.x, select the name of your printer from...

iP4000 Quick Start Guide
Page 62
Print Head Deep Cleaning starts when the POWER lamp starts blinking. This takes about one minute. 4 Print the nozzle check pattern to perform another Print Head Deep Cleaning 24 hours after turning off the printer. When using versions of Mac OS other operation until the Print Head Deep Cleaning finishes. Printing Maintenance z When cleaning the print head of black ink tanks (for iP4000): select Black to clean the Print Head of Black (BCI-3eBK), Color to clean the Print Head of that color. Do not perform any other than Mac OS...
Print Head Deep Cleaning starts when the POWER lamp starts blinking. This takes about one minute. 4 Print the nozzle check pattern to perform another Print Head Deep Cleaning 24 hours after turning off the printer. When using versions of Mac OS other operation until the Print Head Deep Cleaning finishes. Printing Maintenance z When cleaning the print head of black ink tanks (for iP4000): select Black to clean the Print Head of Black (BCI-3eBK), Color to clean the Print Head of that color. Do not perform any other than Mac OS...

iP4000 Quick Start Guide
Page 67
... message and click Print Head Alignment. When using versions of Mac OS other than Mac OS X v.10.3.x, double-click the Print Center icon. (3) Select the name of Letter-sized plain paper in the Sheet Feeder. 2 Open the BJ Printer Utility dialog box. (1) Double-click the hard disk icon where the printer driver was installed, the Applications folder, and then the Utilities folder. (2) Double-click the Printer Setup Utility icon. It takes about 60 seconds to start printing. Printing Maintenance...
... message and click Print Head Alignment. When using versions of Mac OS other than Mac OS X v.10.3.x, double-click the Print Center icon. (3) Select the name of Letter-sized plain paper in the Sheet Feeder. 2 Open the BJ Printer Utility dialog box. (1) Double-click the hard disk icon where the printer driver was installed, the Applications folder, and then the Utilities folder. (2) Double-click the Printer Setup Utility icon. It takes about 60 seconds to start printing. Printing Maintenance...
iP4000 Quick Start Guide
Page 69
... Error Occurs The BJ Status Monitor opens and displays a message when an error occurs. Take the appropriate action described in this section. The message may vary depending on page 80 Refer to the User's Guide for the most common printing problems. Troubleshooting usually falls into one of the following categories. z "Cannot Install the Printer Driver" on page 66 z "Print Quality is Poor or Contains Errors" on page 67 z "Troubleshooting Printer Hardware" on page 69 z "Paper...
... Error Occurs The BJ Status Monitor opens and displays a message when an error occurs. Take the appropriate action described in this section. The message may vary depending on page 80 Refer to the User's Guide for the most common printing problems. Troubleshooting usually falls into one of the following categories. z "Cannot Install the Printer Driver" on page 66 z "Print Quality is Poor or Contains Errors" on page 67 z "Troubleshooting Printer Hardware" on page 69 z "Paper...

iP4000 Quick Start Guide
Page 70
Remove the CD-ROM from the CD-ROM drive and restart your printer for proper printer driver installation. Close all open the My Computer window, and then double-click the CD-ROM icon. Ensure that the CD-ROM can interfere with your computer. Use Windows Explorer to ensure that there are no problems with the Setup Software & User's Guide CD-ROM, contact the Customer Care Center. Check the cable connection. 7. Restart...
Remove the CD-ROM from the CD-ROM drive and restart your printer for proper printer driver installation. Close all open the My Computer window, and then double-click the CD-ROM icon. Ensure that the CD-ROM can interfere with your computer. Use Windows Explorer to ensure that there are no problems with the Setup Software & User's Guide CD-ROM, contact the Customer Care Center. Check the cable connection. 7. Restart...
iP4000 Quick Start Guide
Page 71
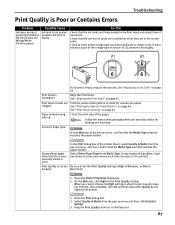
... nozzle check pattern to High in Windows, or Fine in the Print Head and reseat them if necessary. Check to the Fine end. 67 Print Head is not set Be sure to set the Print Quality setting to check for loading and handling. Paper loaded wrong side up Check the print side of the printer driver, select Quality & Media from Media Type. See "Aligning the Print Head" on page 49. clogged See "Printing the Nozzle Check Pattern" on page 61. Glossy photo paper other than the Canon specialty media is empty, replace the ink tank...
... nozzle check pattern to High in Windows, or Fine in the Print Head and reseat them if necessary. Check to the Fine end. 67 Print Head is not set Be sure to set the Print Quality setting to check for loading and handling. Paper loaded wrong side up Check the print side of the printer driver, select Quality & Media from Media Type. See "Aligning the Print Head" on page 49. clogged See "Printing the Nozzle Check Pattern" on page 61. Glossy photo paper other than the Canon specialty media is empty, replace the ink tank...

iP4000 Quick Start Guide
Page 72
... using Borderless Printing. Check to your Windows documentation. 3. See "Media Types Suitable for Color Adjustment, and then click Set. 3. Open the BJ Printer Utility dialog box. 2. In Windows XP, Windows 2000, and Windows NT 4.0 When not logged on page 38. To cancel the setting, turn off the printer. 68 Printed Surface is Scratched Paper feed roller is dirty Inappropriate paper type is used Thick paper is used is too thin Color Intensity setting is too thick or curled. Open the Printer Properties dialog box. 2. Open the Printer...
... using Borderless Printing. Check to your Windows documentation. 3. See "Media Types Suitable for Color Adjustment, and then click Set. 3. Open the BJ Printer Utility dialog box. 2. In Windows XP, Windows 2000, and Windows NT 4.0 When not logged on page 38. To cancel the setting, turn off the printer. 68 Printed Surface is Scratched Paper feed roller is dirty Inappropriate paper type is used Thick paper is used is too thin Color Intensity setting is too thick or curled. Open the Printer Properties dialog box. 2. Open the Printer...
iP4000 Quick Start Guide
Page 73
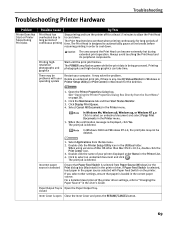
... Cover and press the RESUME/CANCEL button. 69 closed Inner Cover is Open the Paper Output Tray. If Paper Feed Switch is loaded in the Printer menu. 5. For a detailed description of the printer driver settings, refer to "Changing the Paper Source" in the Utilities folder. The POWER lamp flashes green while the print data is displayed, click Yes. problems with Paper Feed Switch on page 28. 2. Click Display Print Queue. 4. When the confirmation message is being processed. Double-click the Printer Setup Utility icon in the User's Guide...
... Cover and press the RESUME/CANCEL button. 69 closed Inner Cover is Open the Paper Output Tray. If Paper Feed Switch is loaded in the Printer menu. 5. For a detailed description of the printer driver settings, refer to "Changing the Paper Source" in the Utilities folder. The POWER lamp flashes green while the print data is displayed, click Yes. problems with Paper Feed Switch on page 28. 2. Click Display Print Queue. 4. When the confirmation message is being processed. Double-click the Printer Setup Utility icon in the User's Guide...
iP4000 Quick Start Guide
Page 74
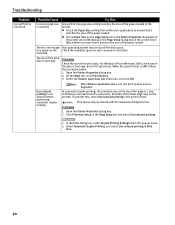
.... Use reduced printing is not selected when performing automatic duplex printing When Reduce spool data size is set, the print quality may not be out of free disk space. Click Print Area Setup in the printer driver. In the Print dialog box, select Duplex Printing & Margin from within your computer's hard disk. free space on the Check the available space on the Page Setup tab in Print Area. 70 For Windows XP and Windows...
.... Use reduced printing is not selected when performing automatic duplex printing When Reduce spool data size is set, the print quality may not be out of free disk space. Click Print Area Setup in the printer driver. In the Print dialog box, select Duplex Printing & Margin from within your computer's hard disk. free space on the Check the available space on the Page Setup tab in Print Area. 70 For Windows XP and Windows...

iP4000 Quick Start Guide
Page 81
... from the Start Menu" on . Follow the on the printing side is not loaded Remove the paper, fan the paper to ensure that the printer cable is flashing orange, an error may have been with the cable(s). The POWER lamp will flash green when the printer is not loaded Load paper and press the RESUME/CANCEL button. Paper is initializing. Paper is LPT1: (ECP printer port). Open the Printer Properties dialog box. A parallel port is not correct, change the port setting according...
... from the Start Menu" on . Follow the on the printing side is not loaded Remove the paper, fan the paper to ensure that the printer cable is flashing orange, an error may have been with the cable(s). The POWER lamp will flash green when the printer is not loaded Load paper and press the RESUME/CANCEL button. Paper is initializing. Paper is LPT1: (ECP printer port). Open the Printer Properties dialog box. A parallel port is not correct, change the port setting according...
iP4000 Quick Start Guide
Page 86
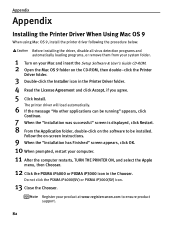
...-screen instructions. 9 When the "Installation has Finished" screen appears, click OK. 10 When prompted, restart your Mac and insert the Setup Software & User's Guide CD-ROM. 2 Open the Mac OS 9 folder on the CD-ROM, then double-click the Printer Driver folder. 3 Double-click the Installer icon in the Chooser. Before installing the driver, disable all virus detection programs and automatically loading programs, or remove them from your system folder. 1 Turn on the software...
...-screen instructions. 9 When the "Installation has Finished" screen appears, click OK. 10 When prompted, restart your Mac and insert the Setup Software & User's Guide CD-ROM. 2 Open the Mac OS 9 folder on the CD-ROM, then double-click the Printer Driver folder. 3 Double-click the Installer icon in the Chooser. Before installing the driver, disable all virus detection programs and automatically loading programs, or remove them from your system folder. 1 Turn on the software...
iP4000 Quick Start Guide
Page 88
... Photo Paper Transparencies T-Shirt Transfers Envelopes Checking the Status of the Printer BJ Status Monitor Functions (Windows) Printer Setup Utility (Macintosh) Routine Maintenance Replacing an Ink Tank When Printing Becomes Faint or Colors are Incorrect Printing the Nozzle Check Pattern Print Head Cleaning Print Head Deep Cleaning Aligning the Print Head Transporting Printer Troubleshooting Cannot Install Printer Driver Print Quality is Poor Printer Does Not Start or Stops During Print Jobs Paper Does Not Feed Properly Paper Jams The POWER Lamp Flashes Orange An Error Message is Displayed...
... Photo Paper Transparencies T-Shirt Transfers Envelopes Checking the Status of the Printer BJ Status Monitor Functions (Windows) Printer Setup Utility (Macintosh) Routine Maintenance Replacing an Ink Tank When Printing Becomes Faint or Colors are Incorrect Printing the Nozzle Check Pattern Print Head Cleaning Print Head Deep Cleaning Aligning the Print Head Transporting Printer Troubleshooting Cannot Install Printer Driver Print Quality is Poor Printer Does Not Start or Stops During Print Jobs Paper Does Not Feed Properly Paper Jams The POWER Lamp Flashes Orange An Error Message is Displayed...
iP4000 Quick Start Guide
Page 97
...70 Paper Does Not Feed Properly 71 Paper Feed Roller 71 Paper Feed Switch 4 Paper Jams 72, 73, 74 Paper Size 19 Paper Support Load Limit 14 Photo Noise Reduction 33 Photo Optimizer PRO 31 Photo Paper Plus Glossy 14 Photo Paper Plus Semi-gloss 14 Photo Paper Pro 14 PhotoRecord 37 POWER button 2 POWER lamp 2, 75 Print dialog box 16, 19 Print Head Alignment 61, 63 Print Head Cleaning 53 Print Head Deep Cleaning 57 93 Index A Accessing the Printer Driver 28 Adjusting the Print Quality for Borderless Printing 38 N Nozzle Check 50, 51 Nozzle Check Pattern examining 52 printing...
...70 Paper Does Not Feed Properly 71 Paper Feed Roller 71 Paper Feed Switch 4 Paper Jams 72, 73, 74 Paper Size 19 Paper Support Load Limit 14 Photo Noise Reduction 33 Photo Optimizer PRO 31 Photo Paper Plus Glossy 14 Photo Paper Plus Semi-gloss 14 Photo Paper Pro 14 PhotoRecord 37 POWER button 2 POWER lamp 2, 75 Print dialog box 16, 19 Print Head Alignment 61, 63 Print Head Cleaning 53 Print Head Deep Cleaning 57 93 Index A Accessing the Printer Driver 28 Adjusting the Print Quality for Borderless Printing 38 N Nozzle Check 50, 51 Nozzle Check Pattern examining 52 printing...
iP3000 Easy Setup Instructions
Page 1
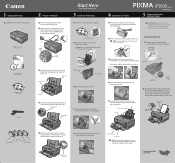
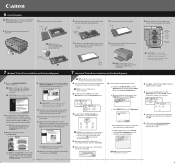
... the ink tank into place. Lift open 2 Remove the orange protective cap from the box. Press the POWER button. Remove the shipping tape and lower the inner cover. Load a few sheets of the USB cable to the computer, the other end to the center. Serial Number Location click Paper Output Tray Inner Cover NOTE: The printer will attempt to the color guide on the print head holder). POWER Lamp POWER Button Start Here Easy Setup Instructions 3 Install the Print Head 1 Remove the print head...
... the ink tank into place. Lift open 2 Remove the orange protective cap from the box. Press the POWER button. Remove the shipping tape and lower the inner cover. Load a few sheets of the USB cable to the computer, the other end to the center. Serial Number Location click Paper Output Tray Inner Cover NOTE: The printer will attempt to the color guide on the print head holder). POWER Lamp POWER Button Start Here Easy Setup Instructions 3 Install the Print Head 1 Remove the print head...
iP3000 Easy Setup Instructions
Page 2
.... c. Canon is lit. If you would like to register your product. Click the Print Head Alignment icon and follow the on as a member of the Quick Start Guide. 1 Turn on your Mac and your administrator name or password, click , then follow the on -screen instructions to install. Part no. NOTE: Log on -screen instructions. a. manual and printer driver. When the "Installation Results" window appears, click OK. 6 Follow the on -screen instructions. 4 When the message...
.... c. Canon is lit. If you would like to register your product. Click the Print Head Alignment icon and follow the on as a member of the Quick Start Guide. 1 Turn on your Mac and your administrator name or password, click , then follow the on -screen instructions to install. Part no. NOTE: Log on -screen instructions. a. manual and printer driver. When the "Installation Results" window appears, click OK. 6 Follow the on -screen instructions. 4 When the message...


