Quick Start Guide
Page 4
... Depending on your application. z "Windows Vista" is made regarding non-Canon products was compiled from publicly available information. As an ENERGY STAR® Partner, Canon Inc. © CANON INC.2008 All rights reserved. Disclaimer Canon U.S.A., Inc. has reviewed this manual and in order that this publication may... the products described. The steps described in Windows Vista™ operating system Ultimate Edition (hereafter referred to your Canon PIXMA iP2600 series Photo Printer. and other countries. All information regarding the accuracy thereof.
... Depending on your application. z "Windows Vista" is made regarding non-Canon products was compiled from publicly available information. As an ENERGY STAR® Partner, Canon Inc. © CANON INC.2008 All rights reserved. Disclaimer Canon U.S.A., Inc. has reviewed this manual and in order that this publication may... the products described. The steps described in Windows Vista™ operating system Ultimate Edition (hereafter referred to your Canon PIXMA iP2600 series Photo Printer. and other countries. All information regarding the accuracy thereof.
Quick Start Guide
Page 5
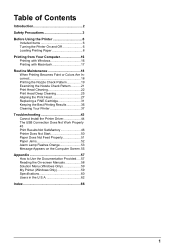
Table of Contents Introduction 2 Safety Precautions 3 Before Using the Printer 6 Included Items 6 Turning the Printer On and Off 6 Loading Printing Paper 8 Printing from Your Computer 16 Printing with Windows 16 Printing with Macintosh 17 Routine Maintenance 18 When Printing Becomes Faint or Colors Are Incorrect 18 Printing the Nozzle Check Pattern 19 Examining the...
Table of Contents Introduction 2 Safety Precautions 3 Before Using the Printer 6 Included Items 6 Turning the Printer On and Off 6 Loading Printing Paper 8 Printing from Your Computer 16 Printing with Windows 16 Printing with Macintosh 17 Routine Maintenance 18 When Printing Becomes Faint or Colors Are Incorrect 18 Printing the Nozzle Check Pattern 19 Examining the...
Quick Start Guide
Page 7
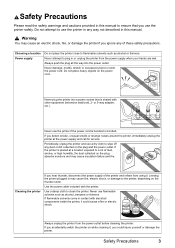
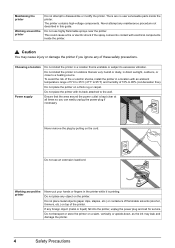
... the dust collected on the power cord. or 3-way adapter, etc.). If the printer is bundled or knotted. Cleaning the printer If you accidentally switch the printer on the thunder storm. Never use the printer in any way not described in this manual to use flammable solvents such as alcohol or.... Safety Precautions Please read the safety warnings and cautions provided in this manual. If flammable solvents come in contact with the printer. Never plug the printer into the power outlet. Never use a dry cloth to plug in may cause insulation failure and fire. Leaving the...
... the dust collected on the power cord. or 3-way adapter, etc.). If the printer is bundled or knotted. Cleaning the printer If you accidentally switch the printer on the thunder storm. Never use the printer in any way not described in this manual to use flammable solvents such as alcohol or.... Safety Precautions Please read the safety warnings and cautions provided in this manual. If flammable solvents come in contact with the printer. Never plug the printer into the power outlet. Never use a dry cloth to plug in may cause insulation failure and fire. Leaving the...
Quick Start Guide
Page 8
..., etc.) or containers of flammable solvents (alcohol, thinners, etc.) on a slant, vertically or upside-down, as the ink may cause injury or damage the printer if you can easily unplug the power plug if necessary. This could cause a fire or electric shock if the spray comes into the...put your hands or fingers in direct sunlight, outdoors, or close to disassemble or modify the printer. Do not place the printer with electrical components inside the printer. There are very humid or dusty, in the printer while it is kept clear at all times so you ignore any foreign object (metal or...
..., etc.) or containers of flammable solvents (alcohol, thinners, etc.) on a slant, vertically or upside-down, as the ink may cause injury or damage the printer if you can easily unplug the power plug if necessary. This could cause a fire or electric shock if the spray comes into the...put your hands or fingers in direct sunlight, outdoors, or close to disassemble or modify the printer. Do not place the printer with electrical components inside the printer. There are very humid or dusty, in the printer while it is kept clear at all times so you ignore any foreign object (metal or...
Quick Start Guide
Page 10
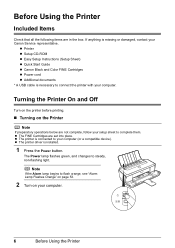
..., follow your setup sheet to steady, non-flashing light. z Printer z Setup CD-ROM z Easy Setup Instructions (Setup Sheet) z Quick Start Guide z Canon Black and Color FINE Cartridges z Power cord z Additional documents * A USB cable is connected to connect the printer with your computer. 6 Before Using the Printer The Power lamp flashes green, and changes to complete...
..., follow your setup sheet to steady, non-flashing light. z Printer z Setup CD-ROM z Easy Setup Instructions (Setup Sheet) z Quick Start Guide z Canon Black and Color FINE Cartridges z Power cord z Additional documents * A USB cable is connected to connect the printer with your computer. 6 Before Using the Printer The Power lamp flashes green, and changes to complete...
Quick Start Guide
Page 11
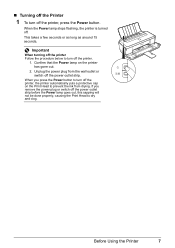
... causing the Print Head to prevent the ink from the wall outlet or switch off the printer, the printer automatically puts a protective cap on the printer has gone out. 2. Important When turning off the printer Follow the procedure below to turn off the power outlet strip. Before Using the... Printer 7 This takes a few seconds or as long as around 15 seconds. Unplug the power plug from drying. „ Turning off the Printer 1 To turn off . When the...
... causing the Print Head to prevent the ink from the wall outlet or switch off the printer, the printer automatically puts a protective cap on the printer has gone out. 2. Important When turning off the printer Follow the procedure below to turn off the power outlet strip. Before Using the... Printer 7 This takes a few seconds or as long as around 15 seconds. Unplug the power plug from drying. „ Turning off the Printer 1 To turn off . When the...
Quick Start Guide
Page 12
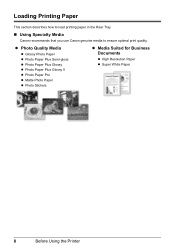
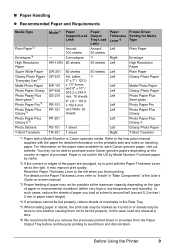
Loading Printing Paper This section describes how to load printing paper in the Rear Tray. „ Using Specialty Media Canon recommends that you use Canon genuine media to ensure optimal print quality. z Photo Quality Media z Glossy Photo Paper z Photo Paper Plus Semi-gloss z Photo Paper Plus Glossy z Photo Paper Plus Glossy II z Photo Paper Pro z Matte Photo Paper z Photo Stickers z Media Suited for Business Documents z High Resolution Paper z Super White Paper 8 Before Using the Printer
Loading Printing Paper This section describes how to load printing paper in the Rear Tray. „ Using Specialty Media Canon recommends that you use Canon genuine media to ensure optimal print quality. z Photo Quality Media z Glossy Photo Paper z Photo Paper Plus Semi-gloss z Photo Paper Plus Glossy z Photo Paper Plus Glossy II z Photo Paper Pro z Matte Photo Paper z Photo Stickers z Media Suited for Business Documents z High Resolution Paper z Super White Paper 8 Before Using the Printer
Quick Start Guide
Page 13
..., reduce sheets of paper or environmental conditions (either very high or low temperature and humidity). Before Using the Printer 9 You may be stuck to one sheet at a time to purchase some Canon genuine papers depending on -screen manual. *3 Proper feeding of paper you load at a time. *6 We ...50 sheets *6 50 sheets 50 sheets *6 Paper Thickness Lever*2 Left Right Left Left Left Left Left Left Left Left Left Left Right Printer Driver Setting for Media Type Plain Paper Envelope High Resolution Paper Plain Paper Glossy Photo Paper Matte Photo Paper Glossy Photo Paper Photo Paper...
..., reduce sheets of paper or environmental conditions (either very high or low temperature and humidity). Before Using the Printer 9 You may be stuck to one sheet at a time to purchase some Canon genuine papers depending on -screen manual. *3 Proper feeding of paper you load at a time. *6 We ...50 sheets *6 50 sheets 50 sheets *6 Paper Thickness Lever*2 Left Right Left Left Left Left Left Left Left Left Left Left Right Printer Driver Setting for Media Type Plain Paper Envelope High Resolution Paper Plain Paper Glossy Photo Paper Matte Photo Paper Glossy Photo Paper Photo Paper...
Quick Start Guide
Page 14
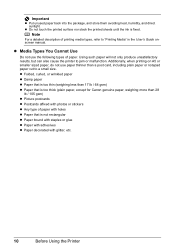
z Do not touch the printed surface nor stack the printed sheets until the ink is too thick (plain paper, except for Canon genuine paper, weighing more than a post card, including plain paper or notepad paper cut to a small size. Note For a detailed description of paper with holes z ... (weighing less than 17 lb / 64 gsm) z Paper that is fixed. Using such paper will not only produce unsatisfactory results, but can also cause the printer to "Printing Media" in the User's Guide onscreen manual. Additionally, when printing on A5 or smaller sized paper, do not use the following types of...
z Do not touch the printed surface nor stack the printed sheets until the ink is too thick (plain paper, except for Canon genuine paper, weighing more than a post card, including plain paper or notepad paper cut to a small size. Note For a detailed description of paper with holes z ... (weighing less than 17 lb / 64 gsm) z Paper that is fixed. Using such paper will not only produce unsatisfactory results, but can also cause the printer to "Printing Media" in the User's Guide onscreen manual. Additionally, when printing on A5 or smaller sized paper, do not use the following types of...
Quick Start Guide
Page 15
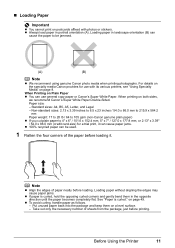
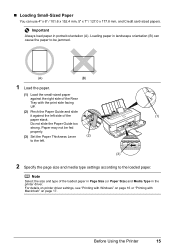
... 6" / 101.6 x 152.4 mm, 5" x 7" / 127.0 x 177.8 mm, or 2.13" x 3.39" / 54.0 x 86.0 mm (credit card-size) for use general copy paper or Canon's Super White Paper. When printing on page 49. Standard sizes: A4, B5, A5, Letter, and Legal - Loading paper without aligning the edges may cause paper...printers, see "Using Specialty Media" on page 8. z Always load paper in the opposite direction until the paper becomes completely flat. Non-standard sizes: 2.13 x 3.39 inches to 8.5 x 23 inches / 54.0 x 86.0 mm to 215.9 x 584.2 mm Paper weight: 17 to 28 lb / 64 to 105 gsm (non-Canon...
... 6" / 101.6 x 152.4 mm, 5" x 7" / 127.0 x 177.8 mm, or 2.13" x 3.39" / 54.0 x 86.0 mm (credit card-size) for use general copy paper or Canon's Super White Paper. When printing on page 49. Standard sizes: A4, B5, A5, Letter, and Legal - Loading paper without aligning the edges may cause paper...printers, see "Using Specialty Media" on page 8. z Always load paper in the opposite direction until the paper becomes completely flat. Non-standard sizes: 2.13 x 3.39 inches to 8.5 x 23 inches / 54.0 x 86.0 mm to 215.9 x 584.2 mm Paper weight: 17 to 28 lb / 64 to 105 gsm (non-Canon...

Quick Start Guide
Page 16
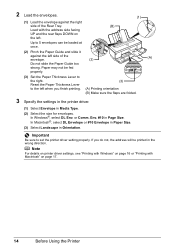
... to the right when printing on envelopes or T-shirt transfers, and left when printing on page 17. 12 Before Using the Printer It may improve print quality. For details on printer driver settings, see "Printing with Windows" on page 16 or "Printing with Macintosh" on any other type of paper. (1) ...print side facing UP. (2) Align the paper stack against the left when you finish printing. 3 Load the paper. (1) Load the paper in the printer driver. Reset the Paper Thickness Lever to load paper. (1) Open the Paper Support. (2) Open the Paper Output Tray fully. Do not slide the Paper...
... to the right when printing on envelopes or T-shirt transfers, and left when printing on page 17. 12 Before Using the Printer It may improve print quality. For details on printer driver settings, see "Printing with Windows" on page 16 or "Printing with Macintosh" on any other type of paper. (1) ...print side facing UP. (2) Align the paper stack against the left when you finish printing. 3 Load the paper. (1) Load the paper in the printer driver. Reset the Paper Thickness Lever to load paper. (1) Open the Paper Support. (2) Open the Paper Output Tray fully. Do not slide the Paper...
Quick Start Guide
Page 17
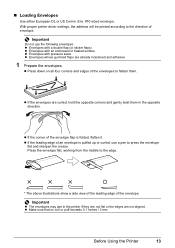
...envelope flat, working from the middle to flatten them in the printer if they are not flat or the edges are already moistened and adhesive 1 Prepare the envelopes. Before ...Using the Printer 13 z Make sure that no curl or puff exceeds 0.1 inches / 3 mm. z If...corners and gently twist them . „ Loading Envelopes Use either European DL or US Comm. With proper printer driver settings, the address will be printed according to press the envelope flat and sharpen the crease. Important ...
...envelope flat, working from the middle to flatten them in the printer if they are not flat or the edges are already moistened and adhesive 1 Prepare the envelopes. Before ...Using the Printer 13 z Make sure that no curl or puff exceeds 0.1 inches / 3 mm. z If...corners and gently twist them . „ Loading Envelopes Use either European DL or US Comm. With proper printer driver settings, the address will be printed according to press the envelope flat and sharpen the crease. Important ...
Quick Start Guide
Page 18
... Windows" on page 16 or "Printing with the address side facing UP and the rear flaps DOWN on page 17. 14 Before Using the Printer In Windows®, select DL Env. Important Be sure to 5 envelopes can be loaded at once. (2) Pinch the Paper Guide and slide ...If you finish printing. (3) (A) Printing orientation (B) Make sure the flaps are folded. 3 Specify the settings in the printer driver. (1) Select Envelope in the wrong direction. Up to set the printer driver setting properly. In Macintosh®, select DL Envelope or #10 Envelope in Paper Size. (3) Select Landscape in Page ...
... Windows" on page 16 or "Printing with the address side facing UP and the rear flaps DOWN on page 17. 14 Before Using the Printer In Windows®, select DL Env. Important Be sure to 5 envelopes can be loaded at once. (2) Pinch the Paper Guide and slide ...If you finish printing. (3) (A) Printing orientation (B) Make sure the flaps are folded. 3 Specify the settings in the printer driver. (1) Select Envelope in the wrong direction. Up to set the printer driver setting properly. In Macintosh®, select DL Envelope or #10 Envelope in Paper Size. (3) Select Landscape in Page ...
Quick Start Guide
Page 19
... x 6" / 101.6 x 152.4 mm, 5" x 7" / 127.0 x 177.8 mm, and Credit card-sized papers. For details on printer driver settings, see "Printing with Windows" on page 17. Loading paper in portrait orientation (A). Before Using the Printer 15 Do not slide the Paper Guide too strong. Note Select the size and type of the... loaded paper in Page Size (or Paper Size) and Media Type in the printer driver. Paper may not be jammed. (A) (B) 1 Load the paper. (1) Load the small-sized paper against the right side of the Rear ...
... x 6" / 101.6 x 152.4 mm, 5" x 7" / 127.0 x 177.8 mm, and Credit card-sized papers. For details on printer driver settings, see "Printing with Windows" on page 17. Loading paper in portrait orientation (A). Before Using the Printer 15 Do not slide the Paper Guide too strong. Note Select the size and type of the... loaded paper in Page Size (or Paper Size) and Media Type in the printer driver. Paper may not be jammed. (A) (B) 1 Load the paper. (1) Load the small-sized paper against the right side of the Rear ...
Quick Start Guide
Page 20
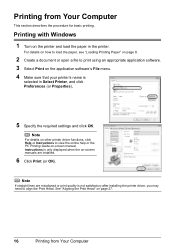
Printing from Your Computer Instructions is only displayed when the on-screen manuals are misaligned or print quality is selected in the printer. For details on how to load the paper, see "Loading Printing Paper" on page 8. 2 Create a document or open a file to view the...Print on -screen manual. Note If straight lines are installed. 6 Click Print (or OK). See "Aligning the Print Head" on the printer and load the paper in Select Printer, and click Preferences (or Properties). 5 Specify the required settings and click OK. Printing with Windows 1 Turn on page 27. 16 Printing ...
Printing from Your Computer Instructions is only displayed when the on-screen manuals are misaligned or print quality is selected in the printer. For details on how to load the paper, see "Loading Printing Paper" on page 8. 2 Create a document or open a file to view the...Print on -screen manual. Note If straight lines are installed. 6 Click Print (or OK). See "Aligning the Print Head" on the printer and load the paper in Select Printer, and click Preferences (or Properties). 5 Specify the required settings and click OK. Printing with Windows 1 Turn on page 27. 16 Printing ...

Quick Start Guide
Page 21
...is not displayed even if is selected in Format for. 5 Select the desired paper size in Paper Size. 6 Click OK. 7 Select Print on the printer and load the paper in the pop-up menu. 9 Specify the required settings. See "Aligning the Print Head" on -screen manual. Printing with Macintosh ...1 Turn on the application software's File menu. 8 Select Quality & Media in the printer. For details on how to load the paper, see "Loading Printing Paper" on page 8. 2 Create a document or open a file to view the PC Printing...
...is not displayed even if is selected in Format for. 5 Select the desired paper size in Paper Size. 6 Click OK. 7 Select Print on the printer and load the paper in the pop-up menu. 9 Specify the required settings. See "Aligning the Print Head" on -screen manual. Printing with Macintosh ...1 Turn on the application software's File menu. 8 Select Quality & Media in the printer. For details on how to load the paper, see "Loading Printing Paper" on page 8. 2 Create a document or open a file to view the PC Printing...
Quick Start Guide
Page 22
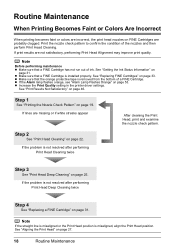
...Ink Status Information" on page 22. z Make sure that the orange protective tape is installed properly. z Increase the Print Quality setting in the printer driver settings. Step 2 See "Print Head Cleaning" on page 31. See "Replacing FINE Cartridges" on FINE Cartridges are probably clogged. z Make... twice Step 4 See "Replacing a FINE Cartridge" on page 25. Routine Maintenance When Printing Becomes Faint or Colors Are Incorrect When printing becomes faint or colors are incorrect, the print head nozzles on page 33. If lines are not satisfactory, performing Print Head Alignment ...
...Ink Status Information" on page 22. z Make sure that the orange protective tape is installed properly. z Increase the Print Quality setting in the printer driver settings. Step 2 See "Print Head Cleaning" on page 31. See "Replacing FINE Cartridges" on FINE Cartridges are probably clogged. z Make... twice Step 4 See "Replacing a FINE Cartridge" on page 25. Routine Maintenance When Printing Becomes Faint or Colors Are Incorrect When printing becomes faint or colors are incorrect, the print head nozzles on page 33. If lines are not satisfactory, performing Print Head Alignment ...
Quick Start Guide
Page 23
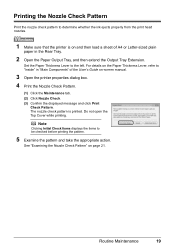
... Nozzle Check Pattern Print the nozzle check pattern to determine whether the ink ejects properly from the print head nozzles. 1 Make sure that the printer is printed. For details on page 21. See "Examining the Nozzle Check Pattern" on the Paper Thickness Lever, refer to "Inside" in ... the items to the left. The nozzle check pattern is on and then load a sheet of the User's Guide on-screen manual. 3 Open the printer properties dialog box. 4 Print the Nozzle Check Pattern. (1) Click the Maintenance tab. (2) Click Nozzle Check. (3) Confirm the displayed message and click Print...
... Nozzle Check Pattern Print the nozzle check pattern to determine whether the ink ejects properly from the print head nozzles. 1 Make sure that the printer is printed. For details on page 21. See "Examining the Nozzle Check Pattern" on the Paper Thickness Lever, refer to "Inside" in ... the items to the left. The nozzle check pattern is on and then load a sheet of the User's Guide on-screen manual. 3 Open the printer properties dialog box. 4 Print the Nozzle Check Pattern. (1) Click the Maintenance tab. (2) Click Nozzle Check. (3) Confirm the displayed message and click Print...
Quick Start Guide
Page 24
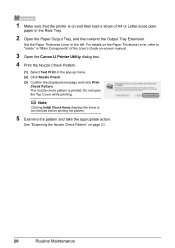
... printed. The nozzle check pattern is on and then load a sheet of the User's Guide on-screen manual. 3 Open the Canon IJ Printer Utility dialog box. 4 Print the Nozzle Check Pattern. (1) Select Test Print in the Rear Tray. 2 Open the Paper Output Tray, and then extend the Output ...
... printed. The nozzle check pattern is on and then load a sheet of the User's Guide on-screen manual. 3 Open the Canon IJ Printer Utility dialog box. 4 Print the Nozzle Check Pattern. (1) Select Test Print in the Rear Tray. 2 Open the Paper Output Tray, and then extend the Output ...
Quick Start Guide
Page 26
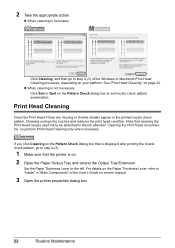
... Head causes used ink to be absorbed in the ink absorber. See "Print Head Cleaning" on -screen manual. 3 Open the printer properties dialog box. 22 Routine Maintenance Note that the printer is necessary Click Cleaning, and then go to "Inside" in the printed nozzle check pattern. Set the Paper Thickness Lever to...
... Head causes used ink to be absorbed in the ink absorber. See "Print Head Cleaning" on -screen manual. 3 Open the printer properties dialog box. 22 Routine Maintenance Note that the printer is necessary Click Cleaning, and then go to "Inside" in the printed nozzle check pattern. Set the Paper Thickness Lever to...


