Quick Start Guide
Page 5
... Using the Printer 6 Included Items 6 Turning the Printer On and Off 6 Loading Printing Paper 8 Printing from Your Computer 16 Printing with Windows 16 Printing with Macintosh 17 Routine Maintenance 18 When Printing Becomes Faint or Colors Are Incorrect 18 Printing the Nozzle Check Pattern 19 Examining the Nozzle Check Pattern ...........21 Print Head Cleaning 22 Print Head Deep Cleaning 25 Aligning the Print Head 27 Replacing...
... Using the Printer 6 Included Items 6 Turning the Printer On and Off 6 Loading Printing Paper 8 Printing from Your Computer 16 Printing with Windows 16 Printing with Macintosh 17 Routine Maintenance 18 When Printing Becomes Faint or Colors Are Incorrect 18 Printing the Nozzle Check Pattern 19 Examining the Nozzle Check Pattern ...........21 Print Head Cleaning 22 Print Head Deep Cleaning 25 Aligning the Print Head 27 Replacing...

Quick Start Guide
Page 16
... the right. The Paper Thickness Lever switches the clearance between the Print Head and the loaded paper to match the media type. (4) Set it against the left when you finish printing. 3 Load the paper. (1) Load the paper in the printer driver. Reset the Paper Thickness Lever to the loaded paper. Do...Mark (A). 4 Specify the page size and media type settings according to the left side of the paper are smudged, try to print with the print side facing UP. (2) Align the paper stack against the right side of the Rear Tray. (A) (3) Pinch the Paper Guide and slide it to the right...
... the right. The Paper Thickness Lever switches the clearance between the Print Head and the loaded paper to match the media type. (4) Set it against the left when you finish printing. 3 Load the paper. (1) Load the paper in the printer driver. Reset the Paper Thickness Lever to the loaded paper. Do...Mark (A). 4 Specify the page size and media type settings according to the left side of the paper are smudged, try to print with the print side facing UP. (2) Align the paper stack against the right side of the Rear Tray. (A) (3) Pinch the Paper Guide and slide it to the right...
Quick Start Guide
Page 20
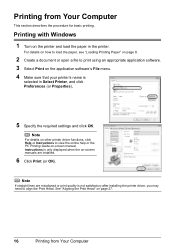
... to view the online help or the PC Printing Guide on the application software's File menu. 4 Make sure that your printer's name is not satisfactory after installing the printer driver, you may need to align the Print Head. See "Aligning the Print Head" on the printer and load the paper in Select Printer, and click Preferences (or Properties). 5 Specify the required...
... to view the online help or the PC Printing Guide on the application software's File menu. 4 Make sure that your printer's name is not satisfactory after installing the printer driver, you may need to align the Print Head. See "Aligning the Print Head" on the printer and load the paper in Select Printer, and click Preferences (or Properties). 5 Specify the required...

Quick Start Guide
Page 21
.... Note For details on other printer driver functions, click to align the Print Head. Printing with Macintosh 1 Turn on the printer and load the paper in the pop-up menu. 9 Specify the required settings. See "Aligning the Print Head" on the application software's File menu. 4 Make sure that your printer's name is clicked. 10 Click Print. Note If straight lines are...
.... Note For details on other printer driver functions, click to align the Print Head. Printing with Macintosh 1 Turn on the printer and load the paper in the pop-up menu. 9 Specify the required settings. See "Aligning the Print Head" on the application software's File menu. 4 Make sure that your printer's name is clicked. 10 Click Print. Note If straight lines are...
Quick Start Guide
Page 22
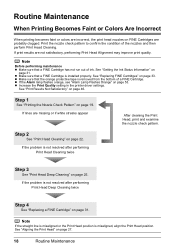
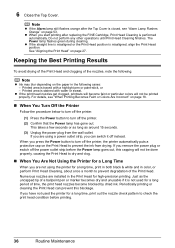
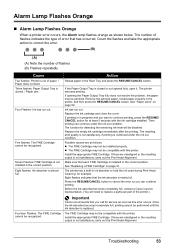
..., align the Print Head position. z If the Alarm lamp flashes orange, see "Alarm Lamp Flashes Orange" on page 25. z Increase the Print Quality setting in the printer driver settings. If the problem is not resolved after performing Print Head Deep Cleaning twice Step 4 See "Replacing a FINE Cartridge" on page 33. Routine Maintenance When Printing Becomes Faint or Colors Are...
..., align the Print Head position. z If the Alarm lamp flashes orange, see "Alarm Lamp Flashes Orange" on page 25. z Increase the Print Quality setting in the printer driver settings. If the problem is not resolved after performing Print Head Deep Cleaning twice Step 4 See "Replacing a FINE Cartridge" on page 33. Routine Maintenance When Printing Becomes Faint or Colors Are...

Quick Start Guide
Page 31
... left. Routine Maintenance 27 The print head alignment pattern is displayed. The dialog for entering a print head alignment value is printed. For details on the Paper ...printing. (4) After the pattern is printed, click Yes. Set the Paper Thickness Lever to complete. Aligning the Print Head If ruled lines are printed misaligned or print results are otherwise unsatisfactory, adjust the print head position. 1 Make sure that the printer is on -screen manual. 3 Print the pattern. (1) Open the printer properties dialog box. (2) In the Maintenance sheet, click Print Head Alignment...
... left. Routine Maintenance 27 The print head alignment pattern is displayed. The dialog for entering a print head alignment value is printed. For details on the Paper ...printing. (4) After the pattern is printed, click Yes. Set the Paper Thickness Lever to complete. Aligning the Print Head If ruled lines are printed misaligned or print results are otherwise unsatisfactory, adjust the print head position. 1 Make sure that the printer is on -screen manual. 3 Print the pattern. (1) Open the printer properties dialog box. (2) In the Maintenance sheet, click Print Head Alignment...

Quick Start Guide
Page 33
The dialog for entering a print head alignment value is printed. The print head alignment pattern is displayed. Routine Maintenance 29 1 Make sure that the printer is on -screen manual. 3 Print the pattern. (1) Open the Canon IJ Printer Utility dialog box. (2) Select Test Print in the Rear Tray. 2 Open the Paper Output Tray and extend the Output Tray Extension. Important Do not open the...
The dialog for entering a print head alignment value is printed. The print head alignment pattern is displayed. Routine Maintenance 29 1 Make sure that the printer is on -screen manual. 3 Print the pattern. (1) Open the Canon IJ Printer Utility dialog box. (2) Select Test Print in the Rear Tray. 2 Open the Paper Output Tray and extend the Output Tray Extension. Important Do not open the...
Quick Start Guide
Page 40
.... Just as around 15 seconds. (3) Unplug the power plug from drying. See "Aligning the Print Head" on the paper in the Print Head for a long time, print in both black & white and in color, or perform Print Head Cleaning, about once a month to prevent the ink from the wall outlet. If ...seconds or as long as the uncapped tip of the Print Head. z If the print head nozzles get clogged, printouts will become blocked by dried ink. If you are not using the printer for high-precision printing. Printed area is not used the printer for a Long Time When you are using a power ...
.... Just as around 15 seconds. (3) Unplug the power plug from drying. See "Aligning the Print Head" on the paper in the Print Head for a long time, print in both black & white and in color, or perform Print Head Cleaning, about once a month to prevent the ink from the wall outlet. If ...seconds or as long as the uncapped tip of the Print Head. z If the print head nozzles get clogged, printouts will become blocked by dried ink. If you are not using the printer for high-precision printing. Printed area is not used the printer for a Long Time When you are using a power ...

Quick Start Guide
Page 51
... unclear prints or prints with reduced quality. Print Head is misaligned. „ White Streaks Cause Print Head nozzles are clogged. Print Head nozzles are clogged. (A) See "When Printing Becomes Faint or Colors Are Incorrect" on the wrong side of such paper may be printed misaligned. If you did not align the Print Head after you install it . „ Printing Does Not Start/Printing Is Blurred/Colors Are...
... unclear prints or prints with reduced quality. Print Head is misaligned. „ White Streaks Cause Print Head nozzles are clogged. Print Head nozzles are clogged. (A) See "When Printing Becomes Faint or Colors Are Incorrect" on the wrong side of such paper may be printed misaligned. If you did not align the Print Head after you install it . „ Printing Does Not Start/Printing Is Blurred/Colors Are...

Quick Start Guide
Page 53
... (A) facing up the paper in a direction opposite to paper curl as seen below. (1) (2) (A) (3)Check to print on page 27 to curl. See "Aligning the Print Head" on the other side facing up. Action See "When Printing Becomes Faint or Colors Are Incorrect" on a level surface. Troubleshooting 49 We recommend putting unused paper back into the package...
... (A) facing up the paper in a direction opposite to paper curl as seen below. (1) (2) (A) (3)Check to print on page 27 to curl. See "Aligning the Print Head" on the other side facing up. Action See "When Printing Becomes Faint or Colors Are Incorrect" on a level surface. Troubleshooting 49 We recommend putting unused paper back into the package...
Quick Start Guide
Page 57
... out the Print Head Alignment. If the Paper Output Tray is not satisfactory, carry out the Print Head Alignment. See "Paper Jams" on page 31. Replace the empty ink cartridge immediately after the printing. Possible causes are as shown below. Install the appropriate FINE Cartridge. The printer has a built... to hold the ink used during Print Head Cleaning, for at least 5 seconds with the ink cartridge installed. Action Reload paper in the printer, and then press the RESUME/CANCEL button. Before the ink absorber becomes completely full, contact a Canon service representative. (You will be...
... out the Print Head Alignment. If the Paper Output Tray is not satisfactory, carry out the Print Head Alignment. See "Paper Jams" on page 31. Replace the empty ink cartridge immediately after the printing. Possible causes are as shown below. Install the appropriate FINE Cartridge. The printer has a built... to hold the ink used during Print Head Cleaning, for at least 5 seconds with the ink cartridge installed. Action Reload paper in the printer, and then press the RESUME/CANCEL button. Before the ink absorber becomes completely full, contact a Canon service representative. (You will be...

Quick Start Guide
Page 58
... the printer back on after leaving it for one minute or more. Action Possible causes are misaligned or the resulting output is not resolved, contact your Canon Service representative. 54 Troubleshooting Install the appropriate FINE Cartridge. If you want to obtain optimum qualities. If the problem is not satisfactory, carry out the Print Head Alignment...
... the printer back on after leaving it for one minute or more. Action Possible causes are misaligned or the resulting output is not resolved, contact your Canon Service representative. 54 Troubleshooting Install the appropriate FINE Cartridge. If you want to obtain optimum qualities. If the problem is not satisfactory, carry out the Print Head Alignment...
Quick Start Guide
Page 70
... printing 19 P Print Head aligning 27 cleaning 22 deep cleaning 25 Printing from Your Computer 16 Macintosh 17 Windows 16 R Replacing a FINE Cartridge 31 ink status information 31 Routine Maintenance 18 S Safety Precautions 3 Specialty Media 8 Specifications 60 System Requirements 61 T Troubleshooting 43 66 Turning off the Printer 7 Turning on the Printer 6 Index A Appendix 57 B Before Using the Printer 6 C Canon...
... printing 19 P Print Head aligning 27 cleaning 22 deep cleaning 25 Printing from Your Computer 16 Macintosh 17 Windows 16 R Replacing a FINE Cartridge 31 ink status information 31 Routine Maintenance 18 S Safety Precautions 3 Specialty Media 8 Specifications 60 System Requirements 61 T Troubleshooting 43 66 Turning off the Printer 7 Turning on the Printer 6 Index A Appendix 57 B Before Using the Printer 6 C Canon...

Easy Setup Instructions
Page 2
... depending on the operating system you can use of Canon printers. The installation resumes from step c to install appears, confirm the contents, click Install. a Be sure to TURN THE PRINTER OFF before continuing. (1) Press the Power button. ...Print Head Alignment Recommended screen appears, click Next. k When the Installation Results screen appears, click Next. In Windows Vista, go to display explanations of each application. Click OK. The printer driver, On-screen Manuals, and application software are installed automatically. Serial Number m When the PIXMA...
... depending on the operating system you can use of Canon printers. The installation resumes from step c to install appears, confirm the contents, click Install. a Be sure to TURN THE PRINTER OFF before continuing. (1) Press the Power button. ...Print Head Alignment Recommended screen appears, click Next. k When the Installation Results screen appears, click Next. In Windows Vista, go to display explanations of each application. Click OK. The printer driver, On-screen Manuals, and application software are installed automatically. Serial Number m When the PIXMA...


