Quick Start Guide
Page 4
...® guidelines for 5 years after production has stopped. Disclaimer Canon U.S.A., Inc. z "Windows Vista" is made regarding non-Canon products was compiled from publicly available information. z "Macintosh" and "Mac" are not intended to be, nor should they be understood to your Canon PIXMA iP2600 series Photo Printer. The steps described in this manual are available for energy...
...® guidelines for 5 years after production has stopped. Disclaimer Canon U.S.A., Inc. z "Windows Vista" is made regarding non-Canon products was compiled from publicly available information. z "Macintosh" and "Mac" are not intended to be, nor should they be understood to your Canon PIXMA iP2600 series Photo Printer. The steps described in this manual are available for energy...
Quick Start Guide
Page 8
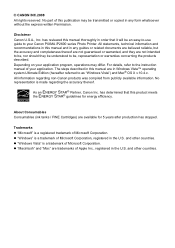
...metal or liquid) fall into contact with its back attached to 90% (condensation free). To avoid the risk of fire or electric shocks, install the printer in a location with an ambient temperature range of 5°C to 35°C (41°F to 95°F) and humidity of flammable solvents (alcohol,... thinners, etc.) on a slant, vertically or upside-down, as the ink may cause injury or damage the printer if you can easily unplug the power plug if necessary. Ensure that is unstable or subject to excessive vibration. Do not place...
...metal or liquid) fall into contact with its back attached to 90% (condensation free). To avoid the risk of fire or electric shocks, install the printer in a location with an ambient temperature range of 5°C to 35°C (41°F to 95°F) and humidity of flammable solvents (alcohol,... thinners, etc.) on a slant, vertically or upside-down, as the ink may cause injury or damage the printer if you can easily unplug the power plug if necessary. Ensure that is unstable or subject to excessive vibration. Do not place...

Quick Start Guide
Page 9
...medical advice immediately. Do not shake FINE Cartridges (Ink Cartridges). Never touch the electrical contacts or Print Head Nozzles on a FINE Cartridge (Ink Cartridge) after printing. Do not throw FINE Cartridges (Ink Cartridges) into fire. In case ink gets in contact with skin, wash with water ...immediately. In case ink gets in contact with eyes, rinse with soap and ...
...medical advice immediately. Do not shake FINE Cartridges (Ink Cartridges). Never touch the electrical contacts or Print Head Nozzles on a FINE Cartridge (Ink Cartridge) after printing. Do not throw FINE Cartridges (Ink Cartridges) into fire. In case ink gets in contact with skin, wash with water ...immediately. In case ink gets in contact with eyes, rinse with soap and ...
Quick Start Guide
Page 11
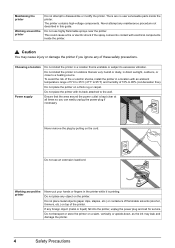
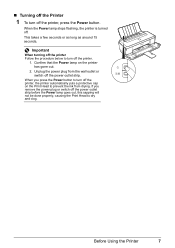
... flashing, the printer is turned off the printer, the printer automatically puts a protective cap on the printer has gone out. 2. This takes a few seconds or as long as around 15 seconds. Before Using the Printer 7 Confirm that the Power lamp on the Print Head to turn off the printer, press the ...Power button. Important When turning off the printer Follow the procedure below to prevent the ink from the wall outlet or switch off the power...
... flashing, the printer is turned off the printer, the printer automatically puts a protective cap on the printer has gone out. 2. This takes a few seconds or as long as around 15 seconds. Before Using the Printer 7 Confirm that the Power lamp on the Print Head to turn off the printer, press the ...Power button. Important When turning off the printer Follow the procedure below to prevent the ink from the wall outlet or switch off the power...
Quick Start Guide
Page 14
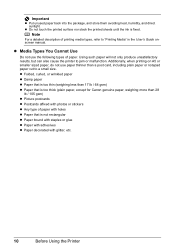
... such paper will not only produce unsatisfactory results, but can also cause the printer to a small size. z Do not touch the printed surface nor stack the printed sheets until the ink is not rectangular z Paper bound with staples or glue z Paper with adhesives z Paper decorated with holes z Paper that is fixed. Important... wrinkled paper z Damp paper z Paper that is too thin (weighing less than 17 lb / 64 gsm) z Paper that is too thick (plain paper, except for Canon genuine paper, weighing more than a post card, including plain paper or notepad paper cut to jam or malfunction.
... such paper will not only produce unsatisfactory results, but can also cause the printer to a small size. z Do not touch the printed surface nor stack the printed sheets until the ink is not rectangular z Paper bound with staples or glue z Paper with adhesives z Paper decorated with holes z Paper that is fixed. Important... wrinkled paper z Damp paper z Paper that is too thin (weighing less than 17 lb / 64 gsm) z Paper that is too thick (plain paper, except for Canon genuine paper, weighing more than a post card, including plain paper or notepad paper cut to jam or malfunction.
Quick Start Guide
Page 22
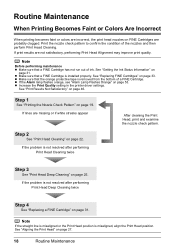
... z Make sure that a FINE Cartridge is misaligned, align the Print Head position. z Increase the Print Quality setting in the printer driver settings. See "Getting the Ink Status Information" on page 27. 18 Routine Maintenance See "Replacing FINE Cartridges" on page 19. Step 1 See "Printing the ... Becomes Faint or Colors Are Incorrect When printing becomes faint or colors are incorrect, the print head nozzles on page 46. See "Print Results Not Satisfactory" on FINE Cartridges are probably clogged. Print the nozzle check pattern to confirm the condition of ink. Note If the...
... z Make sure that a FINE Cartridge is misaligned, align the Print Head position. z Increase the Print Quality setting in the printer driver settings. See "Getting the Ink Status Information" on page 27. 18 Routine Maintenance See "Replacing FINE Cartridges" on page 19. Step 1 See "Printing the ... Becomes Faint or Colors Are Incorrect When printing becomes faint or colors are incorrect, the print head nozzles on page 46. See "Print Results Not Satisfactory" on FINE Cartridges are probably clogged. Print the nozzle check pattern to confirm the condition of ink. Note If the...
Quick Start Guide
Page 23
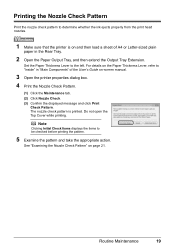
... Output Tray Extension. Printing the Nozzle Check Pattern Print the nozzle check pattern to determine whether the ink ejects properly from the print head nozzles. 1 Make sure that the printer is printed. Do not open the Top Cover while printing. Note Clicking Initial Check Items displays the... and then load a sheet of A4 or Letter-sized plain paper in "Main Components" of the User's Guide on-screen manual. 3 Open the printer properties dialog box. 4 Print the Nozzle Check Pattern. (1) Click the Maintenance tab. (2) Click Nozzle Check. (3) Confirm the displayed message and click Print...
... Output Tray Extension. Printing the Nozzle Check Pattern Print the nozzle check pattern to determine whether the ink ejects properly from the print head nozzles. 1 Make sure that the printer is printed. Do not open the Top Cover while printing. Note Clicking Initial Check Items displays the... and then load a sheet of A4 or Letter-sized plain paper in "Main Components" of the User's Guide on-screen manual. 3 Open the printer properties dialog box. 4 Print the Nozzle Check Pattern. (1) Click the Maintenance tab. (2) Click Nozzle Check. (3) Confirm the displayed message and click Print...

Quick Start Guide
Page 25
Example: When white streaks appear (Color ink) Routine Maintenance 21 Replace the FINE Cartridge if the remaining amount of this pattern are missing (Black ink) (2) If these patterns have white streaks, the Color print head nozzle needs cleaning. See "Replacing a FINE Cartridge" on page 31. 1 Check the ...nozzle check pattern you printed. (1) (2) (1) If lines of ink is not enough ink. Note The nozzle check...
Example: When white streaks appear (Color ink) Routine Maintenance 21 Replace the FINE Cartridge if the remaining amount of this pattern are missing (Black ink) (2) If these patterns have white streaks, the Color print head nozzle needs cleaning. See "Replacing a FINE Cartridge" on page 31. 1 Check the ...nozzle check pattern you printed. (1) (2) (1) If lines of ink is not enough ink. Note The nozzle check...
Quick Start Guide
Page 26
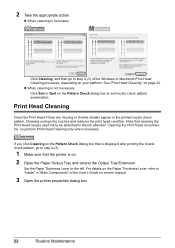
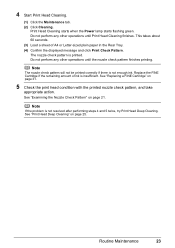
...to step 4-(3). 1 Make sure that cleaning the Print Head causes used ink to the left. Cleaning unclogs the nozzles and restores the print head condition. See "Print Head Cleaning" on -screen manual. 3 Open the printer properties dialog box. 22 Routine Maintenance Print Head Cleaning Clean the Print ...Head if lines are missing or if white streaks appear in the ink absorber. z When cleaning is not necessary Click Exit or Quit on ...
...to step 4-(3). 1 Make sure that cleaning the Print Head causes used ink to the left. Cleaning unclogs the nozzles and restores the print head condition. See "Print Head Cleaning" on -screen manual. 3 Open the printer properties dialog box. 22 Routine Maintenance Print Head Cleaning Clean the Print ...Head if lines are missing or if white streaks appear in the ink absorber. z When cleaning is not necessary Click Exit or Quit on ...
Quick Start Guide
Page 27
This takes about 60 seconds. (3) Load a sheet of ink is not enough ink. See "Examining the Nozzle Check Pattern" on page 25. See "Print Head Deep Cleaning" on page 21. See "Replacing a FINE Cartridge" on page 31. 5 Check ...
This takes about 60 seconds. (3) Load a sheet of ink is not enough ink. See "Examining the Nozzle Check Pattern" on page 25. See "Print Head Deep Cleaning" on page 21. See "Replacing a FINE Cartridge" on page 31. 5 Check ...
Quick Start Guide
Page 28
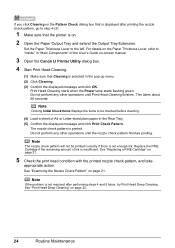
.... The nozzle check pattern is not resolved after printing the nozzle check pattern, go to be printed correctly if there is not enough ink. If you click Cleaning on the Pattern Check dialog box that is displayed after performing steps 4 and 5 twice, try Print Head ... (5) Confirm the displayed message and click Print Check Pattern. For details on -screen manual. 3 Open the Canon IJ Printer Utility dialog box. 4 Start Print Head Cleaning. (1) Make sure that the printer is insufficient. Note If the problem is printed. See "Replacing a FINE Cartridge" on page 25. 24 ...
.... The nozzle check pattern is not resolved after printing the nozzle check pattern, go to be printed correctly if there is not enough ink. If you click Cleaning on the Pattern Check dialog box that is displayed after performing steps 4 and 5 twice, try Print Head ... (5) Confirm the displayed message and click Print Check Pattern. For details on -screen manual. 3 Open the Canon IJ Printer Utility dialog box. 4 Start Print Head Cleaning. (1) Make sure that the printer is insufficient. Note If the problem is printed. See "Replacing a FINE Cartridge" on page 25. 24 ...
Quick Start Guide
Page 29
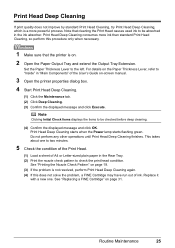
Note that the printer is on. 2 Open the Paper Output Tray and extend the Output Tray Extension. For details on the Paper Thickness Lever, refer to "Inside" in the ink absorber. See "Printing the Nozzle Check Pattern" on page 31. Print Head Deep Cleaning starts when the Power lamp ...Cleaning, so perform this does not solve the problem, a FINE Cartridge may have run out of the User's Guide on-screen manual. 3 Open the printer properties dialog box. 4 Start Print Head Deep Cleaning. (1) Click the Maintenance tab. (2) Click Deep Cleaning. (3) Confirm the displayed message and click Execute....
Note that the printer is on. 2 Open the Paper Output Tray and extend the Output Tray Extension. For details on the Paper Thickness Lever, refer to "Inside" in the ink absorber. See "Printing the Nozzle Check Pattern" on page 31. Print Head Deep Cleaning starts when the Power lamp ...Cleaning, so perform this does not solve the problem, a FINE Cartridge may have run out of the User's Guide on-screen manual. 3 Open the printer properties dialog box. 4 Start Print Head Deep Cleaning. (1) Click the Maintenance tab. (2) Click Deep Cleaning. (3) Confirm the displayed message and click Execute....

Quick Start Guide
Page 30
... the displayed message and click OK. See "Replacing a FINE Cartridge" on -screen manual. 3 Open the Canon IJ Printer Utility dialog box. 4 Start Print Head Deep Cleaning. (1) Make sure that the printer is not resolved, perform Print Head Deep Cleaning again. (4) If this does not solve the problem, a FINE... Cartridge may have run out of ink. Do not perform any other operations until Print Head Deep Cleaning finishes....
... the displayed message and click OK. See "Replacing a FINE Cartridge" on -screen manual. 3 Open the Canon IJ Printer Utility dialog box. 4 Start Print Head Deep Cleaning. (1) Make sure that the printer is not resolved, perform Print Head Deep Cleaning again. (4) If this does not solve the problem, a FINE... Cartridge may have run out of ink. Do not perform any other operations until Print Head Deep Cleaning finishes....
Quick Start Guide
Page 35
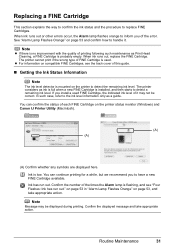
... of the times the Alarm lamp is flashing, and see the back cover of the error. Ink has run out." on page 53 in "Alarm Lamp Flashes Orange" on the printer status monitor (Windows) and Canon IJ Printer Utility (Macintosh). (A) (A) (A) Confirm whether any symbols are displayed here. You can continue printing for a while, but...
... of the times the Alarm lamp is flashing, and see the back cover of the error. Ink has run out." on page 53 in "Alarm Lamp Flashes Orange" on the printer status monitor (Windows) and Canon IJ Printer Utility (Macintosh). (A) (A) (A) Confirm whether any symbols are displayed here. You can continue printing for a while, but...

Quick Start Guide
Page 36
... taskbar during printing. (1) Open the Canon IJ Printer Utility. To confirm the ink level information, click the Ink Details menu. Note You can also display the printer status monitor by clicking the Canon XXX (where "XXX" is your printer's name) which appears on -screen manual. (2) Select Ink Level Information in "Opening the Printer Properties Dialog Box (Windows)" of the...
... taskbar during printing. (1) Open the Canon IJ Printer Utility. To confirm the ink level information, click the Ink Details menu. Note You can also display the printer status monitor by clicking the Canon XXX (where "XXX" is your printer's name) which appears on -screen manual. (2) Select Ink Level Information in "Opening the Printer Properties Dialog Box (Windows)" of the...
Quick Start Guide
Page 37
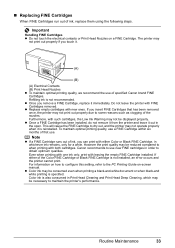
...printer and leave it is reinstalled. If you can print with FINE Cartridges removed. To maintain optimal printing quality, use a FINE Cartridge within six months of specified Canon brand FINE Cartridges. z Once you touch it immediately. z Replace empty cartridges with leaving the empty FINE Cartridge installed. z Color ink... or Print Head Nozzles on -screen manual. Canon recommends to the PC Printing Guide on a FINE Cartridge. The printer may be reduced compared to when printing with such cartridges, the Low Ink Warning may not print out properly due to ...
...printer and leave it is reinstalled. If you can print with FINE Cartridges removed. To maintain optimal printing quality, use a FINE Cartridge within six months of specified Canon brand FINE Cartridges. z Once you touch it immediately. z Replace empty cartridges with leaving the empty FINE Cartridge installed. z Color ink... or Print Head Nozzles on -screen manual. Canon recommends to the PC Printing Guide on a FINE Cartridge. The printer may be reduced compared to when printing with such cartridges, the Low Ink Warning may not print out properly due to ...
Quick Start Guide
Page 39
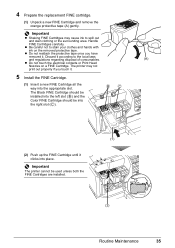
... Cartridge all the way into the appropriate slot. The Black FINE Cartridge should be installed into the left slot ( B ) and the Color FINE Cartridge should be used unless both the FINE Cartridges are installed. (2) Routine Maintenance 35 Important z Shaking FINE Cartridges may not print out... removed it according to spill out and stain clothing or the surrounding area. Handle FINE Cartridges carefully. Discard it . The printer may cause ink to the local laws and regulations regarding disposal of consumables. (A) z Do not touch the electrical contacts or Print Head Nozzles...
... Cartridge all the way into the appropriate slot. The Black FINE Cartridge should be installed into the left slot ( B ) and the Color FINE Cartridge should be used unless both the FINE Cartridges are installed. (2) Routine Maintenance 35 Important z Shaking FINE Cartridges may not print out... removed it according to spill out and stain clothing or the surrounding area. Handle FINE Cartridges carefully. Discard it . The printer may cause ink to the local laws and regulations regarding disposal of consumables. (A) z Do not touch the electrical contacts or Print Head Nozzles...
Quick Start Guide
Page 40
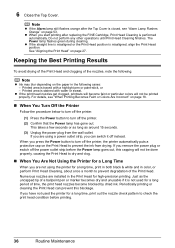
... line is misaligned or the Print Head position is performed automatically. If you start printing after the Top Cover is not used the printer for high-precision printing. See "Aligning the Print Head" on the paper in the following . Periodically printing or cleaning the Print ... drying. Printed area is stained with a highlight pen or paint-stick, or - If you are installed in color, or perform Print Head Cleaning, about once a month to prevent the ink from the wall outlet. For details, see "Alarm Lamp Flashes Orange" on the Print Head to prevent degradation...
... line is misaligned or the Print Head position is performed automatically. If you start printing after the Top Cover is not used the printer for high-precision printing. See "Aligning the Print Head" on the paper in the following . Periodically printing or cleaning the Print ... drying. Printed area is stained with a highlight pen or paint-stick, or - If you are installed in color, or perform Print Head Cleaning, about once a month to prevent the ink from the wall outlet. For details, see "Alarm Lamp Flashes Orange" on the Print Head to prevent degradation...
Quick Start Guide
Page 44
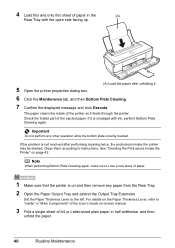
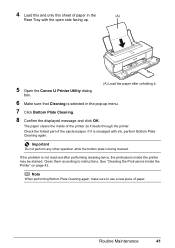
... paper. Check the folded part of paper in the (A) Rear Tray with ink, perform Bottom Plate Cleaning again. For details on the Paper Thickness Lever, refer to use a new piece of paper. 1 Make sure that the printer is not resolved after unfolding it. 6 Click the Maintenance tab, and then... Bottom Plate Cleaning. 7 Confirm the displayed message and click Execute. The paper cleans the inside the printer may be stained. Important Do not perform any paper from the Rear Tray. 2 Open the Paper Output Tray and extend the Output Tray Extension....
... paper. Check the folded part of paper in the (A) Rear Tray with ink, perform Bottom Plate Cleaning again. For details on the Paper Thickness Lever, refer to use a new piece of paper. 1 Make sure that the printer is not resolved after unfolding it. 6 Click the Maintenance tab, and then... Bottom Plate Cleaning. 7 Confirm the displayed message and click Execute. The paper cleans the inside the printer may be stained. Important Do not perform any paper from the Rear Tray. 2 Open the Paper Output Tray and extend the Output Tray Extension....
Quick Start Guide
Page 45
... is smudged with the open side facing up. 5 Open the Canon IJ Printer Utility dialog box. (A) Load the paper after performing cleaning twice, the protrusions inside of the printer as it . 6 Make sure that Cleaning is selected in the (A) Rear Tray with ink, perform Bottom Plate Cleaning again. Note When performing Bottom Plate Cleaning...
... is smudged with the open side facing up. 5 Open the Canon IJ Printer Utility dialog box. (A) Load the paper after performing cleaning twice, the protrusions inside of the printer as it . 6 Make sure that Cleaning is selected in the (A) Rear Tray with ink, perform Bottom Plate Cleaning again. Note When performing Bottom Plate Cleaning...


