ZR Instruction Manual
Page 1
... to the equipment unless otherwise specified in a residential installation. Use of shielded cable is subject to comply with class B limits in the literature accompanying the product. 2 Digital Video Camcorder, ZR This device complies with the instructions, may cause undesired operation. Operation is required... WARNING: Unauthorized recording of copyrighted materials may be contrary to persons. The lightning flash with the limits for help. One Canon Plaza, Lake Success, NY 11042, U.S.A. This equipment generates, uses and can be required to Part 15 of uninsulated "...
... to the equipment unless otherwise specified in a residential installation. Use of shielded cable is subject to comply with class B limits in the literature accompanying the product. 2 Digital Video Camcorder, ZR This device complies with the instructions, may cause undesired operation. Operation is required... WARNING: Unauthorized recording of copyrighted materials may be contrary to persons. The lightning flash with the limits for help. One Canon Plaza, Lake Success, NY 11042, U.S.A. This equipment generates, uses and can be required to Part 15 of uninsulated "...
ZR Instruction Manual
Page 5
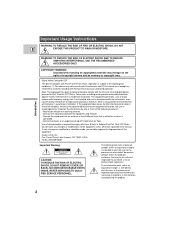
...; Troubleshooting - in case you run into any problems (p. 68) Note that you read this Canon camcorder. CA-600 Compact Power Adapter DC-600 DC Coupler STV-150 Stereo Video Cable S-150 S-video Cable STV-250 Stereo Video Digital Video Cassette Cable FU-100 Finder Unit and Case 6 Its following accessories: advanced technology makes it very...
...; Troubleshooting - in case you run into any problems (p. 68) Note that you read this Canon camcorder. CA-600 Compact Power Adapter DC-600 DC Coupler STV-150 Stereo Video Cable S-150 S-video Cable STV-250 Stereo Video Digital Video Cassette Cable FU-100 Finder Unit and Case 6 Its following accessories: advanced technology makes it very...
ZR Instruction Manual
Page 7
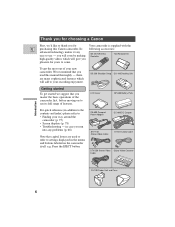
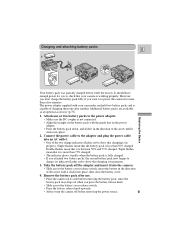
... power socket (100-240 V AC, 50/60 Hz) to the DC current used by your camera with instant power from the TV or the antenna cable. Connecting the camera to an AC outlet 1 2 6 5 4 3 Use the power adapter and the DC coupler to the adapter. 5. You can now close the ...cover release switch in the direction of the arrow. • The battery cover flips open. 2. Connect the DC coupler to emit noise - B A Powering Your Camcorder Before operating your camera, you press the battery release knob. • Slide across the battery cover release switch (and replace the small rubber stopper). •...
... power socket (100-240 V AC, 50/60 Hz) to the DC current used by your camera with instant power from the TV or the antenna cable. Connecting the camera to an AC outlet 1 2 6 5 4 3 Use the power adapter and the DC coupler to the adapter. 5. You can now close the ...cover release switch in the direction of the arrow. • The battery cover flips open. 2. Connect the DC coupler to emit noise - B A Powering Your Camcorder Before operating your camera, you press the battery release knob. • Slide across the battery cover release switch (and replace the small rubber stopper). •...
ZR Instruction Manual
Page 8
...the battery pack fully if you to show that the battery pack is between 50% and 75% charged. Connect the power cable to the adapter and plug the power cable into an AC outlet. • One of the two charge indicators flashes red to power the camera for you want it... are available as an optional accessory (p.73). 1. Double flashes mean that it to show that charging is in progress. 3. Single flashes mean that your camcorder can hold two battery packs and is working properly. Triple flashes mean that charging is in progress. Attach one or two battery packs to charge...
...the battery pack fully if you to show that the battery pack is between 50% and 75% charged. Connect the power cable to the adapter and plug the power cable into an AC outlet. • One of the two charge indicators flashes red to power the camera for you want it... are available as an optional accessory (p.73). 1. Double flashes mean that it to show that charging is in progress. 3. Single flashes mean that your camcorder can hold two battery packs and is working properly. Triple flashes mean that charging is in progress. Attach one or two battery packs to charge...
ZR Instruction Manual
Page 9
...times and how to charge the back-up battery. • Do not tug at the DC Coupler cable, or bend it backwards and forwards, while it is fed through the opening in the "Notes ...remove attached battery packs, but charging will not take place until you do not need to pinch the cable when closing the battery cover. 10 If you attach two battery packs, charging begins from the battery you...the adapter was already plugged into an AC outlet, from the side labeled "A". • When powering your camcorder from an AC outlet, you remove the DC coupler from the adapter. • You can charge a single battery ...
...times and how to charge the back-up battery. • Do not tug at the DC Coupler cable, or bend it backwards and forwards, while it is fed through the opening in the "Notes ...remove attached battery packs, but charging will not take place until you do not need to pinch the cable when closing the battery cover. 10 If you attach two battery packs, charging begins from the battery you...the adapter was already plugged into an AC outlet, from the side labeled "A". • When powering your camcorder from an AC outlet, you remove the DC coupler from the adapter. • You can charge a single battery ...
ZR Instruction Manual
Page 21
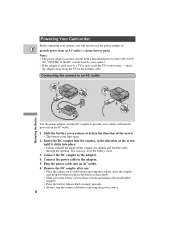
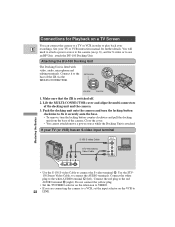
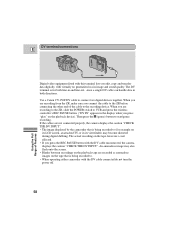
Make sure that the ZR is fitted with video, audio, microphone and editing terminals. Use the STV150 Stereo Video Cable, to the red AUDIO terminal 9 (right). If your E recordings. Connect the red plug to connect the AUDIO terminals. You will need to attach a power source ... to fix it to the base of the docking unit and the camera. 3. Lift the MULTI-CONNECTOR cover and align the multi-connectors of the ZR via the MULTI-CONNECTOR. Attaching the DU-100 Docking Unit The Docking Unit is switched off. 2. Close the cover. • You cannot attach/remove a power...
Make sure that the ZR is fitted with video, audio, microphone and editing terminals. Use the STV150 Stereo Video Cable, to the red AUDIO terminal 9 (right). If your E recordings. Connect the red plug to connect the AUDIO terminals. You will need to attach a power source ... to fix it to the base of the docking unit and the camera. 3. Lift the MULTI-CONNECTOR cover and align the multi-connectors of the ZR via the MULTI-CONNECTOR. Attaching the DU-100 Docking Unit The Docking Unit is switched off. 2. Close the cover. • You cannot attach/remove a power...
ZR Instruction Manual
Page 22
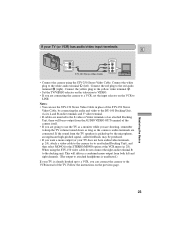
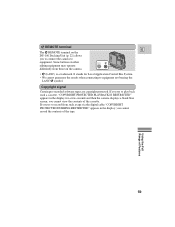
... want a mono output (or your TV does not have audio/video terminals, p. 24), attach a video cable to the camera (or to an attached Docking Unit), and then select MONO for the STEREO/MONO option at the...the DU-100 Docking Unit, via its L and R audio terminals and V video terminal. • If cables are inserted to the S-video or Video terminals of an attached Docking Unit, there will deliver a combined ...0. • Set the TV/VIDEO selector on the previous page. When using the STV-250 Stereo Video Cable. If the sound from both left ). If your TV (or VCR) has audio/video input terminals ...
... want a mono output (or your TV does not have audio/video terminals, p. 24), attach a video cable to the camera (or to an attached Docking Unit), and then select MONO for the STEREO/MONO option at the...the DU-100 Docking Unit, via its L and R audio terminals and V video terminal. • If cables are inserted to the S-video or Video terminals of an attached Docking Unit, there will deliver a combined ...0. • Set the TV/VIDEO selector on the previous page. When using the STV-250 Stereo Video Cable. If the sound from both left ). If your TV (or VCR) has audio/video input terminals ...

ZR Instruction Manual
Page 23
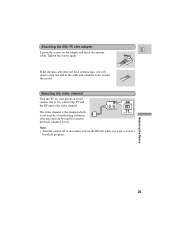
...-100 Docking Unit. • The RF unit is available optionally. 2. Connect the RF unit to the FROM ANT. If your TV has flat twin-lead cable, use the optional RU-100 RF Unit together with F-connectors. Connecting the RF unit 1. If your TV does not have audio/video terminals E TV with... camera directly to a TV which does not have audio/video terminals, you will need to the antenna input on the TV. • Use the coaxial cable with the DU-100 Docking Unit. Connect the TO TV terminal on the RF unit to use the 75-300 ohm adapter. 24
...-100 Docking Unit. • The RF unit is available optionally. 2. Connect the RF unit to the FROM ANT. If your TV has flat twin-lead cable, use the optional RU-100 RF Unit together with F-connectors. Connecting the RF unit 1. If your TV does not have audio/video terminals E TV with... camera directly to a TV which does not have audio/video terminals, you will need to the antenna input on the TV. • Use the coaxial cable with the DU-100 Docking Unit. Connect the TO TV terminal on the RF unit to use the 75-300 ohm adapter. 24
ZR Instruction Manual
Page 24
... Selecting the video channel Turn the TV on, start playback on the adapter and insert the antenna cable. If the antenna cable does not have antenna lugs, you want to strip one end of the cable and wind the wires around the screws. Attaching the 300-75 ohm adapter E Loosen the screws on...
... Selecting the video channel Turn the TV on, start playback on the adapter and insert the antenna cable. If the antenna cable does not have antenna lugs, you want to strip one end of the cable and wind the wires around the screws. Attaching the 300-75 ohm adapter E Loosen the screws on...

ZR Instruction Manual
Page 56
... edit your TV and VCR instruction manuals for Playback on a TV screen" on the camcorder. Prepare the TV and VCR. • Turn on the VCR. Find a point on the camera. 5. Preparations 1. S-150 S-video Cable STV-150 Stereo Video Cable V L R S INPUT S-VIDEO E VIDEO AUDIO L R Record the scenes you want on the TV and set...
... edit your TV and VCR instruction manuals for Playback on a TV screen" on the camcorder. Prepare the TV and VCR. • Turn on the VCR. Find a point on the camera. 5. Preparations 1. S-150 S-video Cable STV-150 Stereo Video Cable V L R S INPUT S-VIDEO E VIDEO AUDIO L R Record the scenes you want on the TV and set...
ZR Instruction Manual
Page 57
... also flash onto the screen. • Blanks between recordings on the tape, however, is being recorded to . • When operating either camcorder with virtually no generation loss in its LCD screen, an attached TV, or in image and sound quality. DV terminal/connections E Digital video ... wireless controller's REC PAUSE button. ("DV IN" appears in both directions. Use a Canon CV-150F DV cable to start/pause recording. The actual recording on the playback tape are recording to the ZR, slide the POWER switch to the recording device. The DV terminal is being recorded to...
... also flash onto the screen. • Blanks between recordings on the tape, however, is being recorded to . • When operating either camcorder with virtually no generation loss in its LCD screen, an attached TV, or in image and sound quality. DV terminal/connections E Digital video ... wireless controller's REC PAUSE button. ("DV IN" appears in both directions. Use a Canon CV-150F DV cable to start/pause recording. The actual recording on the playback tape are recording to the ZR, slide the POWER switch to the recording device. The DV terminal is being recorded to...
ZR Instruction Manual
Page 58
... the contents of Features 59 you try to record from those on other editing equipment may operate MIC m differently from such a tape via the digital cable "COPYRIGHT PROTECTED DUBBING RESTRICTED" appears in the display for Local Application Control Bus System. • We cannot guarantee the results when connecting to equipment. Using...
... the contents of Features 59 you try to record from those on other editing equipment may operate MIC m differently from such a tape via the digital cable "COPYRIGHT PROTECTED DUBBING RESTRICTED" appears in the display for Local Application Control Bus System. • We cannot guarantee the results when connecting to equipment. Using...
ZR Instruction Manual
Page 70
...doesn't display the correct date and time. The wireless controller doesn't work. ? The camera becomes warm during use. ? Additional Information 71 The DV cable is connected correctly, but there's nothing in the display or if normal operation is interrupted, remove and then replace the power source. • If the... behind the LCD panel) using the tip of a ball point pen (or similar): camera functions return to their default setting. • Remove the cable and then reconnect it • The remote sensor is turned off and back on again. • This is not a malfunction. • The ...
...doesn't display the correct date and time. The wireless controller doesn't work. ? The camera becomes warm during use. ? Additional Information 71 The DV cable is connected correctly, but there's nothing in the display or if normal operation is interrupted, remove and then replace the power source. • If the... behind the LCD panel) using the tip of a ball point pen (or similar): camera functions return to their default setting. • Remove the cable and then reconnect it • The remote sensor is turned off and back on again. • This is not a malfunction. • The ...
ZR Instruction Manual
Page 71
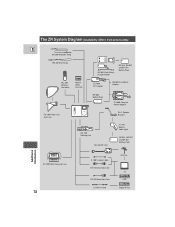
The ZR System Diagram (Availability differs from area to area) E SS-200 Shoulder Strap WS-20 Wrist Strap CH-900 Dual Battery Charger/Holder BP-914, BP-... Unit VL-10Li Battery Video Light BP-914, BP-927 and BP-941 Battery Pack Additional Information SC-1000 Soft Carrying Case 72 S-150 S-video Cable STV-150 Stereo Video Cable STV-250 Stereo Video Cable CV-150F DV Cable Antenna TV VCR Digital device
The ZR System Diagram (Availability differs from area to area) E SS-200 Shoulder Strap WS-20 Wrist Strap CH-900 Dual Battery Charger/Holder BP-914, BP-... Unit VL-10Li Battery Video Light BP-914, BP-927 and BP-941 Battery Pack Additional Information SC-1000 Soft Carrying Case 72 S-150 S-video Cable STV-150 Stereo Video Cable STV-250 Stereo Video Cable CV-150F DV Cable Antenna TV VCR Digital device
ZR Instruction Manual
Page 73
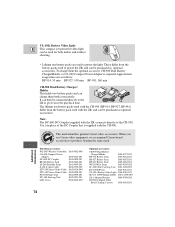
... Wireless Controller CA-600 Compact Power Adapter DC-600 DC Coupler BP-608 Battery Pack SS-200 Shoulder Strap S-150 S-video Cable STV-250 Stereo Video Cable STV-150 Stereo Video Cable FU-100 Finder Unit DU-100 Docking Unit LCD Cover D83-0462-000 D85-0812-201 D85-0800-201 D85-0822... playback time. Note: The DC-600 DC Coupler (supplied with the CH-900. When you use Canon video equipment, we recommend Canon-brand accessories or products bearing the same mark. It can then be connected directly to the ZR to the CH-900. SORY CA NON GEN UINE VIDE This mark identifies genuine...
... Wireless Controller CA-600 Compact Power Adapter DC-600 DC Coupler BP-608 Battery Pack SS-200 Shoulder Strap S-150 S-video Cable STV-250 Stereo Video Cable STV-150 Stereo Video Cable FU-100 Finder Unit DU-100 Docking Unit LCD Cover D83-0462-000 D85-0812-201 D85-0800-201 D85-0822... playback time. Note: The DC-600 DC Coupler (supplied with the CH-900. When you use Canon video equipment, we recommend Canon-brand accessories or products bearing the same mark. It can then be connected directly to the ZR to the CH-900. SORY CA NON GEN UINE VIDE This mark identifies genuine...
ZR Instruction Manual
Page 80
... records counter information, including hour, minute, second, and frame number on a special data code area on , until you press the 2 (record) button if the DV cable is detected. SET THE DATE AND TIME Appears when the battery pack is loaded. Appears when the tape has reached the end. Remove the tape...
... records counter information, including hour, minute, second, and frame number on a special data code area on , until you press the 2 (record) button if the DV cable is detected. SET THE DATE AND TIME Appears when the battery pack is loaded. Appears when the tape has reached the end. Remove the tape...
ZR Instruction Manual
Page 82
...Auto, 38 Feedback, 20 Autofocus, 49 Finder Unit, 17 Finding Your Way Around the ZR, 75 B Focusing, 49 Backup Battery, 62 Basic Recording, 13 H Battery Pack, 9 Head Cleaning, 65 Black and White, 40 Headphones, 44 C Cables, 6, 22 Cassettes, 11 Charging the Battery Pack, 9 Choosing a Recording Program, 36... Displaying Data Code, 52 DC Coupler, 8 Digital Effects, 40 Digital Video, 7 Digital Zoom, 16 DV terminal, 58 I Image Stabilizer, 30 Introducing the ZR, 7 L LANC, 59 LCD Cover, 60 LCD Screen, 17 Loading Cassettes, 11 Low Light, 39 LP Modes, 15 M Maintenance, 64 Making Better Videos...
...Auto, 38 Feedback, 20 Autofocus, 49 Finder Unit, 17 Finding Your Way Around the ZR, 75 B Focusing, 49 Backup Battery, 62 Basic Recording, 13 H Battery Pack, 9 Head Cleaning, 65 Black and White, 40 Headphones, 44 C Cables, 6, 22 Cassettes, 11 Charging the Battery Pack, 9 Choosing a Recording Program, 36... Displaying Data Code, 52 DC Coupler, 8 Digital Effects, 40 Digital Video, 7 Digital Zoom, 16 DV terminal, 58 I Image Stabilizer, 30 Introducing the ZR, 7 L LANC, 59 LCD Cover, 60 LCD Screen, 17 Loading Cassettes, 11 Low Light, 39 LP Modes, 15 M Maintenance, 64 Making Better Videos...


