
ZR Instruction Manual
Page 1
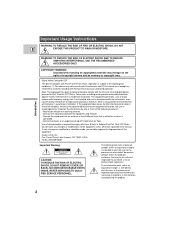
... installation. However, there is connected. • Consult the dealer or an experienced radio/TV technician for class B digital device, pursuant to copyright laws. One Canon Plaza, Lake Success, NY 11042, U.S.A. If such changes or modifications should be made, you could be contrary to Part 15 of electric shock to radio... Important Usage Instructions WARNING: TO REDUCE THE RISK OF FIRE OR ELECTRIC SHOCK, DO NOT E EXPOSE THIS PRODUCT TO RAIN OR MOISTURE. Digital Video Camcorder, ZR This device complies with the instructions, may cause undesired operation.
... installation. However, there is connected. • Consult the dealer or an experienced radio/TV technician for class B digital device, pursuant to copyright laws. One Canon Plaza, Lake Success, NY 11042, U.S.A. If such changes or modifications should be made, you could be contrary to Part 15 of electric shock to radio... Important Usage Instructions WARNING: TO REDUCE THE RISK OF FIRE OR ELECTRIC SHOCK, DO NOT E EXPOSE THIS PRODUCT TO RAIN OR MOISTURE. Digital Video Camcorder, ZR This device complies with the instructions, may cause undesired operation.

ZR Instruction Manual
Page 2
... close to grounding electrodes, and requirements for future reference. They may fall, causing serious injury to a child or adult, and serious damage to the Canon Digital Video Camcorder ZR and all its accessories. Quick stops, excessive force, and uneven surfaces may be sure the antenna is operated. This is equipped with care. Do...
... close to grounding electrodes, and requirements for future reference. They may fall, causing serious injury to a child or adult, and serious damage to the Canon Digital Video Camcorder ZR and all its accessories. Quick stops, excessive force, and uneven surfaces may be sure the antenna is operated. This is equipped with care. Do...
ZR Instruction Manual
Page 3
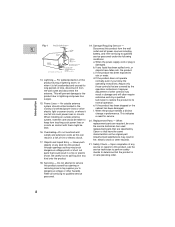
... ELECTRICAL CODE ANTENNA DISCHARGE UNIT (NEC SECTION 810-20) GROUNDING CONDUCTORS (NEC SECTION 810-21) GROUND CLAMPS POWER SERVICE GROUNDING ELECTRODE SYSTEM (NEC ART 250. Canon or that are specified by 16. Servicing - Do not attempt to service this product, ask the service technician to perform safety checks to determine that...
... ELECTRICAL CODE ANTENNA DISCHARGE UNIT (NEC SECTION 810-20) GROUNDING CONDUCTORS (NEC SECTION 810-21) GROUND CLAMPS POWER SERVICE GROUNDING ELECTRODE SYSTEM (NEC ART 250. Canon or that are specified by 16. Servicing - Do not attempt to service this product, ask the service technician to perform safety checks to determine that...

ZR Instruction Manual
Page 4
... on Using the Batteries 61 Setting the Audio Mix 63 Maintenance 64 Troubleshooting 68 The ZR System Diagram 72 Optional Accessories 73 Finding Your Way Around the ZR ....... 75 Screen Displays 78 Specifications 82 Index 83 The serial number of this product ... Instructions 3 Audio Recording 44 Thank you for Choosing a Canon ......... 6 Setting the Self-Timer 46 Introducing the ZR 7 Mastering the Basics ~ When Making Manual Adjustments ...~ Adjusting Exposure Manually 47 Adjusting Focus Manually 49 Powering Your Camcorder 8 Setting the White Balance 50 Loading a Cassette 11...
... on Using the Batteries 61 Setting the Audio Mix 63 Maintenance 64 Troubleshooting 68 The ZR System Diagram 72 Optional Accessories 73 Finding Your Way Around the ZR ....... 75 Screen Displays 78 Specifications 82 Index 83 The serial number of this product ... Instructions 3 Audio Recording 44 Thank you for Choosing a Canon ......... 6 Setting the Self-Timer 46 Introducing the ZR 7 Mastering the Basics ~ When Making Manual Adjustments ...~ Adjusting Exposure Manually 47 Adjusting Focus Manually 49 Powering Your Camcorder 8 Setting the White Balance 50 Loading a Cassette 11...
ZR Instruction Manual
Page 5
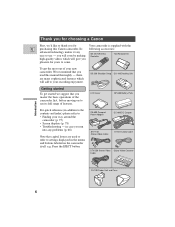
... LCD Cover BP-608 Battery Pack Introduction For quick reference (in the menus and buttons labeled on to : • Finding your way around the camcorder (p. 75) • Screen displays (p. 78) • Troubleshooting - in case you run into any problems (p. 68) Note that capital letters are... DU-100 Docking Unit Getting started we 'd like to your new camcorder, We recommend that you master the basic operations of features. Thank you for choosing a Canon First, we suggest that you read this Canon camcorder. Press the EJECT button. there are used to refer to settings ...
... LCD Cover BP-608 Battery Pack Introduction For quick reference (in the menus and buttons labeled on to : • Finding your way around the camcorder (p. 75) • Screen displays (p. 78) • Troubleshooting - in case you run into any problems (p. 68) Note that capital letters are... DU-100 Docking Unit Getting started we 'd like to your new camcorder, We recommend that you master the basic operations of features. Thank you for choosing a Canon First, we suggest that you read this Canon camcorder. Press the EJECT button. there are used to refer to settings ...
ZR Instruction Manual
Page 6
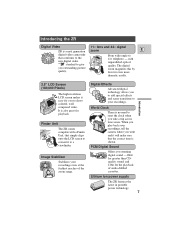
... Video 11× lens and 44× digital ZR is a next generation zoom E digital video camcorder that simply clips onto the LCD screen to convert it ... clock when you to 11× telephoto - Image Stabilizer Stabilizes your recordings. Finder Unit The ZR comes complete with unparalleled optical quality. When you play back your recordings, tell the camera where ...even more dramatic results. PCM Digital Sound Offers you outstanding picture quality. Lithium ion power supply The ZR features the latest in portable power technology. 7 with a Finder Unit, that conforms to the new ...
... Video 11× lens and 44× digital ZR is a next generation zoom E digital video camcorder that simply clips onto the LCD screen to convert it ... clock when you to 11× telephoto - Image Stabilizer Stabilizes your recordings. Finder Unit The ZR comes complete with unparalleled optical quality. When you play back your recordings, tell the camera where ...even more dramatic results. PCM Digital Sound Offers you outstanding picture quality. Lithium ion power supply The ZR features the latest in portable power technology. 7 with a Finder Unit, that conforms to the new ...
ZR Instruction Manual
Page 7
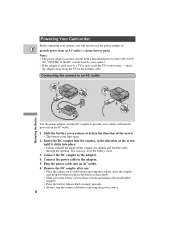
B A Powering Your Camcorder Before operating your camera. • If the adapter is used next to emit noise - Connecting the camera to an AC outlet 1 2 6 5 4 3 Use the power adapter ...
B A Powering Your Camcorder Before operating your camera. • If the adapter is used next to emit noise - Connecting the camera to an AC outlet 1 2 6 5 4 3 Use the power adapter ...
ZR Instruction Manual
Page 8
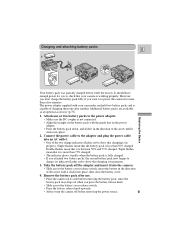
... when the battery pack is fully charged. • If you to show that it left the factory. Connect the power cable to show that your camcorder can hold two battery packs and is more than a few minutes. However, you must charge the battery pack fully if you want it to power...
... when the battery pack is fully charged. • If you to show that it left the factory. Connect the power cable to show that your camcorder can hold two battery packs and is more than a few minutes. However, you must charge the battery pack fully if you want it to power...
ZR Instruction Manual
Page 9
... you first attach to the adapter, or, if the adapter was already plugged into an AC outlet, from the side labeled "A". • When powering your camcorder from either side, A or B. These notes include charging and recording times and how to remove attached battery packs, but charging will not take place until...
... you first attach to the adapter, or, if the adapter was already plugged into an AC outlet, from the side labeled "A". • When powering your camcorder from either side, A or B. These notes include charging and recording times and how to remove attached battery packs, but charging will not take place until...
ZR Instruction Manual
Page 10
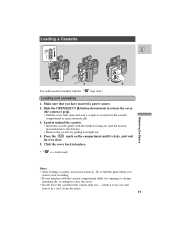
Load or unload the cassette. • Insert the cassette gently with the window facing out (and the erasure prevention tab to close . 5. Click the cover back into place. * Mini is opening or closing automatically, or attempt to the bottom). • Remove the cassette by pulling it is a trade mark. Mastering the Basics Notes: • After loading a cassette, use - Loading a Cassette 2 OPEN/ E EJECT 4 3 5 Use videocassettes marked with the cassette compartment while it straight out. 4. Slide the OPEN/EJECT 5 button downwards to start recording. • Do not interfere ...
Load or unload the cassette. • Insert the cassette gently with the window facing out (and the erasure prevention tab to close . 5. Click the cover back into place. * Mini is opening or closing automatically, or attempt to the bottom). • Remove the cassette by pulling it is a trade mark. Mastering the Basics Notes: • After loading a cassette, use - Loading a Cassette 2 OPEN/ E EJECT 4 3 5 Use videocassettes marked with the cassette compartment while it straight out. 4. Slide the OPEN/EJECT 5 button downwards to start recording. • Do not interfere ...
ZR Instruction Manual
Page 11
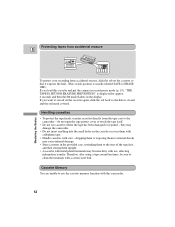
they may damage the camcorder. • Do not insert anything into the small holes on the cassette or cover them upright. • A cassette with metal plated terminals may cause internal ... with care - Protecting tapes from accidental erasure E REC SAVE REC SAVE Mastering the Basics To protect your recording from the tape case to the camcorder - If you load this camcorder. 12 dropping them or exposing them to external shocks may become dirty with this cassette and put the camera in the display.
they may damage the camcorder. • Do not insert anything into the small holes on the cassette or cover them upright. • A cassette with metal plated terminals may cause internal ... with care - Protecting tapes from accidental erasure E REC SAVE REC SAVE Mastering the Basics To protect your recording from the tape case to the camcorder - If you load this camcorder. 12 dropping them or exposing them to external shocks may become dirty with this cassette and put the camera in the display.
ZR Instruction Manual
Page 12
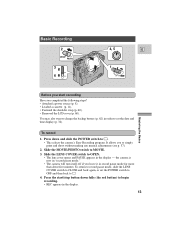
Press down fully (the red button) to begin recording. • REC appears in the display. 13 the camera is now in "record pause mode." • The camera will turn itself off if you completed the following steps? • Attached a power source (p. 8). • Loaded a cassette (p. 11). • Fastened the shoulder strap (p. 60). • Removed the LCD cover (p. 60). Slide the LENS COVER switch to simply point and shoot without making any manual adjustments (see p. 37). 2. To return to record pause mode, slide the LENS COVER switch to [. 4. Basic Recording 2 MOVIE PHOTO 3 OPEN...
Press down fully (the red button) to begin recording. • REC appears in the display. 13 the camera is now in "record pause mode." • The camera will turn itself off if you completed the following steps? • Attached a power source (p. 8). • Loaded a cassette (p. 11). • Fastened the shoulder strap (p. 60). • Removed the LCD cover (p. 60). Slide the LENS COVER switch to simply point and shoot without making any manual adjustments (see p. 37). 2. To return to record pause mode, slide the LENS COVER switch to [. 4. Basic Recording 2 MOVIE PHOTO 3 OPEN...
ZR Instruction Manual
Page 13
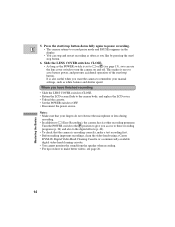
... When you access to these recording programs (p. 36) and also to make a test recording first. • Before making important recordings, clean the video heads using a Canon DVM-CL Digital Video Head Cleaning Cassette or a commercially available digital video head cleaning cassette. • You cannot monitor the sound from the speaker when...
... When you access to these recording programs (p. 36) and also to make a test recording first. • Before making important recordings, clean the video heads using a Canon DVM-CL Digital Video Head Cleaning Cassette or a commercially available digital video head cleaning cassette. • You cannot monitor the sound from the speaker when...
ZR Instruction Manual
Page 14
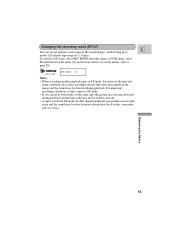
... then close the menu (for instructions on how to use the menus, refer to SP mode. • If you record in both modes on this camcorder, and vice versa. Mastering the Basics 15 Changing the recording mode (SP/LP) E You can record and play ) modes. For important recordings, therefore, set the...
... then close the menu (for instructions on how to use the menus, refer to SP mode. • If you record in both modes on this camcorder, and vice versa. Mastering the Basics 15 Changing the recording mode (SP/LP) E You can record and play ) modes. For important recordings, therefore, set the...
ZR Instruction Manual
Page 15
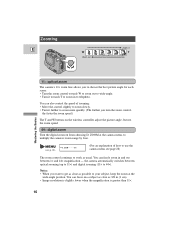
the camera automatically switches between 1× and 44× magnification - You can focus on from choosing D. You can freely zoom in and out between optical zooming (up to 11×) and digital zooming (11× to get as close as 3/8 in (1 cm). • Image resolution is slightly lower when the magnification is greater than 11×. 16 Notes: • When you want to 44×). ZOOM at the wide-angle position. Zooming E W Zoom out W T Zoom in T Mastering the Basics 11× optical zoom The camera's 11× zoom lens allows you turn the zoom control, the faster...
the camera automatically switches between 1× and 44× magnification - You can focus on from choosing D. You can freely zoom in and out between optical zooming (up to 11×) and digital zooming (11× to get as close as 3/8 in (1 cm). • Image resolution is slightly lower when the magnification is greater than 11×. 16 Notes: • When you want to 44×). ZOOM at the wide-angle position. Zooming E W Zoom out W T Zoom in T Mastering the Basics 11× optical zoom The camera's 11× zoom lens allows you turn the zoom control, the faster...
ZR Instruction Manual
Page 16
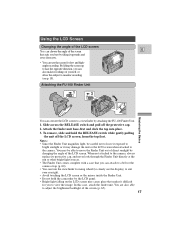
To remove, slide and hold the camcorder by the LCD panel. • Bright light falling on the LCD screen may damage the unit or the LCD screen when attached to a viewfinder by ...
To remove, slide and hold the camcorder by the LCD panel. • Bright light falling on the LCD screen may damage the unit or the LCD screen when attached to a viewfinder by ...
ZR Instruction Manual
Page 17
... certain displays are reversed (mirror mode) and the time code and remaining tape indicators disappear. About the LCD Screen E The LCD screen built into this camcorder is unaffected.
... certain displays are reversed (mirror mode) and the time code and remaining tape indicators disappear. About the LCD Screen E The LCD screen built into this camcorder is unaffected.
ZR Instruction Manual
Page 18
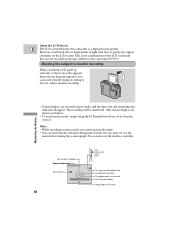
...: • To avoid accidental recording, make sure that it exposes the hole (the switch position is rough (mosaic-like noise), clean the video heads using a Canon DVM-CL Digital Video Head Cleaning Cassette or a commercially available digital video head cleaning cassette. 19 Press down the e (play back your recordings on the...
...: • To avoid accidental recording, make sure that it exposes the hole (the switch position is rough (mosaic-like noise), clean the video heads using a Canon DVM-CL Digital Video Head Cleaning Cassette or a commercially available digital video head cleaning cassette. 19 Press down the e (play back your recordings on the...
ZR Instruction Manual
Page 19
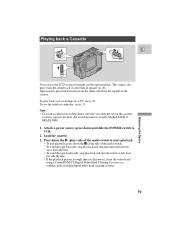
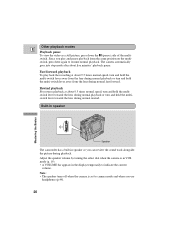
Built-in speaker Speaker The camcorder has a built-in the display temporarily to indicate the current volume. Adjust the speaker volume by turning the select dial when the camera is set ...
Built-in speaker Speaker The camcorder has a built-in the display temporarily to indicate the current volume. Adjust the speaker volume by turning the select dial when the camera is set ...
ZR Instruction Manual
Page 20
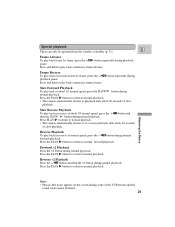
Slow Forward Playback To play back continuous frame advance. Note: • Mosaic-like noise appears on reverse frame by frame, press the +/ae button repeatedly during normal playback. Press the PLAY e button to return to normal playback. • The camera automatically returns to playback after about 1/5 normal speed, press the -/4a button and then the SLOW button during playback pause. Press and hold to ×1 reverse playback after about 1/5 normal speed, press the SLOW button during normal forward playback. Press the PLAY e button to return to play back at...
Slow Forward Playback To play back continuous frame advance. Note: • Mosaic-like noise appears on reverse frame by frame, press the +/ae button repeatedly during normal playback. Press the PLAY e button to return to normal playback. • The camera automatically returns to playback after about 1/5 normal speed, press the -/4a button and then the SLOW button during playback pause. Press and hold to ×1 reverse playback after about 1/5 normal speed, press the SLOW button during normal forward playback. Press the PLAY e button to return to play back at...
