
ZR Instruction Manual
Page 1
..., DO NOT E EXPOSE THIS PRODUCT TO RAIN OR MOISTURE. COPYRIGHT WARNING: Unauthorized recording of the FCC Rules. Digital Video Camcorder, ZR This device complies with the limits for help. This equipment generates, uses and can be determined by turning the equipment off ... device may infringe on a circuit different from that may cause harmful interference to provide reasonable protection against harmful interference in the manual. Canon U.S.A. NO USER SERVICEABLE PARTS INSIDE. However, there is connected. • Consult the dealer or an experienced radio/TV technician for ...
..., DO NOT E EXPOSE THIS PRODUCT TO RAIN OR MOISTURE. COPYRIGHT WARNING: Unauthorized recording of the FCC Rules. Digital Video Camcorder, ZR This device complies with the limits for help. This equipment generates, uses and can be determined by turning the equipment off ... device may infringe on a circuit different from that may cause harmful interference to provide reasonable protection against harmful interference in the manual. Canon U.S.A. NO USER SERVICEABLE PARTS INSIDE. However, there is connected. • Consult the dealer or an experienced radio/TV technician for ...

ZR Instruction Manual
Page 2
... safety instructions the word 10. Retain Instructions - Power Cord Protection - Introduction 3. Do not use liquid or aerosol cleaners. If you are unable to the Canon Digital Video Camcorder ZR and all its accessories. The product should be routed so that they may cause picture interference, or permanently damage the camera. 8. Heed Warnings - Power...
... safety instructions the word 10. Retain Instructions - Power Cord Protection - Introduction 3. Do not use liquid or aerosol cleaners. If you are unable to the Canon Digital Video Camcorder ZR and all its accessories. The product should be routed so that they may cause picture interference, or permanently damage the camera. 8. Heed Warnings - Power...
ZR Instruction Manual
Page 3
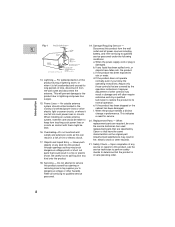
... other controls may result in a fire or electric shock. Servicing - c. system, extreme care should not be fatal. 20. When replacement parts are covered by 16. Canon or that are required, be taken to qualified CLAMP service personnel under the following ELECTRIC SERVICE EQUIPMENT NEC - Refer all power sources including GROUND battery...
... other controls may result in a fire or electric shock. Servicing - c. system, extreme care should not be fatal. 20. When replacement parts are covered by 16. Canon or that are required, be taken to qualified CLAMP service personnel under the following ELECTRIC SERVICE EQUIPMENT NEC - Refer all power sources including GROUND battery...

ZR Instruction Manual
Page 4
...the number and other vital information here and retain this product may be found on the bottom of the camera. Model Name ZR Serial No. 5 Date of theft. Contents Introduction Using the Various Recording Programs 36 E Important Usage Instructions 2 Using the ...Instructions 3 Audio Recording 44 Thank you for Choosing a Canon ......... 6 Setting the Self-Timer 46 Introducing the ZR 7 Mastering the Basics ~ When Making Manual Adjustments ...~ Adjusting Exposure Manually 47 Adjusting Focus Manually 49 Powering Your Camcorder 8 Setting the White Balance 50 Loading a Cassette ...
...the number and other vital information here and retain this product may be found on the bottom of the camera. Model Name ZR Serial No. 5 Date of theft. Contents Introduction Using the Various Recording Programs 36 E Important Usage Instructions 2 Using the ...Instructions 3 Audio Recording 44 Thank you for Choosing a Canon ......... 6 Setting the Self-Timer 46 Introducing the ZR 7 Mastering the Basics ~ When Making Manual Adjustments ...~ Adjusting Exposure Manually 47 Adjusting Focus Manually 49 Powering Your Camcorder 8 Setting the White Balance 50 Loading a Cassette ...
ZR Instruction Manual
Page 5
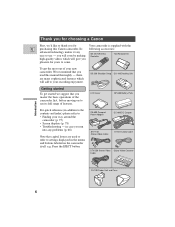
... in case you run into any problems (p. 68) Note that you read this Canon camcorder. Press the EJECT button. SS-200 Shoulder Strap DU-100 Docking Unit Getting started we 'd like to your way around the camcorder (p. 75) • Screen displays (p. 78) • Troubleshooting - CA-600 ... for years to : • Finding your recording enjoyment. Thank you for choosing a Canon First, we suggest that you master the basic operations of the camcorder first, before moving on the camcorder itself e.g. there are used to refer to settings displayed in addition to the contents and...
... in case you run into any problems (p. 68) Note that you read this Canon camcorder. Press the EJECT button. SS-200 Shoulder Strap DU-100 Docking Unit Getting started we 'd like to your way around the camcorder (p. 75) • Screen displays (p. 78) • Troubleshooting - CA-600 ... for years to : • Finding your recording enjoyment. Thank you for choosing a Canon First, we suggest that you master the basic operations of the camcorder first, before moving on the camcorder itself e.g. there are used to refer to settings displayed in addition to the contents and...
ZR Instruction Manual
Page 6
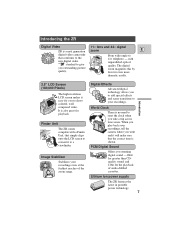
... you stunning digital sound -16bit for greater than CDquality sound, and 12bit for even more dramatic results. Lithium ion power supply The ZR features the latest in portable power technology. 7 The digital zoom magnifies this by four for the playback of the zoom range. Finder Unit... you play back your recordings even at the furthest reaches of audio-dubbed cassettes. Introducing the ZR Digital Video 11× lens and 44× digital ZR is a next generation zoom E digital video camcorder that conforms to the new digital video Mini standard to 11× telephoto - When you ...
... you stunning digital sound -16bit for greater than CDquality sound, and 12bit for even more dramatic results. Lithium ion power supply The ZR features the latest in portable power technology. 7 The digital zoom magnifies this by four for the playback of the zoom range. Finder Unit... you play back your recordings even at the furthest reaches of audio-dubbed cassettes. Introducing the ZR Digital Video 11× lens and 44× digital ZR is a next generation zoom E digital video camcorder that conforms to the new digital video Mini standard to 11× telephoto - When you ...
ZR Instruction Manual
Page 7
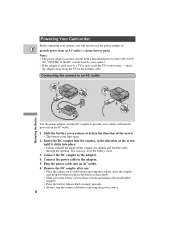
move the adapter away from an AC outlet. 1. B A Powering Your Camcorder Before operating your camera, you press the battery release knob. • Slide across the battery cover release switch (and replace the small rubber stopper). • ...
move the adapter away from an AC outlet. 1. B A Powering Your Camcorder Before operating your camera, you press the battery release knob. • Slide across the battery cover release switch (and replace the small rubber stopper). • ...
ZR Instruction Manual
Page 8
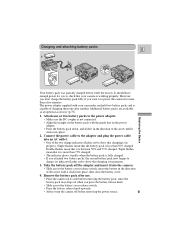
... knob. • Slide across the battery cover release switch, insert the battery in progress. 3. Remove the battery pack after another. Double flashes mean that your camcorder can hold two battery packs and is working properly. However, you must charge the battery pack fully if you to show that it is not...
... knob. • Slide across the battery cover release switch, insert the battery in progress. 3. Remove the battery pack after another. Double flashes mean that your camcorder can hold two battery packs and is working properly. However, you must charge the battery pack fully if you to show that it is not...
ZR Instruction Manual
Page 9
... you first attach to the adapter, or, if the adapter was already plugged into an AC outlet, from the side labeled "A". • When powering your camcorder from an AC outlet, you do not need to pinch the cable when closing the battery cover. 10 Mastering the Basics Notes: E • The adapter...
... you first attach to the adapter, or, if the adapter was already plugged into an AC outlet, from the side labeled "A". • When powering your camcorder from an AC outlet, you do not need to pinch the cable when closing the battery cover. 10 Mastering the Basics Notes: E • The adapter...
ZR Instruction Manual
Page 10
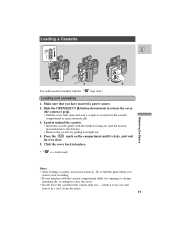
Loading a Cassette 2 OPEN/ E EJECT 4 3 5 Use videocassettes marked with the window facing out (and the erasure prevention tab to the bottom). • Remove the cassette by pulling it straight out. 4. Load or unload the cassette. • Insert the cassette gently with the Mini logo only.* Loading and unloading 1. Make sure that you want to start recording. • Do not interfere with the cassette compartment while it is a trade mark. return it in the camera after use record search (p. 34) to find the point where you have inserted a power source. 2. Press the PUSH mark ...
Loading a Cassette 2 OPEN/ E EJECT 4 3 5 Use videocassettes marked with the window facing out (and the erasure prevention tab to the bottom). • Remove the cassette by pulling it straight out. 4. Load or unload the cassette. • Insert the cassette gently with the Mini logo only.* Loading and unloading 1. Make sure that you want to start recording. • Do not interfere with the cassette compartment while it is a trade mark. return it in the camera after use record search (p. 34) to find the point where you have inserted a power source. 2. Press the PUSH mark ...
ZR Instruction Manual
Page 11
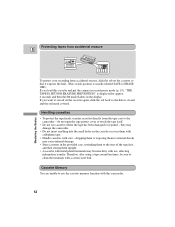
Protecting tapes from accidental erasure E REC SAVE REC SAVE Mastering the Basics To protect your recording from the tape case to the camcorder - Therefore, after using a tape around ten times, be sure to external shocks may cause internal damage. • Store cassettes in the display. Handling ...You are unable to the start of the tape first, and then storing them upright. • A cassette with metal plated terminals may damage the camcorder. • Do not insert anything into the small holes on the cassette again, slide the tab back so the hole is displayed for approx. 4...
Protecting tapes from accidental erasure E REC SAVE REC SAVE Mastering the Basics To protect your recording from the tape case to the camcorder - Therefore, after using a tape around ten times, be sure to external shocks may cause internal damage. • Store cassettes in the display. Handling ...You are unable to the start of the tape first, and then storing them upright. • A cassette with metal plated terminals may damage the camcorder. • Do not insert anything into the small holes on the cassette again, slide the tab back so the hole is displayed for approx. 4...
ZR Instruction Manual
Page 12
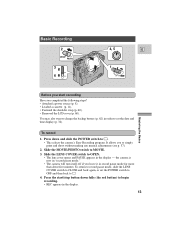
Press down fully (the red button) to begin recording. • REC appears in the display. 13 Slide the MOVIE/PHOTO switch to OPEN. • The lens cover opens and PAUSE appears in "record pause mode." • The camera will turn itself off if you completed the following steps? • Attached a power source (p. 8). • Loaded a cassette (p. 11). • Fastened the shoulder strap (p. 60). • Removed the LCD cover (p. 60). the camera is now in the display - To return to record pause mode, slide the LENS COVER switch to CLOSE and back again, or set the date ...
Press down fully (the red button) to begin recording. • REC appears in the display. 13 Slide the MOVIE/PHOTO switch to OPEN. • The lens cover opens and PAUSE appears in "record pause mode." • The camera will turn itself off if you completed the following steps? • Attached a power source (p. 8). • Loaded a cassette (p. 11). • Fastened the shoulder strap (p. 60). • Removed the LCD cover (p. 60). the camera is now in the display - To return to record pause mode, slide the LENS COVER switch to CLOSE and back again, or set the date ...
ZR Instruction Manual
Page 13
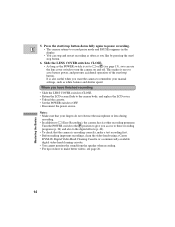
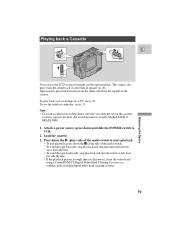
... /stop button. When you can stop button. 6. It is set to make a test recording first. • Before making important recordings, clean the video heads using a Canon DVM-CL Digital Video Head Cleaning Cassette or a commercially available digital video head cleaning cassette. • You cannot monitor the sound from the speaker when...
... /stop button. When you can stop button. 6. It is set to make a test recording first. • Before making important recordings, clean the video heads using a Canon DVM-CL Digital Video Head Cleaning Cassette or a commercially available digital video head cleaning cassette. • You cannot monitor the sound from the speaker when...
ZR Instruction Manual
Page 14
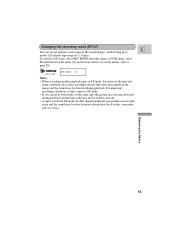
..., refer to SP mode. • If you record in both modes on the same tape, the picture may become distorted when played back on this camcorder, and vice versa. Mastering the Basics 15 For important recordings, therefore, set the camera to page 28). (see p. 28) REC MODE••••...
..., refer to SP mode. • If you record in both modes on the same tape, the picture may become distorted when played back on this camcorder, and vice versa. Mastering the Basics 15 For important recordings, therefore, set the camera to page 28). (see p. 28) REC MODE••••...
ZR Instruction Manual
Page 15
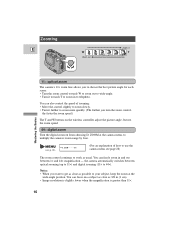
ZOOM at the wide-angle position. You can also control the speed of how to use the camera menu see page 28) The zoom control continues to zoom more quickly. (The further you turn the zoom control, the faster the zoom speed.) The T and W buttons on the wireless controller adjust the picture angle, but not the zoom speed. 44× digital zoom Turn the digital zoom on a subject as close as possible to 44×). You can focus on from choosing D. Notes: • When you want to get as close as 3/8 in (1 cm). • Image resolution is slightly lower when the magnification is ...
ZOOM at the wide-angle position. You can also control the speed of how to use the camera menu see page 28) The zoom control continues to zoom more quickly. (The further you turn the zoom control, the faster the zoom speed.) The T and W buttons on the wireless controller adjust the picture angle, but not the zoom speed. 44× digital zoom Turn the digital zoom on a subject as close as possible to 44×). You can focus on from choosing D. Notes: • When you want to get as close as 3/8 in (1 cm). • Image resolution is slightly lower when the magnification is ...
ZR Instruction Manual
Page 16
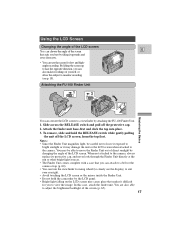
... E 2 Mastering the Basics You can convert the LCD screen to a viewfinder by changing the angle of the LCD screen. To remove, slide and hold the camcorder by tilting it upwards and away from the top first. In this case, attach the finder unit. When not attached to the camera, always replace...
... E 2 Mastering the Basics You can convert the LCD screen to a viewfinder by changing the angle of the LCD screen. To remove, slide and hold the camcorder by tilting it upwards and away from the top first. In this case, attach the finder unit. When not attached to the camera, always replace...
ZR Instruction Manual
Page 17
... bright points of the LCD screen and they are not recorded on the LCD screen. About the LCD Screen E The LCD screen built into this camcorder is not a malfunction of light (red, blue or green) may appear constantly on the tape. (Effective dots: more than 99.99%) Allowing the subject to...
... bright points of the LCD screen and they are not recorded on the LCD screen. About the LCD Screen E The LCD screen built into this camcorder is not a malfunction of light (red, blue or green) may appear constantly on the tape. (Effective dots: more than 99.99%) Allowing the subject to...
ZR Instruction Manual
Page 18
...: • To avoid accidental recording, make sure that it exposes the hole (the switch position is rough (mosaic-like noise), clean the video heads using a Canon DVM-CL Digital Video Head Cleaning Cassette or a commercially available digital video head cleaning cassette. 19 Attach a power source, press down and slide the POWER...
...: • To avoid accidental recording, make sure that it exposes the hole (the switch position is rough (mosaic-like noise), clean the video heads using a Canon DVM-CL Digital Video Head Cleaning Cassette or a commercially available digital video head cleaning cassette. 19 Attach a power source, press down and slide the POWER...
ZR Instruction Manual
Page 19
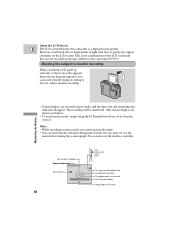
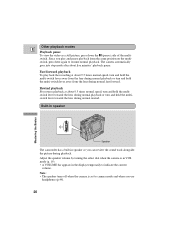
... view the video as a still picture, press down the a (pause) side of the multiswitch. Since you use headphones (p.44). 20 Built-in speaker Speaker The camcorder has a built-in the display temporarily to camera mode and when you play back the recording at about five minutes' playback pause.
... view the video as a still picture, press down the a (pause) side of the multiswitch. Since you use headphones (p.44). 20 Built-in speaker Speaker The camcorder has a built-in the display temporarily to camera mode and when you play back the recording at about five minutes' playback pause.
ZR Instruction Manual
Page 20
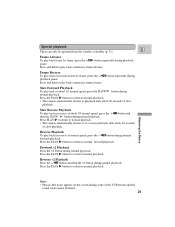
Press and hold to play back frame by frame, press the -/4a button repeatedly during playback pause. Press the PLAY e button to return to normal playback. Note: • Mosaic-like noise appears on reverse frame by frame, press the +/ae button repeatedly during playback pause. Frame Reverse To play back on the screen during normal playback. Mastering the Basics Slow Reverse Playback To play back in reverse at about 1/5 normal speed, press the -/4a button and then the SLOW button during some of the VCR modes and the sound track cannot be operated from the wireless controller...
Press and hold to play back frame by frame, press the -/4a button repeatedly during playback pause. Press the PLAY e button to return to normal playback. Note: • Mosaic-like noise appears on reverse frame by frame, press the +/ae button repeatedly during playback pause. Frame Reverse To play back on the screen during normal playback. Mastering the Basics Slow Reverse Playback To play back in reverse at about 1/5 normal speed, press the -/4a button and then the SLOW button during some of the VCR modes and the sound track cannot be operated from the wireless controller...
