CONSOLE_V1-1_ENG.pdf
Page 3
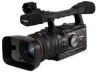
... repeater. If your computer for which type of cable to use some functions XL2* Required Accessories Canon digital camcorder compatible with CONSOLE. Select [Always On] in the [Power Options Properties] window. ( Appx-60) When the computer enters stand-by IEEE1394, CONSOLE will not operate properly... 1024 x 768 or more devices (including the connected computer and the XL H1 itself) by mode or hangs up to the maximum. XH G1 XH A1 XL H1* *Unable to use : 4-pin: 6-pin: System Requirements OS CPU RAM Hard Disk Display Sound Interface Microsoft Windows XP Home...
... repeater. If your computer for which type of cable to use some functions XL2* Required Accessories Canon digital camcorder compatible with CONSOLE. Select [Always On] in the [Power Options Properties] window. ( Appx-60) When the computer enters stand-by IEEE1394, CONSOLE will not operate properly... 1024 x 768 or more devices (including the connected computer and the XL H1 itself) by mode or hangs up to the maximum. XH G1 XH A1 XL H1* *Unable to use : 4-pin: 6-pin: System Requirements OS CPU RAM Hard Disk Display Sound Interface Microsoft Windows XP Home...
CONSOLE_V1-1_ENG.pdf
Page 7
... programs that are running before installing CONSOLE. Do not turn the camcorder's power off and do not quit the driver's installation before completing the installation of the driver. 1 Turn the camcorder's power on the setting of the computer, an editing software may be launched. If... driver has been installed correctly. From the second time you connect a camcorder for downloading and uploading the Custom Preset file (Camcorder settings) from and to the computer. Open [My Computer] and check if the [Canon Camera Storage Device] icon appears. Uninstall ( 7-54) and reinstall the...
... programs that are running before installing CONSOLE. Do not turn the camcorder's power off and do not quit the driver's installation before completing the installation of the driver. 1 Turn the camcorder's power on the setting of the computer, an editing software may be launched. If... driver has been installed correctly. From the second time you connect a camcorder for downloading and uploading the Custom Preset file (Camcorder settings) from and to the computer. Open [My Computer] and check if the [Canon Camera Storage Device] icon appears. Uninstall ( 7-54) and reinstall the...
CONSOLE_V1-1_ENG.pdf
Page 8
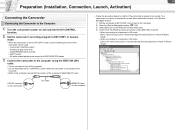
... (Installation, Connection, Launch, Activation) Connecting the Camcorder Connecting the Camcorder to the Computer 1 Turn the camcorder's power on the computer • Follow the procedure below to confirm if the camcorder is correctly connected if you see items described in step 4 in SD mode: [Canon DV camcorder], [Canon Camera Storage Device] and [Canon Virtual VCR] are shown. • When connecting...
... (Installation, Connection, Launch, Activation) Connecting the Camcorder Connecting the Camcorder to the Computer 1 Turn the camcorder's power on the computer • Follow the procedure below to confirm if the camcorder is correctly connected if you see items described in step 4 in SD mode: [Canon DV camcorder], [Canon Camera Storage Device] and [Canon Virtual VCR] are shown. • When connecting...
CONSOLE_V1-1_ENG.pdf
Page 17
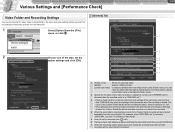
.... 5 Sets the cache recording time ( 5-46). 6 Placing a check mark displays a dialog confirming the video folder each time you start the recording the camcorder pictures onto the hard disk. [General] Tab 1 Select [Option] from the recording file. You can name the folder after the specified prefix (e.g."CNSL0001.avi").... specify the video folder (a target folder), file name and other settings before you start CONSOLE. 7 When the remaining battery power goes down below the specified level, the hard disk recording will be automatically terminated. CONSOLE only saves the settings of the...
.... 5 Sets the cache recording time ( 5-46). 6 Placing a check mark displays a dialog confirming the video folder each time you start the recording the camcorder pictures onto the hard disk. [General] Tab 1 Select [Option] from the recording file. You can name the folder after the specified prefix (e.g."CNSL0001.avi").... specify the video folder (a target folder), file name and other settings before you start CONSOLE. 7 When the remaining battery power goes down below the specified level, the hard disk recording will be automatically terminated. CONSOLE only saves the settings of the...
CONSOLE_V1-1_ENG.pdf
Page 51
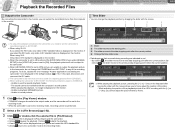
...[Play Viewer] and the camcorder. • Clicking pauses the...camcorder's SDI terminal cannot be displayed when you pause and restart the HDV standard file. • Clicking returns the camcorder... picture to the camcorder, do so, ...camcorder will not be set to the receiving mode. • While the camcorder is set the camcorder...camcorder." When pausing the playback, no image is displayed on the monitor. When the camcorder... be output to the camcorder. When [HD...pictures to the camcorder, you need ...Camcorder Time Slider By connecting the camcorder to the monitor,...
...[Play Viewer] and the camcorder. • Clicking pauses the...camcorder's SDI terminal cannot be displayed when you pause and restart the HDV standard file. • Clicking returns the camcorder... picture to the camcorder, do so, ...camcorder will not be set to the receiving mode. • While the camcorder is set the camcorder...camcorder." When pausing the playback, no image is displayed on the monitor. When the camcorder... be output to the camcorder. When [HD...pictures to the camcorder, you need ...Camcorder Time Slider By connecting the camcorder to the monitor,...
CONSOLE_V1-1_ENG.pdf
Page 54
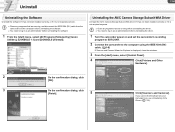
...129; Close any programs that are running, and disconnect the IEEE1394 (DV) cable from the camcorder and the computer before uninstalling the software. You need to log in as an administrator before uninstalling the... driver. 1 Turn the camcorder power on and set the camcorder's recording program to EXT.CONT. 2 Connect the camcorder to the computer using the IEEE1394 (DV) cable. ( 1-8) If Scanner and Camera... windows. 3 From the [start ] menu, select [All Programs] followed by [Canon Utilities], [CONSOLE 1.1] and [CONSOLE Uninstall].
...129; Close any programs that are running, and disconnect the IEEE1394 (DV) cable from the camcorder and the computer before uninstalling the software. You need to log in as an administrator before uninstalling the... driver. 1 Turn the camcorder power on and set the camcorder's recording program to EXT.CONT. 2 Connect the camcorder to the computer using the IEEE1394 (DV) cable. ( 1-8) If Scanner and Camera... windows. 3 From the [start ] menu, select [All Programs] followed by [Canon Utilities], [CONSOLE 1.1] and [CONSOLE Uninstall].

CONSOLE_V1-1_ENG.pdf
Page 60
... other than CONSOLE before you start recording. ÎA program other than CONSOLE is not played back smoothly. ÎDepending on the laptop PC's power scheme settings that control the CPU operations, the preview image may occur on the [HDV Rec] tab. Select a smaller size in [Preview resolution...the usage continuously goes over the 100% for a long time, data dropping may not be displayed. 3) Select the [Power Schemes] tab and select [Always On] in [Power schemes]. The preview image is started. Follow the procedure below to change the software settings using one or more of the ...
... other than CONSOLE before you start recording. ÎA program other than CONSOLE is not played back smoothly. ÎDepending on the laptop PC's power scheme settings that control the CPU operations, the preview image may occur on the [HDV Rec] tab. Select a smaller size in [Preview resolution...the usage continuously goes over the 100% for a long time, data dropping may not be displayed. 3) Select the [Power Schemes] tab and select [Always On] in [Power schemes]. The preview image is started. Follow the procedure below to change the software settings using one or more of the ...
XH G1 XH A1 Instruction Manual
Page 3
... into this manual. 11. Polarization - If you are not sure of the type of antenna discharge unit, connection to the Canon HD Video Camera Recorder XH G1 A/XH A1 A and all servicing to overturn. 10. If an outside antenna is left unattended and unused for long periods of time, ... CLAMP ANTENNA LEAD IN WIRE ANTENNA DISCHARGE UNIT (NEC SECTION 810-20) ELECTRIC SERVICE EQUIPMENT NEC - Water and Moisture - Section 810 of overhead power lines or other hazards. PART H) 14. This will fit into the outlet, try reversing the plug. Read Instructions - The safety and operating...
... into this manual. 11. Polarization - If you are not sure of the type of antenna discharge unit, connection to the Canon HD Video Camera Recorder XH G1 A/XH A1 A and all servicing to overturn. 10. If an outside antenna is left unattended and unused for long periods of time, ... CLAMP ANTENNA LEAD IN WIRE ANTENNA DISCHARGE UNIT (NEC SECTION 810-20) ELECTRIC SERVICE EQUIPMENT NEC - Water and Moisture - Section 810 of overhead power lines or other hazards. PART H) 14. This will fit into the outlet, try reversing the plug. Read Instructions - The safety and operating...

XH G1 XH A1 Instruction Manual
Page 4
.... d. e. When the product exhibits a distinct change in fire, electric shock or other hazards. 21. Replacement Parts - Contact your Canon dealer for information about plug adapter for service. 20. f. If the product does not operate normally even if you follow the operating instructions... with the same type number CA-920. Safety Check - Upon completion of power supply is damaged. Damage Requiring Service - b. c. If the product has been exposed to the responsible nearest Canon Service Center and please replace it to rain or water. When replacement parts ...
.... d. e. When the product exhibits a distinct change in fire, electric shock or other hazards. 21. Replacement Parts - Contact your Canon dealer for information about plug adapter for service. 20. f. If the product does not operate normally even if you follow the operating instructions... with the same type number CA-920. Safety Check - Upon completion of power supply is damaged. Damage Requiring Service - b. c. If the product has been exposed to the responsible nearest Canon Service Center and please replace it to rain or water. When replacement parts ...
XH G1 XH A1 Instruction Manual
Page 7
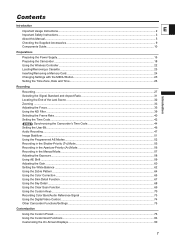
...Usage Instructions...2 E Important Safety Instructions...3 About this Manual...5 Checking the Supplied Accessories ...9 Components Guide...10 Preparations Preparing the Power Supply...15 Preparing the Camcorder ...18 Using the Wireless Controller ...22 Loading/Removing a Cassette ...23 Inserting/Removing a Memory Card...24 Changing Settings ...the Focus ...35 Using the ND Filter ...39 Selecting the Frame Rate...40 Setting the Time Code ...42 Synchronizing the Camcorder's Time Code 44 Setting the User Bit...46 Audio Recording ...47 Image Stabilizer ...51 Using the Programmed AE Modes ...52...
...Usage Instructions...2 E Important Safety Instructions...3 About this Manual...5 Checking the Supplied Accessories ...9 Components Guide...10 Preparations Preparing the Power Supply...15 Preparing the Camcorder ...18 Using the Wireless Controller ...22 Loading/Removing a Cassette ...23 Inserting/Removing a Memory Card...24 Changing Settings ...the Focus ...35 Using the ND Filter ...39 Selecting the Frame Rate...40 Setting the Time Code ...42 Synchronizing the Camcorder's Time Code 44 Setting the User Bit...46 Audio Recording ...47 Image Stabilizer ...51 Using the Programmed AE Modes ...52...
XH G1 XH A1 Instruction Manual
Page 8
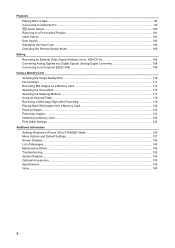
... Still Images from a Memory Card 120 Erasing Images...122 Protecting Images...123 Initializing a Memory Card ...124 Print Order Settings ...125 Additional Information Settings Retained at Power Off or STANDBY Mode 126 Menu Options and Default Settings...127 Screen Displays...142 List of Messages...145 Maintenance/Others ...146 Troubleshooting...152 System Diagram...
... Still Images from a Memory Card 120 Erasing Images...122 Protecting Images...123 Initializing a Memory Card ...124 Print Order Settings ...125 Additional Information Settings Retained at Power Off or STANDBY Mode 126 Menu Options and Default Settings...127 Screen Displays...142 List of Messages...145 Maintenance/Others ...146 Troubleshooting...152 System Diagram...
XH G1 XH A1 Instruction Manual
Page 9
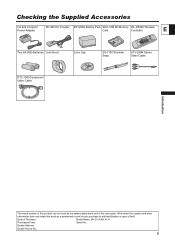
... the number and other information here and retain this product can be found at the battery attachment unit of the camcorder. Date of theft. Checking the Supplied Accessories CA-920 Compact Power Adapter DC-920 DC Coupler BP-950G Battery Pack SDC-16M SD Memory WL-D5000 Wireless Card Controller E Two AA... Component Video Cable Introduction The serial number of this book as a permanent record of your purchase to aid identification in case of Purchase: Model Name: XH G1 A/XH A1 A Purchased From: Serial No.: Dealer Address Dealer Phone No.: 9
... the number and other information here and retain this product can be found at the battery attachment unit of the camcorder. Date of theft. Checking the Supplied Accessories CA-920 Compact Power Adapter DC-920 DC Coupler BP-950G Battery Pack SDC-16M SD Memory WL-D5000 Wireless Card Controller E Two AA... Component Video Cable Introduction The serial number of this book as a permanent record of your purchase to aid identification in case of Purchase: Model Name: XH G1 A/XH A1 A Purchased From: Serial No.: Dealer Address Dealer Phone No.: 9

XH G1 XH A1 Instruction Manual
Page 10
...AWB (automatic white balance) switch ( 62) WHITE BAL. (white balance) switch ( 62) WHITE BAL. Components Guide XH G1/XH A1 Left side view POWER dial External control mode VCR/PLAY mode Power off Auto Shutter-Priority Aperture-Priority Manual Spotlight Night Easy Recording Recording programs DISP. (display) button ( 29) PEAKING ...34, 37) Focus mode switch ( 35) POSITION PRESET ON/SET switch ( ND FILTER switch ( 39) Iris ring ( 56, 57) Side panel ( 144) POWER indicator OPEN (open the LCD display) switch ( CH1/CH2 dials ( 49) AUDIO LEVEL switch ( 49) SELECT/SET dial ( 25) 34, 37) 19) MENU...
...AWB (automatic white balance) switch ( 62) WHITE BAL. (white balance) switch ( 62) WHITE BAL. Components Guide XH G1/XH A1 Left side view POWER dial External control mode VCR/PLAY mode Power off Auto Shutter-Priority Aperture-Priority Manual Spotlight Night Easy Recording Recording programs DISP. (display) button ( 29) PEAKING ...34, 37) Focus mode switch ( 35) POSITION PRESET ON/SET switch ( ND FILTER switch ( 39) Iris ring ( 56, 57) Side panel ( 144) POWER indicator OPEN (open the LCD display) switch ( CH1/CH2 dials ( 49) AUDIO LEVEL switch ( 49) SELECT/SET dial ( 25) 34, 37) 19) MENU...

XH G1 XH A1 Instruction Manual
Page 15
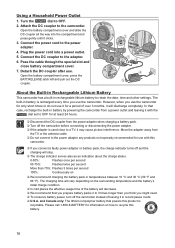
...arrow until it clicks. • The charge indicator starts flashing. Turn the dial to open the battery compartment cover. 3. Plug the power cord into the compartment and press gently until it clicks. 4. The indicator will stay on when the charging is completed, remove the battery...the charging is completed. 4. To Remove the Battery 1. Charge indicator Preparations Attaching the Battery Pack 1. Insert the battery all the way into a power outlet. 3. Turn the dial to the adapter. • Press lightly and slide the battery pack in the direction of the arrow to the adapter....
...arrow until it clicks. • The charge indicator starts flashing. Turn the dial to open the battery compartment cover. 3. Plug the power cord into the compartment and press gently until it clicks. 4. The indicator will stay on when the charging is completed, remove the battery...the charging is completed. 4. To Remove the Battery 1. Charge indicator Preparations Attaching the Battery Pack 1. Insert the battery all the way into a power outlet. 3. Turn the dial to the adapter. • Press lightly and slide the battery pack in the direction of the arrow to the adapter....
XH G1 XH A1 Instruction Manual
Page 16
...%: Flashes 3 times per second More than you think you use the camcorder for only short times or do not use the camcorder. However, when you might need. To conserve battery power, turn off the camcorder instead of leaving it may cause picture interference. The charging time will ...the charging will decrease. We recommend that case, recharge the built-in battery by powering the camcorder from a power outlet and leaving it with this battery. 16 Turn the dial to recycle this camcorder. If you use it for at least 24 hours. Disconnect the ...
...%: Flashes 3 times per second More than you think you use the camcorder for only short times or do not use the camcorder. However, when you might need. To conserve battery power, turn off the camcorder instead of leaving it may cause picture interference. The charging time will ...the charging will decrease. We recommend that case, recharge the built-in battery by powering the camcorder from a power outlet and leaving it with this battery. 16 Turn the dial to recycle this camcorder. If you use it for at least 24 hours. Disconnect the ...

XH G1 XH A1 Instruction Manual
Page 17
... min. 330 min. Playback Time LCD screen [NORMAL] 195 min. 290 min. 410 min. 580 min. * Approximate times for recording with the CA-920 Compact Power Adapter 145 min. 220 min. 235 min. 320 min. Battery Pack E BP-930 BP-945 BP-950G BP-970G Charging Time with repeated operations such... as start/stop, zooming, power on/off. Preparations HDV Recording and Playback Times Maximum Recording Time Viewfinder [NORMAL] BP-930 BP-945 BP-950G BP-970G 165 min. 245 min...
... min. 330 min. Playback Time LCD screen [NORMAL] 195 min. 290 min. 410 min. 580 min. * Approximate times for recording with the CA-920 Compact Power Adapter 145 min. 220 min. 235 min. 320 min. Battery Pack E BP-930 BP-945 BP-950G BP-970G Charging Time with repeated operations such... as start/stop, zooming, power on/off. Preparations HDV Recording and Playback Times Maximum Recording Time Viewfinder [NORMAL] BP-930 BP-945 BP-950G BP-970G 165 min. 245 min...

XH G1 XH A1 Instruction Manual
Page 18
... SETUP * The default value is [BRIGHT] while using the power adapter. Turn the SELECT/SET dial to close the menu. 18 If necessary, change additional settings in the viewfinder. Preparing the Camcorder Dioptric Adjustment Turn on a tripod, or during its transportation. ...Pay special attention when mounting the camcorder on the camcorder and adjust the dioptric adjustment lever. Press the MENU button to ...
... SETUP * The default value is [BRIGHT] while using the power adapter. Turn the SELECT/SET dial to close the menu. 18 If necessary, change additional settings in the viewfinder. Preparing the Camcorder Dioptric Adjustment Turn on a tripod, or during its transportation. ...Pay special attention when mounting the camcorder on the camcorder and adjust the dioptric adjustment lever. Press the MENU button to ...

XH G1 XH A1 Instruction Manual
Page 19
... brightness, contrast, color, sharpness and backlight of the arrow to black & white display ( 20). By default, the viewfinder display is [BRIGHT] while using the power adapter. MENU ( 25) DISPLAY SETUP/ LCD SETUP * The default value is turned off while you will not affect your recording. Select [LCD SETUP] and then...
... brightness, contrast, color, sharpness and backlight of the arrow to black & white display ( 20). By default, the viewfinder display is [BRIGHT] while using the power adapter. MENU ( 25) DISPLAY SETUP/ LCD SETUP * The default value is turned off while you will not affect your recording. Select [LCD SETUP] and then...

XH G1 XH A1 Instruction Manual
Page 23
... the cassette compartment while it straight out. 3. The cassette compartment will retract automatically. Slide the OPEN/EJECT switch to OFF. 23 If the camcorder is connected to a power source, cassettes can be loaded/removed even if the dial is opening or closing automatically. Be careful not to get your fingers caught...
... the cassette compartment while it straight out. 3. The cassette compartment will retract automatically. Slide the OPEN/EJECT switch to OFF. 23 If the camcorder is connected to a power source, cassettes can be loaded/removed even if the dial is opening or closing automatically. Be careful not to get your fingers caught...

XH G1 XH A1 Instruction Manual
Page 27
...a test recording first to a recording program. The default recording standard is HDV. Press the lock button and set the dial to check if the camcorder operates correctly. Set the dial to the relevant chapter ( 47). Recording 3. About the audio recording, refer to OFF. 2. When You Have Finished...Turn the dial to OFF if you do not intend to pause recording. If necessary, clean the video heads E ( 147). Disconnect the power source. The end search, date search and index search functions may not work correctly if you mix recordings in different standards on the same ...
...a test recording first to a recording program. The default recording standard is HDV. Press the lock button and set the dial to check if the camcorder operates correctly. Set the dial to the relevant chapter ( 47). Recording 3. About the audio recording, refer to OFF. 2. When You Have Finished...Turn the dial to OFF if you do not intend to pause recording. If necessary, clean the video heads E ( 147). Disconnect the power source. The end search, date search and index search functions may not work correctly if you mix recordings in different standards on the same ...

