

HG10 Instruction Manual
Page 13
power cord) BP-2L13 Battery Pack WL-D86 Wireless Controller Lithium Button Battery CR2025 for Wireless Controller CTC-100/S Component Cable Red • Green • Blue plugs STV-250N Stereo Video Cable Yellow • Red • White plugs IFC-400PCU USB Cable Software CD-ROM and User Manual Corel Application Disc Software CD-ROM* DIGITAL VIDEO Solution Disk Software CD-ROM* Backup Utility * The CD-ROM includes the software instruction manual (electronic version on PDF file). 13 Getting to Know the Camcorder Supplied Accessories CA-570 Compact Power Adapter (incl.
power cord) BP-2L13 Battery Pack WL-D86 Wireless Controller Lithium Button Battery CR2025 for Wireless Controller CTC-100/S Component Cable Red • Green • Blue plugs STV-250N Stereo Video Cable Yellow • Red • White plugs IFC-400PCU USB Cable Software CD-ROM and User Manual Corel Application Disc Software CD-ROM* DIGITAL VIDEO Solution Disk Software CD-ROM* Backup Utility * The CD-ROM includes the software instruction manual (electronic version on PDF file). 13 Getting to Know the Camcorder Supplied Accessories CA-570 Compact Power Adapter (incl.

HG10 Instruction Manual
Page 77
... can mark in advance the still images you want to print. 2 Turn on the printer. 3 Connect the camcorder to the printer using the supplied USB cable. • Refer to PC Connection Diagram ( 87). • appears and changes to . • The (print/share) button lights up and ...and features of the camcorder can be used either for shooting video or for approx. 6 seconds. 77 You can be displayed for taking photos. Canon printers: SELPHY printers of copies as a print order ( 81). The following functions... Connecting the Camcorder to the Printer ( 24) 1 Insert the...
... can mark in advance the still images you want to print. 2 Turn on the printer. 3 Connect the camcorder to the printer using the supplied USB cable. • Refer to PC Connection Diagram ( 87). • appears and changes to . • The (print/share) button lights up and ...and features of the camcorder can be used either for shooting video or for approx. 6 seconds. 77 You can be displayed for taking photos. Canon printers: SELPHY printers of copies as a print order ( 81). The following functions... Connecting the Camcorder to the Printer ( 24) 1 Insert the...

HG10 Instruction Manual
Page 78
... the printer. After a short while, turn off the camcorder and the printer. Erasing all transfer orders - Erasing all still images - In such case, disconnect the USB cable and turn them on page 79. 78 The setting options vary depending on the printer model. [ PAPER TYPE] Select [PHOTO], [FAST PHOTO], [PLAIN] or [DEFAULT...
... the printer. After a short while, turn off the camcorder and the printer. Erasing all transfer orders - Erasing all still images - In such case, disconnect the USB cable and turn them on page 79. 78 The setting options vary depending on the printer model. [ PAPER TYPE] Select [PHOTO], [FAST PHOTO], [PLAIN] or [DEFAULT...

HG10 Instruction Manual
Page 80
... be printed correctly with the camcorder but edited on again, set the camcorder to select another still image. Do not disconnect the USB cable. - Canon's PictBridge-compatible printers: Resolve the error. Refer also to the memory card. - The print settings menu disappears when the printing is... To continue printing, press or to mode and restore the connection. If the error still persists and printing does not restart, disconnect the USB cable and turn them on a computer. - After a short while, turn off the camcorder and the printer. Images recorded with a PictBridgecompatible ...
... be printed correctly with the camcorder but edited on again, set the camcorder to select another still image. Do not disconnect the USB cable. - Canon's PictBridge-compatible printers: Resolve the error. Refer also to the memory card. - The print settings menu disappears when the printing is... To continue printing, press or to mode and restore the connection. If the error still persists and printing does not restart, disconnect the USB cable and turn them on a computer. - After a short while, turn off the camcorder and the printer. Images recorded with a PictBridgecompatible ...

HG10 Instruction Manual
Page 81
...print out the print orders by connecting the camcorder to a PictBridge-compatible printer ( 77). POINTS TO CHECK Set the print orders before connecting the USB cable to the print menu. PRINT ORDER Press : The image selection screen appears. to return to the camcorder. ( 24) FUNC. ( 26) FUNC...Press to move the trimming frame. 4 Press FUNC. The number of copies appears in orange in advance the still images you disconnect the USB cable. - Selecting Still Images for a still image not recorded with the trimming frame. Print Orders You can set the desired number of copies ...
...print out the print orders by connecting the camcorder to a PictBridge-compatible printer ( 77). POINTS TO CHECK Set the print orders before connecting the USB cable to the print menu. PRINT ORDER Press : The image selection screen appears. to return to the camcorder. ( 24) FUNC. ( 26) FUNC...Press to move the trimming frame. 4 Press FUNC. The number of copies appears in orange in advance the still images you disconnect the USB cable. - Selecting Still Images for a still image not recorded with the trimming frame. Print Orders You can set the desired number of copies ...

HG10 Instruction Manual
Page 82
... the number of copies to 0. 4 Repeat steps 1-3 to mark additional images with Print Orders FUNC. ( 26) 1 Connect the camcorder to the printer using the supplied USB cable. ERASE ALL ORD FUNC. The print settings menu disappears when the printing is completed.
... the number of copies to 0. 4 Repeat steps 1-3 to mark additional images with Print Orders FUNC. ( 26) 1 Connect the camcorder to the printer using the supplied USB cable. ERASE ALL ORD FUNC. The print settings menu disappears when the printing is completed.
HG10 Instruction Manual
Page 87
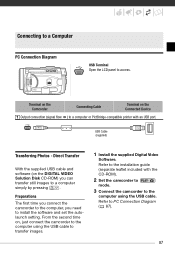
... Photos - From the second time on, just connect the camcorder to the computer using the USB cable. Refer to install the software and set the autolaunch setting. Preparations The first time you connect the camcorder to the computer, you can ...DIGITAL VIDEO Solution Disk CD-ROM) you need to PC Connection Diagram ( 87). 87 Refer to the installation guide (separate leaflet included with an USB port. Direct Transfer With the supplied USB cable and software (on the Connected Device 1 Output connection (signal flow ) to access. Connecting to a Computer PC Connection Diagram...
... Photos - From the second time on, just connect the camcorder to the computer using the USB cable. Refer to install the software and set the autolaunch setting. Preparations The first time you connect the camcorder to the computer, you can ...DIGITAL VIDEO Solution Disk CD-ROM) you need to PC Connection Diagram ( 87). 87 Refer to the installation guide (separate leaflet included with an USB port. Direct Transfer With the supplied USB cable and software (on the Connected Device 1 Output connection (signal flow ) to access. Connecting to a Computer PC Connection Diagram...
HG10 Instruction Manual
Page 88
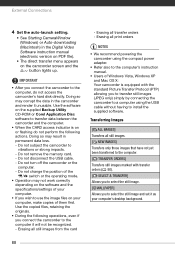
... use the image files on your computer's desktop background. 88 Doing so may result in permanent data loss. - Do not disconnect the USB cable. - Use the software on the supplied Backup Utility CD-ROM or Corel Application Disc software to transfer data between the camcorder and the ...select the still image. [ WALLPAPER] Allows you to transfer still images (JPEG only) simply by connecting the camcorder to a computer using the USB cable without having to install the supplied software. Erasing all still images. [ NEW IMAGES] Transfers only those images that have not yet been transferred to...
... use the image files on your computer's desktop background. 88 Doing so may result in permanent data loss. - Do not disconnect the USB cable. - Use the software on the supplied Backup Utility CD-ROM or Corel Application Disc software to transfer data between the camcorder and the ...select the still image. [ WALLPAPER] Allows you to transfer still images (JPEG only) simply by connecting the camcorder to a computer using the USB cable without having to install the supplied software. Erasing all still images. [ NEW IMAGES] Transfers only those images that have not yet been transferred to...

HG10 Instruction Manual
Page 95
.... REACHED THE MAXIMUM NUMBER OF SCENES The maximum number of Messages Message Explanation CHANGE THE BATTERY PACK Battery pack is not operating even Disconnect the USB cable and turn them on until the 103 camcorder dries completely before resuming use .
.... REACHED THE MAXIMUM NUMBER OF SCENES The maximum number of Messages Message Explanation CHANGE THE BATTERY PACK Battery pack is not operating even Disconnect the USB cable and turn them on until the 103 camcorder dries completely before resuming use .

HG10 Instruction Manual
Page 96
... the hard disk or attempting to write onto it is set to [OFF] if using the camcorder in a situation where drops are recorded on . the USB cable, the camcorder automatically turns off to the camcorder recorded in the camcorder. 30 NO IMAGES No images are likely to free some recordings. Initialize the...
... the hard disk or attempting to write onto it is set to [OFF] if using the camcorder in a situation where drops are recorded on . the USB cable, the camcorder automatically turns off to the camcorder recorded in the camcorder. 30 NO IMAGES No images are likely to free some recordings. Initialize the...

HG10 Instruction Manual
Page 97
... card and set more than 1,800. Reduce the number of 90 still images marked with the paper. Direct Print Related Messages About Canon PIXMA/SELPHY DS Printers: If the printer's error indicator flashes or an error message appears on the camcorder. TRANSFER ORDER ERROR You ...mode. THE CAMCORDER IS SET TO STILL You pressed START/STOP while recording still images ( IMAGE MODE mode). - Disconnecting DISCONNECT THE USB CABLE OR the USB cable or power source while this message will erase all the images on the memory card.) CARD FULL Memory card is in hard POWER...
... card and set more than 1,800. Reduce the number of 90 still images marked with the paper. Direct Print Related Messages About Canon PIXMA/SELPHY DS Printers: If the printer's error indicator flashes or an error message appears on the camcorder. TRANSFER ORDER ERROR You ...mode. THE CAMCORDER IS SET TO STILL You pressed START/STOP while recording still images ( IMAGE MODE mode). - Disconnecting DISCONNECT THE USB CABLE OR the USB cable or power source while this message will erase all the images on the memory card.) CARD FULL Memory card is in hard POWER...

HG10 Instruction Manual
Page 98
...in use the print order settings to print from a memory card that were recorded with another camcorder, with another camcorder. Cancel printing, disconnect the USB cable and turn off the printer. If the printer is a problem with a battery, it back on a computer. When you attempted to print ...some paper again and retry printing. Consult a Canon Service Center (refer to the list included with the printer) to print an image that was recorded with a print order. Reduce the number of ink. Cancel printing, disconnect the USB cable and turn off the printer. There is ...
...in use the print order settings to print from a memory card that were recorded with another camcorder, with another camcorder. Cancel printing, disconnect the USB cable and turn off the printer. If the printer is a problem with a battery, it back on a computer. When you attempted to print ...some paper again and retry printing. Consult a Canon Service Center (refer to the list included with the printer) to print an image that was recorded with a print order. Reduce the number of ink. Cancel printing, disconnect the USB cable and turn off the printer. There is ...

HG10 Instruction Manual
Page 105
... Tele-converter FS-43U II Filter Set STV-250N Stereo Video Cable DTC-100 D Terminal Cable CTC-100 Component Cable VCR/DVD recorder TV/HDTV SC-2000 Soft Carrying Case VFL-1 Video Flash Light VL-3 Video Light HTC-100 HDMI Cable IFC-400PCU USB Cable PictBridgecompatible printers miniSD card adapter miniSD card Card reader/writer Computer...
... Tele-converter FS-43U II Filter Set STV-250N Stereo Video Cable DTC-100 D Terminal Cable CTC-100 Component Cable VCR/DVD recorder TV/HDTV SC-2000 Soft Carrying Case VFL-1 Video Flash Light VL-3 Video Light HTC-100 HDMI Cable IFC-400PCU USB Cable PictBridgecompatible printers miniSD card adapter miniSD card Card reader/writer Computer...

HG10 Instruction Manual
Page 110
Additional Information Product Codes Provided Accessories CA-570 Compact Power Adapter BP-2L13 Battery Pack WL-D86 Wireless Controller STV-250N Stereo Video Cable IFC-400PCU USB Cable Optional Accessories NB-2LH Battery Pack BP-2L14 Battery Pack BP-2L24H Battery Pack CB-2LW Battery Charger TL-H43 Tele-converter WD-...H43 Wide-converter FS-43U II Filter Set HTC-100 HDMI Cable CTC-100 Component Cable WS-20 Wrist Strap SC-2000 Soft Carrying Case ...
Additional Information Product Codes Provided Accessories CA-570 Compact Power Adapter BP-2L13 Battery Pack WL-D86 Wireless Controller STV-250N Stereo Video Cable IFC-400PCU USB Cable Optional Accessories NB-2LH Battery Pack BP-2L14 Battery Pack BP-2L24H Battery Pack CB-2LW Battery Charger TL-H43 Tele-converter WD-...H43 Wide-converter FS-43U II Filter Set HTC-100 HDMI Cable CTC-100 Component Cable WS-20 Wrist Strap SC-2000 Soft Carrying Case ...

Digital Video Software (Windows) Ver.27 Instruction Manual
Page 4
... resulting from a memory card to your computer and the version of a CD-ROM played on your computer. • IFC-400PCU USB Cable • DIGITAL VIDEO Solution Disk The explanations in this guide is also possible to suffer from hearing loss from listening with headphones to... stored in a retrieval system, or translated into any language in any form, by any means, without the prior written permission of Canon. • Canon makes no liability can be registered trademarks or trademarks of Apple Inc., registered in the U.S. Checking Supplied Accessories Use the following accessories ...
... resulting from a memory card to your computer and the version of a CD-ROM played on your computer. • IFC-400PCU USB Cable • DIGITAL VIDEO Solution Disk The explanations in this guide is also possible to suffer from hearing loss from listening with headphones to... stored in a retrieval system, or translated into any language in any form, by any means, without the prior written permission of Canon. • Canon makes no liability can be registered trademarks or trademarks of Apple Inc., registered in the U.S. Checking Supplied Accessories Use the following accessories ...

Digital Video Software (Windows) Ver.27 Instruction Manual
Page 20
...-click the [setup.exe] icon. 4) Follow the instructions in the [User Account Control] window that the camcorder is connected, detach the USB cable from the [start automatically). This protocol enables you can download still images. Still images protected on the camcorder may take a few...images by simply connecting the camcorder to a computer with this setting once they are several limitations to downloading still images with the USB cable (applications such as a Computer System Administrator to the computer, the software cannot be installed normally. If a camcorder is not...
...-click the [setup.exe] icon. 4) Follow the instructions in the [User Account Control] window that the camcorder is connected, detach the USB cable from the [start automatically). This protocol enables you can download still images. Still images protected on the camcorder may take a few...images by simply connecting the camcorder to a computer with this setting once they are several limitations to downloading still images with the USB cable (applications such as a Computer System Administrator to the computer, the software cannot be installed normally. If a camcorder is not...

Digital Video Software (Windows) Ver.27 Instruction Manual
Page 25
...; Do not connect two or more camcorders to start. Windows 2000: Installation of the computer's main USB ports. Wait until the card access indicator stops flashing. 5 Attach the supplied USB cable to the computer's USB port and the camcorder's USB Terminal. • The first time you connect the camcorder to the computer: - Before Downloading Still...
...; Do not connect two or more camcorders to start. Windows 2000: Installation of the computer's main USB ports. Wait until the card access indicator stops flashing. 5 Attach the supplied USB cable to the computer's USB port and the camcorder's USB Terminal. • The first time you connect the camcorder to the computer: - Before Downloading Still...

Digital Video Software (Windows) Ver.27 Instruction Manual
Page 26
• For instructions on the Computer 26 Before Downloading Still Images Camcorder End Computer End USB Cable USB Terminal on the Camcorder USB Port on how to start ZoomBrowser EX and download images to the computer, see Downloading Still Images (ZoomBrowser EX) ( 27).
• For instructions on the Computer 26 Before Downloading Still Images Camcorder End Computer End USB Cable USB Terminal on the Camcorder USB Port on how to start ZoomBrowser EX and download images to the computer, see Downloading Still Images (ZoomBrowser EX) ( 27).

Digital Video Software (Windows) Ver.27 Instruction Manual
Page 27
Do not remove the memory card or detach the USB cable. - In this case, use a card reader/writer to become corrupted. - Do not change the position of the file first before working on it on how ...
Do not remove the memory card or detach the USB cable. - In this case, use a card reader/writer to become corrupted. - Do not change the position of the file first before working on it on how ...

Digital Video Software (Windows) Ver.27 Instruction Manual
Page 85
... the Maintenance Complete window appears, click [Finish]. Uninstalling the TWAIN Driver (Windows 2000 only) 1 Connect the camcorder to OFF and remove the USB cable from the [Scanners and Cameras Properties] list. 6 Click [OK] to close it. 3 Click the Windows [Start] menu and select [...If you cannot find the [Scanners and Cameras] icon, see TWAIN Driver Uninstallation ( 87). 5 Delete [Canon Camera] from the computer. 8 Click the Windows [Start] menu and select [Programs], [Canon Utilities], [DV TWAIN Driver x.x] and [TWAIN Driver Uninstall]. A version number appears in place of "x.x". ...
... the Maintenance Complete window appears, click [Finish]. Uninstalling the TWAIN Driver (Windows 2000 only) 1 Connect the camcorder to OFF and remove the USB cable from the [Scanners and Cameras Properties] list. 6 Click [OK] to close it. 3 Click the Windows [Start] menu and select [...If you cannot find the [Scanners and Cameras] icon, see TWAIN Driver Uninstallation ( 87). 5 Delete [Canon Camera] from the computer. 8 Click the Windows [Start] menu and select [Programs], [Canon Utilities], [DV TWAIN Driver x.x] and [TWAIN Driver Uninstall]. A version number appears in place of "x.x". ...


