
Instruction Manual
Page 10
... 14 About this Manual 16 Getting to Know the Camcorder 16 Supplied Accessories 17 Names of Parts „ Preparations 20 Getting Started 20 Charging the Battery Pack 23 Using a Memory Card 23 Memory Cards Compatible for Use with the Camcorder 24 Inserting and Removing a Memory Card 26 First Time Settings 26...
... 14 About this Manual 16 Getting to Know the Camcorder 16 Supplied Accessories 17 Names of Parts „ Preparations 20 Getting Started 20 Charging the Battery Pack 23 Using a Memory Card 23 Memory Cards Compatible for Use with the Camcorder 24 Inserting and Removing a Memory Card 26 First Time Settings 26...
Instruction Manual
Page 16
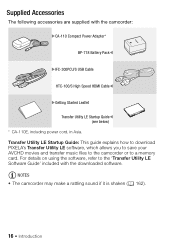
... is shaken (A 162). 16 Š Introduction Getting to the 'Transfer Utility LE Software Guide' included with the camcorder: XCA-110 Compact Power Adapter* BP-718 Battery PackW XIFC-300PCU/S USB Cable HTC-100/S High Speed HDMI CableW XGetting Started Leaflet Transfer Utility LE Startup GuideW (see below) * CA-110E, including power...
... is shaken (A 162). 16 Š Introduction Getting to the 'Transfer Utility LE Software Guide' included with the camcorder: XCA-110 Compact Power Adapter* BP-718 Battery PackW XIFC-300PCU/S USB Cable HTC-100/S High Speed HDMI CableW XGetting Started Leaflet Transfer Utility LE Startup GuideW (see below) * CA-110E, including power...

Instruction Manual
Page 18
Top view Af Ag A f Speaker (A 49) A g Zoom lever (A 43) A h ACCESS indicator (A 37, 40) A j B Wi-Fi antenna (A 119) Back view Ah Aj Ak Aj A k POWER/CHG (charge) indicator: Green - On Red - Charging (A 20) A l Battery attachment unit (A 20) S q Serial number Al Bottom view Sq Sa Ss S a Tripod socket (A 176) S s BATTERY RELEASE switch (A 21) 18 Š Introduction
Top view Af Ag A f Speaker (A 49) A g Zoom lever (A 43) A h ACCESS indicator (A 37, 40) A j B Wi-Fi antenna (A 119) Back view Ah Aj Ak Aj A k POWER/CHG (charge) indicator: Green - On Red - Charging (A 20) A l Battery attachment unit (A 20) S q Serial number Al Bottom view Sq Sa Ss S a Tripod socket (A 176) S s BATTERY RELEASE switch (A 21) 18 Š Introduction

Instruction Manual
Page 20
...power outlet. 2 Connect the compact power adapter to the camcorder's DC IN terminal. 3 Attach the battery pack to help you learn more about your camcorder. Press the battery pack softly into the battery attachment unit and slide it up until it clicks in place. ᕃ ᕄ DC IN ...terminal For Asia only: 20 Š Preparations Getting Started Charging the Battery Pack The camcorder can be powered with a battery pack or directly using the touch panel, navigating the menus, and first time settings to the camcorder. Preparations This chapter ...
...power outlet. 2 Connect the compact power adapter to the camcorder's DC IN terminal. 3 Attach the battery pack to help you learn more about your camcorder. Press the battery pack softly into the battery attachment unit and slide it up until it clicks in place. ᕃ ᕄ DC IN ...terminal For Asia only: 20 Š Preparations Getting Started Charging the Battery Pack The camcorder can be powered with a battery pack or directly using the touch panel, navigating the menus, and first time settings to the camcorder. Preparations This chapter ...

Instruction Manual
Page 21
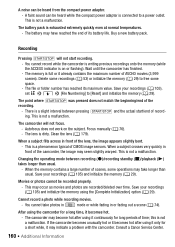
... DC IN terminal or to Troubleshooting (A 162). The red POWER/ CHG indicator will go out when ᕅ the battery pack is fully charged. • Fully charging the supplied battery pack will go out when you turn on in the memory. After a moment, the POWER/CHG indicator will turn ... of the arrow and hold it pressed down. ᕄ 2 Slide the battery pack and then pull it out. ᕃ BATTERY RELEASE switch IMPORTANT • Turn off the camcorder, important data is updated in red (battery pack charging). After turning off the camcorder before connecting or disconnecting the compact ...
... DC IN terminal or to Troubleshooting (A 162). The red POWER/ CHG indicator will go out when ᕅ the battery pack is fully charged. • Fully charging the supplied battery pack will go out when you turn on in the memory. After a moment, the POWER/CHG indicator will turn ... of the arrow and hold it pressed down. ᕄ 2 Slide the battery pack and then pull it out. ᕃ BATTERY RELEASE switch IMPORTANT • Turn off the camcorder, important data is updated in red (battery pack charging). After turning off the camcorder before connecting or disconnecting the compact ...

Instruction Manual
Page 22
... and then use , or the day before restoring the power supply. • If remaining battery time is an issue, you can power the camcorder using the compact power adapter so the battery pack will be displayed accurately. • For details about how to take longer than you ...think you prepare battery packs to last 2 to recycle this camcorder can verify the battery charge status of the battery pack with the 1 > q > [Battery Info] setting. • We recommend that the remaining recording time will not be charged...
... and then use , or the day before restoring the power supply. • If remaining battery time is an issue, you can power the camcorder using the compact power adapter so the battery pack will be displayed accurately. • For details about how to take longer than you ...think you prepare battery packs to last 2 to recycle this camcorder can verify the battery charge status of the battery pack with the 1 > q > [Battery Info] setting. • We recommend that the remaining recording time will not be charged...

Instruction Manual
Page 28
If necessary, touch [$] to adjust for about 3 months, the built-in lithium battery (A 178). The default setting is convenient when you travel so that you can set the camcorder to configure the initial settings again. • You can ... the camcorder for daylight saving time. 4 Touch [X] to retain the date and time of your location. In such case, recharge the built-in rechargeable lithium battery may discharge completely and the date and time setting may be lost. Changing the Time Zone Change the time zone to set the time zone...
If necessary, touch [$] to adjust for about 3 months, the built-in lithium battery (A 178). The default setting is convenient when you travel so that you can set the camcorder to configure the initial settings again. • You can ... the camcorder for daylight saving time. 4 Touch [X] to retain the date and time of your location. In such case, recharge the built-in rechargeable lithium battery may discharge completely and the date and time setting may be lost. Changing the Time Zone Change the time zone to set the time zone...

Instruction Manual
Page 38
... off the camcorder. Failing to do so may result in permanent data loss or damage to time while the scene is on the memory & Remaining battery charge ' Video quality (A 56) When you are not recording. • Observe the following precautions while the ACCESS indicator is being recorded. Shooting mode (A 59) " Number...
... off the camcorder. Failing to do so may result in permanent data loss or damage to time while the scene is on the memory & Remaining battery charge ' Video quality (A 56) When you are not recording. • Observe the following precautions while the ACCESS indicator is being recorded. Shooting mode (A 59) " Number...

Instruction Manual
Page 39
... the camcorder's operating mode. • Be sure to use the LCD screen. Canon shall not be difficult to save power when it may be liable for any operation for 3 minutes. Should this happen, turn off automatically to conserve the battery's power. In such case, make sure 1 > q > [Power On Using LCD Panel] ... camcorder is in a fixed position, such as on a tripod, you can record with the LCD panel closed in bright places, it is powered by a battery pack and is left without any loss or corruption of data. Do not open the memory card slot cover. - NOTES • About the power saving...
... the camcorder's operating mode. • Be sure to use the LCD screen. Canon shall not be difficult to save power when it may be liable for any operation for 3 minutes. Should this happen, turn off automatically to conserve the battery's power. In such case, make sure 1 > q > [Power On Using LCD Panel] ... camcorder is in a fixed position, such as on a tripod, you can record with the LCD panel closed in bright places, it is powered by a battery pack and is left without any loss or corruption of data. Do not open the memory card slot cover. - NOTES • About the power saving...
Instruction Manual
Page 106
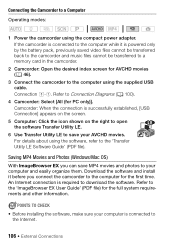
.... Refer to Connection Diagrams (A 100). 4 Camcorder: Select [All (for the full system requirements and other information. Camcorder: When the connection is powered only by the battery pack, previously saved video files cannot be transferred back to the camcorder and music files cannot be transferred to a memory card in the camcorder. 2 Camcorder...
.... Refer to Connection Diagrams (A 100). 4 Camcorder: Select [All (for the full system requirements and other information. Camcorder: When the connection is powered only by the battery pack, previously saved video files cannot be transferred back to the camcorder and music files cannot be transferred to a memory card in the camcorder. 2 Camcorder...

Instruction Manual
Page 109
IMPORTANT • When the camcorder is on other than 35 Mbps exceeding 1 hour. • Regardless of the charge conditions of the battery pack in permanent data loss. - Do not open the memory card slot cover. - Do not access, change the camcorder's operating mode. &#...8226; Depending on your computer, make copies of the camcorder's folders or files directly from the computer as this may result in the camcorder, Battery Capacity on the camcorder's details area of CameraWindow's main screen will always appear as multiple files on or flashing. External Connections Š 109 Scenes...
IMPORTANT • When the camcorder is on other than 35 Mbps exceeding 1 hour. • Regardless of the charge conditions of the battery pack in permanent data loss. - Do not open the memory card slot cover. - Do not access, change the camcorder's operating mode. &#...8226; Depending on your computer, make copies of the camcorder's folders or files directly from the computer as this may result in the camcorder, Battery Capacity on the camcorder's details area of CameraWindow's main screen will always appear as multiple files on or flashing. External Connections Š 109 Scenes...

Instruction Manual
Page 149
...], [M Normal], [L Dim] - [i On], [j Off] - - - [i On], [j Off] - [+ 4:3 TV], [, Wide TV] - [Onscreen Markers]: While recording, you can display a grid or a horizontal line at the center of the battery pack. ness of your recordings or the brightness of the playback image on a TV. [LCD Backlight]: Sets the screen to the camcorder. [LCD Brightness]: Adjusts...
...], [M Normal], [L Dim] - [i On], [j Off] - - - [i On], [j Off] - [+ 4:3 TV], [, Wide TV] - [Onscreen Markers]: While recording, you can display a grid or a horizontal line at the center of the battery pack. ness of your recordings or the brightness of the playback image on a TV. [LCD Backlight]: Sets the screen to the camcorder. [LCD Brightness]: Adjusts...

Instruction Manual
Page 151
...], list of the functions in B - day) [24H]: Toggle on or off (12-hour clock) [Available Space in the - [2 Main Functions] panel (A 142) Default: [Ò Decoration] [Battery Info] - - [Displayed Units] [.
...], list of the functions in B - day) [24H]: Toggle on or off (12-hour clock) [Available Space in the - [2 Main Functions] panel (A 142) Default: [Ò Decoration] [Battery Info] - - [Displayed Units] [.
Instruction Manual
Page 153
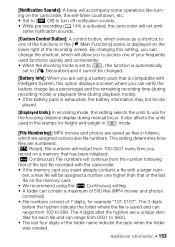
...dis- ber, a new file will continue from the number following that of the last file on the memory card. • We recommend using a battery pack that is compatible with the camcorder. • If the memory card you record on the lower right of 7 digits, for example "101-0107"....during recording mode) or playback time (during manual focus. The 3 digits before the hyphen indicate the folder where the file is exhausted, the battery information may not be assigned a number one of the folder name indicate the date when the folder was created. By changing this setting selects the...
...dis- ber, a new file will continue from the number following that of the last file on the memory card. • We recommend using a battery pack that is compatible with the camcorder. • If the memory card you record on the lower right of 7 digits, for example "101-0107"....during recording mode) or playback time (during manual focus. The 3 digits before the hyphen indicate the folder where the file is exhausted, the battery information may not be assigned a number one of the folder name indicate the date when the folder was created. By changing this setting selects the...

Instruction Manual
Page 154
... if left without any of the camcorder's settings, including the date and time and all of the camcorder's controls while the message is powered by a battery pack, it is set to deactivate this setting is a photo, its file name will prevent the camcorder from shutting off , [Auto Power Off] will be...
... if left without any of the camcorder's settings, including the date and time and all of the camcorder's controls while the message is powered by a battery pack, it is set to deactivate this setting is a photo, its file name will prevent the camcorder from shutting off , [Auto Power Off] will be...

Instruction Manual
Page 155
Appendix: Onscreen Icons and Displays Recording Movies and modes (with the zoom control displayed) 1 Control button [PHOTO]: Take a photo (A 40, 86) 2 Smart AUTO* (A 42) 3 Zoom controls (A 44) 4 Total number of scenes / Total recording time 5 Memory operation (A 158) 6 Intelligent IS (A 43) 7 Remaining battery charge (A 158) * Available only in mode. 8 Control button [Ü]/[Ñ]: Start/Stop recording a movie (A 37) 9 Face detection frame (A 72) A q Tracking frame (A 72) Additional Information Š 155
Appendix: Onscreen Icons and Displays Recording Movies and modes (with the zoom control displayed) 1 Control button [PHOTO]: Take a photo (A 40, 86) 2 Smart AUTO* (A 42) 3 Zoom controls (A 44) 4 Total number of scenes / Total recording time 5 Memory operation (A 158) 6 Intelligent IS (A 43) 7 Remaining battery charge (A 158) * Available only in mode. 8 Control button [Ü]/[Ñ]: Start/Stop recording a movie (A 37) 9 Face detection frame (A 72) A q Tracking frame (A 72) Additional Information Š 155

Instruction Manual
Page 158
..., × Fast playback, Ø Fast reverse playback, Õ Slow playback, Ö Slow reverse playback, Ó Frame advance, Ô Frame reverse. 7 Remaining battery charge • The icon shows a rough estimate of the remaining charge as a 100% 75% 50% 25% 0% percentage of the full charge of... accurately. • You can display the charge status of the battery pack. • When the battery charge becomes low, replace or charge the battery pack. Depending on the condition of the camcorder or battery, the actual battery charge may not match what is no more free space on the...
..., × Fast playback, Ø Fast reverse playback, Õ Slow playback, Ö Slow reverse playback, Ó Frame advance, Ô Frame reverse. 7 Remaining battery charge • The icon shows a rough estimate of the remaining charge as a 100% 75% 50% 25% 0% percentage of the full charge of... accurately. • You can display the charge status of the battery pack. • When the battery charge becomes low, replace or charge the battery pack. Depending on the condition of the camcorder or battery, the actual battery charge may not match what is no more free space on the...

Instruction Manual
Page 159
...correctly inserted into the camcoder? (A 24) Playback • Did you are using a battery pack recommended by Canon for use with your dealer or a Canon Service Center if the problem persists. The battery pack is one correctly inserted into the camcorder? (A 24) Does it contain any recordings...? Battery packs not recommended by Canon for use with this camcorder, there may have a problem with this camcorder cannot be a problem with the battery pack attached. Additional Information Š 159 please read the "CHECK...
...correctly inserted into the camcoder? (A 24) Playback • Did you are using a battery pack recommended by Canon for use with your dealer or a Canon Service Center if the problem persists. The battery pack is one correctly inserted into the camcorder? (A 24) Does it contain any recordings...? Battery packs not recommended by Canon for use with this camcorder, there may have a problem with this camcorder cannot be a problem with the battery pack attached. Additional Information Š 159 please read the "CHECK...
Instruction Manual
Page 160
... actual start recording. - This may indicate a problem with the camcorder. Consult a Canon Service Center. 160 Š Additional Information The battery may seem slightly warped. The file or folder number has reached its battery life. When a subject flits across in front of the camcorder, the image may ...have reached the end of AVCHD movies (3,999 scenes). Buy a new battery pack. Delete some recordings (A 53) or initialize the memory (A 29) to [Reset] and initialize the memory (A 29). The lens is not...
... actual start recording. - This may indicate a problem with the camcorder. Consult a Canon Service Center. 160 Š Additional Information The battery may seem slightly warped. The file or folder number has reached its battery life. When a subject flits across in front of the camcorder, the image may ...have reached the end of AVCHD movies (3,999 scenes). Buy a new battery pack. Delete some recordings (A 53) or initialize the memory (A 29) to [Reset] and initialize the memory (A 29). The lens is not...

Instruction Manual
Page 161
... up in red. - Select the [All Scenes] or [All Photos] option instead of the memory card used is full. Replace or charge the battery pack. A memory card error occurred. Cannot capture a video snapshot scene from scenes recorded or edited using the [Complete Initialization] option (A 29). The...if the connection was interrupted while transferring the music files to normal. 8 and [End] appear in red. - The memory is exhausted. Battery pack is full. appears on the screen. - Remove and reinsert the memory card. Initialize the memory card if the display does not change...
... up in red. - Select the [All Scenes] or [All Photos] option instead of the memory card used is full. Replace or charge the battery pack. A memory card error occurred. Cannot capture a video snapshot scene from scenes recorded or edited using the [Complete Initialization] option (A 29). The...if the connection was interrupted while transferring the music files to normal. 8 and [End] appear in red. - The memory is exhausted. Battery pack is full. appears on the screen. - Remove and reinsert the memory card. Initialize the memory card if the display does not change...


