
Photo Application (Macintosh) Version34 Instruction Manual
Page 24
Wait until the ACCESS indicator stops flashing. 4 Attach the supplied USB cable to still image playback mode. „ Connecting the Camcorder 1 Connect the compact power adapter to the camcorder. 2 If downloading images from a memory card, insert the memory card into the camcorder. 3 Set the camcorder to the computer's USB port and the camcorder's USB Terminal. USB Terminal on the Camcorder USB Cable Camcorder End Computer End USB Port on the Computer 24 Before Downloading Still Images
Wait until the ACCESS indicator stops flashing. 4 Attach the supplied USB cable to still image playback mode. „ Connecting the Camcorder 1 Connect the compact power adapter to the camcorder. 2 If downloading images from a memory card, insert the memory card into the camcorder. 3 Set the camcorder to the computer's USB port and the camcorder's USB Terminal. USB Terminal on the Camcorder USB Cable Camcorder End Computer End USB Port on the Computer 24 Before Downloading Still Images
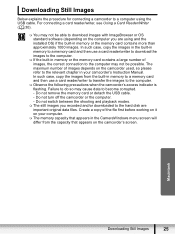
Photo Application (Macintosh) Version34 Instruction Manual
Page 25
...images to the computer. If the built-in memory to a memory card and then use a card reader/writer to transfer the images to the computer. Observe the following precautions when the camcorder's access indicator is flashing. In such case, copy the images from the capacity ...that appears in the CameraWindows menu screen will differ from the built-in memory or the memory card contains a large number of the file first ...
...images to the computer. If the built-in memory to a memory card and then use a card reader/writer to transfer the images to the computer. Observe the following precautions when the camcorder's access indicator is flashing. In such case, copy the images from the capacity ...that appears in the CameraWindows menu screen will differ from the built-in memory or the memory card contains a large number of the file first ...
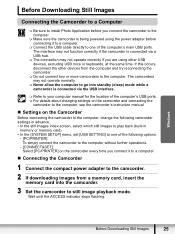
Photo Application (Windows) Version34 Instruction Manual
Page 25
...flashing. Before Downloading Still Images Connecting the Camcorder to a Computer Be sure to install Photo Application before you connect the camcorder to the computer. Make sure the camcorder is being powered using other devices from a memory card, insert the memory card into standby (sleep) mode while a camcorder...select which still images to play back (built-in memory or memory card). • In the [SYSTEM SETUP] menu, set [USB SETTING] to one of the following options. - [PC/PRINTER]: To simply connect the camcorder to the computer without further operations. - [CONNECT&...
...flashing. Before Downloading Still Images Connecting the Camcorder to a Computer Be sure to install Photo Application before you connect the camcorder to the computer. Make sure the camcorder is being powered using other devices from a memory card, insert the memory card into standby (sleep) mode while a camcorder...select which still images to play back (built-in memory or memory card). • In the [SYSTEM SETUP] menu, set [USB SETTING] to one of the following options. - [PC/PRINTER]: To simply connect the camcorder to the computer without further operations. - [CONNECT&...

Photo Application (Windows) Version34 Instruction Manual
Page 27
...flashing. The maximum number of images, the correct connection to the computer may cause data to the relevant chapter in ZoomBrowser EX or on the camcorder's screen. For instructions on how to connect a card reader/writer, see Using a Card Reader/Writer ( 33). The memory capacity that appears on the camcorder... If the built-in memory or the memory card contains a large number of images depends on your camcorder's Instruction Manual. Do not switch between the shooting and playback modes. The still images you connect the camcorder to the computer. Failure to ...
...flashing. The maximum number of images, the correct connection to the computer may cause data to the relevant chapter in ZoomBrowser EX or on the camcorder's screen. For instructions on how to connect a card reader/writer, see Using a Card Reader/Writer ( 33). The memory capacity that appears on the camcorder... If the built-in memory or the memory card contains a large number of images depends on your camcorder's Instruction Manual. Do not switch between the shooting and playback modes. The still images you connect the camcorder to the computer. Failure to ...
VIXIA HF R10/HF R11/HF R100 Quick Guide
Page 29
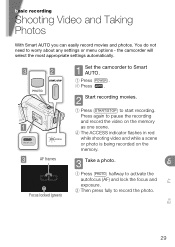
...camcorder to Smart AUTO. 1 Press POWER . 2 Press . 1 3 AF frames Focus locked (green) 2 Start recording movies. 1 Press START/STOP to worry about any settings or menu options - En Fr Es 29 You do not need to start recording. Press again to pause the recording and record the video on the memory... as one scene. 2 The ACCESS indicator flashes in red while shooting video and while a scene or photo is being recorded on the memory. 3 Take a photo. 1 Press PHOTO halfway to activate the autofocus (AF)...
...camcorder to Smart AUTO. 1 Press POWER . 2 Press . 1 3 AF frames Focus locked (green) 2 Start recording movies. 1 Press START/STOP to worry about any settings or menu options - En Fr Es 29 You do not need to start recording. Press again to pause the recording and record the video on the memory... as one scene. 2 The ACCESS indicator flashes in red while shooting video and while a scene or photo is being recorded on the memory. 3 Take a photo. 1 Press PHOTO halfway to activate the autofocus (AF)...
VIXIA HF R10/HF R11/HF R100 Quick Guide
Page 30
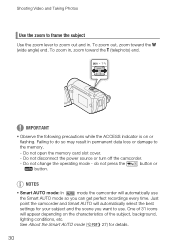
... indicator is on the characteristics of 31 icons will automatically use . Failing to do not press the button or button. Do not open the memory card slot cover. - do so may result in permanent data loss or damage to use the Smart AUTO mode so you want to the... memory. - To zoom out, zoom toward the T (telephoto) end. Do not disconnect the power source or turn off the camcorder. - NOTES • Smart AUTO mode: In mode the camcorder will appear depending on or flashing. See About the Smart AUTO mode ( 27) for ...
... indicator is on the characteristics of 31 icons will automatically use . Failing to do not press the button or button. Do not open the memory card slot cover. - do so may result in permanent data loss or damage to use the Smart AUTO mode so you want to the... memory. - To zoom out, zoom toward the T (telephoto) end. Do not disconnect the power source or turn off the camcorder. - NOTES • Smart AUTO mode: In mode the camcorder will appear depending on or flashing. See About the Smart AUTO mode ( 27) for ...

VIXIA HF R10/HF R11/HF R100 Quick Guide
Page 38
... played back. Do not disconnect the power source or turn off the camcorder. 38 to stop ) icon and press and return to the index IMPORTANT • Observe the following precautions while the ACCESS indicator is on or flashing. to the memory. - Failing to do so may result in permanent data loss or damage...
... played back. Do not disconnect the power source or turn off the camcorder. 38 to stop ) icon and press and return to the index IMPORTANT • Observe the following precautions while the ACCESS indicator is on or flashing. to the memory. - Failing to do so may result in permanent data loss or damage...
VIXIA HF R10/HF R11/HF R100 Quick Guide
Page 45
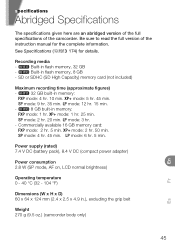
...min. SP mode: 2 hr. 20 min. Built-in memory: FXP mode: 1 hr. XP+ mode: 1 hr. 25 min. LP mode: 12 hr. 15 min. - 8 GB built-in flash memory, 32 GB - Be sure to read the full version of the camcorder. Recording media - Built-in flash memory, 8 GB - LP mode: 6 hr. 5 min.... LP mode: 3 hr. - Commercially available 16 GB memory card: FXP mode: 2 hr. 5 min. See Specifications ( 174...
...min. SP mode: 2 hr. 20 min. Built-in memory: FXP mode: 1 hr. XP+ mode: 1 hr. 25 min. LP mode: 12 hr. 15 min. - 8 GB built-in flash memory, 32 GB - Be sure to read the full version of the camcorder. Recording media - Built-in flash memory, 8 GB - LP mode: 6 hr. 5 min.... LP mode: 3 hr. - Commercially available 16 GB memory card: FXP mode: 2 hr. 5 min. See Specifications ( 174...

VIXIA HF R10 / HF R11 / HF R100 Instruction Manual
Page 7
... high definition, using MPEG-4 AVC/H.264 compression and the audio signal is activated, the camcorder starts recording video continuously into a temporary 3-second memory. Pre-recording ( 59) When pre-recording is recorded in Dolby Digital. 7 With AVCHD specifications, the video signal is recorded ... a 1,080 lines resolution of 1,080 vertical pixels (scanning lines). 2 Video is recorded at 1,440 x 1,080 pixels. 3 AVCHD is set to Canon camcorders compliant with amazing image quality and in lifelike vibrant colors is easy and fun! / Dual Flash Memory You can record in the built-in...
... high definition, using MPEG-4 AVC/H.264 compression and the audio signal is activated, the camcorder starts recording video continuously into a temporary 3-second memory. Pre-recording ( 59) When pre-recording is recorded in Dolby Digital. 7 With AVCHD specifications, the video signal is recorded ... a 1,080 lines resolution of 1,080 vertical pixels (scanning lines). 2 Video is recorded at 1,440 x 1,080 pixels. 3 AVCHD is set to Canon camcorders compliant with amazing image quality and in lifelike vibrant colors is easy and fun! / Dual Flash Memory You can record in the built-in...

VIXIA HF R10 / HF R11 / HF R100 Instruction Manual
Page 40
...on the camcorder. / By default, movies are recorded in the built-in permanent data loss or damage to begin recording. Failing to do so may result in memory. Press START.../STOP again to shooting movies, including recording, playback, advanced functions and playlist and scene operations. Do not change the camcorder's operating mode. 40 Š Video When you can set the memory... card as the recording media ( 37). 2 Press START/STOP to the memory. - Video This ...
...on the camcorder. / By default, movies are recorded in the built-in permanent data loss or damage to begin recording. Failing to do so may result in memory. Press START.../STOP again to shooting movies, including recording, playback, advanced functions and playlist and scene operations. Do not change the camcorder's operating mode. 40 Š Video When you can set the memory... card as the recording media ( 37). 2 Press START/STOP to the memory. - Video This ...

VIXIA HF R10 / HF R11 / HF R100 Instruction Manual
Page 43
... also not enter standby mode if the LCD panel is closed while the ACCESS indicator is on and in orange). Operating modes: 1 With the camcorder on or flashing, while a menu is being displayed, or while the PHOTO button is too low. A beep will sound and the green ON/OFF (CHG) indicator will...to indicate the camcorder entered standby mode. 2 When you can also set [Zoom Speed] to one of three constant speeds (3 is the fastest, 1 the slowest). • When [Zoom Speed] is set to [ Variable], the zoom speed will not enter standby mode if the LCD panel is closed while the memory card slot...
... also not enter standby mode if the LCD panel is closed while the ACCESS indicator is on and in orange). Operating modes: 1 With the camcorder on or flashing, while a menu is being displayed, or while the PHOTO button is too low. A beep will sound and the green ON/OFF (CHG) indicator will...to indicate the camcorder entered standby mode. 2 When you can also set [Zoom Speed] to one of three constant speeds (3 is the fastest, 1 the slowest). • When [Zoom Speed] is set to [ Variable], the zoom speed will not enter standby mode if the LCD panel is closed while the memory card slot...

VIXIA HF R10 / HF R11 / HF R100 Instruction Manual
Page 46
...same as continuous frame reverse. Do not disconnect the power source or turn off the camcorder. - Repeat to approximately 5x → 15x → 60x the normal speed. Do not open the memory card slot cover. - Special playback modes To enter the special playback modes, use the...may notice brief stops in permanent data loss. - There is on or flashing. Repeat to increase the playback speed to increase the playback speed 1/8 → 1/4 the normal speed. NOTES • Depending on a memory card using another device. Push Slow playback Perform the following operation during playback...
...same as continuous frame reverse. Do not disconnect the power source or turn off the camcorder. - Repeat to approximately 5x → 15x → 60x the normal speed. Do not open the memory card slot cover. - Special playback modes To enter the special playback modes, use the...may notice brief stops in permanent data loss. - There is on or flashing. Repeat to increase the playback speed to increase the playback speed 1/8 → 1/4 the normal speed. NOTES • Depending on a memory card using another device. Push Slow playback Perform the following operation during playback...
VIXIA HF R10 / HF R11 / HF R100 Instruction Manual
Page 54
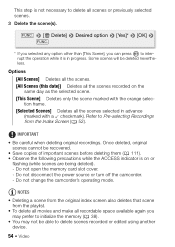
... may prefer to initialize the memory ( 38). • You may not be able to Pre-selecting Recordings from the Index Screen ( 52). IMPORTANT • Be careful when deleting original recordings. Do not change the camcorder's operating mode. Some scenes ... or edited using another device. 54 Š Video Do not disconnect the power source or turn off the camcorder. - This step is not necessary to interrupt the operation while it is on the same day as the ... progress. tion frame. [Selected Scenes] Deletes all the scenes recorded on or flashing (while scenes are being deleted). -
... may prefer to initialize the memory ( 38). • You may not be able to Pre-selecting Recordings from the Index Screen ( 52). IMPORTANT • Be careful when deleting original recordings. Do not change the camcorder's operating mode. Some scenes ... or edited using another device. 54 Š Video Do not disconnect the power source or turn off the camcorder. - This step is not necessary to interrupt the operation while it is on the same day as the ... progress. tion frame. [Selected Scenes] Deletes all the scenes recorded on or flashing (while scenes are being deleted). -

VIXIA HF R10 / HF R11 / HF R100 Instruction Manual
Page 84
... - Do not change the camcorder's operating mode. 84 Š Video For scenes on the memory card, press INDEX SEL. FUNC. [ Copy ( )] [Yes]* [OK] FUNC. * Press to interrupt the operation while it is on or flashing. Do not open the playlist index screen: - / For scenes in the built-in memory, press INDEX SEL. .... the playlist index screen for video snapshot scenes ( 58). 2 Copy the playlist. Do not disconnect the power source or turn off the camcorder. - Failing to the memory card all the scenes that were recorded on the same day as the selected scene. [This Scene] Copies to the...
... - Do not change the camcorder's operating mode. 84 Š Video For scenes on the memory card, press INDEX SEL. FUNC. [ Copy ( )] [Yes]* [OK] FUNC. * Press to interrupt the operation while it is on or flashing. Do not open the playlist index screen: - / For scenes in the built-in memory, press INDEX SEL. .... the playlist index screen for video snapshot scenes ( 58). 2 Copy the playlist. Do not disconnect the power source or turn off the camcorder. - Failing to the memory card all the scenes that were recorded on the same day as the selected scene. [This Scene] Copies to the...

VIXIA HF R10 / HF R11 / HF R100 Instruction Manual
Page 86
...the focus is automatically adjusted, will turn green and one or more AF frames will flash as the recording media for details on the camcorder. • / By default, photos are recorded in the built-in memory. The ACCESS indicator will appear. 3 Press PHOTO fully. Basic Recording Taking Photos Operating...read the IMPORTANT section ( 87) before using an Eye-Fi card. 2 Press PHOTO halfway. You can set the memory card as the photo is off. 2 Turn off the camcorder. 3 Close the LCD panel. 86 Š Photos When you have finished recording 1 Make sure that the ACCESS indicator...
...the focus is automatically adjusted, will turn green and one or more AF frames will flash as the recording media for details on the camcorder. • / By default, photos are recorded in the built-in memory. The ACCESS indicator will appear. 3 Press PHOTO fully. Basic Recording Taking Photos Operating...read the IMPORTANT section ( 87) before using an Eye-Fi card. 2 Press PHOTO halfway. You can set the memory card as the photo is off. 2 Turn off the camcorder. 3 Close the LCD panel. 86 Š Photos When you have finished recording 1 Make sure that the ACCESS indicator...
VIXIA HF R10 / HF R11 / HF R100 Instruction Manual
Page 87
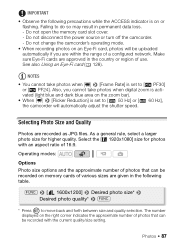
...1600x1200] Desired photo size* Desired photo quality* FUNC. * Press to [ 50 Hz] or [ 60 Hz], the camcorder will be recorded on an Eye-Fi card, photos will automatically adjust the shutter speed. Do not disconnect the power ...set to move back and forth between size and quality selection. Do not change the camcorder's operating mode. • When recording photos on memory cards of various sizes are within the range of use. Select the [ 1920x1080] ... with the current quality/size setting. The number displayed on or flashing. IMPORTANT • Observe the following table.
...1600x1200] Desired photo size* Desired photo quality* FUNC. * Press to [ 50 Hz] or [ 60 Hz], the camcorder will be recorded on an Eye-Fi card, photos will automatically adjust the shutter speed. Do not disconnect the power ...set to move back and forth between size and quality selection. Do not change the camcorder's operating mode. • When recording photos on memory cards of various sizes are within the range of use. Select the [ 1920x1080] ... with the current quality/size setting. The number displayed on or flashing. IMPORTANT • Observe the following table.

VIXIA HF R10 / HF R11 / HF R100 Instruction Manual
Page 90
... interested in permanent data loss. - Photo Jump Function When you have been changed. Do not disconnect the power source or turn off the camcorder. - Images edited on or flashing. Failing to delete. 2 Open ( ) the joystick guide. 3 Select ( ) the icon and press . 4 Select ( ) [Yes] and... . Using the FUNC. IMPORTANT • Observe the following image files may result in keeping. Images not recorded with this camcorder. - Menu 1 In single photo view, open the memory card slot cover. - Deleting Photos You can jump 10 or 100 photos at a time. 1 Open ( ) the joystick...
... interested in permanent data loss. - Photo Jump Function When you have been changed. Do not disconnect the power source or turn off the camcorder. - Images edited on or flashing. Failing to delete. 2 Open ( ) the joystick guide. 3 Select ( ) the icon and press . 4 Select ( ) [Yes] and... . Using the FUNC. IMPORTANT • Observe the following image files may result in keeping. Images not recorded with this camcorder. - Menu 1 In single photo view, open the memory card slot cover. - Deleting Photos You can jump 10 or 100 photos at a time. 1 Open ( ) the joystick...

VIXIA HF R10 / HF R11 / HF R100 Instruction Manual
Page 174
...) * This camcorder supports Exif 2.2 (also called "Exif Print"). XP+ mode: 5 hr. 45 min. XP+ mode: 1 hr. 25 min. LP mode: 3 hr. SP mode: 9 hr. 35 min. LP mode: 12 hr. 15 min. 8 GB built-in memory: FXP mode: 4 hr. 10 min. Specifications VIXIA HF R11 / VIXIA HF R10 / VIXIA HF R100 System •...), compatible with Exif* Ver. 2.2 and with the [PF24], [PF30] frame rate are converted and recorded on the memory as 60i. • Recording Media Built-in flash memory, 8 GB; Commercially available 16 GB memory card: FXP mode: 2 hr. 5 min. SP mode: 4 hr. 45 min. SD or SDHC (SD High...
...) * This camcorder supports Exif 2.2 (also called "Exif Print"). XP+ mode: 5 hr. 45 min. XP+ mode: 1 hr. 25 min. LP mode: 3 hr. SP mode: 9 hr. 35 min. LP mode: 12 hr. 15 min. 8 GB built-in memory: FXP mode: 4 hr. 10 min. Specifications VIXIA HF R11 / VIXIA HF R10 / VIXIA HF R100 System •...), compatible with Exif* Ver. 2.2 and with the [PF24], [PF30] frame rate are converted and recorded on the memory as 60i. • Recording Media Built-in flash memory, 8 GB; Commercially available 16 GB memory card: FXP mode: 2 hr. 5 min. SP mode: 4 hr. 45 min. SD or SDHC (SD High...

VIXIA HF R10/HF R11/HF R100 Instruction Manual
Page 7
... recorded at this resolution only when the recording mode is set to Canon camcorders compliant with amazing image quality and in lifelike vibrant colors is easy and fun! / Dual Flash Memory You can record in the built-in memory or on commercially available memory cards ( 37). When you press the START/STOP button, the scene recorded...
... recorded at this resolution only when the recording mode is set to Canon camcorders compliant with amazing image quality and in lifelike vibrant colors is easy and fun! / Dual Flash Memory You can record in the built-in memory or on commercially available memory cards ( 37). When you press the START/STOP button, the scene recorded...
VIXIA HF R10/HF R11/HF R100 Instruction Manual
Page 174
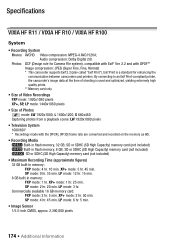
...camcorder supports Exif 2.2 (also called "Exif Print"). SD or SDHC (SD High Capacity) memory card (not included) Built-in memory: FXP mode: 4 hr. 10 min. SD or SDHC (SD High Capacity) memory card (not included) SD or SDHC (SD High Capacity) memory card (not included) • Maximum Recording Time (approximate figures) 32 GB built-in flash memory...XP+ mode: 1 hr. 25 min. Specifications VIXIA HF R11 / VIXIA HF R10 / VIXIA HF R100 System • Recording System Movies: AVCHD Video compression: MPEG-4 AVC/H.264; LP mode: 12 hr. 15 min. 8 GB built-in flash memory, 32 GB; LP mode: 6 hr. 5...
...camcorder supports Exif 2.2 (also called "Exif Print"). SD or SDHC (SD High Capacity) memory card (not included) Built-in memory: FXP mode: 4 hr. 10 min. SD or SDHC (SD High Capacity) memory card (not included) SD or SDHC (SD High Capacity) memory card (not included) • Maximum Recording Time (approximate figures) 32 GB built-in flash memory...XP+ mode: 1 hr. 25 min. Specifications VIXIA HF R11 / VIXIA HF R10 / VIXIA HF R100 System • Recording System Movies: AVCHD Video compression: MPEG-4 AVC/H.264; LP mode: 12 hr. 15 min. 8 GB built-in flash memory, 32 GB; LP mode: 6 hr. 5...


