Realis_E.pdf
Page 2
.... Š 2500 lumens provides brilliant performance even in bright places. Š Native SXGA+ resolution ensures projection of a high-quality image in a wider projection area as compared...elapsed time of presentation. • "NO SHOW" allows you for purchasing a Canon projector. The MULTIMEDIA PROJECTOR SX50 is displayable) allows you to zoom in our memory vividly, just how we... projected without trapezoidal distortion. Š The "Auto PC Adjustment Function" automatically makes optimum settings for presentation. • "D. COPYRIGHT NOTICE • Microsoft, Windows, Windows Me, Windows...
.... Š 2500 lumens provides brilliant performance even in bright places. Š Native SXGA+ resolution ensures projection of a high-quality image in a wider projection area as compared...elapsed time of presentation. • "NO SHOW" allows you for purchasing a Canon projector. The MULTIMEDIA PROJECTOR SX50 is displayable) allows you to zoom in our memory vividly, just how we... projected without trapezoidal distortion. Š The "Auto PC Adjustment Function" automatically makes optimum settings for presentation. • "D. COPYRIGHT NOTICE • Microsoft, Windows, Windows Me, Windows...
Realis_E.pdf
Page 3
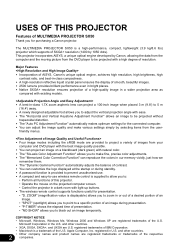
... This section describes the functions listed in the menus. MAINTENANCE TROUBLESHOOTING 3 BEFORE USE Setting up the Projector This section describes preparations for projecting an image from AV Equipment This section describes the procedure for installing the... Learning the Functions Available during Projection USEFUL FUNCTIONS AVAILABLE This section describes the useful functions available during projection. SETTING UP FUNCTIONS USING MENUS Projector Maintenance This section describes how to read this section. Projecting an Image from a digital still camera, digital...
... This section describes the functions listed in the menus. MAINTENANCE TROUBLESHOOTING 3 BEFORE USE Setting up the Projector This section describes preparations for projecting an image from AV Equipment This section describes the procedure for installing the... Learning the Functions Available during Projection USEFUL FUNCTIONS AVAILABLE This section describes the useful functions available during projection. SETTING UP FUNCTIONS USING MENUS Projector Maintenance This section describes how to read this section. Projecting an Image from a digital still camera, digital...
Realis_E.pdf
Page 5
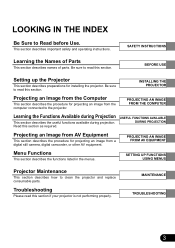
... the Lamp 77 PROJECTING AN IMAGE FROM THE COMPUTER 23 Connecting the Projector to AV Equipment 42 Starting Projection 44 Adjusting the Image 48 SETTING UP FUNCTIONS USING MENUS 49 Using Menus 49 Display Settings Menu 52 Image Adj. TABLE OF CONTENTS TABLE OF CONTENTS USES OF... Distance to the Screen .....20 PROJECTING AN IMAGE FROM AV EQUIPMENT 42 Connecting the Projector to the Computer..23 Starting Projection 26 Adjusting the Image 30 Turning Off the Projector 35 Setting up the Power Management Function 36 USEFUL FUNCTIONS AVAILABLE DURING PROJECTION 37 Blacking Out an...
... the Lamp 77 PROJECTING AN IMAGE FROM THE COMPUTER 23 Connecting the Projector to AV Equipment 42 Starting Projection 44 Adjusting the Image 48 SETTING UP FUNCTIONS USING MENUS 49 Using Menus 49 Display Settings Menu 52 Image Adj. TABLE OF CONTENTS TABLE OF CONTENTS USES OF... Distance to the Screen .....20 PROJECTING AN IMAGE FROM AV EQUIPMENT 42 Connecting the Projector to the Computer..23 Starting Projection 26 Adjusting the Image 30 Turning Off the Projector 35 Setting up the Power Management Function 36 USEFUL FUNCTIONS AVAILABLE DURING PROJECTION 37 Blacking Out an...
Realis_E.pdf
Page 16
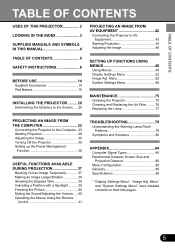
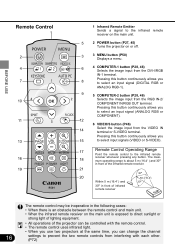
... 2 4 7 10 11 13 16 19 1 Infrared Remote Emitter Sends a signal to the infrared remote receiver on the main unit. 5 2 POWER button (P27, 45) Turns the projector on the main unit is exposed to direct sunlight or strong light of lighting equipment. • All operations of the... may be controlled with the remote control. • The remote control uses infrared light. • When you use two projectors at the same time, you can change the channel 16 settings to prevent the two remote controls from interfering with each other. (P72) Pressing this button continuously allows you to select...
... 2 4 7 10 11 13 16 19 1 Infrared Remote Emitter Sends a signal to the infrared remote receiver on the main unit. 5 2 POWER button (P27, 45) Turns the projector on the main unit is exposed to direct sunlight or strong light of lighting equipment. • All operations of the... may be controlled with the remote control. • The remote control uses infrared light. • When you use two projectors at the same time, you can change the channel 16 settings to prevent the two remote controls from interfering with each other. (P72) Pressing this button continuously allows you to select...

Realis_E.pdf
Page 23
...15-pin)* PROJECTING AN IMAGE FROM THE COMPUTER Some computers require adapters. PROJECTING AN IMAGE FROM THE COMPUTER Connecting the Projector to the Computer Connect the projector to the User's Manual that came with digital RGB signals in the corresponding socket, refer to the computer. MAC ... used to Video Terminals • Before connecting cables, turn off both the projector and computer. • Images may be switched to the monitor output (analog RGB) terminal by connecting the USB cable. Set the slide switches (1-6) on the adapter depending on the market. This terminal ...
...15-pin)* PROJECTING AN IMAGE FROM THE COMPUTER Some computers require adapters. PROJECTING AN IMAGE FROM THE COMPUTER Connecting the Projector to the Computer Connect the projector to the User's Manual that came with digital RGB signals in the corresponding socket, refer to the computer. MAC ... used to Video Terminals • Before connecting cables, turn off both the projector and computer. • Images may be switched to the monitor output (analog RGB) terminal by connecting the USB cable. Set the slide switches (1-6) on the adapter depending on the market. This terminal ...
Realis_E.pdf
Page 25
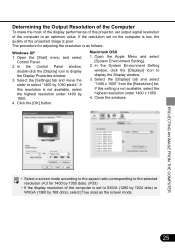
.... 3. PROJECTING AN IMAGE FROM THE COMPUTER • Select a screen mode according to the aspect ratio corresponding to an optimum value. Select the [Settings] tab and move the slider to SXGA (1280 by 1024 dots) or WXGA (1360 by 768 dots), select [True size] as follows: Windows XP 1. Close the windows. Open the... dots). (P33) • If the display resolution of the projected image is not available, select the highest resolution under 1400 by 1050 pixels". If this projector, set on the computer is low, the quality of the computer is...
.... 3. PROJECTING AN IMAGE FROM THE COMPUTER • Select a screen mode according to the aspect ratio corresponding to an optimum value. Select the [Settings] tab and move the slider to SXGA (1280 by 1024 dots) or WXGA (1360 by 768 dots), select [True size] as follows: Windows XP 1. Close the windows. Open the... dots). (P33) • If the display resolution of the projected image is not available, select the highest resolution under 1400 by 1050 pixels". If this projector, set on the computer is low, the quality of the computer is...
Realis_E.pdf
Page 29
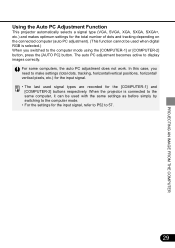
... adjustment becomes active to display images correctly. PROJECTING AN IMAGE FROM THE COMPUTER Using the Auto PC Adjustment Function This projector automatically selects a signal type (VGA, SVGA, XGA, SXGA, SXGA+, etc.) and makes optimum settings for the total number of dots and tracking depending on the connected computer (auto PC adjustment). (This function cannot...
... adjustment becomes active to display images correctly. PROJECTING AN IMAGE FROM THE COMPUTER Using the Auto PC Adjustment Function This projector automatically selects a signal type (VGA, SVGA, XGA, SXGA, SXGA+, etc.) and makes optimum settings for the total number of dots and tracking depending on the connected computer (auto PC adjustment). (This function cannot...

Realis_E.pdf
Page 33
Since the image is higher than 1400 by 768 dots]). A clear image can be selected by selecting "Screen settings" from the menu. (P57) Full screen Normal Select this to project an image displayed on the computer screen at a 5:4 (W:H) aspect ratio is projected with...• A screen mode can be obtained because of no image processing. Select this to project an image displayed on the computer screen at a 4:3 aspect ratio (W:H) (SXGA+ [1400 by 1050 dots] or XGA [1024 by 1050 dots, select a lower resolution before starting projection. • The upper, lower, left, and/or right ...
Since the image is higher than 1400 by 768 dots]). A clear image can be selected by selecting "Screen settings" from the menu. (P57) Full screen Normal Select this to project an image displayed on the computer screen at a 5:4 (W:H) aspect ratio is projected with...• A screen mode can be obtained because of no image processing. Select this to project an image displayed on the computer screen at a 4:3 aspect ratio (W:H) (SXGA+ [1400 by 1050 dots] or XGA [1024 by 1050 dots, select a lower resolution before starting projection. • The upper, lower, left, and/or right ...

Realis_E.pdf
Page 34
... correction/Advanced color adjustment Adjust this when color tones are saved for color tone reproduction. [sRGB] Select this to project an image with the same settings. • An image mode can be selected by the user are different from a sRGB- Once they are saved, images can be projected with a similar quality...
... correction/Advanced color adjustment Adjust this when color tones are saved for color tone reproduction. [sRGB] Select this to project an image with the same settings. • An image mode can be selected by the user are different from a sRGB- Once they are saved, images can be projected with a similar quality...

Realis_E.pdf
Page 36
...off and its cooling starts. Projection will enter the power management mode selected in a power management mode (for 90 seconds), the projector is being cooled in advance. Shutdown mode Select this mode, the lamp is pressed. The lamp will turn off five minutes later ...is turned off and its cooling starts. You can be disabled (OFF). 36 When the projector enters this mode to start projection immediately. PROJECTING AN IMAGE FROM THE COMPUTER Setting up the Power Management Function If the projector receives no signal input within 30 seconds, a countdown timer appears.
...off and its cooling starts. Projection will enter the power management mode selected in a power management mode (for 90 seconds), the projector is being cooled in advance. Shutdown mode Select this mode, the lamp is pressed. The lamp will turn off five minutes later ...is turned off and its cooling starts. You can be disabled (OFF). 36 When the projector enters this mode to start projection immediately. PROJECTING AN IMAGE FROM THE COMPUTER Setting up the Power Management Function If the projector receives no signal input within 30 seconds, a countdown timer appears.

Realis_E.pdf
Page 48
.... • A screen mode can select one of three screen modes depending on your AV equipment, specifications of a projected image may be selected by selecting "Screen settings" from the menu. (58) J Normal (VIDEO, S-VIDEO and COM- 4:3 PONENT input only) Select this if you want to project an image at a 16:9... • When DIGITAL RGB or ANALOG RGB-1 is selected as the input signal type, the display mode is the same as that used when the projector is connected to AV equipment. For wide screen sizes, see P30. J Wide Screen (VIDEO, S-VIDEO and 16:9 COMPONENT input only) Select this if ...
.... • A screen mode can select one of three screen modes depending on your AV equipment, specifications of a projected image may be selected by selecting "Screen settings" from the menu. (58) J Normal (VIDEO, S-VIDEO and COM- 4:3 PONENT input only) Select this if you want to project an image at a 16:9... • When DIGITAL RGB or ANALOG RGB-1 is selected as the input signal type, the display mode is the same as that used when the projector is connected to AV equipment. For wide screen sizes, see P30. J Wide Screen (VIDEO, S-VIDEO and 16:9 COMPONENT input only) Select this if ...

Realis_E.pdf
Page 49
... procedure for handling menus. Component COMPONENT input VIDEO input/S-VIDEO input SETTING UP FUNCTIONS USING MENUS 49 This projector supports the following three menus: Display Setting Menu This menu is used to set various functions of the computer and AV equipment and make various adjustments... to display. Menu item used when projecting an image from the computer. System Setting Menu This menu is used to set input signals of the projector. Next, we will give a detailed description of menu items. Symbols Indicating Item Categories Menu items...
... procedure for handling menus. Component COMPONENT input VIDEO input/S-VIDEO input SETTING UP FUNCTIONS USING MENUS 49 This projector supports the following three menus: Display Setting Menu This menu is used to set various functions of the computer and AV equipment and make various adjustments... to display. Menu item used when projecting an image from the computer. System Setting Menu This menu is used to set input signals of the projector. Next, we will give a detailed description of menu items. Symbols Indicating Item Categories Menu items...

Realis_E.pdf
Page 50
To select another tab, press the [^] button repeatedly. Remote control Top control 2 Select the tab containing the item you want to set. A menu window appears. • To close the menu window, press the [MENU] button again. Select the [Display settings], [Image Adj.], or [System settings] tab. • The selected tab contains the items handled previously. Selected item is highlighted in orange. 50 Buttons Used Here Remote control Top control SETTING UP FUNCTIONS USING MENUS 1 Press the [MENU] button.
To select another tab, press the [^] button repeatedly. Remote control Top control 2 Select the tab containing the item you want to set. A menu window appears. • To close the menu window, press the [MENU] button again. Select the [Display settings], [Image Adj.], or [System settings] tab. • The selected tab contains the items handled previously. Selected item is highlighted in orange. 50 Buttons Used Here Remote control Top control SETTING UP FUNCTIONS USING MENUS 1 Press the [MENU] button.

Realis_E.pdf
Page 51
Selecting from the menu, make an adjustment using the slide bar, or make a setting in a Different Window (Example : Registration of setting. Some menu items take effect at the time they are selected and some take effect when the [OK] button is ... : Adjustment of Contrast) 6 When you want to the purpose of User Logo) 51 SETTING UP FUNCTIONS USING MENUS The setting takes effect. Making a Setting in a different window according to set. 4 Make a setting. 3 Select the item you finished setting the selected item, press the [MENU] button. Select an item from the Menu (Example...
Selecting from the menu, make an adjustment using the slide bar, or make a setting in a Different Window (Example : Registration of setting. Some menu items take effect at the time they are selected and some take effect when the [OK] button is ... : Adjustment of Contrast) 6 When you want to the purpose of User Logo) 51 SETTING UP FUNCTIONS USING MENUS The setting takes effect. Making a Setting in a different window according to set. 4 Make a setting. 3 Select the item you finished setting the selected item, press the [MENU] button. Select an item from the Menu (Example...

Realis_E.pdf
Page 52
... Displaying a logo (No Show) Displaying a logo (Projector on) When Ceiling-mounted or for the next item [Input signal settings]. (P53 to P55) SETTING UP FUNCTIONS USING MENUS 52 Display Settings Menu Make various settings related to input signals of the computer and AV equipment...pixels P55 [Vertical pixels P55 [Input signal select] ....P56, 57 [Screen settings] ........ Display settings Auto PC Adj. P60 [Projector on P61 [Image flip H/V P61 Performing the Auto PC Adjustment The projector automatically detects the input signal (ANALOG RGB) from the connected computer to display...
... Displaying a logo (No Show) Displaying a logo (Projector on) When Ceiling-mounted or for the next item [Input signal settings]. (P53 to P55) SETTING UP FUNCTIONS USING MENUS 52 Display Settings Menu Make various settings related to input signals of the computer and AV equipment...pixels P55 [Vertical pixels P55 [Input signal select] ....P56, 57 [Screen settings] ........ Display settings Auto PC Adj. P60 [Projector on P61 [Image flip H/V P61 Performing the Auto PC Adjustment The projector automatically detects the input signal (ANALOG RGB) from the connected computer to display...

Realis_E.pdf
Page 53
... of dots. This adjustment is required when the auto PC adjustment cannot project images correctly. > Increases the set value. < Decreases the set value. • This adjustment is required when the auto PC adjustment cannot project images correctly. • The... setting is recorded for the [ANALOG RGB-1] signal and [ANALOG RGB-2] signal separately. 53 Display settings Input signal settings Total dots Display settings Input signal settings Tracking SETTING UP FUNCTIONS USING MENUS > Increase the total number of dots. <...
... of dots. This adjustment is required when the auto PC adjustment cannot project images correctly. > Increases the set value. < Decreases the set value. • This adjustment is required when the auto PC adjustment cannot project images correctly. • The... setting is recorded for the [ANALOG RGB-1] signal and [ANALOG RGB-2] signal separately. 53 Display settings Input signal settings Total dots Display settings Input signal settings Tracking SETTING UP FUNCTIONS USING MENUS > Increase the total number of dots. <...

Realis_E.pdf
Page 54
...Vertical Position Adjust the horizontal position of the screen when the projected image is shifted horizontally. Display settings Input signal settings Horizontal position Display settings Input signal settings Vertical position SETTING UP FUNCTIONS USING MENUS > Moves the screen to the right. < Moves the screen to the... left. • This adjustment is required when the auto PC adjustment cannot project images correctly. • The setting is recorded for the [ANALOG RGB-1] signal and [ANALOG RGB-2] signal separately. > Moves the screen up. < Moves the screen down...
...Vertical Position Adjust the horizontal position of the screen when the projected image is shifted horizontally. Display settings Input signal settings Horizontal position Display settings Input signal settings Vertical position SETTING UP FUNCTIONS USING MENUS > Moves the screen to the right. < Moves the screen to the... left. • This adjustment is required when the auto PC adjustment cannot project images correctly. • The setting is recorded for the [ANALOG RGB-1] signal and [ANALOG RGB-2] signal separately. > Moves the screen up. < Moves the screen down...

Realis_E.pdf
Page 55
... < Decrease the number of horizontal pixels. • This adjustment is required when the auto PC adjustment cannot project images correctly. • The setting is recorded for the [ANALOG RGB-1] signal and [ANALOG RGB-2] signal separately. > Increase the number of horizontal pixels. < Decrease the number ...of horizontal pixels. • This adjustment is required when the auto PC adjustment cannot project images correctly. • The setting is too large or small, adjust it to the screen size. Adjusting the Number of Horizontal Pixels Adjusting the Number of Vertical Pixels...
... < Decrease the number of horizontal pixels. • This adjustment is required when the auto PC adjustment cannot project images correctly. • The setting is recorded for the [ANALOG RGB-1] signal and [ANALOG RGB-2] signal separately. > Increase the number of horizontal pixels. < Decrease the number ...of horizontal pixels. • This adjustment is required when the auto PC adjustment cannot project images correctly. • The setting is too large or small, adjust it to the screen size. Adjusting the Number of Horizontal Pixels Adjusting the Number of Vertical Pixels...
Realis_E.pdf
Page 56
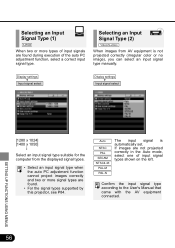
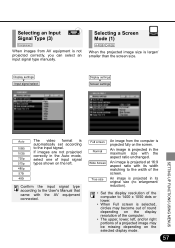
... . • For the signal types supported by this projector, see P84. Confirm the input signal type according to the User's Manual that came with the AV equipment connected. 56 Display settings Input signal select Display settings Input signal select SETTING UP FUNCTIONS USING MENUS [1280 x 1024] [1400 x... 1050] ••• Select an input signal type suitable for the computer from AV equipment is automatically set. Selecting an Input Signal Type (1) Selecting an Input Signal Type (2) When two or more signal types are found during execution of input...
... . • For the signal types supported by this projector, see P84. Confirm the input signal type according to the User's Manual that came with the AV equipment connected. 56 Display settings Input signal select Display settings Input signal select SETTING UP FUNCTIONS USING MENUS [1280 x 1024] [1400 x... 1050] ••• Select an input signal type suitable for the computer from AV equipment is automatically set. Selecting an Input Signal Type (1) Selecting an Input Signal Type (2) When two or more signal types are found during execution of input...
Realis_E.pdf
Page 57
...a Screen Mode (1) When images from the computer is projected fully on the screen. When the projected image size is automatically set according to the User's Manual that came with the aspect ratio unchanged. Confirm the input signal type according to the input ...is projected at 16:9 aspect ratio with its original size (no enlargement/ reduction). • Set the display resolution of the screen. Display settings Input signal select Display settings Screen settings SETTING UP FUNCTIONS USING MENUS Auto 1080i 1035i 720p 575p 480p 575i 480i The video format is larger...
...a Screen Mode (1) When images from the computer is projected fully on the screen. When the projected image size is automatically set according to the User's Manual that came with the aspect ratio unchanged. Confirm the input signal type according to the input ...is projected at 16:9 aspect ratio with its original size (no enlargement/ reduction). • Set the display resolution of the screen. Display settings Input signal select Display settings Screen settings SETTING UP FUNCTIONS USING MENUS Auto 1080i 1035i 720p 575p 480p 575i 480i The video format is larger...


