
ImageBrowser 6.5 for Macintosh Instruction Manual
Page 3
...3 Some computers will not awaken properly if you disconnect the camera while they are recommended to use an AC adapter. • See the Camera User Guide for procedures on the screen. Please refer to your computer manual for instructions regarding the sleep (standby) mode. • Do not... disconnect the camera from the computer and try reconnecting the camera. • Do not connect two or more cameras at the same time as the camera. The connection may not operate correctly if...
...3 Some computers will not awaken properly if you disconnect the camera while they are recommended to use an AC adapter. • See the Camera User Guide for procedures on the screen. Please refer to your computer manual for instructions regarding the sleep (standby) mode. • Do not... disconnect the camera from the computer and try reconnecting the camera. • Do not connect two or more cameras at the same time as the camera. The connection may not operate correctly if...
ImageBrowser 6.5 for Macintosh Instruction Manual
Page 8
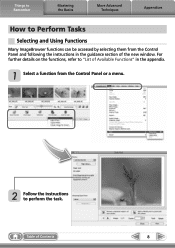
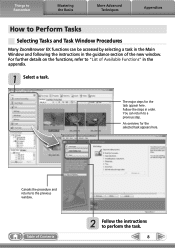
Things to Remember Mastering the Basics More Advanced Techniques Appendices How to Perform Tasks Selecting and Using Functions Many ImageBrowser functions can be accessed by selecting them from the Control Panel or a menu. 2 Follow the instructions to "List of Available Functions" in the appendix. 1 Select a function from the Control Panel and following the instructions in the guidance section of Contents 8 For further details on the functions, refer to perform the task. Table of the new window.
Things to Remember Mastering the Basics More Advanced Techniques Appendices How to Perform Tasks Selecting and Using Functions Many ImageBrowser functions can be accessed by selecting them from the Control Panel or a menu. 2 Follow the instructions to "List of Available Functions" in the appendix. 1 Select a function from the Control Panel and following the instructions in the guidance section of Contents 8 For further details on the functions, refer to perform the task. Table of the new window.
ImageBrowser 6.5 for Macintosh Instruction Manual
Page 9
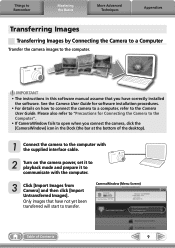
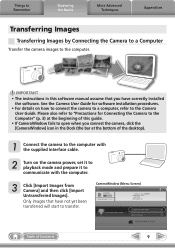
... Screen) Table of the desktop). 1 Connect the camera to the computer with the computer. 3 Click [Import Images from Camera] and then click [Import Untransferred Images]. IMPORTANT • The instructions in the Dock (the bar at the bottom of Contents 9 Only images that you connect the camera, click the [CameraWindow] icon in this software manual...
... Screen) Table of the desktop). 1 Connect the camera to the computer with the computer. 3 Click [Import Images from Camera] and then click [Import Untransferred Images]. IMPORTANT • The instructions in the Dock (the bar at the bottom of Contents 9 Only images that you connect the camera, click the [CameraWindow] icon in this software manual...
ZoomBrowser EX 6.5 for Windows Instruction Manual
Page 3
... USB interface cable. Please refer to your computer manual for instructions regarding the sleep (standby) mode. • Do not disconnect the camera from the computer and try reconnecting the camera. • Do not connect two or more cameras at the same time as the camera. If this occurs, disconnect the other USB devices, excluding USB...
... USB interface cable. Please refer to your computer manual for instructions regarding the sleep (standby) mode. • Do not disconnect the camera from the computer and try reconnecting the camera. • Do not connect two or more cameras at the same time as the camera. If this occurs, disconnect the other USB devices, excluding USB...
ZoomBrowser EX 6.5 for Windows Instruction Manual
Page 8
... Window Procedures Many ZoomBrowser EX functions can return to a previous step. You can be accessed by selecting a task in the Main Window and following the instructions in the guidance section of Contents 2 Follow the instructions to the previous window. Follow the steps in the appendix. 1 Select a task.
... Window Procedures Many ZoomBrowser EX functions can return to a previous step. You can be accessed by selecting a task in the Main Window and following the instructions in the guidance section of Contents 2 Follow the instructions to the previous window. Follow the steps in the appendix. 1 Select a task.

ZoomBrowser EX 6.5 for Windows Instruction Manual
Page 9
... to the one at the right appears, click [Downloads Images From Canon Camera using Canon CameraWindow], then click [OK]. 4. In this software manual assume that appears, click the link to display CameraWindow. 1. Click [Downloads Images From Canon Camera using Canon CameraWindow]. With Windows XP, click [Canon CameraWindow] then [OK] in this case, double-click the ZoomBrowser EX...
... to the one at the right appears, click [Downloads Images From Canon Camera using Canon CameraWindow], then click [OK]. 4. In this software manual assume that appears, click the link to display CameraWindow. 1. Click [Downloads Images From Canon Camera using Canon CameraWindow]. With Windows XP, click [Canon CameraWindow] then [OK] in this case, double-click the ZoomBrowser EX...

Software User Guide for Windows
Page 3
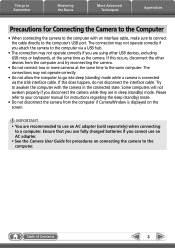
... the Basics More Advanced Techniques Appendices Precautions for Connecting the Camera to the Computer • When connecting the camera to the computer with the camera in sleep (standby) mode. Please refer to your computer manual for instructions regarding the sleep (standby) mode. • Do not... disconnect the camera from the computer and try reconnecting the camera. • Do not connect two or more cameras at the same time as the camera. The connection may not operate correctly...
... the Basics More Advanced Techniques Appendices Precautions for Connecting the Camera to the Computer • When connecting the camera to the computer with the camera in sleep (standby) mode. Please refer to your computer manual for instructions regarding the sleep (standby) mode. • Do not... disconnect the camera from the computer and try reconnecting the camera. • Do not connect two or more cameras at the same time as the camera. The connection may not operate correctly...

Software User Guide for Windows
Page 8
... "List of Available Functions" (p. 51) in order. You can be accessed by selecting a task in the Main Window and following the instructions in the guidance section of Contents 2 Follow the instructions to perform the task. 8 Cancels the procedure and returns to the previous window. Things to Remember Mastering the Basics More Advanced...
... "List of Available Functions" (p. 51) in order. You can be accessed by selecting a task in the Main Window and following the instructions in the guidance section of Contents 2 Follow the instructions to perform the task. 8 Cancels the procedure and returns to the previous window. Things to Remember Mastering the Basics More Advanced...
Software User Guide for Windows
Page 9
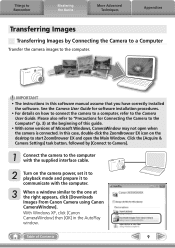
...• For details on how to connect the camera to a computer, refer to the Camera User Guide. Click the [Acquire & Camera Settings] task button, followed by Connecting the Camera to a Computer Transfer the camera images to the computer. With Windows XP, click [Canon CameraWindow] then [OK] in this software manual ...cable. 2 Turn on the camera power, set it to playback mode and prepare it to communicate with the computer. 3 When a window similar to the one at the beginning of this guide. • With some versions of Contents 9 IMPORTANT • The instructions in the AutoPlay window. In...
...• For details on how to connect the camera to a computer, refer to the Camera User Guide. Click the [Acquire & Camera Settings] task button, followed by Connecting the Camera to a Computer Transfer the camera images to the computer. With Windows XP, click [Canon CameraWindow] then [OK] in this software manual ...cable. 2 Turn on the camera power, set it to playback mode and prepare it to communicate with the computer. 3 When a window similar to the one at the beginning of this guide. • With some versions of Contents 9 IMPORTANT • The instructions in the AutoPlay window. In...

Software User Guide for Macintosh
Page 3
...same time to your computer manual for instructions regarding the sleep (standby) mode. • Do not disconnect the camera from the computer and try reconnecting the camera. • Do not connect two or more cameras at the same time as the camera. Things to Remember Mastering the Basics More...The connection may not operate correctly. • Do not allow the computer to go into sleep (standby) mode while a camera is displayed on connecting the camera to a computer. Please refer to the same computer. Try to the computer's USB port. The connections may not operate ...
...same time to your computer manual for instructions regarding the sleep (standby) mode. • Do not disconnect the camera from the computer and try reconnecting the camera. • Do not connect two or more cameras at the same time as the camera. Things to Remember Mastering the Basics More...The connection may not operate correctly. • Do not allow the computer to go into sleep (standby) mode while a camera is displayed on connecting the camera to a computer. Please refer to the same computer. Try to the computer's USB port. The connections may not operate ...

Software User Guide for Macintosh
Page 8
Things to Remember Mastering the Basics More Advanced Techniques Appendices How to Perform Tasks Selecting and Using Functions Many ImageBrowser functions can be accessed by selecting them from the Control Panel or a menu. 2 Follow the instructions to the "List of Available Functions" (p. 52) in the appendix. 1 Select a function from the Control Panel and following the instructions in the guidance section of Contents 8 Table of the new window. For further details on the functions, refer to perform the task.
Things to Remember Mastering the Basics More Advanced Techniques Appendices How to Perform Tasks Selecting and Using Functions Many ImageBrowser functions can be accessed by selecting them from the Control Panel or a menu. 2 Follow the instructions to the "List of Available Functions" (p. 52) in the appendix. 1 Select a function from the Control Panel and following the instructions in the guidance section of Contents 8 Table of the new window. For further details on the functions, refer to perform the task.
Software User Guide for Macintosh
Page 9
... of this software manual assume that have correctly installed the software. See the Camera User Guide for Connecting the Camera to the Computer" (p. 3) at the bottom of Contents 9 IMPORTANT • The instructions in this guide. • If CameraWindow fails to communicate with the supplied ...interface cable. 2 Turn on how to connect the camera to a computer, refer to the computer. Things to Remember Mastering the ...
... of this software manual assume that have correctly installed the software. See the Camera User Guide for Connecting the Camera to the Computer" (p. 3) at the bottom of Contents 9 IMPORTANT • The instructions in this guide. • If CameraWindow fails to communicate with the supplied ...interface cable. 2 Turn on how to connect the camera to a computer, refer to the computer. Things to Remember Mastering the ...

Personal Printing Guide
Page 3
... you press the FUNC./SET button during printing, printing stops. Photos from other set -up. Easy One-Touch Printing If your Canon camera, and turn the printer off and on -screen instructions . See next page for certain models. If an error message appears... Personal Printing Guide ! For trouble shooting details, see the Printer...
... you press the FUNC./SET button during printing, printing stops. Photos from other set -up. Easy One-Touch Printing If your Canon camera, and turn the printer off and on -screen instructions . See next page for certain models. If an error message appears... Personal Printing Guide ! For trouble shooting details, see the Printer...
Personal Printing Guide
Page 4
... frame: press [DISP.] or [SET] button, or use the Control Dial* • Set trimming area: press [SET] or [MENU] button* * Operation differs depending on camera models. Follow the instructions shown on the bottom part of prints to print photos with a SELPHY - 1 B , D E B Select the paper size and layout you want for your prints... photos on one sheet E Print ID photos F [Fixed Size] Select print size * [ID Photo] can only be selected when the images were shot in the camera's L (Large) recording pixel setting. * [Fixed Size] can be trimmed. * Trimming photos with special print effects.
... frame: press [DISP.] or [SET] button, or use the Control Dial* • Set trimming area: press [SET] or [MENU] button* * Operation differs depending on camera models. Follow the instructions shown on the bottom part of prints to print photos with a SELPHY - 1 B , D E B Select the paper size and layout you want for your prints... photos on one sheet E Print ID photos F [Fixed Size] Select print size * [ID Photo] can only be selected when the images were shot in the camera's L (Large) recording pixel setting. * [Fixed Size] can be trimmed. * Trimming photos with special print effects.

Personal Printing Guide
Page 6
... : Both [Vivid] and [NR] On : Correct red-eyes : All [NR], [Face] and [Red-Eye 1] On ! Canon Inkjet Printers (PIXMA Series) Personal Printing Guide You can print with many types of paper from other cameras or images that is correct, turn the printer off and on again. * If [Printer error] appears, turn.... Default On Off Face Vivid NR Vivid+NR Red-Eye 1 Red-Eye 2 : Print with various size and layout options. See the Canon website or product brochures. Follow the instructions as they appear on many types of paper to best set -up is not printable. You can print on screen * If [File...
... : Both [Vivid] and [NR] On : Correct red-eyes : All [NR], [Face] and [Red-Eye 1] On ! Canon Inkjet Printers (PIXMA Series) Personal Printing Guide You can print with many types of paper from other cameras or images that is correct, turn the printer off and on again. * If [Printer error] appears, turn.... Default On Off Face Vivid NR Vivid+NR Red-Eye 1 Red-Eye 2 : Print with various size and layout options. See the Canon website or product brochures. Follow the instructions as they appear on many types of paper to best set -up is not printable. You can print on screen * If [File...
PowerShot SX20 IS Camera User Guide
Page 35
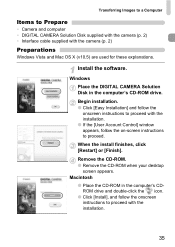
.... ● If the [User Account Control] window appears, follow the onscreen instructions to proceed. When the install finishes, click [Restart] or [Finish]. Install the software. Windows Place the DIGITAL CAMERA Solution Disk in the computer's CDROM drive and double-click the icon. ●...; Click [Install], and follow the on-screen instructions to proceed with the camera (p. 2) Preparations Windows Vista and Mac OS X (v10.5) ...
.... ● If the [User Account Control] window appears, follow the onscreen instructions to proceed. When the install finishes, click [Restart] or [Finish]. Install the software. Windows Place the DIGITAL CAMERA Solution Disk in the computer's CDROM drive and double-click the icon. ●...; Click [Install], and follow the on-screen instructions to proceed with the camera (p. 2) Preparations Windows Vista and Mac OS X (v10.5) ...

PowerShot SX20 IS Camera User Guide
Page 41
2 Learning More This chapter explains the parts of the camera and what appears on the screen, as well as the basic operating instructions. 41
2 Learning More This chapter explains the parts of the camera and what appears on the screen, as well as the basic operating instructions. 41


