ImageBrowser 6.5 for Macintosh Instruction Manual
Page 25
.... Things to Remember Mastering the Basics More Advanced Techniques Appendices Red Eye Correction Restores eye appearance to the original color when light reflected from the flash makes them appear red. • Click [Start] when Auto Mode is selected. • Switch to Manual Mode if Auto Mode cannot correct the image, and...
.... Things to Remember Mastering the Basics More Advanced Techniques Appendices Red Eye Correction Restores eye appearance to the original color when light reflected from the flash makes them appear red. • Click [Start] when Auto Mode is selected. • Switch to Manual Mode if Auto Mode cannot correct the image, and...
ZoomBrowser EX 6.5 for Windows Instruction Manual
Page 24
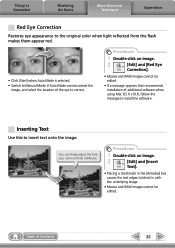
... of the window: [Edit] and [Edit Image]. 2 Select an image. 3 [2. Red Eye Correction Restores eye appearance to the original color when light reflected from the flash makes them appear red. • Click [Start] when Auto mode is selected. • Switch to Manual mode if Auto mode cannot correct the image, and...
... of the window: [Edit] and [Edit Image]. 2 Select an image. 3 [2. Red Eye Correction Restores eye appearance to the original color when light reflected from the flash makes them appear red. • Click [Start] when Auto mode is selected. • Switch to Manual mode if Auto mode cannot correct the image, and...

Software Guide for Windows
Page 22
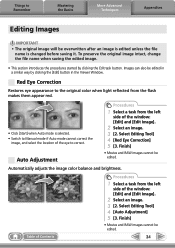
... overwritten after an image is edited unless the file name is changed before saving it. Select Editing Tool] 4 [Auto Adjustment] 5 [3. Procedures 1 Select a task from the flash makes them appear red. • Click [Start] when Auto mode is selected. • Switch to Manual mode if Auto mode cannot correct the image and...
... overwritten after an image is edited unless the file name is changed before saving it. Select Editing Tool] 4 [Auto Adjustment] 5 [3. Procedures 1 Select a task from the flash makes them appear red. • Click [Start] when Auto mode is selected. • Switch to Manual mode if Auto mode cannot correct the image and...

Software Guide for Macintosh
Page 23
... Things to Remember Mastering the Basics More Advanced Techniques Appendices Red Eye Correction Restores eye appearance to the original color when light reflected from the flash makes them appear red. • Click [Start] when Auto Mode is selected. • Switch to Manual Mode if Auto Mode cannot correct the image and...
... Things to Remember Mastering the Basics More Advanced Techniques Appendices Red Eye Correction Restores eye appearance to the original color when light reflected from the flash makes them appear red. • Click [Start] when Auto Mode is selected. • Switch to Manual Mode if Auto Mode cannot correct the image and...
PowerShot SX10 IS Camera User Guide
Page 5
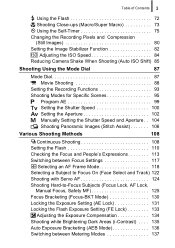
Table of Contents 3 Using the Flash 72 Shooting Close-ups (Macro/Super Macro 73 Using the Self-Timer 75 Changing the Recording Pixels and Compression (Still Images 80 Setting the Image Stabilizer Function 82 Adjusting the ISO Speed 84 Reducing Camera Shake When Shooting (Auto ISO ... the Shutter Speed and Aperture . . 104 Shooting Panoramic Images (Stitch Assist 106 Various Shooting Methods 108 Continuous Shooting 108 Setting the Flash 110 Checking the Focus and People's Expressions 113 Switching between Focus Settings 117 Selecting an AF Frame Mode 118 Selecting a Subject to ...
Table of Contents 3 Using the Flash 72 Shooting Close-ups (Macro/Super Macro 73 Using the Self-Timer 75 Changing the Recording Pixels and Compression (Still Images 80 Setting the Image Stabilizer Function 82 Adjusting the ISO Speed 84 Reducing Camera Shake When Shooting (Auto ISO ... the Shutter Speed and Aperture . . 104 Shooting Panoramic Images (Stitch Assist 106 Various Shooting Methods 108 Continuous Shooting 108 Setting the Flash 110 Checking the Focus and People's Expressions 113 Switching between Focus Settings 117 Selecting an AF Frame Mode 118 Selecting a Subject to ...
PowerShot SX10 IS Camera User Guide
Page 7
...Their Default Values 222 Connecting to a TV 223 Shooting/Playback Using a TV 223 Customizing the Camera (My Camera Settings) 225 Changing My Camera Settings 225 Registering My Camera Settings 226 Troubleshooting 228 List of Messages 239 Appendix 243 Safety Precautions 243 Preventing Malfunctions 249 ...Attaching the Lens Hood 253 Using the Power Kits (Sold Separately 254 Using an Externally Mounted Flash (Sold Separately) . . 257 Replacing the Date Battery 265 Camera Care and Maintenance 267 Specifications 268 Index 277 Functions Available in Each Shooting Mode 284
...Their Default Values 222 Connecting to a TV 223 Shooting/Playback Using a TV 223 Customizing the Camera (My Camera Settings) 225 Changing My Camera Settings 225 Registering My Camera Settings 226 Troubleshooting 228 List of Messages 239 Appendix 243 Safety Precautions 243 Preventing Malfunctions 249 ...Attaching the Lens Hood 253 Using the Power Kits (Sold Separately 254 Using an Externally Mounted Flash (Sold Separately) . . 257 Replacing the Date Battery 265 Camera Care and Maintenance 267 Specifications 268 Index 277 Functions Available in Each Shooting Mode 284

PowerShot SX10 IS Camera User Guide
Page 8
The illustrations and screenshots used in this Guide 72 Using the Flash Available Shooting Modes 1 Raise the flash manually. These are based on the camera's default settings at time of purchase. You can use SD memory cards, SDHC (SD High Capacity) memory cards, MultiMediaCards, MMCplus ... be available in certain shooting modes. Explanations in this guide are collectively referred to that effect, the function may differ from the actual camera. 6 About this Guide About this Guide Symbol Conventions in this guide. If there is no notation to as memory cards in all modes...
The illustrations and screenshots used in this Guide 72 Using the Flash Available Shooting Modes 1 Raise the flash manually. These are based on the camera's default settings at time of purchase. You can use SD memory cards, SDHC (SD High Capacity) memory cards, MultiMediaCards, MMCplus ... be available in certain shooting modes. Explanations in this guide are collectively referred to that effect, the function may differ from the actual camera. 6 About this Guide About this Guide Symbol Conventions in this guide. If there is no notation to as memory cards in all modes...

PowerShot SX10 IS Camera User Guide
Page 19
... the start -up sound will display in mode). Set the mode dial to focus. • When the camera focuses, it beeps twice. • If blinks red, we recommend shooting with a flash (p. 72) (the message "Raise the flash" also appears in the LCD monitor. Select a shooting mode. 1. Recordable Shots 4. Using a tripod is no startup...
... the start -up sound will display in mode). Set the mode dial to focus. • When the camera focuses, it beeps twice. • If blinks red, we recommend shooting with a flash (p. 72) (the message "Raise the flash" also appears in the LCD monitor. Select a shooting mode. 1. Recordable Shots 4. Using a tripod is no startup...
PowerShot SX10 IS Camera User Guide
Page 38
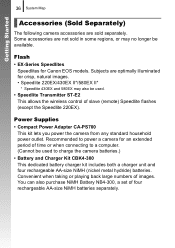
... unit and four rechargeable AA-size NiMH (nickel metal hydride) batteries. Getting Started 36 System Map Accessories (Sold Separately) The following camera accessories are optimally illuminated for crisp, natural images. • Speedlite 220EX/430EX II*/580EX II* * Speedlite 430EX and 580EX may ...size NiMH batteries separately. Convenient when taking or playing back large numbers of slave (remote) Speedlite flashes (except the Speedlite 220EX). Flash • EX-Series Speedlites Speedlites for Canon EOS models. Subjects are sold in some regions, or may also be used . • ...
... unit and four rechargeable AA-size NiMH (nickel metal hydride) batteries. Getting Started 36 System Map Accessories (Sold Separately) The following camera accessories are optimally illuminated for crisp, natural images. • Speedlite 220EX/430EX II*/580EX II* * Speedlite 430EX and 580EX may ...size NiMH batteries separately. Convenient when taking or playing back large numbers of slave (remote) Speedlite flashes (except the Speedlite 220EX). Flash • EX-Series Speedlites Speedlites for Canon EOS models. Subjects are sold in some regions, or may also be used . • ...
PowerShot SX10 IS Camera User Guide
Page 42
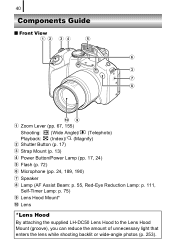
40 Components Guide „ Front View a Zoom Lever (pp. 67, 155) Shooting: (Wide Angle)/ (Telephoto) Playback: (Index)/ (Magnify) b Shutter Button (p. 17) c Strap Mount (p. 13) d Power Button/Power Lamp (pp. 17, 24) e Flash (p. 72) f Microphone (pp. 24, 189, 190) g Speaker h Lamp (AF Assist Beam: p. 55, Red-Eye Reduction Lamp: p. 111, Self-Timer Lamp: p. 75) i Lens Hood Mount* j Lens *Lens Hood By attaching the supplied LH-DC50 Lens Hood to the Lens Hood Mount (groove), you can reduce the amount of unnecessary light that enters the lens while shooting backlit or wide-angle photos (p. 253).
40 Components Guide „ Front View a Zoom Lever (pp. 67, 155) Shooting: (Wide Angle)/ (Telephoto) Playback: (Index)/ (Magnify) b Shutter Button (p. 17) c Strap Mount (p. 13) d Power Button/Power Lamp (pp. 17, 24) e Flash (p. 72) f Microphone (pp. 24, 189, 190) g Speaker h Lamp (AF Assist Beam: p. 55, Red-Eye Reduction Lamp: p. 111, Self-Timer Lamp: p. 75) i Lens Hood Mount* j Lens *Lens Hood By attaching the supplied LH-DC50 Lens Hood to the Lens Hood Mount (groove), you can reduce the amount of unnecessary light that enters the lens while shooting backlit or wide-angle photos (p. 253).

PowerShot SX10 IS Camera User Guide
Page 44
42 „ Controls a (Shortcut)/ (Print/Share) Button (pp. 21, 31, 151) b (Flash)/ (Microphone) Button (pp. 72, 189, 190) c Diopter Adjustment Dial (p. 63) d Hot Shoe (p. 257) e Movie Button (pp. 24, 88) f Mode Dial (pp. 17, 24, 87) g (Playback) ...
42 „ Controls a (Shortcut)/ (Print/Share) Button (pp. 21, 31, 151) b (Flash)/ (Microphone) Button (pp. 72, 189, 190) c Diopter Adjustment Dial (p. 63) d Hot Shoe (p. 257) e Movie Button (pp. 24, 88) f Mode Dial (pp. 17, 24, 87) g (Playback) ...

PowerShot SX10 IS Camera User Guide
Page 51
... Shooting Modes p. 284 Shooting Mode Histogram (p. 52) e g i cd f h j Battery Charge Indicator Spot AE Point Frame/ b a Av/Tv bar Camera Shake ( ) (p. 231) s r qp n Shutter Speed, Aperture Value o AF Frame m lk Exposure Level Indicator (p. 104) Buffer Warning*1 Remaining Time/... (FUNC. menu), Zoom Lever d Macro ( )/Super Macro ( ) button e ISO ( Speed ) button ( in mode) f Flash ( ) button, raise/lower the flash g Red-Eye Corr. ( ) MENU button ([Flash Control] menu in the Rec. menu) h Drive ( Mode ) / button i Auto Rotate ( ) MENU button (Set up menu...
... Shooting Modes p. 284 Shooting Mode Histogram (p. 52) e g i cd f h j Battery Charge Indicator Spot AE Point Frame/ b a Av/Tv bar Camera Shake ( ) (p. 231) s r qp n Shutter Speed, Aperture Value o AF Frame m lk Exposure Level Indicator (p. 104) Buffer Warning*1 Remaining Time/... (FUNC. menu), Zoom Lever d Macro ( )/Super Macro ( ) button e ISO ( Speed ) button ( in mode) f Flash ( ) button, raise/lower the flash g Red-Eye Corr. ( ) MENU button ([Flash Control] menu in the Rec. menu) h Drive ( Mode ) / button i Auto Rotate ( ) MENU button (Set up menu...

PowerShot SX10 IS Camera User Guide
Page 52
...appears in red when no more recording space is not normally displayed. menu) m Camera Shake ( ) MENU button (Rec. If the "Raise the flash" message appears and the camera shake warning icon ( ) and the flash warning icon ( ) blink on the LCD monitor Summary (blinking red) Battery ...methods to replace with new batteries. About the Battery Charge Indicator When the battery charge is low. Attach the camera to select a setting other than [Off] (p. 82) - They will display. Raise the flash to a tripod or other than (p. 72) - menu) n Audio ( ) MENU button (Set up...
...appears in red when no more recording space is not normally displayed. menu) m Camera Shake ( ) MENU button (Rec. If the "Raise the flash" message appears and the camera shake warning icon ( ) and the flash warning icon ( ) blink on the LCD monitor Summary (blinking red) Battery ...methods to replace with new batteries. About the Battery Charge Indicator When the battery charge is low. Attach the camera to select a setting other than [Off] (p. 82) - They will display. Raise the flash to a tripod or other than (p. 72) - menu) n Audio ( ) MENU button (Set up...

PowerShot SX10 IS Camera User Guide
Page 55
Basic Operations 53 Settings using the Menu Item Flash Exposure Compensation Macro/Super Macro Manual Focus ISO Speed Drive Mode , , , MF, or Options ... ( will also display in movie mode.) / button Reference Page p. 72 p. 134 p. 73 p. 127 p. 84 pp. 108, 75 FUNC. Menu Menu Item White Balance My Colors Bracket Flash Compensation/Flash Output Metering Mode Recording Pixels (Movie) Recording Pixels (Still Image) Compression Options Reference Page p. 139 p. 142 pp. 130, 136 p. 110 p. 137 p. 91 p. 80 p. 80
Basic Operations 53 Settings using the Menu Item Flash Exposure Compensation Macro/Super Macro Manual Focus ISO Speed Drive Mode , , , MF, or Options ... ( will also display in movie mode.) / button Reference Page p. 72 p. 134 p. 73 p. 127 p. 84 pp. 108, 75 FUNC. Menu Menu Item White Balance My Colors Bracket Flash Compensation/Flash Output Metering Mode Recording Pixels (Movie) Recording Pixels (Still Image) Compression Options Reference Page p. 139 p. 142 pp. 130, 136 p. 110 p. 137 p. 91 p. 80 p. 80

PowerShot SX10 IS Camera User Guide
Page 56
...3 shots) Self-Timer: 10 sec.*, 2 sec., Custom Timer p. 75 Delay: 0 - 10*, 15, 20, 30 sec. Comp -2 to 0* to +2 Flash Output Minimum*/Medium/Maximum Shutter Sync. 1st-curtain*/2nd-curtain p. 110 Slow Synchro On/Off* Red-Eye Corr. Menu * Default setting Menu Item Options Summary/ ... Zoom On/Off* p. 113 Servo AF On/Off* p. 124 AF Mode Continuous*/Single p. 117 Digital Zoom (Still image) Standard*/Off/1.4x/2.3x p. 68 (Movie) Standard*/Off Flash Control Flash Mode Auto*/Manual Flash Exp. On/Off* Red-Eye Lamp On*/Off Safety FE On*/Off i-Contrast Off*/Auto p. 135...
...3 shots) Self-Timer: 10 sec.*, 2 sec., Custom Timer p. 75 Delay: 0 - 10*, 15, 20, 30 sec. Comp -2 to 0* to +2 Flash Output Minimum*/Medium/Maximum Shutter Sync. 1st-curtain*/2nd-curtain p. 110 Slow Synchro On/Off* Red-Eye Corr. Menu * Default setting Menu Item Options Summary/ ... Zoom On/Off* p. 113 Servo AF On/Off* p. 124 AF Mode Continuous*/Single p. 117 Digital Zoom (Still image) Standard*/Off/1.4x/2.3x p. 68 (Movie) Standard*/Off Flash Control Flash Mode Auto*/Manual Flash Exp. On/Off* Red-Eye Lamp On*/Off Safety FE On*/Off i-Contrast Off*/Auto p. 135...

PowerShot SX10 IS Camera User Guide
Page 74
... shooting with the camera attached to shoot with the , or mode there is displayed (p. 110). 3 When you press the MENU button while this case, raise the flash before shooting. 72 Using the Flash Available Shooting Modes 1 Raise the flash manually. You are not using the flash, lower the flash until it closes. • (flash off) appears in...
... shooting with the camera attached to shoot with the , or mode there is displayed (p. 110). 3 When you press the MENU button while this case, raise the flash before shooting. 72 Using the Flash Available Shooting Modes 1 Raise the flash manually. You are not using the flash, lower the flash until it closes. • (flash off) appears in...
PowerShot SX10 IS Camera User Guide
Page 76
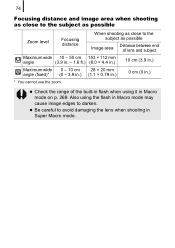
... subject as possible Zoom level Focusing distance When shooting as close to the subject as possible Image area Distance between end of the built-in flash when using the flash in Macro mode may cause image edges to avoid damaging the lens when shooting in Super Macro mode.
... subject as possible Zoom level Focusing distance When shooting as close to the subject as possible Image area Distance between end of the built-in flash when using the flash in Macro mode may cause image edges to avoid damaging the lens when shooting in Super Macro mode.

PowerShot SX10 IS Camera User Guide
Page 78
... the self-timer mode. • Pressing the MENU button while this screen is displayed will display the [Drive Settings] screen in [Flash Control] (p. 110), the lamp will light 2 seconds before the flash fires. Press the MENU button. 2. Press the button. Press the MENU button. 3 Press the button. 1. Press the button. 4. To Cancel...
... the self-timer mode. • Pressing the MENU button while this screen is displayed will display the [Drive Settings] screen in [Flash Control] (p. 110), the lamp will light 2 seconds before the flash fires. Press the MENU button. 2. Press the button. Press the MENU button. 3 Press the button. 1. Press the button. 4. To Cancel...

PowerShot SX10 IS Camera User Guide
Page 79
.... - Use the or button to select [Delay] or [Shots] and the or button to select . The interval between shots lengthens. - If the flash is set to select . 2. Use the or button to change the settings. 3. If the [Shots] option is used, the interval between shots may ...lengthen when the built-in memory of the camera fills. - Press the button. 2. Shooting will automatically cease if the memory card becomes full. (Using the FaceSelf-Timer) 1 Select . 1. Commonly Used ...
.... - Use the or button to select [Delay] or [Shots] and the or button to select . The interval between shots lengthens. - If the flash is set to select . 2. Use the or button to change the settings. 3. If the [Shots] option is used, the interval between shots may ...lengthen when the built-in memory of the camera fills. - Press the button. 2. Shooting will automatically cease if the memory card becomes full. (Using the FaceSelf-Timer) 1 Select . 1. Commonly Used ...

PowerShot SX10 IS Camera User Guide
Page 84
...since the IS mode runs continually. In Shoot Only mode, subjects can check the effect of up and down camera motions on subjects. Continuous You can be taken without a flash. This makes it easier to compose images and focus on the image. In the menu, use the or ... Off - 82 Setting the Image Stabilizer Function Available Shooting Modes p. 284 The lens-shift type image stabilizer function allows you to minimize the camera shake effect (blurred images) when you shoot distant subjects that may occur depending on the LCD monitor (or the viewfinder). Press the MENU button...
...since the IS mode runs continually. In Shoot Only mode, subjects can check the effect of up and down camera motions on subjects. Continuous You can be taken without a flash. This makes it easier to compose images and focus on the image. In the menu, use the or ... Off - 82 Setting the Image Stabilizer Function Available Shooting Modes p. 284 The lens-shift type image stabilizer function allows you to minimize the camera shake effect (blurred images) when you shoot distant subjects that may occur depending on the LCD monitor (or the viewfinder). Press the MENU button...


