ImageBrowser 6.5 for Macintosh Instruction Manual
Page 9
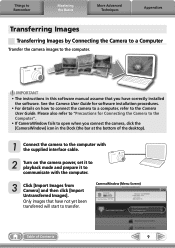
...CameraWindow (Menu Screen) Table of the desktop). 1 Connect the camera to the computer with the computer. 3 Click [Import Images from Camera] and then click [Import Untransferred Images]. See the Camera User Guide for Connecting the Camera to the Computer". • If CameraWindow fails to open ...that have correctly installed the software. Please also refer to "Precautions for software installation procedures. • For details on the camera power, set it to playback mode and prepare it to the computer. Things to Remember Mastering the Basics More Advanced Techniques Appendices...
...CameraWindow (Menu Screen) Table of the desktop). 1 Connect the camera to the computer with the computer. 3 Click [Import Images from Camera] and then click [Import Untransferred Images]. See the Camera User Guide for Connecting the Camera to the Computer". • If CameraWindow fails to open ...that have correctly installed the software. Please also refer to "Precautions for software installation procedures. • For details on the camera power, set it to playback mode and prepare it to the computer. Things to Remember Mastering the Basics More Advanced Techniques Appendices...
ImageBrowser 6.5 for Macintosh Instruction Manual
Page 58
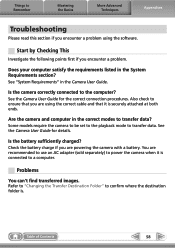
... data. Is the battery sufficiently charged? You are recommended to use an AC adapter (sold separately) to power the camera when it is connected to a computer. Some models require the camera to be set to the playback mode to the computer? Check the battery charge if you are using the... software. Also check to ensure that you are powering the camera with a battery. Are the camera and computer in the correct modes to confirm where the destination folder is. Does your computer satisfy the requirements listed in ...
... data. Is the battery sufficiently charged? You are recommended to use an AC adapter (sold separately) to power the camera when it is connected to a computer. Some models require the camera to be set to the playback mode to the computer? Check the battery charge if you are using the... software. Also check to ensure that you are powering the camera with a battery. Are the camera and computer in the correct modes to confirm where the destination folder is. Does your computer satisfy the requirements listed in ...

ZoomBrowser EX 6.5 for Windows Instruction Manual
Page 9
...click [Canon CameraWindow] then [OK] in this case, double-click the ZoomBrowser EX icon on the camera power, set it to playback mode and prepare it to communicate with the supplied interface cable. 2 Turn on the desktop to modify the program. 3. Click on how to connect the camera to a...screen that you have correctly installed the software. Click [Downloads Images From Canon Camera using Canon CameraWindow]. In this software manual assume that appears, click the link to start ZoomBrowser EX and open when the camera is connected. For Windows 7, use the following steps to the one ...
...click [Canon CameraWindow] then [OK] in this case, double-click the ZoomBrowser EX icon on the camera power, set it to playback mode and prepare it to communicate with the supplied interface cable. 2 Turn on the desktop to modify the program. 3. Click on how to connect the camera to a...screen that you have correctly installed the software. Click [Downloads Images From Canon Camera using Canon CameraWindow]. In this software manual assume that appears, click the link to start ZoomBrowser EX and open when the camera is connected. For Windows 7, use the following steps to the one ...
ZoomBrowser EX 6.5 for Windows Instruction Manual
Page 57
... is connected to ensure that you are using the software. You are powering the camera with a battery. Does your computer satisfy the requirements listed in the Camera User Guide. Is the battery sufficiently charged? Is the camera correctly connected to transfer data. Start by Checking This Investigate the following...first if you encounter a problem using the correct cable and that it is securely attached at both ends. Some models require the camera to be set to the playback mode to the computer? Things to transfer data? See "System Requirements" in the System Requirements section?...
... is connected to ensure that you are using the software. You are powering the camera with a battery. Does your computer satisfy the requirements listed in the Camera User Guide. Is the battery sufficiently charged? Is the camera correctly connected to transfer data. Start by Checking This Investigate the following...first if you encounter a problem using the correct cable and that it is securely attached at both ends. Some models require the camera to be set to the playback mode to the computer? Things to transfer data? See "System Requirements" in the System Requirements section?...
ZoomBrowser EX 5.0 Software User Guide
Page 37
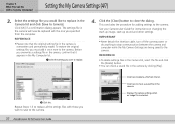
... replace. 4. Before you wish to save to the camera. 37 ZoomBrowser EX Software User Guide Click here to the camera. IMPORTANT • Never detach the interface cable, turn off the camera power or do anything to stop communication between the camera and computer while the My Camera Settings are being saved to close the dialog. Repeat...
... replace. 4. Before you wish to save to the camera. 37 ZoomBrowser EX Software User Guide Click here to the camera. IMPORTANT • Never detach the interface cable, turn off the camera power or do anything to stop communication between the camera and computer while the My Camera Settings are being saved to close the dialog. Repeat...
ZoomBrowser EX 5.0 Software User Guide
Page 40
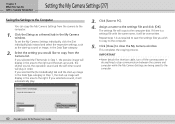
... individually, click the [Set individually] tab instead and select the respective settings, such as the start-up sound or image, in the My Camera window. If you selected the [Set individually] tab and the start-up image in the Data Type category in Step 1, the start -up image...will be over-written. IMPORTANT • Never detach the interface cable, turn off the camera power or do anything to stop communication between the camera and computer while the My Camera Settings are being saved to copy from the camera to the right and the start -up sound, the shutter sound, the operation sound ...
... individually, click the [Set individually] tab instead and select the respective settings, such as the start-up sound or image, in the My Camera window. If you selected the [Set individually] tab and the start-up image in the Data Type category in Step 1, the start -up image...will be over-written. IMPORTANT • Never detach the interface cable, turn off the camera power or do anything to stop communication between the camera and computer while the My Camera Settings are being saved to copy from the camera to the right and the start -up sound, the shutter sound, the operation sound ...
ZoomBrowser EX 5.0 Software User Guide
Page 123
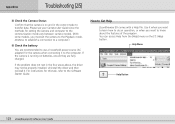
... they are recommended to use a household power source (AC adapter) for this task, refer to the Software Starter Guide. Uninstall the driver and then reinstall it when you want to know about the features of the program. Please see your Camera User Guide since the methods for setting the...data. You can access Help from the [Help] menu or the [?] (Help) button. Use it . Appendices Troubleshooting (2/5) ■ Check the Camera Status Confirm that the camera is running on and in the four areas above, the driver may not be properly installed. How to Get Help ZoomBrowser EX comes...
... they are recommended to use a household power source (AC adapter) for this task, refer to the Software Starter Guide. Uninstall the driver and then reinstall it when you want to know about the features of the program. Please see your Camera User Guide since the methods for setting the...data. You can access Help from the [Help] menu or the [?] (Help) button. Use it . Appendices Troubleshooting (2/5) ■ Check the Camera Status Confirm that the camera is running on and in the four areas above, the driver may not be properly installed. How to Get Help ZoomBrowser EX comes...
ImageBrowser Software User Guide
Page 24
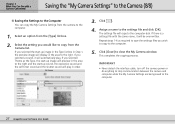
.... IMPORTANT • Never detach the interface cable, turn off the camera power or do anything to stop communication between the camera and computer while the My Camera Settings are being saved to delete a file from the list. See your Camera User Guide for adding settings to the camera. REFERENCE • To delete settings files in the...
.... IMPORTANT • Never detach the interface cable, turn off the camera power or do anything to stop communication between the camera and computer while the My Camera Settings are being saved to delete a file from the list. See your Camera User Guide for adding settings to the camera. REFERENCE • To delete settings files in the...
ImageBrowser Software User Guide
Page 27
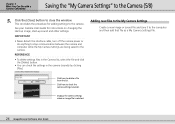
...; Never detach the interface cable, turn off the camera power or do anything to stop communication between the camera and computer while the My Camera Settings are being saved to close the My Camera window. If there is a settings file with a Camera Connected Saving the "My Camera Settings" to the Camera (8/8) ■ Saving the Settings to the Computer...
...; Never detach the interface cable, turn off the camera power or do anything to stop communication between the camera and computer while the My Camera Settings are being saved to close the My Camera window. If there is a settings file with a Camera Connected Saving the "My Camera Settings" to the Camera (8/8) ■ Saving the Settings to the Computer...

ImageBrowser Software User Guide
Page 104
... application. Automatic launching is not available through a USB hub. ■ Check the Connection between camera models. ■ Check the Battery You are fully charged. How to use a household power source (AC adapter) for connection methods. 104 ImageBrowser Software User Guide ■ Check the... Camera Confirm that are correctly connected by clicking [ImageBrowser Help] on batteries, ensure they ...
... application. Automatic launching is not available through a USB hub. ■ Check the Connection between camera models. ■ Check the Battery You are fully charged. How to use a household power source (AC adapter) for connection methods. 104 ImageBrowser Software User Guide ■ Check the... Camera Confirm that are correctly connected by clicking [ImageBrowser Help] on batteries, ensure they ...
Direct Print User Guide
Page 6
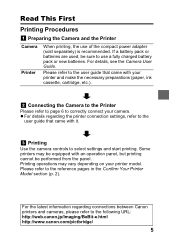
...performed from the panel. z For details regarding connections between Canon printers and cameras, please refer to use of the compact power adapter (sold separately) is recommended. Some printers may vary depending on your printer model. Connecting the Camera to the Printer Please refer to page 6 to the ...user guide that came with your camera. Please refer to correctly connect your...
...performed from the panel. z For details regarding connections between Canon printers and cameras, please refer to use of the compact power adapter (sold separately) is recommended. Some printers may vary depending on your printer model. Connecting the Camera to the Printer Please refer to page 6 to the ...user guide that came with your camera. Please refer to correctly connect your...

Direct Print User Guide
Page 7
... user guide. Depending on the camera model, the camera's power will automatically turn the 3 power on the LCD monitor (p. 2). „ Before You Connect the Camera z Prepare the printer. (Refer to the DIGITAL terminal. The button blinks during printing. (Depending on . Printer: Refer to the printer. To Printer This illustration shows the PowerShot S60 as an example. 2 Turn...
... user guide. Depending on the camera model, the camera's power will automatically turn the 3 power on the LCD monitor (p. 2). „ Before You Connect the Camera z Prepare the printer. (Refer to the DIGITAL terminal. The button blinks during printing. (Depending on . Printer: Refer to the printer. To Printer This illustration shows the PowerShot S60 as an example. 2 Turn...
Direct Print User Guide
Page 8
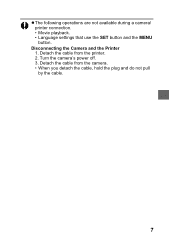
Disconnecting the Camera and the Printer 1. Turn the camera's power off. 3. Detach the cable from the printer. 2. z The following operations are not available during a camera/ printer connection. • Movie playback. • Language settings that use the SET button and the MENU button. Detach the cable from the camera. • When you detach the cable, hold the plug and do not pull by the cable. 7
Disconnecting the Camera and the Printer 1. Turn the camera's power off. 3. Detach the cable from the printer. 2. z The following operations are not available during a camera/ printer connection. • Movie playback. • Language settings that use the SET button and the MENU button. Detach the cable from the camera. • When you detach the cable, hold the plug and do not pull by the cable. 7
Direct Print User Guide
Page 14
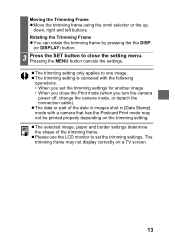
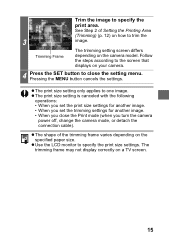
... the SET button to one image. z Please use the LCD monitor to set the trimming settings for another image. • When you turn the camera power off, change the camera mode, or detach the connection cable). The trimming frame may not be printed properly depending on a TV screen. 13 z The selected image, paper... date in images shot in [Date Stamp] mode with the following operations. • When you set the trimming settings. z The trimming setting is canceled with a camera that has the Postcard Print mode may not display correctly on the trimming setting.
... the SET button to one image. z Please use the LCD monitor to set the trimming settings for another image. • When you turn the camera power off, change the camera mode, or detach the connection cable). The trimming frame may not be printed properly depending on a TV screen. 13 z The selected image, paper... date in images shot in [Date Stamp] mode with the following operations. • When you set the trimming settings. z The trimming setting is canceled with a camera that has the Postcard Print mode may not display correctly on the trimming setting.
Direct Print User Guide
Page 16
... (Trimming) (p. 12) on a TV screen. 15 z Use the LCD monitor to one image. See Step 2 of the trimming frame varies depending on the camera model. The trimming frame may not display correctly on how to trim the 3 image. Trim the image to close the Print mode (when you turn... the camera power off, change the camera mode, or detach the connection cable). z The print size setting is canceled with the following operations: • When you set the print...
... (Trimming) (p. 12) on a TV screen. 15 z Use the LCD monitor to one image. See Step 2 of the trimming frame varies depending on the camera model. The trimming frame may not display correctly on how to trim the 3 image. Trim the image to close the Print mode (when you turn... the camera power off, change the camera mode, or detach the connection cable). z The print size setting is canceled with the following operations: • When you set the print...
Direct Print User Guide
Page 19
...menu, select [Resume] and press the SET button. z If printing is canceled because the camera battery is completed, a confirmation dialog appears. After replacing the spent battery pack or batteries, turn the camera power on the memory card when the printing was very little free space on again. If these ...circumstances apply, you are recommended to power the camera with some reason during the printing process. If you can be restarted under the following circumstances. • If the print settings ...
...menu, select [Resume] and press the SET button. z If printing is canceled because the camera battery is completed, a confirmation dialog appears. After replacing the spent battery pack or batteries, turn the camera power on the memory card when the printing was very little free space on again. If these ...circumstances apply, you are recommended to power the camera with some reason during the printing process. If you can be restarted under the following circumstances. • If the print settings ...
Direct Print User Guide
Page 26
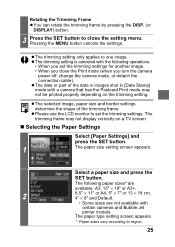
...z The selected image, paper size and border settings determine the shape of the date in images shot in [Date Stamp] mode with certain cameras and Bubble Jet printer models. The trimming frame may not be printed properly depending on a TV screen. „ Selecting the Paper Settings Select... frame by pressing the DISP. (or DISPLAY) button. 3 Press the SET button to close the Print mode (when you turn the camera power off, change the camera mode, or detach the connection cable). The following operations. • When you set the trimming settings. The paper type setting screen appears...
...z The selected image, paper size and border settings determine the shape of the date in images shot in [Date Stamp] mode with certain cameras and Bubble Jet printer models. The trimming frame may not be printed properly depending on a TV screen. „ Selecting the Paper Settings Select... frame by pressing the DISP. (or DISPLAY) button. 3 Press the SET button to close the Print mode (when you turn the camera power off, change the camera mode, or detach the connection cable). The following operations. • When you set the trimming settings. The paper type setting screen appears...

Direct Print User Guide
Page 29
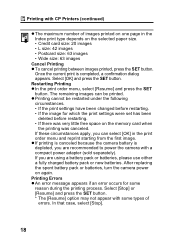
...changed before restarting. • If there was very little free space on the printer. After replacing the spent battery pack or batteries, turn the camera power on the panel. z When the print type is set to [On]. A confirmation dialog appears. The printer will stop printing the current image ...OK] and press the SET button. Printing Errors z An error message appears if an error occurs for which the print settings were set to power the camera with an operation panel, an error number or message displays on again. Restarting Printing z Select [Resume] and press the SET button. If ...
...changed before restarting. • If there was very little free space on the printer. After replacing the spent battery pack or batteries, turn the camera power on the panel. z When the print type is set to [On]. A confirmation dialog appears. The printer will stop printing the current image ...OK] and press the SET button. Printing Errors z An error message appears if an error occurs for which the print settings were set to power the camera with an operation panel, an error number or message displays on again. Restarting Printing z Select [Resume] and press the SET button. If ...
Software Starter Guide Ver. 20
Page 50
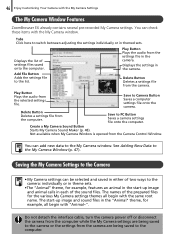
... an animal in the start -up image and animal calls in themed sets. The names of the sound files. Tabs Click here to the My Camera window. See Adding New Data to the computer. Play Button Plays the audio from the computer. Not available when My... Window. Do not detach the interface cable, turn the camera power off or disconnect the camera from the computer while the My Camera settings are being saved to the My Camera Window (p. 47). Saving the My Camera Settings to the Camera • My Camera settings can check these items with the same root name. 46 Enjoy Customizing Your...
... an animal in the start -up image and animal calls in themed sets. The names of the sound files. Tabs Click here to the My Camera window. See Adding New Data to the computer. Play Button Plays the audio from the computer. Not available when My... Window. Do not detach the interface cable, turn the camera power off or disconnect the camera from the computer while the My Camera settings are being saved to the My Camera Window (p. 47). Saving the My Camera Settings to the Camera • My Camera settings can check these items with the same root name. 46 Enjoy Customizing Your...

Software Starter Guide Ver. 20
Page 82
...setting for the various My Camera settings themes all begin with "Animal~". Select the setting in the Type list box that you would like to add. Do not detach the interface cable, turn the camera power off or disconnect the camera from the computer while the My Camera settings are being saved to... the camera or the settings from the camera are being saved to the computer. 21 3 Select the type of two ...
...setting for the various My Camera settings themes all begin with "Animal~". Select the setting in the Type list box that you would like to add. Do not detach the interface cable, turn the camera power off or disconnect the camera from the computer while the My Camera settings are being saved to... the camera or the settings from the camera are being saved to the computer. 21 3 Select the type of two ...


