
User Manual
Page 4
... Input Signal (P59 - P51) Connecting to the Default Setting (P140) Adjusting the Image Adjusting the Image Size and Focus (P71 P73) Adjusting Keystone Distortion (P76) Adjusting Aspect Ratio (P63 - P55) Changing the Remote Control Channel (P124) Projecting an Image Starting Projection (P56 - Quick Reference Guide This Quick Reference Guide will help you find functions that make full use of the projector and are useful for the Projecting Image (P109) Making Fine Color Adjustments (P114) Removing Noise (P116) Miscellaneous Functions Using the Power Saving Mode (P120) Turning...
... Input Signal (P59 - P51) Connecting to the Default Setting (P140) Adjusting the Image Adjusting the Image Size and Focus (P71 P73) Adjusting Keystone Distortion (P76) Adjusting Aspect Ratio (P63 - P55) Changing the Remote Control Channel (P124) Projecting an Image Starting Projection (P56 - Quick Reference Guide This Quick Reference Guide will help you find functions that make full use of the projector and are useful for the Projecting Image (P109) Making Fine Color Adjustments (P114) Removing Noise (P116) Miscellaneous Functions Using the Power Saving Mode (P120) Turning...
User Manual
Page 10
... Controlling the Projector from a Computer 188 Error Mail ...190 Maintenance 191 Cleaning the Projector 192 Cleaning and Replacing the Air Filter 193 Replacing the Air Filter ...193 Cleaning the Air Filter...194 Replacing the Lamp 195 Replacement Lamp ...196 Replacing the Lamp ...196 Appendix 199 Appendix ...201 Troubleshooting...202 LED Indicator Meanings ...202 Symptoms and Solutions...203 ■ You Cannot Turn on the Projector 203 ■ You Cannot Project an Image from the Projector 203 ■ There is no Sound...
... Controlling the Projector from a Computer 188 Error Mail ...190 Maintenance 191 Cleaning the Projector 192 Cleaning and Replacing the Air Filter 193 Replacing the Air Filter ...193 Cleaning the Air Filter...194 Replacing the Lamp 195 Replacement Lamp ...196 Replacing the Lamp ...196 Appendix 199 Appendix ...201 Troubleshooting...202 LED Indicator Meanings ...202 Symptoms and Solutions...203 ■ You Cannot Turn on the Projector 203 ■ You Cannot Project an Image from the Projector 203 ■ There is no Sound...
User Manual
Page 12
... the Protection of this manual thoroughly. This projector provides many years to be operating properly, read this manual. Safety Instructions Before installing and operating the projector, read this manual again, check operations and cable connections, and try the solutions in the "Troubleshooting" section in the back of Electronic Computer / Data Processing Equipment, ANSI / NFPA 75. 12 NO USER-SERVICEABLE PARTS INSIDE EXCEPT LAMP REPLACEMENT. THIS SYMBOL INDICATES THAT DANGEROUS VOLTAGE CONSTITUTING...
... the Protection of this manual thoroughly. This projector provides many years to be operating properly, read this manual. Safety Instructions Before installing and operating the projector, read this manual again, check operations and cable connections, and try the solutions in the "Troubleshooting" section in the back of Electronic Computer / Data Processing Equipment, ANSI / NFPA 75. 12 NO USER-SERVICEABLE PARTS INSIDE EXCEPT LAMP REPLACEMENT. THIS SYMBOL INDICATES THAT DANGEROUS VOLTAGE CONSTITUTING...
User Manual
Page 14
... of the projector during a lightning storm, or when it is provided. 14 For added protection of the instructions given here and retain them for cleaning. An appliance and cart combination should never be read before cleaning. Safety Instructions ■READ AND KEEP THIS OWNER'S MANUAL FOR LATER USE. All the safety and operating instructions should use near water... Read all warnings and instructions marked...
... of the projector during a lightning storm, or when it is provided. 14 For added protection of the instructions given here and retain them for cleaning. An appliance and cart combination should never be read before cleaning. Safety Instructions ■READ AND KEEP THIS OWNER'S MANUAL FOR LATER USE. All the safety and operating instructions should use near water... Read all warnings and instructions marked...

User Manual
Page 21
... the Canon Customer Support Center. • When hanging the projector from the projector lens etc., do so could cause a personal injury. • Before replacing the lens unit, wait at least one hour after the projector is operating. Doing so may be performed. Doing so could cause a fire. • When cleaning off dust or dirt from a ceiling, put the projector down / left / right powered by...
... the Canon Customer Support Center. • When hanging the projector from the projector lens etc., do so could cause a personal injury. • Before replacing the lens unit, wait at least one hour after the projector is operating. Doing so may be performed. Doing so could cause a fire. • When cleaning off dust or dirt from a ceiling, put the projector down / left / right powered by...

User Manual
Page 38
... screen. (4) LENS button Each time the button is pressed, the screen changes to page 39. • POWER ON (green): Lights up or flashes when the power is on. • STAND BY (red) : Lights up or flashes during standby or when the projector is shut down. • WARNING (red) : Lights up or flashes when an error occurs. • LAMP (orange) : Flashes when the time for replacing the lamp is high, it will also flash. To adjust, use the [ ] / [ ] or the [ ] / [ ] buttons. (5) INPUT button (P60) Switches the input signal. (6) Pointer / VOL buttons...
... screen. (4) LENS button Each time the button is pressed, the screen changes to page 39. • POWER ON (green): Lights up or flashes when the power is on. • STAND BY (red) : Lights up or flashes during standby or when the projector is shut down. • WARNING (red) : Lights up or flashes when an error occurs. • LAMP (orange) : Flashes when the time for replacing the lamp is high, it will also flash. To adjust, use the [ ] / [ ] or the [ ] / [ ] buttons. (5) INPUT button (P60) Switches the input signal. (6) Pointer / VOL buttons...

User Manual
Page 39
... turn power on . Another error has occurred. * Either the [POWER ON] or [STAND BY] indicator illuminates, depending on the power status. 39 Power-saving mode engaged. * * The time for replacing the lamp is open. Internal temperature is not connected. Power was turned off due to high internal temperature. Before Use Part Names ■LED Indicator Displays The LED indicators flash or illuminate to indicate the operating status of the projector. : Off : Lit : Flashing LED indicator POWER ON (green) STAND BY (red) WARNING (red) LAMP (orange) TEMP (red) Operating status...
... turn power on . Another error has occurred. * Either the [POWER ON] or [STAND BY] indicator illuminates, depending on the power status. 39 Power-saving mode engaged. * * The time for replacing the lamp is open. Internal temperature is not connected. Power was turned off due to high internal temperature. Before Use Part Names ■LED Indicator Displays The LED indicators flash or illuminate to indicate the operating status of the projector. : Off : Lit : Flashing LED indicator POWER ON (green) STAND BY (red) WARNING (red) LAMP (orange) TEMP (red) Operating status...

User Manual
Page 57
... perform focus adjustment. (P73) Remote control Projector Remote control An item highlighted in orange will be used by the projector for displaying menus and messages in the window. Select the desired language with the pointer buttons and press the OK button. Starting Projection Changing Operations When Projector is Turned On You can change operations when the projector is turned on as follows. • You can turn on the computer or AV equipment power. User's Manual Projecting an Image 4 Turn on the projector by connecting the power cord...
... perform focus adjustment. (P73) Remote control Projector Remote control An item highlighted in orange will be used by the projector for displaying menus and messages in the window. Select the desired language with the pointer buttons and press the OK button. Starting Projection Changing Operations When Projector is Turned On You can change operations when the projector is turned on as follows. • You can turn on the computer or AV equipment power. User's Manual Projecting an Image 4 Turn on the projector by connecting the power cord...
User Manual
Page 109
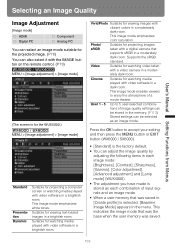
... each image mode: [Brightness], [Contrast], [Sharpness], [Gamma], [Color adjustment], [Advanced adjustment] and [Lamp mode] (WUX4000) • The adjustment you have made is stored as an image mode. Selecting an Image Quality User's Manual Setting Functions from Menus Image Adjustment [Image mode] HDMI Digital PC Component Analog PC You can select an image mode suitable for the projected image. (P78) You can also select it with the IMAGE button on the remote control. (P79) MENU > [Image adjustment] > [Image mode] (The screen is for the WUX5000.) MENU > [Image adjustment] > [Image mode...
... each image mode: [Brightness], [Contrast], [Sharpness], [Gamma], [Color adjustment], [Advanced adjustment] and [Lamp mode] (WUX4000) • The adjustment you have made is stored as an image mode. Selecting an Image Quality User's Manual Setting Functions from Menus Image Adjustment [Image mode] HDMI Digital PC Component Analog PC You can select an image mode suitable for the projected image. (P78) You can also select it with the IMAGE button on the remote control. (P79) MENU > [Image adjustment] > [Image mode] (The screen is for the WUX5000.) MENU > [Image adjustment] > [Image mode...

User Manual
Page 111
... screen is for the WUX5000.) MENU > [Image adjustment] > [Brightness] User's Manual Setting Functions from Menus [ ] Increases the brightness of an image. [ ] Decreases the brightness of the current projection. 111 When you have made is stored as adjusted values for the input signals and image mode of an image. When a user memory is selected as the image mode, the image mode that user memory is displayed in the user memory. Adjusting the Brightness [Brightness] HDMI Digital PC...
... screen is for the WUX5000.) MENU > [Image adjustment] > [Brightness] User's Manual Setting Functions from Menus [ ] Increases the brightness of an image. [ ] Decreases the brightness of the current projection. 111 When you have made is stored as adjusted values for the input signals and image mode of an image. When a user memory is selected as the image mode, the image mode that user memory is displayed in the user memory. Adjusting the Brightness [Brightness] HDMI Digital PC...

User Manual
Page 119
...input signal and image mode for the current projection is selected for the combination of the current projection. Cancels resetting of the image adjustment settings. • Only the setting for [Image mode], the settings are returned to the default settings. OK Cancel Resets the image adjustment settings. MENU > [Image adjustment] > [Lamp mode] Selecting an Image Quality Resetting the Image Adjustment Settings [Reset] HDMI Digital PC Component Analog PC You can also enable or disable this mode with the LAMP button on the remote control. If reset is performed when user...
...input signal and image mode for the current projection is selected for the combination of the current projection. Cancels resetting of the image adjustment settings. • Only the setting for [Image mode], the settings are returned to the default settings. OK Cancel Resets the image adjustment settings. MENU > [Image adjustment] > [Lamp mode] Selecting an Image Quality Resetting the Image Adjustment Settings [Reset] HDMI Digital PC Component Analog PC You can also enable or disable this mode with the LAMP button on the remote control. If reset is performed when user...
User Manual
Page 126
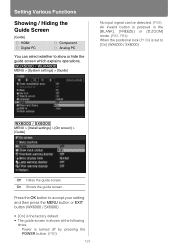
... lock (P139) is shown at the following times. - No input signal can select whether to [On] (WX6000 / SX6000) MENU > [Install settings] > [On screen] > [Guide] Off Hides the guide screen. MENU > [System settings] > [Guide] - Press the OK button to accept your setting and then press the MENU button or EXIT button (WX6000 / SX6000). • [On] is the factory default. • The guide screen is set to show or hide the guide screen which explains operations. Setting Various Functions Showing / Hiding the Guide Screen [Guide] HDMI Digital...
... lock (P139) is shown at the following times. - No input signal can select whether to [On] (WX6000 / SX6000) MENU > [Install settings] > [On screen] > [Guide] Off Hides the guide screen. MENU > [System settings] > [Guide] - Press the OK button to accept your setting and then press the MENU button or EXIT button (WX6000 / SX6000). • [On] is the factory default. • The guide screen is set to show or hide the guide screen which explains operations. Setting Various Functions Showing / Hiding the Guide Screen [Guide] HDMI Digital...
User Manual
Page 128
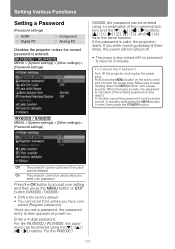
... also turned off the projector and unplug the power plug. Setting Various Functions Setting a Password [Password settings] HDMI Digital PC Component Analog PC Disables the projector unless the correct password is also reset.) To forcibly cancel the password from the remote control, in standby state press the MENU button 3 times, then press the POWER button. For the WUX5000 / WUX4000, the password can be entered using the buttons. For the WX6000 / 128 Hold down the MENU button until a beep sounds...
... also turned off the projector and unplug the power plug. Setting Various Functions Setting a Password [Password settings] HDMI Digital PC Component Analog PC Disables the projector unless the correct password is also reset.) To forcibly cancel the password from the remote control, in standby state press the MENU button 3 times, then press the POWER button. For the WUX5000 / WUX4000, the password can be entered using the buttons. For the WX6000 / 128 Hold down the MENU button until a beep sounds...

User Manual
Page 139
... setting and then press the MENU button or EXIT button (WX6000 / SX6000). • The factory default is inputted in Audio in terminal select] Setting Various Functions Locking Installation Related Functions [Positional lock] HDMI Digital PC Component Analog PC Operation of installation related functions can - On Installation related functions can be used . Press the OK button to Test pattern display, Screen aspect settings, Keystone adjustment, Digital image shift adjustment, Image flip H/V, Focus adjustment, Zoom adjustment, Lens shift adjustment and Lens shift reset...
... setting and then press the MENU button or EXIT button (WX6000 / SX6000). • The factory default is inputted in Audio in terminal select] Setting Various Functions Locking Installation Related Functions [Positional lock] HDMI Digital PC Component Analog PC Operation of installation related functions can - On Installation related functions can be used . Press the OK button to Test pattern display, Screen aspect settings, Keystone adjustment, Digital image shift adjustment, Image flip H/V, Focus adjustment, Zoom adjustment, Lens shift adjustment and Lens shift reset...

User Manual
Page 140
... [Factory defaults] HDMI Digital PC Component Analog PC You can reset the menu item settings and restore the system settings to the conditions at the time it was saved. (P110) MENU > [System settings] > [Other settings] > [Factory defaults] Select [Factory defaults] and press the OK button. MENU > [System settings] > [Other settings] > [Factory defaults] • This function does not reset the values for confirmation appears. OK Settings are not reset to default. The following screen for [Lamp counter], [Language], [Remote control], [Input signal], [Network Setting], [Filter...
... [Factory defaults] HDMI Digital PC Component Analog PC You can reset the menu item settings and restore the system settings to the conditions at the time it was saved. (P110) MENU > [System settings] > [Other settings] > [Factory defaults] Select [Factory defaults] and press the OK button. MENU > [System settings] > [Other settings] > [Factory defaults] • This function does not reset the values for confirmation appears. OK Settings are not reset to default. The following screen for [Lamp counter], [Language], [Remote control], [Input signal], [Network Setting], [Filter...

User Manual
Page 190
... projector to the air filter Other types of the power supply is not connected to the lens unit properly. Faulty lamp cover The lamp cover is not installed properly. If the same warning occurs again, the lamp drive circuit may be defective. Contact your dealer. Faulty lens connector The lens cable is abnormally high or any other problem has occurred in the power supply. Faulty air filter unit The air filter unit is open. Check whether the lens cable...
... projector to the air filter Other types of the power supply is not connected to the lens unit properly. Faulty lamp cover The lamp cover is not installed properly. If the same warning occurs again, the lamp drive circuit may be defective. Contact your dealer. Faulty lens connector The lens cable is abnormally high or any other problem has occurred in the power supply. Faulty air filter unit The air filter unit is open. Check whether the lens cable...

User Manual
Page 194
... the POWER button, the message "Push POWER button again to turn off and pull out the power plug. • Hook your finger into the air filter handle on the projector after approx. 300 hours). If damaged, the air filter will not work properly. • When the lamp is replaced, it will disappear. • This screen is not displayed when [Filter warning display] is displayed when turning on the side of the projector. Cleaning and Replacing the Air Filter...
... the POWER button, the message "Push POWER button again to turn off and pull out the power plug. • Hook your finger into the air filter handle on the projector after approx. 300 hours). If damaged, the air filter will not work properly. • When the lamp is replaced, it will disappear. • This screen is not displayed when [Filter warning display] is displayed when turning on the side of the projector. Cleaning and Replacing the Air Filter...
User Manual
Page 202
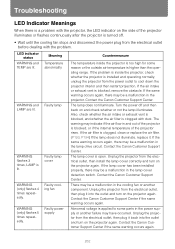
... install the lamp cover correctly and turn on the projector again. Contact the Canon Customer Support Center. Faulty cooling fan There may be a malfunction in the cooling fan or another failure may indicate if the air flow in the projector. Contact the Canon Customer Support Center if the same warning occurs again. LED indicator status Meaning Countermeasure WARNING and Temperature TEMP are lit. The warning may have occurred. WARNING and Faulty lamp LAMP are lit. WARNING flashes 3 times, LAMP is...
... install the lamp cover correctly and turn on the projector again. Contact the Canon Customer Support Center. Faulty cooling fan There may be a malfunction in the cooling fan or another failure may indicate if the air flow in the projector. Contact the Canon Customer Support Center if the same warning occurs again. LED indicator status Meaning Countermeasure WARNING and Temperature TEMP are lit. The warning may have occurred. WARNING and Faulty lamp LAMP are lit. WARNING flashes 3 times, LAMP is...

User Manual
Page 203
... turned on, the opening window is not enabled for approximately 20 seconds. Meaning Faulty lens connector Filter error Countermeasure Disconnect the lens connector which joins the lens unit and projector. Contact the Canon Customer Support Center. Contact the Canon Customer Support Center if the same warning occurs again. Check whether the air filter is installed correctly. (P193) Check that Key lock (P123) is displayed for the projector or the remote control. Troubleshooting LED indicator status WARNING (only) flashes 6 times repeatedly. The power cord...
... turned on, the opening window is not enabled for approximately 20 seconds. Meaning Faulty lens connector Filter error Countermeasure Disconnect the lens connector which joins the lens unit and projector. Contact the Canon Customer Support Center. Contact the Canon Customer Support Center if the same warning occurs again. Check whether the air filter is installed correctly. (P193) Check that Key lock (P123) is displayed for the projector or the remote control. Troubleshooting LED indicator status WARNING (only) flashes 6 times repeatedly. The power cord...

User Manual
Page 219
... connection cable, User's Manual / Installation Manual (this manual), warranty certificate **12 When using a Standard Zoom Lens (RS-IL01ST). F2.65 Zooming / Focusing system Electric / Electric Lens shift V: -15% - +55%, H: ±10% Light source 330-NSHA 336 W 310-NSHA 300 / 264 W (lamp mode Normal / Quiet) Image size (projection distance) (*1) Size 40 to 600 (1.3 m / 4.6' to center (*1) 88% Speaker 5W monaural x 1 Maximum input resolution 1920 x 1200 dots Input terminal Video signals Analog PC input WUXGA / UXGA / WSXGA+ / SXGA+ / WXGA+ / SXGA / WXGA / XGA / SVGA / VGA...
... connection cable, User's Manual / Installation Manual (this manual), warranty certificate **12 When using a Standard Zoom Lens (RS-IL01ST). F2.65 Zooming / Focusing system Electric / Electric Lens shift V: -15% - +55%, H: ±10% Light source 330-NSHA 336 W 310-NSHA 300 / 264 W (lamp mode Normal / Quiet) Image size (projection distance) (*1) Size 40 to 600 (1.3 m / 4.6' to center (*1) 88% Speaker 5W monaural x 1 Maximum input resolution 1920 x 1200 dots Input terminal Video signals Analog PC input WUXGA / UXGA / WSXGA+ / SXGA+ / WXGA+ / SXGA / WXGA / XGA / SVGA / VGA...


