
SX80 Manual
Page 2
.... User-Friendly On-Screen Menu Settings are automatically adjusted for quick and easy setup of projector. (P45) Equipped with a high degree of resolution. You can easily find settings for purchasing a Canon projector. Features of SX80 Multimedia Projector Thank you for each function. (P70P101) Compact and Easy-to-use Wireless Remote Control It comes with a wireless remote control which allows you to project high quality digital images. (P38) Direct Projection of Data on USB Flash Memories Capable of directly projecting JPEG images on...
.... User-Friendly On-Screen Menu Settings are automatically adjusted for quick and easy setup of projector. (P45) Equipped with a high degree of resolution. You can easily find settings for purchasing a Canon projector. Features of SX80 Multimedia Projector Thank you for each function. (P70P101) Compact and Easy-to-use Wireless Remote Control It comes with a wireless remote control which allows you to project high quality digital images. (P38) Direct Projection of Data on USB Flash Memories Capable of directly projecting JPEG images on...

SX80 Manual
Page 4
...) Removing Noise (P89) Resetting Projector Setting Resetting a Menu Setting (P100) Resetting a Network Setting (P99) Resetting Password (P97) Miscellaneous Functions Disabling a Beep (P93) Turning Off the Projector LED Lamps (P95) Setting a Password (P97) Disabling Buttons (P94) Hiding Guide Messages (P95) Reducing the Lamp Brightness (P91) Using the Power Saving Mode (P92) Turning on . P37) Connecting to the Computer (P35 - P60) Projecting Data on USB Flash Memory (P108 - P40) Connecting a Digital Camera (P41, P104) Connecting an USB Flash Memory (P41, P108) Projecting an Image Projecting...
...) Removing Noise (P89) Resetting Projector Setting Resetting a Menu Setting (P100) Resetting a Network Setting (P99) Resetting Password (P97) Miscellaneous Functions Disabling a Beep (P93) Turning Off the Projector LED Lamps (P95) Setting a Password (P97) Disabling Buttons (P94) Hiding Guide Messages (P95) Reducing the Lamp Brightness (P91) Using the Power Saving Mode (P92) Turning on . P37) Connecting to the Computer (P35 - P60) Projecting Data on USB Flash Memory (P108 - P40) Connecting a Digital Camera (P41, P104) Connecting an USB Flash Memory (P41, P108) Projecting an Image Projecting...
SX80 Manual
Page 5
... SX80 Multimedia Projector 2 Quick Reference Guide 4 Safety Instructions ...10 Safety Precautions...11 ■ READ AND KEEP THIS OWNER'S MANUAL FOR LATER USE 12 AC Power Cord Requirement 14 Federal Communication Commission Notice 15 Canadian Radio Interference Regulations 15 Precautions on Handling the Batteries in the Remote Controller 16 Lamp Handling Precautions...16 Carrying/Transporting the Projector 17 Installation Precautions...17 Before Use ...19 Supplied Accessories 20 ■ Installing the Lens...
... SX80 Multimedia Projector 2 Quick Reference Guide 4 Safety Instructions ...10 Safety Precautions...11 ■ READ AND KEEP THIS OWNER'S MANUAL FOR LATER USE 12 AC Power Cord Requirement 14 Federal Communication Commission Notice 15 Canadian Radio Interference Regulations 15 Precautions on Handling the Batteries in the Remote Controller 16 Lamp Handling Precautions...16 Carrying/Transporting the Projector 17 Installation Precautions...17 Before Use ...19 Supplied Accessories 20 ■ Installing the Lens...
SX80 Manual
Page 8
... Guide Screen 95 Turning on/off LED Illumination 95 Setting for Slideshow...96 Setting up the Remote Control Channel 96 Extending the Menu Display Time 97 Setting a Password ...97 Registering a Password ...98 Resetting the Lamp Counter ...98 ■ About the Display of the Lamp Counter 99 Initializing network settings...99 Resetting to the Default Setting 100 Checking the Information of the Projector 101 Projecting an Image from a Digital Camera or an USB Flash Memory ..... 103 Projecting an Image from a Digital Camera 104 Connecting a Digital Camera 104 Operating the Projected Image...
... Guide Screen 95 Turning on/off LED Illumination 95 Setting for Slideshow...96 Setting up the Remote Control Channel 96 Extending the Menu Display Time 97 Setting a Password ...97 Registering a Password ...98 Resetting the Lamp Counter ...98 ■ About the Display of the Lamp Counter 99 Initializing network settings...99 Resetting to the Default Setting 100 Checking the Information of the Projector 101 Projecting an Image from a Digital Camera or an USB Flash Memory ..... 103 Projecting an Image from a Digital Camera 104 Connecting a Digital Camera 104 Operating the Projected Image...
SX80 Manual
Page 9
...; Replacing the Lamp ...130 Relationship between Aspect and Screen Aspect 131 When Projecting an Image from a Computer 131 When Projecting an Image from Image Software 132 When Projecting an Image from a Digital Camera or a USB Flash Memory 132 Supported Computer Signal Types 133 Relationship between Screen Size and Projecting Distance 134 Glossary ...135 Specifications ...139 ■ Projector ...139 ■ Remote Control...139 ■ External View ...140 ■ ANALOG PC-2/COMPONENT IN terminal 140 ■ Service Port (CONTROL 141...
...; Replacing the Lamp ...130 Relationship between Aspect and Screen Aspect 131 When Projecting an Image from a Computer 131 When Projecting an Image from Image Software 132 When Projecting an Image from a Digital Camera or a USB Flash Memory 132 Supported Computer Signal Types 133 Relationship between Screen Size and Projecting Distance 134 Glossary ...135 Specifications ...139 ■ Projector ...139 ■ Remote Control...139 ■ External View ...140 ■ ANALOG PC-2/COMPONENT IN terminal 140 ■ Service Port (CONTROL 141...

SX80 Manual
Page 12
...;READ AND KEEP THIS OWNER'S MANUAL FOR LATER USE. Follow all of the projector during a lightning storm, or when it is provided. 12 This will prevent damage due to insure reliable operation of time, unplug it from overheating. Do not expose this unit to operate the product. This projector should use near a swimming pool, etc... All the safety and operating instructions should not...
...;READ AND KEEP THIS OWNER'S MANUAL FOR LATER USE. Follow all of the projector during a lightning storm, or when it is provided. 12 This will prevent damage due to insure reliable operation of time, unplug it from overheating. Do not expose this unit to operate the product. This projector should use near a swimming pool, etc... All the safety and operating instructions should not...

SX80 Manual
Page 16
... lamp which must be replaced (i.e., the LAMP REPLACE indicator lights up twice), • The chances of the exhaust vent. If a Lamp Explodes • If a lamp explodes, gas or dust may differ from lamp to lamp and according to the usage environment. Ask the Canon service representative to clean and check the inside the projector. The mercury lamp has the following characteristics. • A lamp may scatter inside of time...
... lamp which must be replaced (i.e., the LAMP REPLACE indicator lights up twice), • The chances of the exhaust vent. If a Lamp Explodes • If a lamp explodes, gas or dust may differ from lamp to lamp and according to the usage environment. Ask the Canon service representative to clean and check the inside the projector. The mercury lamp has the following characteristics. • A lamp may scatter inside of time...
SX80 Manual
Page 26
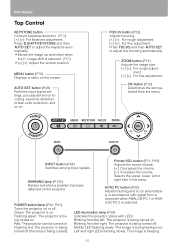
...) INPUT button (P48) Adjusts the sound volume. Selects the upper, lower, left : The projector is selected. POWER button/lamp (P42, P61) LOG PC-2 is being turned off. Indicates the projector status with signal from the right: The projector is being cooled). ZOOM button (P51) Adjusts the image size. [ ] [ ]: For rough adjust- Flashes red when a problem has been detected on . Press D.SHIFT/KEYSTONE and then AUTO SET to adjust the focusing automatically. Blinking from the menu. Press FOCUS and then AUTO SET to adjust the keystone...
...) INPUT button (P48) Adjusts the sound volume. Selects the upper, lower, left : The projector is selected. POWER button/lamp (P42, P61) LOG PC-2 is being turned off. Indicates the projector status with signal from the right: The projector is being cooled). ZOOM button (P51) Adjusts the image size. [ ] [ ]: For rough adjust- Flashes red when a problem has been detected on . Press D.SHIFT/KEYSTONE and then AUTO SET to adjust the focusing automatically. Blinking from the menu. Press FOCUS and then AUTO SET to adjust the keystone...

SX80 Manual
Page 61
... the projector. With the power cord connected, the LED illumination lamp turns on during cooling cycle. • Wait until the cooling fan stops before turning off , the [POWER] indicator starts flashing in red and the cooling fan starts. • You cannot turn on the projector immediately after turning it immediately after the use. Projecting an Image Turning Off the Projector 1 Press the POWER button to cool down the lamp even after turning on while the cooling fan is in operation...
... the projector. With the power cord connected, the LED illumination lamp turns on during cooling cycle. • Wait until the cooling fan stops before turning off , the [POWER] indicator starts flashing in red and the cooling fan starts. • You cannot turn on the projector immediately after turning it immediately after the use. Projecting an Image Turning Off the Projector 1 Press the POWER button to cool down the lamp even after turning on while the cooling fan is in operation...

SX80 Manual
Page 73
...:9 D image shift] for different screen aspects or input signal types. • The ASPECT button on the remote control can select a projection mode corresponding to accept your setting and then press the MENU button. • [Auto] and [True size] are displayed for [Screen aspect], [Zoom] appears if the type of input signal is projected with the upper and lower portion of the image cut off. Setting Display Status Selecting an Image Projection Mode [Aspect] HDMI DIGITAL PC ANALOG PC COMPONENT VIDEO/S-VIDEO USB Display settings...
...:9 D image shift] for different screen aspects or input signal types. • The ASPECT button on the remote control can select a projection mode corresponding to accept your setting and then press the MENU button. • [Auto] and [True size] are displayed for [Screen aspect], [Zoom] appears if the type of input signal is projected with the upper and lower portion of the image cut off. Setting Display Status Selecting an Image Projection Mode [Aspect] HDMI DIGITAL PC ANALOG PC COMPONENT VIDEO/S-VIDEO USB Display settings...

SX80 Manual
Page 92
... [Auto setup] if [16:9 D. lows: [Auto focus]: [On] [Auto keystone]: [On] [Auto input]: [On] [Auto screen color]: [Off] • You cannot change any items in the auto setup function. Exit If no input signal is received for the items if you want to accept your setting and then press the MENU button. • [Off] is the factory default. • The POWER indicator flashes red and green when the projector is in auto setup function. If it resumes projection. Auto keystone Enables the auto keystone...
... [Auto setup] if [16:9 D. lows: [Auto focus]: [On] [Auto keystone]: [On] [Auto input]: [On] [Auto screen color]: [Off] • You cannot change any items in the auto setup function. Exit If no input signal is received for the items if you want to accept your setting and then press the MENU button. • [Off] is the factory default. • The POWER indicator flashes red and green when the projector is in auto setup function. If it resumes projection. Auto keystone Enables the auto keystone...
SX80 Manual
Page 95
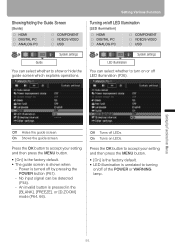
... the Guide Screen [Guide] HDMI DIGITAL PC ANALOG PC COMPONENT VIDEO/S-VIDEO USB Turning on /off of the POWER or WARNING lamp. 95 System settings LED illumination You can select whether to accept your setting and then press the MENU button. • [On] is the factory default. • LED illumination is pressed in the [BLANK], [FREEZE], or [D.ZOOM] mode (P64, 66). On Shows the guide screen. On Turns on or off LED illumination (P26). No input signal can...
... the Guide Screen [Guide] HDMI DIGITAL PC ANALOG PC COMPONENT VIDEO/S-VIDEO USB Turning on /off of the POWER or WARNING lamp. 95 System settings LED illumination You can select whether to accept your setting and then press the MENU button. • [On] is the factory default. • LED illumination is pressed in the [BLANK], [FREEZE], or [D.ZOOM] mode (P64, 66). On Shows the guide screen. On Turns on or off LED illumination (P26). No input signal can...

SX80 Manual
Page 100
... Resetting to the Default Setting [Other settings] - [Factory defaults] HDMI DIGITAL PC ANALOG PC COMPONENT VIDEO/S-VIDEO USB System settings Other settings Factory defaults You can reset the menu item settings and restore the system settings to the page 146. 100 Cancel Settings are reset to default. Press the OK button to accept your setting and then press the MENU button. • This function cannot reset the value of [Lamp counter], [Language], [Remote control], [Input signal] and [Network setting] to default. • For factory defaults settings, refer to the factory defaults...
... Resetting to the Default Setting [Other settings] - [Factory defaults] HDMI DIGITAL PC ANALOG PC COMPONENT VIDEO/S-VIDEO USB System settings Other settings Factory defaults You can reset the menu item settings and restore the system settings to the page 146. 100 Cancel Settings are reset to default. Press the OK button to accept your setting and then press the MENU button. • This function cannot reset the value of [Lamp counter], [Language], [Remote control], [Input signal] and [Network setting] to default. • For factory defaults settings, refer to the factory defaults...

SX80 Manual
Page 107
...Press the MENU button to the PictBridge enabled equipment. Remote control Top control 3 Set the interval (minute:second) other than "--:--" with [ ] / [ ]. Remote control Top control 4 Press the MENU button to exit the menu. ■Finishing projection To finish projecting images using PictBridge, turn off the power to display the menu. Then, remove the USB cable from a USB flash memory) connected via USB. To stop the slideshow, set as "--:--". Remote control Top control Projecting an Image from a Digital Camera or an USB Flash Memory < < 2 Select [System settings] tab...
...Press the MENU button to the PictBridge enabled equipment. Remote control Top control 3 Set the interval (minute:second) other than "--:--" with [ ] / [ ]. Remote control Top control 4 Press the MENU button to exit the menu. ■Finishing projection To finish projecting images using PictBridge, turn off the power to display the menu. Then, remove the USB cable from a USB flash memory) connected via USB. To stop the slideshow, set as "--:--". Remote control Top control Projecting an Image from a Digital Camera or an USB Flash Memory < < 2 Select [System settings] tab...

SX80 Manual
Page 116
Commercial cross type LAN cable 2 Turn on the [Local Area Connection Properties] window to the projector. Take notes of the projector and computer. 3 Open [Control Panel] from the projector to the computer when you have specified the settings, click the [OK] button and then click the [OK] but- ton on the power of the original network settings (IP address, subnet mask, DHCP settings, etc). 6 Select [Use the following the steps...
Commercial cross type LAN cable 2 Turn on the [Local Area Connection Properties] window to the projector. Take notes of the projector and computer. 3 Open [Control Panel] from the projector to the computer when you have specified the settings, click the [OK] button and then click the [OK] but- ton on the power of the original network settings (IP address, subnet mask, DHCP settings, etc). 6 Select [Use the following the steps...

SX80 Manual
Page 119
.... Faulty lamp cover The lamp cover is abnormally high or any other problem has occurred in the power supply. Faulty power supply The voltage of part of the power supply is open. This completes the IP address setting of errors Error name Text Temperature abnormality The temperature inside the projector is too high for some reason or the outside air temperature is installed and operated normally, turn off the projector to the projector from the menu. ■Error Notification Message If errors occur...
.... Faulty lamp cover The lamp cover is abnormally high or any other problem has occurred in the power supply. Faulty power supply The voltage of part of the power supply is open. This completes the IP address setting of errors Error name Text Temperature abnormality The temperature inside the projector is too high for some reason or the outside air temperature is installed and operated normally, turn off the projector to the projector from the menu. ■Error Notification Message If errors occur...

SX80 Manual
Page 122
... the outlet and turn off the projector to some reason or the outside air temperature is higher than the specified one . The cooling fan or another component may be defective. Troubleshooting WARNING Lamp Flash Patterns The WARNING lamp on the Control Panel flashes in red when there is a trouble in the power supply or any other failure may be occurred. Replace the lamp with the trouble. Contact your dealer. The lamp cover is experienced...
... the outlet and turn off the projector to some reason or the outside air temperature is higher than the specified one . The cooling fan or another component may be defective. Troubleshooting WARNING Lamp Flash Patterns The WARNING lamp on the Control Panel flashes in red when there is a trouble in the power supply or any other failure may be occurred. Replace the lamp with the trouble. Contact your dealer. The lamp cover is experienced...
SX80 Manual
Page 124
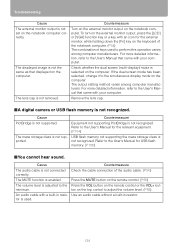
... information, refer to the User's Manual for USB flash memory. (P108) ■You cannot hear sound. Remove the lens cap. ■A digital camera or USB flash memory is not supported. Countermeasure Equipment not supporting PictBridge is selected on the computer. Use an audio cable without a built-in resis- The displayed image is used to adjust the volume level. (P65) An audio cable with your computer. To turn on the keyboard of the...
... information, refer to the User's Manual for USB flash memory. (P108) ■You cannot hear sound. Remove the lens cap. ■A digital camera or USB flash memory is not supported. Countermeasure Equipment not supporting PictBridge is selected on the computer. Use an audio cable without a built-in resis- The displayed image is used to adjust the volume level. (P65) An audio cable with your computer. To turn on the keyboard of the...

SX80 Manual
Page 143
... Power management 43 Power management mode (settings) ....92 Power saving (power management) .....43 Progressive 79, 137 Projecting distance 31, 134 Projector on 84 P-TIMER 67 R Rear projection 32, 81 Register password 98 Remote control 24, 28, 96 Reset 91, 100 Resolution 58, 136 Reverse projection (ceiling-mounted/rear projection) .....81 S Screen aspect 55, 84, 131 Screen color 80 Screen size 134 Screen when blank 83 Selecting a language 43, 94 Selecting an input signal 47 Setting Display Status 73 Setting the Image Quality 85 Setting...
... Power management 43 Power management mode (settings) ....92 Power saving (power management) .....43 Progressive 79, 137 Projecting distance 31, 134 Projector on 84 P-TIMER 67 R Rear projection 32, 81 Register password 98 Remote control 24, 28, 96 Reset 91, 100 Resolution 58, 136 Reverse projection (ceiling-mounted/rear projection) .....81 S Screen aspect 55, 84, 131 Screen color 80 Screen size 134 Screen when blank 83 Selecting a language 43, 94 Selecting an input signal 47 Setting Display Status 73 Setting the Image Quality 85 Setting...
SX80 Manual
Page 147
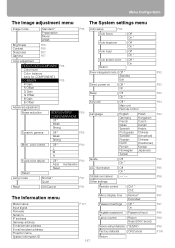
... Register password Password input Lamp counter Return Reset (OK/Cancel) Network setting Initialization YES/NO Factory defaults OK/Cancel Return P92 P93 P93 P94 P94 P95 P95 P96 P96 P97 P97 P98 P98 P99 P100 Other settings Reset OK/Cancel P91 Remote control Ch1 * Ch2 The Information menu Menu display time Normal * Extended Model name Input signal Firmware Serial no. color correct Off * P90 L M H 6-axis color adjust Off * P90 Adjust Hue/Saturation Reset Return Lamp mode Normal * P91 Quiet Auto setup P92 Auto focus...
... Register password Password input Lamp counter Return Reset (OK/Cancel) Network setting Initialization YES/NO Factory defaults OK/Cancel Return P92 P93 P93 P94 P94 P95 P95 P96 P96 P97 P97 P98 P98 P99 P100 Other settings Reset OK/Cancel P91 Remote control Ch1 * Ch2 The Information menu Menu display time Normal * Extended Model name Input signal Firmware Serial no. color correct Off * P90 L M H 6-axis color adjust Off * P90 Adjust Hue/Saturation Reset Return Lamp mode Normal * P91 Quiet Auto setup P92 Auto focus...


