User Guide
Page 2
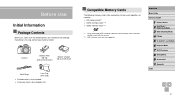
... Initial Information Package Contents Before use, make sure the following memory cards (sold separately) can be used, regardless of capacity. ●● SD memory cards*1 ●● SDHC memory cards *1*2 ●● SDXC memory cards*1*2 *1 Cards conforming to work with cord) ●● Printed matter is also included. ●● A memory card is missing, contact your camera retailer. If anything is...
... Initial Information Package Contents Before use, make sure the following memory cards (sold separately) can be used, regardless of capacity. ●● SD memory cards*1 ●● SDHC memory cards *1*2 ●● SDXC memory cards*1*2 *1 Cards conforming to work with cord) ●● Printed matter is also included. ●● A memory card is missing, contact your camera retailer. If anything is...
User Guide
Page 3
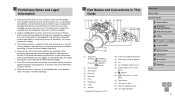
...using the camera. ●● When the camera is used over an extended period, it may become warm. Please note that Canon Inc., its subsidiaries and affiliates, and its distributors are produced under extremely high-precision manufacturing conditions and more than 99.99% of...images were recorded correctly. Seek)] button (15) (N-Mark)* (16) [ (Framing Assist - Lock)] button (17) Tripod socket (18) Lock release switch (19) Memory card/battery cover (20) DC coupler cable port Before Use Basic Guide Advanced Guide 1 Camera Basics 2 Auto Mode / Hybrid Auto Mode 3 Other Shooting Modes 4 P ...
...using the camera. ●● When the camera is used over an extended period, it may become warm. Please note that Canon Inc., its subsidiaries and affiliates, and its distributors are produced under extremely high-precision manufacturing conditions and more than 99.99% of...images were recorded correctly. Seek)] button (15) (N-Mark)* (16) [ (Framing Assist - Lock)] button (17) Tripod socket (18) Lock release switch (19) Memory card/battery cover (20) DC coupler cable port Before Use Basic Guide Advanced Guide 1 Camera Basics 2 Auto Mode / Hybrid Auto Mode 3 Other Shooting Modes 4 P ...

User Guide
Page 4
..." represents a page number) ●● Instructions in this guide apply to the camera under default settings. ●● For convenience, all supported memory cards are simply referred to as the "memory card". ●● The symbols " Still Images" and " Movies" below titles indicate how the function is used-whether for still images or movies.
..." represents a page number) ●● Instructions in this guide apply to the camera under default settings. ●● For convenience, all supported memory cards are simply referred to as the "memory card". ●● The symbols " Still Images" and " Movies" below titles indicate how the function is used-whether for still images or movies.
User Guide
Page 5
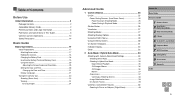
Table of Contents Before Use Initial Information 2 Package Contents 2 Compatible Memory Cards 2 Preliminary Notes and Legal Information 3 Part Names and Conventions in This Guide 3 Common Camera Operations 12 Safety Precautions 14 Basic Guide Basic Operations 17 Initial... Preparations 17 Attaching Accessories 17 Holding the Camera 18 Charging the Battery Pack 18 Inserting the Battery Pack and Memory Card 19 Using the Screen 20 Adjusting the Screen Angle and Orientation 20 Setting the Date and Time 20 Changing the Date and Time 21 Display...
Table of Contents Before Use Initial Information 2 Package Contents 2 Compatible Memory Cards 2 Preliminary Notes and Legal Information 3 Part Names and Conventions in This Guide 3 Common Camera Operations 12 Safety Precautions 14 Basic Guide Basic Operations 17 Initial... Preparations 17 Attaching Accessories 17 Holding the Camera 18 Charging the Battery Pack 18 Inserting the Battery Pack and Memory Card 19 Using the Screen 20 Adjusting the Screen Angle and Orientation 20 Setting the Date and Time 20 Changing the Date and Time 21 Display...
User Guide
Page 9
...to Listed Access Points 132 Previous Access Points 132 Sending Images to a Registered Web Service 133 Registering Web Services 133 Registering CANON iMAGE GATEWAY 133 Registering Other Web Services 135 Uploading Images to Web Services 135 Printing Images Wirelessly from a Connected Printer........... 136... Lens Retraction Timing 147 Using Eco Mode 147 Power-Saving Adjustment 147 Screen Brightness 148 Hiding the Start-Up Screen 148 Formatting Memory Cards 148 Low-Level Formatting 149 File Numbering 149 Date-Based Image Storage 150 Metric / Non-Metric Display 150 Before Use Basic...
...to Listed Access Points 132 Previous Access Points 132 Sending Images to a Registered Web Service 133 Registering Web Services 133 Registering CANON iMAGE GATEWAY 133 Registering Other Web Services 135 Uploading Images to Web Services 135 Printing Images Wirelessly from a Connected Printer........... 136... Lens Retraction Timing 147 Using Eco Mode 147 Power-Saving Adjustment 147 Screen Brightness 148 Hiding the Start-Up Screen 148 Formatting Memory Cards 148 Low-Level Formatting 149 File Numbering 149 Date-Based Image Storage 150 Metric / Non-Metric Display 150 Before Use Basic...
User Guide
Page 11
... 182 Functions and Menu Tables 182 Functions Available in Each Shooting Mode 182 FUNC. Playback (Detailed Information Display 181 Summary of Shots per Memory Card 197 Recording Time per Memory Card 198 Flash Range 198 Shooting Range 198 Continuous Shooting Speed 198 Shutter Speed 199 Aperture 199 Battery Pack NB-10L 199 Battery Charger...
... 182 Functions and Menu Tables 182 Functions Available in Each Shooting Mode 182 FUNC. Playback (Detailed Information Display 181 Summary of Shots per Memory Card 197 Recording Time per Memory Card 198 Flash Range 198 Shooting Range 198 Continuous Shooting Speed 198 Shutter Speed 199 Aperture 199 Battery Pack NB-10L 199 Battery Charger...

User Guide
Page 19
... with a fully charged battery pack, see "Number of Shots per Memory Card" (= 197). Charge the battery pack on (or immediately before using a new memory card (or a memory card formatted in another device), you insert it. Inserting memory cards facing the wrong way may damage the battery pack. Never use ....clicks shut. ●●If you insert the battery pack facing the (1) wrong way, it clicks into place. ●●Make sure the memory card is in the locked position. Before Use Basic Guide Advanced Guide 1 Camera Basics 2 Auto Mode / Hybrid Auto Mode 3 Other Shooting Modes 4...
... with a fully charged battery pack, see "Number of Shots per Memory Card" (= 197). Charge the battery pack on (or immediately before using a new memory card (or a memory card formatted in another device), you insert it. Inserting memory cards facing the wrong way may damage the battery pack. Never use ....clicks shut. ●●If you insert the battery pack facing the (1) wrong way, it clicks into place. ●●Make sure the memory card is in the locked position. Before Use Basic Guide Advanced Guide 1 Camera Basics 2 Auto Mode / Hybrid Auto Mode 3 Other Shooting Modes 4...
User Guide
Page 32
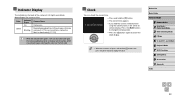
... Recording/reading/transmitting images, distance warning (=174), or cannot focus (when the flash is off , open the memory card/battery cover, or shake or jolt the camera, which may corrupt images or damage the camera or memory card. Press the [ ][ ] buttons to change the display color. ●●Press the [ ] button again to cancel...
... Recording/reading/transmitting images, distance warning (=174), or cannot focus (when the flash is off , open the memory card/battery cover, or shake or jolt the camera, which may corrupt images or damage the camera or memory card. Press the [ ][ ] buttons to change the display color. ●●Press the [ ] button again to cancel...

User Guide
Page 35
... recompose shots, the focus, brightness, and colors will be automatically adjusted. 3) Finish shooting. ●●Press the movie button again to stop automatically when the memory card becomes full. ●● The flash firing during shots indicates that movies shot at subjects about four seconds before shooting still images. 3 Shoot. ●●...
... recompose shots, the focus, brightness, and colors will be automatically adjusted. 3) Finish shooting. ●●Press the movie button again to stop automatically when the memory card becomes full. ●● The flash firing during shots indicates that movies shot at subjects about four seconds before shooting still images. 3 Shoot. ●●...

User Guide
Page 45
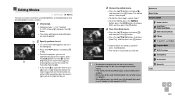
Shooting will remain lit in the lower-right corner. Use the software downloaded from the Canon website (=164) to take shots, the camera adds the shooting date or time to the lower-right corner of images. ●●To restore the ...-timer, [Delay] represents the delay before the shot, the lamp blinking and self-timer sound will speed up. (The lamp will stop automatically when the memory card becomes full. ●● When a delay longer than two seconds is specified, two seconds before recording begins, but the [Shots] setting has no effect. ●...
Shooting will remain lit in the lower-right corner. Use the software downloaded from the Canon website (=164) to take shots, the camera adds the shooting date or time to the lower-right corner of images. ●●To restore the ...-timer, [Delay] represents the delay before the shot, the lamp blinking and self-timer sound will speed up. (The lamp will stop automatically when the memory card becomes full. ●● When a delay longer than two seconds is specified, two seconds before recording begins, but the [Shots] setting has no effect. ●...

User Guide
Page 52
... Wi-Fi Functions 8 Setting Menu 9 Accessories 10 Appendix Index 52 Changing Image Resolution (Size) Still Images Movies Choose from 4 levels of Shots per Memory Card" (= 197). ●●Press the [ ] button, choose [ ] in the menu, and choose the desired option (=29). ●●...the camera misinterprets red eye makeup as red pupils, for 4:3 Images) A2 (16.5 x 23.4 in.) A3 - Guidelines for Choosing Resolution Based on a memory card, see "Number of image resolution, as follows. 1 Access the [Built-in Flash Settings] screen. ●●Press the [ ] button, choose [...
... Wi-Fi Functions 8 Setting Menu 9 Accessories 10 Appendix Index 52 Changing Image Resolution (Size) Still Images Movies Choose from 4 levels of Shots per Memory Card" (= 197). ●●Press the [ ] button, choose [ ] in the menu, and choose the desired option (=29). ●●...the camera misinterprets red eye makeup as red pupils, for 4:3 Images) A2 (16.5 x 23.4 in.) A3 - Guidelines for Choosing Resolution Based on a memory card, see "Number of image resolution, as follows. 1 Access the [Built-in Flash Settings] screen. ●●Press the [ ] button, choose [...

User Guide
Page 53
... Balance. ●●Press the [ ] button, choose [Hg Lamp Corr.] on the top and bottom edges of image quality that will fit on a memory card, see "Recording Time per Memory Card" (= 198). ●●Press the [ ] button, choose [ ] in standard definition ●● In [ ], [ ], and [ ] modes, black bars displayed on the [ ] tab, and then...
... Balance. ●●Press the [ ] button, choose [Hg Lamp Corr.] on the top and bottom edges of image quality that will fit on a memory card, see "Recording Time per Memory Card" (= 198). ●●Press the [ ] button, choose [ ] in standard definition ●● In [ ], [ ], and [ ] modes, black bars displayed on the [ ] tab, and then...

User Guide
Page 58
... camera will continue to adjust focus and image brightness where the blue frame is increased to [ ]. SD Speed Class 6 or higher memory cards are generated in one color Bold, distinctive-looking images Subdued, natural-looking images Moving Subjects (Sports) Still Images Shoot continuously as the camera...suit the shooting conditions. ●● For details on shooting conditions, camera settings, and the zoom position. Note that some types of memory cards may look grainy because the ISO speed (=73) is displayed. 3 Shoot. ●●Hold the shutter button all the way down ...
... camera will continue to adjust focus and image brightness where the blue frame is increased to [ ]. SD Speed Class 6 or higher memory cards are generated in one color Bold, distinctive-looking images Subdued, natural-looking images Moving Subjects (Sports) Still Images Shoot continuously as the camera...suit the shooting conditions. ●● For details on shooting conditions, camera settings, and the zoom position. Note that some types of memory cards may look grainy because the ISO speed (=73) is displayed. 3 Shoot. ●●Hold the shutter button all the way down ...

User Guide
Page 89
...Setting Menu 9 Accessories 10 Appendix Index 89 However, the compression process is irreversible, and images cannot be adjusted with minimal loss of Shots per Memory Card" (= 197). The data cannot be configured. ●● The file extension for JPEG images is .CR2. For details on resolution and...or printing. Additionally, noise reduction level (=74), i-Contrast (=75) and My Colors (=77) cannot be used in the camera for viewing on a card, see "Number of image quality. Records JPEG images. Image processing may also cause some loss of image quality. Records two images, both a RAW...
...Setting Menu 9 Accessories 10 Appendix Index 89 However, the compression process is irreversible, and images cannot be adjusted with minimal loss of Shots per Memory Card" (= 197). The data cannot be configured. ●● The file extension for JPEG images is .CR2. For details on resolution and...or printing. Additionally, noise reduction level (=74), i-Contrast (=75) and My Colors (=77) cannot be used in the camera for viewing on a card, see "Number of image quality. Records JPEG images. Image processing may also cause some loss of image quality. Records two images, both a RAW...

User Guide
Page 90
For guidelines on how many shots at the moment of Shots per Memory Card" (= 197). ●●Press the [ ] button, choose [ ] in the menu, and choose the desired option (= 29). Continuous Shoot Only* Off Optimal image stabilization for ... it still. Deactivates image stabilization. * The setting is changed to [Continuous] for the shooting conditions is active only at each compression ratio can fit on a memory card, see "Number of shooting. Changing the IS Mode Settings Still Images Movies 1 Access the setting screen. ●●Press the [ ] button, choose [IS Settings] ...
For guidelines on how many shots at the moment of Shots per Memory Card" (= 197). ●●Press the [ ] button, choose [ ] in the menu, and choose the desired option (= 29). Continuous Shoot Only* Off Optimal image stabilization for ... it still. Deactivates image stabilization. * The setting is changed to [Continuous] for the shooting conditions is active only at each compression ratio can fit on a memory card, see "Number of shooting. Changing the IS Mode Settings Still Images Movies 1 Access the setting screen. ●●Press the [ ] button, choose [IS Settings] ...

User Guide
Page 105
Finding Images Matching Specified Conditions Still Images Movies Find desired images quickly on a memory card full of images by pressing the [ ][ ] buttons. Displays images tagged as favorites (=115). Before Use Basic Guide Advanced Guide 1 Camera Basics 2 Auto Mode / Hybrid Auto ...
Finding Images Matching Specified Conditions Still Images Movies Find desired images quickly on a memory card full of images by pressing the [ ][ ] buttons. Displays images tagged as favorites (=115). Before Use Basic Guide Advanced Guide 1 Camera Basics 2 Auto Mode / Hybrid Auto ...

User Guide
Page 109
... menu screen, press the [ ] button. For fast-forward or fast-rewind, hold the [ ][ ] buttons down. Viewing Slideshows Still Images Movies Automatically play back images from a memory card as follows. 1 Access the setting screen. ●●Press the [ ] button, and then choose [Slideshow] on the [ ] tab (= 30). 2 Configure the setting. ●●Choose...
... menu screen, press the [ ] button. For fast-forward or fast-rewind, hold the [ ][ ] buttons down. Viewing Slideshows Still Images Movies Automatically play back images from a memory card as follows. 1 Access the setting screen. ●●Press the [ ] button, and then choose [Slideshow] on the [ ] tab (= 30). 2 Configure the setting. ●●Choose...

User Guide
Page 110
... you want to view next. ●●Your chosen image is displayed in the center, surrounded by the camera (= 112). After you format the card (=148, =149). ●● Protected images cannot be erased using the camera's erasure function. Choosing a Selection Method 1 Access the setting screen....an option as desired (=30). ●●To return to the menu screen, press the [ ] button. ●● Protected images on a memory card will be erased if you choose to prevent accidental erasure by the next four candidate images. ●●For full-screen display of the center...
... you want to view next. ●●Your chosen image is displayed in the center, surrounded by the camera (= 112). After you format the card (=148, =149). ●● Protected images cannot be erased using the camera's erasure function. Choosing a Selection Method 1 Access the setting screen....an option as desired (=30). ●●To return to the menu screen, press the [ ] button. ●● Protected images on a memory card will be erased if you choose to prevent accidental erasure by the next four candidate images. ●●For full-screen display of the center...

User Guide
Page 116
... computers running Windows 8 or Windows 7. (Does not apply to choose [OK], and then press the [ ] button. ●●The image is only available when the memory card has sufficient free space. Still Images Movies 1 Choose [Resize]. ●●Press the [ ] button and choose [Resize] on the [ ] tab (=30). 2 Choose an image. ●...
... computers running Windows 8 or Windows 7. (Does not apply to choose [OK], and then press the [ ] button. ●●The image is only available when the memory card has sufficient free space. Still Images Movies 1 Choose [Resize]. ●●Press the [ ] button and choose [Resize] on the [ ] tab (=30). 2 Choose an image. ●...
User Guide
Page 120
... panel, and (2) is in progress. ●● When editing movies, you move [ ]. In this case, the original movie will be erased. ●● If the memory card lacks sufficient space, only [Overwrite] will be cut. 3 Review the edited movie. ●●Press the [ ][ ] buttons to choose [ ], and then press the [ ] button. Cut...
... panel, and (2) is in progress. ●● When editing movies, you move [ ]. In this case, the original movie will be erased. ●● If the memory card lacks sufficient space, only [Overwrite] will be cut. 3 Review the edited movie. ●●Press the [ ][ ] buttons to choose [ ], and then press the [ ] button. Cut...

