User Guide
Page 3
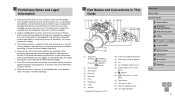
... thin plastic film for personal use , photography may appear as red or black dots. Preliminary Notes and Legal Information ●● Take and review some commercial settings. ●● The camera warranty is valid only in the area of purchase. Lock)] button (17) Tripod socket (18... (approx.) (12) Lens (13) Lens hood/filter adapter mount (14) [ (Framing Assist - If covered, remove the film before contacting a Canon Customer Support Help Desk. ●● Although the LCD monitor and viewfinder are not liable for any malfunction of a camera or accessory, including memory...
... thin plastic film for personal use , photography may appear as red or black dots. Preliminary Notes and Legal Information ●● Take and review some commercial settings. ●● The camera warranty is valid only in the area of purchase. Lock)] button (17) Tripod socket (18... (approx.) (12) Lens (13) Lens hood/filter adapter mount (14) [ (Framing Assist - If covered, remove the film before contacting a Canon Customer Support Help Desk. ●● Although the LCD monitor and viewfinder are not liable for any malfunction of a camera or accessory, including memory...
User Guide
Page 56
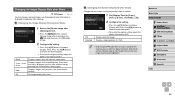
... Displays images only until you can shoot again. 2 sec., 4 sec., 8 sec. Changing the Image Display Period after Shots 1 Access the [Review image after shooting] screen. ●●Press the [ ] button, choose [Review image after shots. Displays only the image. Before Use Basic Guide Advanced Guide 1 Camera Basics 2 Auto Mode / Hybrid Auto Mode...
... Displays images only until you can shoot again. 2 sec., 4 sec., 8 sec. Changing the Image Display Period after Shots 1 Access the [Review image after shooting] screen. ●●Press the [ ] button, choose [Review image after shots. Displays only the image. Before Use Basic Guide Advanced Guide 1 Camera Basics 2 Auto Mode / Hybrid Auto Mode...
User Guide
Page 101
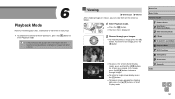
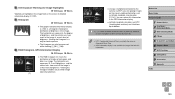
... Shooting Modes 4 P Mode 5 Tv, Av, M, C1, and C2 Mode 6 Playback Mode 7 Wi-Fi Functions 8 Setting Menu 9 Accessories 10 Appendix Index 101 6 Playback Mode Have fun reviewing your images. ●●To view the previous image, press the [ ] button. Viewing Still Images Movies After shooting images or movies, you can view them...
... Shooting Modes 4 P Mode 5 Tv, Av, M, C1, and C2 Mode 6 Playback Mode 7 Wi-Fi Functions 8 Setting Menu 9 Accessories 10 Appendix Index 101 6 Playback Mode Have fun reviewing your images. ●●To view the previous image, press the [ ] button. Viewing Still Images Movies After shooting images or movies, you can view them...
User Guide
Page 103
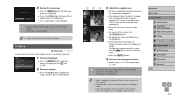
... information display. ●●Latitude, longitude, elevation, and UTC (shooting date and time) are listed from top to the camera via Wi-Fi, you can review this information.
... information display. ●●Latitude, longitude, elevation, and UTC (shooting date and time) are listed from top to the camera via Wi-Fi, you can review this information.
User Guide
Page 117
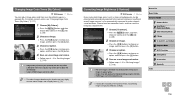
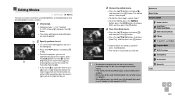
...the image to be cropped (1). ●●The original image is shown in the upper left, and a preview of the image as a new image and review. ●●Follow steps 4 - 5 in "Resizing Images" (= 116). ●● Editing is not possible for cropping will have the same aspect ...To change the frame orientation, press the [ ] button. ●●Faces detected in the image are enclosed in gray frames in the upper-left image. 5 Review the new image. ●●Press the [ ] button. [Display new image?] is displayed. ●●Press the [ ][ ] buttons to choose [Yes...
...the image to be cropped (1). ●●The original image is shown in the upper left, and a preview of the image as a new image and review. ●●Follow steps 4 - 5 in "Resizing Images" (= 116). ●● Editing is not possible for cropping will have the same aspect ...To change the frame orientation, press the [ ] button. ●●Faces detected in the image are enclosed in gray frames in the upper-left image. 5 Review the new image. ●●Press the [ ] button. [Display new image?] is displayed. ●●Press the [ ][ ] buttons to choose [Yes...
User Guide
Page 118
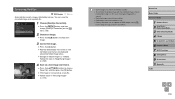
... 3 Choose an option. ●●Press the [ ][ ] buttons to choose an option, and then press the [ ] button. 4 Save as a new image and review. ●●Follow steps 4 - 5 in "Resizing Images" (= 116). ●● For some images, correction may be inaccurate or may cause images to appear grainy....9679; RAW images cannot be edited this function may vary slightly from four correction levels, and then save the edited image as a new image and review. ●●Follow steps 4 - 5 in "Resizing Images" (= 116). ●● Image quality of pictures you repeatedly edit this way...
... 3 Choose an option. ●●Press the [ ][ ] buttons to choose an option, and then press the [ ] button. 4 Save as a new image and review. ●●Follow steps 4 - 5 in "Resizing Images" (= 116). ●● For some images, correction may be inaccurate or may cause images to appear grainy....9679; RAW images cannot be edited this function may vary slightly from four correction levels, and then save the edited image as a new image and review. ●●Follow steps 4 - 5 in "Resizing Images" (= 116). ●● Image quality of pictures you repeatedly edit this way...
User Guide
Page 119
... Mode 6 Playback Mode 7 Wi-Fi Functions 8 Setting Menu 9 Accessories 10 Appendix Index 119 Follow the steps in "Magnifying Images" (= 108). 4 Save as a new image and review. ●●Press the buttons to choose [New File], and then press the [ ] button. ●●The image is now corrected, and frames are displayed...
... Mode 6 Playback Mode 7 Wi-Fi Functions 8 Setting Menu 9 Accessories 10 Appendix Index 119 Follow the steps in "Magnifying Images" (= 108). 4 Save as a new image and review. ●●Press the buttons to choose [New File], and then press the [ ] button. ●●The image is now corrected, and frames are displayed...
User Guide
Page 120
...] in step 4. Cut the (2) beginning of the movie (from [ ]) by choosing [ ], and cut the end of the movie by [ ] on the right will be cut. 3 Review the edited movie. ●●Press the [ ][ ] buttons to choose [ ], and then press the [ ] button. Editing Movies Still Images Movies You can cut movies to...
...] in step 4. Cut the (2) beginning of the movie (from [ ]) by choosing [ ], and cut the end of the movie by [ ] on the right will be cut. 3 Review the edited movie. ●●Press the [ ][ ] buttons to choose [ ], and then press the [ ] button. Editing Movies Still Images Movies You can cut movies to...
User Guide
Page 191
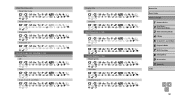
Wind filter/Attenuator Wind Filter: Auto *2 / *2 / / / // / ////// / / / / / Wind Filter: Off *2 / *2 / / / // / ////// / / / / / Attenuator: Off *2 / *2 / / / // / ////// / / / / / Attenuator: On *2 / *2 / / / // / ////// / / / / / Review image after shooting (=56) Display Time Off *2 / *2 / / / // / ////// / / / / / Quick *2 / *2 / / / // / ////// / / / / / 2 sec./4 sec./8 sec./Hold *2 / *2 / / / // / ////// / / / / / Display Info Off *2 / *2 Detailed *2 / *2 Blink Detection (=55) On *2 / *2 Off *2 / *2 Custom Display (=...
Wind filter/Attenuator Wind Filter: Auto *2 / *2 / / / // / ////// / / / / / Wind Filter: Off *2 / *2 / / / // / ////// / / / / / Attenuator: Off *2 / *2 / / / // / ////// / / / / / Attenuator: On *2 / *2 / / / // / ////// / / / / / Review image after shooting (=56) Display Time Off *2 / *2 / / / // / ////// / / / / / Quick *2 / *2 / / / // / ////// / / / / / 2 sec./4 sec./8 sec./Hold *2 / *2 / / / // / ////// / / / / / Display Info Off *2 / *2 Detailed *2 / *2 Blink Detection (=55) On *2 / *2 Off *2 / *2 Custom Display (=...


