User Guide
Page 3
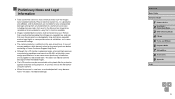
...; Images recorded by the camera shall be for protection against scratches during shipment. If covered, remove the film before contacting a Canon Customer Support Help Desk. ●● Although the LCD monitor is produced under extremely high-precision manufacturing conditions and more than 99... Tv, Av, and M Mode 6 Playback Mode 7 Setting Menu 8 Accessories 9 Appendix Index 3 Preliminary Notes and Legal Information ●● Take and review some commercial settings. ●● The camera warranty is valid only in the area of an image to be recorded or to make sure the...
...; Images recorded by the camera shall be for protection against scratches during shipment. If covered, remove the film before contacting a Canon Customer Support Help Desk. ●● Although the LCD monitor is produced under extremely high-precision manufacturing conditions and more than 99... Tv, Av, and M Mode 6 Playback Mode 7 Setting Menu 8 Accessories 9 Appendix Index 3 Preliminary Notes and Legal Information ●● Take and review some commercial settings. ●● The camera warranty is valid only in the area of an image to be recorded or to make sure the...

User Guide
Page 46
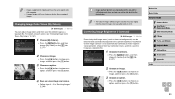
... [On]. Displays images until you press the shutter button halfway. Displays images for the specified time. Changing the Image Display Period after Shots 1 Access the [Review image after shooting] screen. ●●Press the [ ] button, choose [Review image after shooting. Changing the Image Display Style after shots.
... [On]. Displays images until you press the shutter button halfway. Displays images for the specified time. Changing the Image Display Period after Shots 1 Access the [Review image after shooting] screen. ●●Press the [ ] button, choose [Review image after shooting. Changing the Image Display Style after shots.

User Guide
Page 74
... 2 Auto Mode / Hybrid Auto Mode 3 Other Shooting Modes 4 P Mode 5 Tv, Av, and M Mode 6 Playback Mode 7 Setting Menu 8 Accessories 9 Appendix Index 74 6 Playback Mode Have fun reviewing your images. ●●To view the previous image, press the [ ] button. Viewing Still Images Movies After shooting images or movies, you can view them...
... 2 Auto Mode / Hybrid Auto Mode 3 Other Shooting Modes 4 P Mode 5 Tv, Av, and M Mode 6 Playback Mode 7 Setting Menu 8 Accessories 9 Appendix Index 74 6 Playback Mode Have fun reviewing your images. ●●To view the previous image, press the [ ] button. Viewing Still Images Movies After shooting images or movies, you can view them...

User Guide
Page 89
...●●Press the [ ][ ] buttons to choose [OK], and then press the [ ] button. ●●The image is now saved as a new file. 5 Review the new image. ●●Press the [ ] button. [Display new image?] is displayed. ●●Press the [ ][ ] buttons to choose [Yes], and then.... ●●Faces detected in the image are enclosed in gray frames in the upper-left , and a preview of the image as a new image and review. ●●Follow steps 4 - 5 in the lower right. To crop the image based on the [ ] tab (= 27). (1) (2) (3) 2 Choose an image. ●●...
...●●Press the [ ][ ] buttons to choose [OK], and then press the [ ] button. ●●The image is now saved as a new file. 5 Review the new image. ●●Press the [ ] button. [Display new image?] is displayed. ●●Press the [ ][ ] buttons to choose [Yes], and then.... ●●Faces detected in the image are enclosed in gray frames in the upper-left , and a preview of the image as a new image and review. ●●Follow steps 4 - 5 in the lower right. To crop the image based on the [ ] tab (= 27). (1) (2) (3) 2 Choose an image. ●●...
User Guide
Page 90
Insufficient overall image contrast is also automatically corrected, to choose an option, and then press the [ ] button. 4 Save as a new image and review. ●●Follow steps 4 - 5 in "Resizing Images" (= 88). ●● Image quality of pictures you may not be detected and automatically adjusted to choose an ...
Insufficient overall image contrast is also automatically corrected, to choose an option, and then press the [ ] button. 4 Save as a new image and review. ●●Follow steps 4 - 5 in "Resizing Images" (= 88). ●● Image quality of pictures you may not be detected and automatically adjusted to choose an ...

User Guide
Page 91
4 Save as a new image and review. ●●Follow steps 4 - 5 in step 4. In this function. ●● If [Auto] does not produce the expected results, try correcting images using [Low], [Medium], .... ●●Press the [ ] button. ●●Red-eye detected by red-eye. Follow the steps in "Magnifying Images" (= 80). 4 Save as a new image and review. ●●Press the buttons to appear grainy. ●● Images may look grainy after repeated editing using this case, the original image will be...
4 Save as a new image and review. ●●Follow steps 4 - 5 in step 4. In this function. ●● If [Auto] does not produce the expected results, try correcting images using [Low], [Medium], .... ●●Press the [ ] button. ●●Red-eye detected by red-eye. Follow the steps in "Magnifying Images" (= 80). 4 Save as a new image and review. ●●Press the buttons to appear grainy. ●● Images may look grainy after repeated editing using this case, the original image will be...

User Guide
Page 92
... in step 4. In this case, the original movie will be erased. ●● If the memory card lacks sufficient space, only [Overwrite] will be cut. 3 Review the edited movie. ●●Press the [ ][ ] buttons to move [ ]. Editing Movies Still Images Movies You can cut movies to remove unneeded portions at the...
... in step 4. In this case, the original movie will be erased. ●● If the memory card lacks sufficient space, only [Overwrite] will be cut. 3 Review the edited movie. ●●Press the [ ][ ] buttons to move [ ]. Editing Movies Still Images Movies You can cut movies to remove unneeded portions at the...

User Guide
Page 130
Red-Eye Corr. On Off / / / / / Red-Eye Lamp On/Off / / / / / / / / / Safety FE On / / / / Off i-Contrast (=60) Auto Off Safety Shift (=72) On / / / / / // / / / / / // / / / / / // / / / / / // / / / / / // / / / / / // / / / / / // / / / / / // Off / / // / / / Review image after shooting (=46) Display Time Off Quick / / / / / // / / // / / / 2 sec./4 sec./8 sec./Hold / / / / / Display Info Off / / / / / / / / / // Detailed / / / / / // Blink Detection (=45) On / / / / / // Off / / / / ...
Red-Eye Corr. On Off / / / / / Red-Eye Lamp On/Off / / / / / / / / / Safety FE On / / / / Off i-Contrast (=60) Auto Off Safety Shift (=72) On / / / / / // / / / / / // / / / / / // / / / / / // / / / / / // / / / / / // / / / / / // / / / / / // Off / / // / / / Review image after shooting (=46) Display Time Off Quick / / / / / // / / // / / / 2 sec./4 sec./8 sec./Hold / / / / / Display Info Off / / / / / / / / / // Detailed / / / / / // Blink Detection (=45) On / / / / / // Off / / / / ...


