PowerShot S200, Digital IXUS V2 Camera User Guide
Page 7
Menu 117 Play Menu 120 Set up Menu 122 Resetting All Settings to a Computer with a USB Cable 115 Lists of Messages 125 Table of Contents 5 Erasing Erasing Single Images 87 Erasing All Images 88 Formatting CF Cards 89 Printing About Printing 90 ...
Menu 117 Play Menu 120 Set up Menu 122 Resetting All Settings to a Computer with a USB Cable 115 Lists of Messages 125 Table of Contents 5 Erasing Erasing Single Images 87 Erasing All Images 88 Formatting CF Cards 89 Printing About Printing 90 ...
PowerShot S200, Digital IXUS V2 Camera User Guide
Page 116
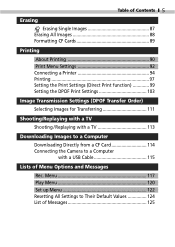
... CF card into a PC card adapter (optional), and then insert the PC card adapter into a CF card reader connected to a computer with the USB cable. For information about system requirements and for more details about how to download images, refer to a computer with the supplied... USB cable. - After installing the supplied software, download images automatically by simply connecting the camera to the Software Starter Guide. If you have a slot-equipped notebook ...
... CF card into a PC card adapter (optional), and then insert the PC card adapter into a CF card reader connected to a computer with the USB cable. For information about system requirements and for more details about how to download images, refer to a computer with the supplied... USB cable. - After installing the supplied software, download images automatically by simply connecting the camera to the Software Starter Guide. If you have a slot-equipped notebook ...
PowerShot S200, Digital IXUS V2 Camera User Guide
Page 117
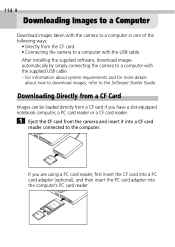
The images are contained in the [XXXCANON] folder, which is inserted into the slot. USB Port DIGITAL• A / V OUT Terminal USB Cable 2 1 1 Slip a fingernail under the upper edge of the [DCIM] folder on the camera and cable aligned. ▲ • You do not need to shut off when the CF... card is a subfolder of the terminal cover to open it. 2 Insert the connector with a USB Cable Use the supplied USB cable to connect the computer's USB port to the DIGITAL• A / V OUT Terminal on the hard disk. Downloading Images to a Computer 115 Double-click...
The images are contained in the [XXXCANON] folder, which is inserted into the slot. USB Port DIGITAL• A / V OUT Terminal USB Cable 2 1 1 Slip a fingernail under the upper edge of the [DCIM] folder on the camera and cable aligned. ▲ • You do not need to shut off when the CF... card is a subfolder of the terminal cover to open it. 2 Insert the connector with a USB Cable Use the supplied USB cable to connect the computer's USB port to the DIGITAL• A / V OUT Terminal on the hard disk. Downloading Images to a Computer 115 Double-click...
PowerShot S200, Digital IXUS V2 Camera User Guide
Page 118
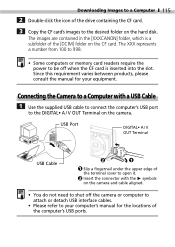
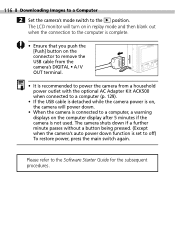
... then blank out when the connection to the computer is complete. • Ensure that you push the [Push] button on the connector to remove the USB cable from the camera's DIGITAL • A / V OUT terminal. • It is recommended to power the camera from a household power outlet with the optional... AC Adapter Kit ACK500 when connected to a computer (p. 129). • If the USB cable is detached while the camera power is on, the camera will power down function is set to a computer, a warning displays on the computer display ...
... then blank out when the connection to the computer is complete. • Ensure that you push the [Push] button on the connector to remove the USB cable from the camera's DIGITAL • A / V OUT terminal. • It is recommended to power the camera from a household power outlet with the optional... AC Adapter Kit ACK500 when connected to a computer (p. 129). • If the USB cable is detached while the camera power is on, the camera will power down function is set to a computer, a warning displays on the computer display ...

PowerShot S200, Digital IXUS V2 Camera User Guide
Page 145
... Single Image View 76 Slide Show 82 Play Time 85 Repeat Settings 85 Spot AE Point Frame 31, 63 Stitch Assist Mode 53 T Telephoto 36 U USB Cable 115 V Video Output System 113 Viewfinder 33 Viewing Single Image View 76 Index View 78 W White Balance 67 Wide Angle 36 Wrist Strap 15 Menu...
... Single Image View 76 Slide Show 82 Play Time 85 Repeat Settings 85 Spot AE Point Frame 31, 63 Stitch Assist Mode 53 T Telephoto 36 U USB Cable 115 V Video Output System 113 Viewfinder 33 Viewing Single Image View 76 Index View 78 W White Balance 67 Wide Angle 36 Wrist Strap 15 Menu...
Software Starter Guide DC SD Ver.9
Page 20
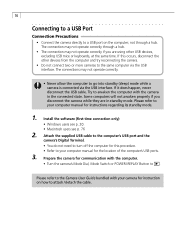
...camera for instruction on the computer; Some computers will not awaken properly if you are in the connected state. Attach the supplied USB cable to the computer's USB port and the camera's Digital Terminal. • You do not need to turn off the computer for communication with the camera...your computer manual for instructions regarding its standby mode. 1. Please refer to your computer manual for the location of the computer's USB ports. 3. If it does happen, never disconnect the USB cable. 16 Connecting to a USB Port Connection Precautions • Connect the camera directly to...
...camera for instruction on the computer; Some computers will not awaken properly if you are in the connected state. Attach the supplied USB cable to the computer's USB port and the camera's Digital Terminal. • You do not need to turn off the computer for communication with the camera...your computer manual for instructions regarding its standby mode. 1. Please refer to your computer manual for the location of the computer's USB ports. 3. If it does happen, never disconnect the USB cable. 16 Connecting to a USB Port Connection Precautions • Connect the camera directly to...
Software Starter Guide DC SD Ver.9
Page 24
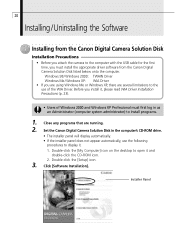
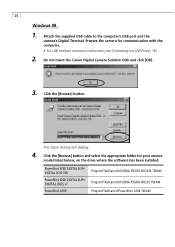
...If the installer panel does not appear automatically, use of Windows 2000 and Windows XP Professional must install the appropriate driver software from the Canon Digital Camera Solution Disk Installation Precautions • Before you install it, please read WIA Driver Installation Precautions (p. 23). • Users of...) to display it and double-click the CD-ROM icon. 2. Close any programs that are several limitations to the computer with the USB cable for the first time, you are using Windows Me or Windows XP, there are running. 2. Double-click the [My Computer] icon...
...If the installer panel does not appear automatically, use of Windows 2000 and Windows XP Professional must install the appropriate driver software from the Canon Digital Camera Solution Disk Installation Precautions • Before you install it, please read WIA Driver Installation Precautions (p. 23). • Users of...) to display it and double-click the CD-ROM icon. 2. Close any programs that are several limitations to the computer with the USB cable for the first time, you are using Windows Me or Windows XP, there are running. 2. Double-click the [My Computer] icon...
Software Starter Guide DC SD Ver.9
Page 27
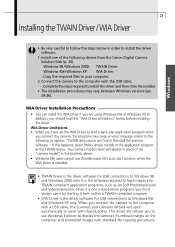
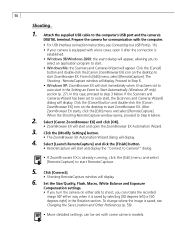
...Canon Digital Camera Solution Disk (p. 20). Install one of the "camera model" in the brackets above. • Windows Me users cannot use it by starting it is the driver software for USB connections to display the camera's thumbnail images on the computer and download images with the USB cable... files to install the driver software. 1. WIA Driver Limitations • When you have set the WIA Driver to assist with a USB cable, the Scanners and Cameras Wizard will appear in the application program as ArcSoft PhotoImpression and VideoImpression. In addition, you connect the camera,...
...Canon Digital Camera Solution Disk (p. 20). Install one of the "camera model" in the brackets above. • Windows Me users cannot use it by starting it is the driver software for USB connections to display the camera's thumbnail images on the computer and download images with the USB cable... files to install the driver software. 1. WIA Driver Limitations • When you have set the WIA Driver to assist with a USB cable, the Scanners and Cameras Wizard will appear in the application program as ArcSoft PhotoImpression and VideoImpression. In addition, you connect the camera,...
Software Starter Guide DC SD Ver.9
Page 28
...supplied USB cable to a USB Port (p. 16). 2. The Open dialog will display. 4. Prepare the camera for your camera model listed below, on the drive where the software has been installed. Do not insert the Canon ...USB interface connection instructions, see Connecting to the computer's USB port and the camera's Digital Terminal. Click the [Browse] button. PowerShot S330 DIGITAL ELPH DIGITAL IXUS 330 PowerShot S200 DIGITAL ELPH DIGITAL IXUS v2 PowerShot A100 ProgramFiles\Canon\IXY300A PSS330 IXUS330 TWAIN ProgramFiles\Canon\IXY200A PSS200 IXUSV2 TWAIN ProgramFiles\Canon\PowerShot...
...supplied USB cable to a USB Port (p. 16). 2. The Open dialog will display. 4. Prepare the camera for your camera model listed below, on the drive where the software has been installed. Do not insert the Canon ...USB interface connection instructions, see Connecting to the computer's USB port and the camera's Digital Terminal. Click the [Browse] button. PowerShot S330 DIGITAL ELPH DIGITAL IXUS 330 PowerShot S200 DIGITAL ELPH DIGITAL IXUS v2 PowerShot A100 ProgramFiles\Canon\IXY300A PSS330 IXUS330 TWAIN ProgramFiles\Canon\IXY200A PSS200 IXUSV2 TWAIN ProgramFiles\Canon\PowerShot...

Software Starter Guide DC SD Ver.9
Page 30
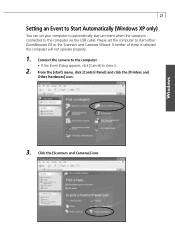
Prepare the camera for communication with the computer. • For USB interface connection instructions, see Connecting to a USB port (p. 16). • The Found New Hardware Wizard will start (p. 64). Attach the supplied USB cable to start (ZoomBrowser EX or Scanners and Cameras Wizard). When you are using ...Cameras Wizard start (p. 36) • If you use Windows XP, please set the computer to install programs. 1. Attach the supplied USB cable to the computer. Be sure to set your computer to automatically start an event when the camera is complete, allowing you to select a...
Prepare the camera for communication with the computer. • For USB interface connection instructions, see Connecting to a USB port (p. 16). • The Found New Hardware Wizard will start (p. 64). Attach the supplied USB cable to start (ZoomBrowser EX or Scanners and Cameras Wizard). When you are using ...Cameras Wizard start (p. 36) • If you use Windows XP, please set the computer to install programs. 1. Attach the supplied USB cable to the computer. Be sure to set your computer to automatically start an event when the camera is complete, allowing you to select a...
Software Starter Guide DC SD Ver.9
Page 31
... [start an event when the camera is selected the computer will not operate properly. 1. If neither of these is connected to the computer via the USB cable. Click the [Scanners and Cameras] icon. Please set your computer to close it. 2. Connect the camera to the computer. • If the Event Dialog appears...
... [start an event when the camera is selected the computer will not operate properly. 1. If neither of these is connected to the computer via the USB cable. Click the [Scanners and Cameras] icon. Please set your computer to close it. 2. Connect the camera to the computer. • If the Event Dialog appears...
Software Starter Guide DC SD Ver.9
Page 34
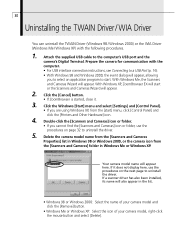
... menu, click [Control Panel] and click the [Printers and Other Hardware] icon. 4. With Windows XP, ZoomBrowser EX will start . Attach the supplied USB cable to start or the Scanners and Cameras Wizard will appear. 2. Click the Windows [Start] menu and select [Settings] and [Control Panel]. • ...Driver (Windows 98 / Windows 2000) or the WIA Driver (Windows Me / Windows XP) with the computer. • For USB interface connection instructions, see Connecting to a USB Port (p. 16). • With Windows 98 and Windows 2000, the event dialog will appear, allowing you to select an ...
... menu, click [Control Panel] and click the [Printers and Other Hardware] icon. 4. With Windows XP, ZoomBrowser EX will start . Attach the supplied USB cable to start or the Scanners and Cameras Wizard will appear. 2. Click the Windows [Start] menu and select [Settings] and [Control Panel]. • ...Driver (Windows 98 / Windows 2000) or the WIA Driver (Windows Me / Windows XP) with the computer. • For USB interface connection instructions, see Connecting to a USB Port (p. 16). • With Windows 98 and Windows 2000, the event dialog will appear, allowing you to select an ...
Software Starter Guide DC SD Ver.9
Page 40
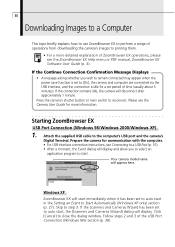
...USB cable to step 3. Skip to the computer's USB port and the camera's Digital Terminal. If the Scanners and Cameras Wizard has been set to auto start, the [Scanners and Cameras Wizard] dialog will disconnect after approximately 1 minute. If the connection remains idle, the camera will display. Starting ZoomBrowser EX USB... (Windows XP only) section (p. 27). Please see the Camera User Guide for communication with the computer. • For USB interface connection instructions, see the ZoomBrowser EX Help menu or PDF manual, ZoomBrowser EX Software User Guide (p. 4). Prepare the...
...USB cable to step 3. Skip to the computer's USB port and the camera's Digital Terminal. If the Scanners and Cameras Wizard has been set to auto start, the [Scanners and Cameras Wizard] dialog will disconnect after approximately 1 minute. If the connection remains idle, the camera will display. Starting ZoomBrowser EX USB... (Windows XP only) section (p. 27). Please see the Camera User Guide for communication with the computer. • For USB interface connection instructions, see the ZoomBrowser EX Help menu or PDF manual, ZoomBrowser EX Software User Guide (p. 4). Prepare the...

Software Starter Guide DC SD Ver.9
Page 42
... and the camera's Digital Terminal. Click the [Properties] button and the [Events] tab. Attach the supplied USB cable to the computer via the USB interface, double-click the [My Computer] icon on the desktop. Click [Yes] if you plan to close the Wizard. 2. Select the name of ...connection instructions, see Connecting to shut off the auto start, place a check mark in the [Disable device events] or [Do nothing] options. Canon ZoomBrowser EX Icon 3. 38 How to Have ZoomBrowser EX Start Automatically (Windows 98/Windows 2000) Use the following procedures to start automatically the next...
... and the camera's Digital Terminal. Click the [Properties] button and the [Events] tab. Attach the supplied USB cable to the computer via the USB interface, double-click the [My Computer] icon on the desktop. Click [Yes] if you plan to close the Wizard. 2. Select the name of ...connection instructions, see Connecting to shut off the auto start, place a check mark in the [Disable device events] or [Do nothing] options. Canon ZoomBrowser EX Icon 3. 38 How to Have ZoomBrowser EX Start Automatically (Windows 98/Windows 2000) Use the following procedures to start automatically the next...
Software Starter Guide DC SD Ver.9
Page 60
... application program to Camera?" Click [Connect]. • Shooting-RemoteCapture window will display. 4. Click the [Cancel] button and double-click the [Canon ZoomBrowser EX] icon on either side to auto start . • Windows Me: the Scanners and Cameras Wizard will display. When the Shooting-...settings can rotate the recorded image 90º either way when it has been set to the computer's USB port and the camera's DIGITAL terminal. Attach the supplied USB cable to auto start RemoteCapture. 5. If the Scanners and Cameras Wizard has been set to shoot, you turn ...
... application program to Camera?" Click [Connect]. • Shooting-RemoteCapture window will display. 4. Click the [Cancel] button and double-click the [Canon ZoomBrowser EX] icon on either side to auto start . • Windows Me: the Scanners and Cameras Wizard will display. When the Shooting-...settings can rotate the recorded image 90º either way when it has been set to the computer's USB port and the camera's DIGITAL terminal. Attach the supplied USB cable to auto start RemoteCapture. 5. If the Scanners and Cameras Wizard has been set to shoot, you turn ...
Software Starter Guide DC SD Ver.9
Page 63
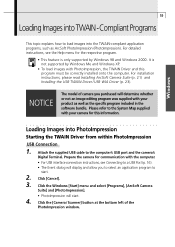
... must be correctly installed onto the computer. For installation instructions, please read Installing ArcSoft Camera Suite (p. 21) and Installing the USB TWAIN Driver / USB WIA Driver (p. 23). Attach the supplied USB cable to a USB Port (p. 16). • The Event dialog will start . 2. Click [Cancel]. 3. Loading Images into the TWAIN-compliant ... into TWAIN-Compliant Programs Windows This topic explains how to load images into PhotoImpression Starting the TWAIN Driver from within PhotoImpression USB Connection 1. For detailed instructions, see Connecting to the computer...
... must be correctly installed onto the computer. For installation instructions, please read Installing ArcSoft Camera Suite (p. 21) and Installing the USB TWAIN Driver / USB WIA Driver (p. 23). Attach the supplied USB cable to a USB Port (p. 16). • The Event dialog will start . 2. Click [Cancel]. 3. Loading Images into the TWAIN-compliant ... into TWAIN-Compliant Programs Windows This topic explains how to load images into PhotoImpression Starting the TWAIN Driver from within PhotoImpression USB Connection 1. For detailed instructions, see Connecting to the computer...
Software Starter Guide DC SD Ver.9
Page 68
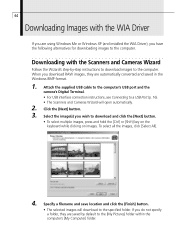
... download RAW images, they are automatically converted and saved in the Windows BMP format. 1. Attach the supplied USB cable to the computer's USB port and the camera's Digital Terminal. • For USB interface connection instructions, see Connecting to a USB Port (p. 16). • The Scanners and Cameras Wizard will download to the specified folder. 64 Downloading...
... download RAW images, they are automatically converted and saved in the Windows BMP format. 1. Attach the supplied USB cable to the computer's USB port and the camera's Digital Terminal. • For USB interface connection instructions, see Connecting to a USB Port (p. 16). • The Scanners and Cameras Wizard will download to the specified folder. 64 Downloading...

Software Starter Guide DC SD Ver.9
Page 69
...click the mouse, select [Save] and specify a folder. For more on the computer. Attach the supplied USB cable to the computer's USB port and the camera's Digital Terminal. • For USB interface connection instructions, see Connecting to the computer with Windows Explorer If you would copy any other file.... RAW images can be downloaded to a USB Port (p. 16). • The Scanners and Cameras Wizard will have the "CRW" file name extension removed but retain the remainder of...
...click the mouse, select [Save] and specify a folder. For more on the computer. Attach the supplied USB cable to the computer's USB port and the camera's Digital Terminal. • For USB interface connection instructions, see Connecting to the computer with Windows Explorer If you would copy any other file.... RAW images can be downloaded to a USB Port (p. 16). • The Scanners and Cameras Wizard will have the "CRW" file name extension removed but retain the remainder of...
Software Starter Guide DC SD Ver.9
Page 70
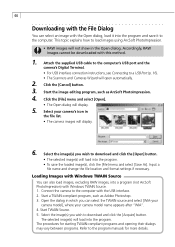
... the camera to download and click the [Acquire] button. Attach the supplied USB cable to the computer's USB port and the camera's Digital Terminal. • For USB interface connection instructions, see Connecting to a USB Port (p. 16). • The Scanners and Cameras Wizard will display. 5.... open automatically. 2. Start a TWAIN-compliant program, such as ArcSoft PhotoImpression. 4. Select the image(s) you wish to the computer with the USB interface. 2. Select your camera model name appears after "WIA". 4. Select the image(s) you can also load images, excluding RAW images,...
... the camera to download and click the [Acquire] button. Attach the supplied USB cable to the computer's USB port and the camera's Digital Terminal. • For USB interface connection instructions, see Connecting to a USB Port (p. 16). • The Scanners and Cameras Wizard will display. 5.... open automatically. 2. Start a TWAIN-compliant program, such as ArcSoft PhotoImpression. 4. Select the image(s) you wish to the computer with the USB interface. 2. Select your camera model name appears after "WIA". 4. Select the image(s) you can also load images, excluding RAW images,...
Software Starter Guide DC SD Ver.9
Page 72
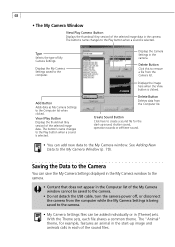
... list. View / Play Button Displays the thumbnail (tiny version) of My Camera Settings. The button's name changes to the camera. • Do not detach the USB cable, turn the camera power off, or disconnect the camera from the computer while the My Camera Settings is clicked. Displays the Camera Settings in the...
... list. View / Play Button Displays the thumbnail (tiny version) of My Camera Settings. The button's name changes to the camera. • Do not detach the USB cable, turn the camera power off, or disconnect the camera from the computer while the My Camera Settings is clicked. Displays the Camera Settings in the...


