
Camera User Guide
Page 2
... NB-9L* Compact Power Adapter CA-DC30/ CA-DC30E Interface Cable IFC-400PCU Wrist Strap * Do not peel off the battery pack label. ●● Printed matter is also included. ●● A memory card is missing, contact your camera retailer. Before Use Basic Guide Advanced Guide 1 ...
... NB-9L* Compact Power Adapter CA-DC30/ CA-DC30E Interface Cable IFC-400PCU Wrist Strap * Do not peel off the battery pack label. ●● Printed matter is also included. ●● A memory card is missing, contact your camera retailer. Before Use Basic Guide Advanced Guide 1 ...
Camera User Guide
Page 4
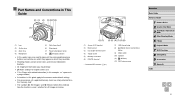
...) ●● Instructions in brackets. ●● : Important information you should know ●● : Notes and tips for still images or movies. (1) Screen (LCD monitor) (2) Battery cover (3) DC coupler terminal cover (4) Tripod socket (5) Memory card cover (6) DIGITAL terminal * Used with NFC features (=81). (7) USB charge lamp (8) [ (Mobile Device Connection)] button (9) Mode...
...) ●● Instructions in brackets. ●● : Important information you should know ●● : Notes and tips for still images or movies. (1) Screen (LCD monitor) (2) Battery cover (3) DC coupler terminal cover (4) Tripod socket (5) Memory card cover (6) DIGITAL terminal * Used with NFC features (=81). (7) USB charge lamp (8) [ (Mobile Device Connection)] button (9) Mode...

Camera User Guide
Page 5
... 14 Touch-Screen Operations 14 Touching 14 Dragging 14 Initial Preparations 15 Attaching the Strap 15 Inserting and Charging the Battery Pack 15 Using a Computer to Charge the Battery 16 Removing the Battery Pack 17 Inserting the Memory Card 17 Removing the Memory Card 17 Setting the Date and Time 17 Changing the...
... 14 Touch-Screen Operations 14 Touching 14 Dragging 14 Initial Preparations 15 Attaching the Strap 15 Inserting and Charging the Battery Pack 15 Using a Computer to Charge the Battery 16 Removing the Battery Pack 17 Inserting the Memory Card 17 Removing the Memory Card 17 Setting the Date and Time 17 Changing the...

Camera User Guide
Page 8
... Other Settings 110 Restoring Defaults 110 9 Accessories 111 System Map 111 Optional Accessories 112 Power Supplies 112 Printer 112 Using Optional Accessories 113 Charging Battery Pack by Battery Charger 113 Powering the Camera with Household Power 113 Using the Software 114 Software 114 Software Instruction Manual 114 Computer Connections via a Cable 115...
... Other Settings 110 Restoring Defaults 110 9 Accessories 111 System Map 111 Optional Accessories 112 Power Supplies 112 Printer 112 Using Optional Accessories 113 Charging Battery Pack by Battery Charger 113 Powering the Camera with Household Power 113 Using the Software 114 Software 114 Software Instruction Manual 114 Computer Connections via a Cable 115...

Camera User Guide
Page 9
...Removing All Images from a Photobook 120 10 Appendix 121 Troubleshooting 121 On-Screen Messages 125 On-Screen Information 127 Shooting (Information Display 127 Battery Level 127 Playback (Detailed Information Display 128 Summary of 4:3 Shots per Memory Card 134 Recording Time per Memory Card 134 Flash Range 134... Shooting Range 135 Continuous Shooting Speed 135 Shutter Speed 135 Aperture 135 Battery Pack NB-9L 135 Compact Power Adapter CA-DC30/CA-DC30E 135 Index 136 Wi-Fi (Wireless LAN) Precautions 138 Radio Wave...
...Removing All Images from a Photobook 120 10 Appendix 121 Troubleshooting 121 On-Screen Messages 125 On-Screen Information 127 Shooting (Information Display 127 Battery Level 127 Playback (Detailed Information Display 128 Summary of 4:3 Shots per Memory Card 134 Recording Time per Memory Card 134 Flash Range 134... Shooting Range 135 Continuous Shooting Speed 135 Shutter Speed 135 Aperture 135 Battery Pack NB-9L 135 Compact Power Adapter CA-DC30/CA-DC30E 135 Index 136 Wi-Fi (Wireless LAN) Precautions 138 Radio Wave...

Camera User Guide
Page 11
... keys) to also check the guides included with liquid, and do not allow dust or metal objects (such as inside , remove the battery pack/batteries or unplug immediately. ●● Do not look through the viewfinder (if your product uses a power cord, mistakenly winding the cord around... a child's neck may cause the battery pack/batteries to people's eyes. If your model has one) at least 1 meter (3.3 feet) away from being injured or incurring property damage. ●●...
... keys) to also check the guides included with liquid, and do not allow dust or metal objects (such as inside , remove the battery pack/batteries or unplug immediately. ●● Do not look through the viewfinder (if your product uses a power cord, mistakenly winding the cord around... a child's neck may cause the battery pack/batteries to people's eyes. If your model has one) at least 1 meter (3.3 feet) away from being injured or incurring property damage. ●●...

Camera User Guide
Page 12
...emitted from the broken fragments. ●● When using the flash, be careful not to cover it may crack, and the shards of the battery pack/batteries, resulting in injury. Before Use Basic Guide Advanced Guide 1 Camera Basics 2 Creative Shot Mode 3 Auto Mode / Hybrid Auto Mode 4 Other...camera. ●● Be careful not to subject the screen to malfunction. ●● Remove and store the battery pack/batteries when you discard the battery pack/batteries, cover the terminals with the lowering flash. Caution Denotes the possibility of injury. ●● When carrying the ...
...emitted from the broken fragments. ●● When using the flash, be careful not to cover it may crack, and the shards of the battery pack/batteries, resulting in injury. Before Use Basic Guide Advanced Guide 1 Camera Basics 2 Creative Shot Mode 3 Auto Mode / Hybrid Auto Mode 4 Other...camera. ●● Be careful not to subject the screen to malfunction. ●● Remove and store the battery pack/batteries when you discard the battery pack/batteries, cover the terminals with the lowering flash. Caution Denotes the possibility of injury. ●● When carrying the ...

Camera User Guide
Page 13
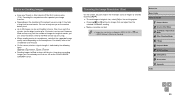
.../ Hybrid Auto Mode 4 Other Shooting Modes 5 P Mode 6 Playback Mode 7 Wi-Fi Functions 8 Setting Menu 9 Accessories 10 Appendix Index 13 ●● Unplug any battery charger used with the product when not in use. Doing so may be lost because a magnet (1) is attached to the back of time may cause...Also close the screen (so that hard objects do not use . Do not cover with a cloth or other objects when in use old and new batteries together. terminals reversed. Leaving the unit plugged in for a long period of the screen. ●● Do not attach any hard objects to ...
.../ Hybrid Auto Mode 4 Other Shooting Modes 5 P Mode 6 Playback Mode 7 Wi-Fi Functions 8 Setting Menu 9 Accessories 10 Appendix Index 13 ●● Unplug any battery charger used with the product when not in use. Doing so may be lost because a magnet (1) is attached to the back of time may cause...Also close the screen (so that hard objects do not use . Do not cover with a cloth or other objects when in use old and new batteries together. terminals reversed. Leaving the unit plugged in for a long period of the screen. ●● Do not attach any hard objects to ...

Camera User Guide
Page 15
...1 Open the cover. ●●Slide the cover (1) and open it (2). 2 Insert the battery pack. ●●Holding the battery pack with the terminals (1) facing as you insert the battery pack facing the wrong way, it clicks into the correct position. Attaching the Strap ●●Thread...Mode 7 Wi-Fi Functions 8 Setting Menu 9 Accessories 10 Appendix Index 15 Inserting and Charging the Battery Pack Install and charge the battery pack in the direction of the arrow and insert the battery pack until the lock clicks shut. ●●If you slide it, until it cannot be ...
...1 Open the cover. ●●Slide the cover (1) and open it (2). 2 Insert the battery pack. ●●Holding the battery pack with the terminals (1) facing as you insert the battery pack facing the wrong way, it clicks into the correct position. Attaching the Strap ●●Thread...Mode 7 Wi-Fi Functions 8 Setting Menu 9 Accessories 10 Appendix Index 15 Inserting and Charging the Battery Pack Install and charge the battery pack in the direction of the arrow and insert the battery pack until the lock clicks shut. ●●If you slide it, until it cannot be ...

Camera User Guide
Page 16
...Install the memory card to the camera (=17) before ) the day of the interface cable into the included compact power adapter. 5 Charge the battery pack. ●●CA-DC30: Flip out the plug (1) and plug the compact power adapter into a power outlet (2). ●●CA-DC30E...interface cable into a computer's USB terminal in step 4 of the computer. Also note that use an electrical transformer designed for traveling, which may damage the battery pack. Before Use Basic Guide Advanced Guide 1 Camera Basics 2 Creative Shot Mode 3 Auto Mode / Hybrid Auto Mode 4 Other Shooting Modes 5 P Mode...
...Install the memory card to the camera (=17) before ) the day of the interface cable into the included compact power adapter. 5 Charge the battery pack. ●●CA-DC30: Flip out the plug (1) and plug the compact power adapter into a power outlet (2). ●●CA-DC30E...interface cable into a computer's USB terminal in step 4 of the computer. Also note that use an electrical transformer designed for traveling, which may damage the battery pack. Before Use Basic Guide Advanced Guide 1 Camera Basics 2 Creative Shot Mode 3 Auto Mode / Hybrid Auto Mode 4 Other Shooting Modes 5 P Mode...

Camera User Guide
Page 17
... ●●Open the cover and press the battery lock in the direction of 4:3 Shots per Memory Card" (= 134). Inserting the Memory Card Insert a memory card (sold separately). Note that before using a new memory ...; For guidelines on how many shots or hours of recording can be saved on one memory card, see "Number of the arrow. ●●The battery pack will pop up . Setting the Date and Time Set the current date and time correctly as follows if the [Date/Time] screen is displayed...
... ●●Open the cover and press the battery lock in the direction of 4:3 Shots per Memory Card" (= 134). Inserting the Memory Card Insert a memory card (sold separately). Note that before using a new memory ...; For guidelines on how many shots or hours of recording can be saved on one memory card, see "Number of the arrow. ●●The battery pack will pop up . Setting the Date and Time Set the current date and time correctly as follows if the [Date/Time] screen is displayed...

Camera User Guide
Page 18
...9679; To set the date, time, and home time zone, the [Date/ Time] screen will be charged in about 4 hours once you charge the battery or connect the camera to choose your home time zone. 4 Finish the setup process. ●●Touch [OK] when finished. Changing the Date and ... ●● Date/time settings can be retained for about 3 weeks by the camera's built-in date/time battery (backup battery) after the battery pack is removed. ●● The date/time battery will be displayed when you turn off the camera, press the power button. ●● Unless you set daylight...
...9679; To set the date, time, and home time zone, the [Date/ Time] screen will be charged in about 4 hours once you charge the battery or connect the camera to choose your home time zone. 4 Finish the setup process. ●●Touch [OK] when finished. Changing the Date and ... ●● Date/time settings can be retained for about 3 weeks by the camera's built-in date/time battery (backup battery) after the battery pack is removed. ●● The date/time battery will be displayed when you turn off the camera, press the power button. ●● Unless you set daylight...

Camera User Guide
Page 24
... 6 Playback Mode 7 Wi-Fi Functions 8 Setting Menu 9 Accessories 10 Appendix Index 24 Power Saving in all the way down . 1 Press halfway. (Press lightly to conserve battery power, the camera automatically deactivates the screen (Display Off) and then turns itself off but the lens is retracted and the camera turns itself off...
... 6 Playback Mode 7 Wi-Fi Functions 8 Setting Menu 9 Accessories 10 Appendix Index 24 Power Saving in all the way down . 1 Press halfway. (Press lightly to conserve battery power, the camera automatically deactivates the screen (Display Off) and then turns itself off but the lens is retracted and the camera turns itself off...

Camera User Guide
Page 29
...;Available input modes vary depending on the camera status. Deleting Characters ●●Touch [ ] to a computer (=115), or display off , open the memory card or battery cover, or shake or jolt the camera, which may corrupt images or damage the camera or memory card. Indicator Display The indicator of information you...
...;Available input modes vary depending on the camera status. Deleting Characters ●●Touch [ ] to a computer (=115), or display off , open the memory card or battery cover, or shake or jolt the camera, which may corrupt images or damage the camera or memory card. Indicator Display The indicator of information you...

Camera User Guide
Page 36
... Range" (= 134). ●● The subject may be too close if the camera only beeps once when you press the shutter ring halfway. ●● Battery life is shorter in this case, mount the camera on a tripod or take other measures to keep it still. ●● If your previous shot...
... Range" (= 134). ●● The subject may be too close if the camera only beeps once when you press the shutter ring halfway. ●● Battery life is shorter in this case, mount the camera on a tripod or take other measures to keep it still. ●● If your previous shot...

Camera User Guide
Page 78
... of movie] is displayed. ●●Touching [ ] when it is displayed will be available. ●● Movies may not be saved if the battery pack runs out while saving is now saved as a new file. ●●To cancel trimming, touch [Cancel]. ●●To clear your trimming ...[Cut Beginning] or [Cut End]. ●●[Cut Beginning] removes the beginning of the movie, up to the end when you should use a fully charged battery pack or an AC adapter kit (sold separately, =112). Before Use Basic Guide Advanced Guide 1 Camera Basics 2 Creative Shot Mode 3 Auto Mode / Hybrid ...
... of movie] is displayed. ●●Touching [ ] when it is displayed will be available. ●● Movies may not be saved if the battery pack runs out while saving is now saved as a new file. ●●To cancel trimming, touch [Cancel]. ●●To clear your trimming ...[Cut Beginning] or [Cut End]. ●●[Cut Beginning] removes the beginning of the movie, up to the end when you should use a fully charged battery pack or an AC adapter kit (sold separately, =112). Before Use Basic Guide Advanced Guide 1 Camera Basics 2 Creative Shot Mode 3 Auto Mode / Hybrid ...
Camera User Guide
Page 99
... (=4). However, Web services may take less time when resending images you have already sent that are still on the CANON iMAGE GATEWAY server. Be sure to keep an eye on the camera battery level. ●● Up to 50 images can send. For details, refer to the Web service you are using...
... (=4). However, Web services may take less time when resending images you have already sent that are still on the CANON iMAGE GATEWAY server. Be sure to keep an eye on the camera battery level. ●● Up to 50 images can send. For details, refer to the Web service you are using...

Camera User Guide
Page 101
...it on the screen. 2 Save the images to the computer. ●●Images are automatically saved to the computer when you should use a fully charged battery pack or an AC adapter kit (sold separately, =112). When the images have already assigned [ ] to the [ ] button, press the [ ...Choose the type of images to send (only when sending movies with images). ●●Touch [ ], touch [ ], choose [Wi-Fi Settings] on the CANON iMAGE GATEWAY server. Before Use Basic Guide Advanced Guide 1 Camera Basics 2 Creative Shot Mode 3 Auto Mode / Hybrid Auto Mode 4 Other Shooting Modes 5 P ...
...it on the screen. 2 Save the images to the computer. ●●Images are automatically saved to the computer when you should use a fully charged battery pack or an AC adapter kit (sold separately, =112). When the images have already assigned [ ] to the [ ] button, press the [ ...Choose the type of images to send (only when sending movies with images). ●●Touch [ ], touch [ ], choose [Wi-Fi Settings] on the CANON iMAGE GATEWAY server. Before Use Basic Guide Advanced Guide 1 Camera Basics 2 Creative Shot Mode 3 Auto Mode / Hybrid Auto Mode 4 Other Shooting Modes 5 P ...

Camera User Guide
Page 108
... card capacity indicated on the formatting screen may be less than the advertised capacity. Using Eco Mode This function allows you to conserve battery power in another device, you should format the card with this camera. Before formatting, copy images on the memory card to a ...-Fi Functions 8 Setting Menu 9 Accessories 10 Appendix Index 108 approximately ten seconds after approximately three minutes of memory cards, take other steps to reduce battery consumption. 1 Configure the setting. ●●Choose [Eco Mode], and then choose [On]. ●●[ ] is now shown on the ...
... card capacity indicated on the formatting screen may be less than the advertised capacity. Using Eco Mode This function allows you to conserve battery power in another device, you should format the card with this camera. Before formatting, copy images on the memory card to a ...-Fi Functions 8 Setting Menu 9 Accessories 10 Appendix Index 108 approximately ten seconds after approximately three minutes of memory cards, take other steps to reduce battery consumption. 1 Configure the setting. ●●Choose [Eco Mode], and then choose [On]. ●●[ ] is now shown on the ...

Camera User Guide
Page 111
... Mode 7 Wi-Fi Functions 8 Setting Menu 9 Accessories 10 Appendix Index 111 Use of genuine Canon accessories is designed to achieve excellent performance when used with optional Canon accessories and other compatible accessories sold separately System Map Included Accessories Battery Pack NB-9L* Compact Power Adapter CA-DC30/ CA-DC30E Wrist strap Interface Cable...
... Mode 7 Wi-Fi Functions 8 Setting Menu 9 Accessories 10 Appendix Index 111 Use of genuine Canon accessories is designed to achieve excellent performance when used with optional Canon accessories and other compatible accessories sold separately System Map Included Accessories Battery Pack NB-9L* Compact Power Adapter CA-DC30/ CA-DC30E Wrist strap Interface Cable...