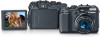

PowerShot G11 Camera User Guide
Page 8
...Printing from the Print List (DPOF 143 Choosing Images for Printing (DPOF 144 8 Customizing the Camera.....147 Changing Functions 148 Changing Shooting Functions........152 Registering Commonly Used Shooting Menus 157 Changing Playback Functions .......158 Changing the Start-up Image or Sound 159 9 Useful Information 161 Using Household Power 162 Using... an Externally Mounted Flash (Sold Separately 167 Troubleshooting 175 List of Messages that Appear on the Screen 178 Functions Available in Each Shooting Mode 180 Menus 182 Handling Precautions 186 Specifications 187 Index 191 8
...Printing from the Print List (DPOF 143 Choosing Images for Printing (DPOF 144 8 Customizing the Camera.....147 Changing Functions 148 Changing Shooting Functions........152 Registering Commonly Used Shooting Menus 157 Changing Playback Functions .......158 Changing the Start-up Image or Sound 159 9 Useful Information 161 Using Household Power 162 Using... an Externally Mounted Flash (Sold Separately 167 Troubleshooting 175 List of Messages that Appear on the Screen 178 Functions Available in Each Shooting Mode 180 Menus 182 Handling Precautions 186 Specifications 187 Index 191 8

PowerShot G11 Camera User Guide
Page 18
... shots that can be taken? Can you check the number of shots that can be taken will not be taken when the camera is in a Shooting mode (p. 25). SD and SDHC memory cards have a write-protect tab. If this tab is in the locked position, [Card locked!] will appear on the screen...
... shots that can be taken? Can you check the number of shots that can be taken will not be taken when the camera is in a Shooting mode (p. 25). SD and SDHC memory cards have a write-protect tab. If this tab is in the locked position, [Card locked!] will appear on the screen...

PowerShot G11 Camera User Guide
Page 19
... Disp.] from the 4 tab, and press the qr buttons to right (mirror image). Always keep the LCD monitor closed with the screen facing outwards. In shooting mode, if the screen is not in Step 2, the image will be flipped from you). Approx. 180° Approx. 90° Approx. 170° Rotate ...the LCD monitor. ● Rotate the LCD monitor 180° toward the lens (turn the top edge of the LCD monitor to compose pictures before shooting, operate menus or play back images. Using the LCD Monitor You can freely adjust the angle and orientation of the LCD monitor away from left...
... Disp.] from the 4 tab, and press the qr buttons to right (mirror image). Always keep the LCD monitor closed with the screen facing outwards. In shooting mode, if the screen is not in Step 2, the image will be flipped from you). Approx. 180° Approx. 90° Approx. 170° Rotate ...the LCD monitor. ● Rotate the LCD monitor 180° toward the lens (turn the top edge of the LCD monitor to compose pictures before shooting, operate menus or play back images. Using the LCD Monitor You can freely adjust the angle and orientation of the LCD monitor away from left...

PowerShot G11 Camera User Guide
Page 28
..., while turning it clockwise displays images in the order they were taken. ● Pressing the shutter button halfway in Playback mode switches the camera to Shooting mode. ● The lens will appear. Enter Playback mode. ● Press the 1 button. Choose an image. ● Pressing the q button will cycle through the images in reverse order...
..., while turning it clockwise displays images in the order they were taken. ● Pressing the shutter button halfway in Playback mode switches the camera to Shooting mode. ● The lens will appear. Enter Playback mode. ● Press the 1 button. Choose an image. ● Pressing the q button will cycle through the images in reverse order...
PowerShot G11 Camera User Guide
Page 42
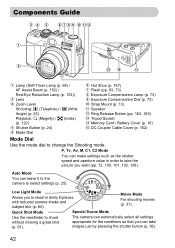
...Lamp (p. 68) / AF Assist Beam (p. 152) / Red-Eye Reduction Lamp (p. 153)) Lens Zoom Lever Shooting: i (Telephoto) / j (Wide Angle) (p. 25) Playback: k (Magnify) / g (Index) (p. 122) Shutter Button (p. 24) Mode Dial Hot Shoe (p. 167) Flash (pp. 63, 73) Exposure Compensation Lamp (p. 73) Exposure Compensation Dial ...Battery Cover (p. 16) DC Coupler Cable Cover (p. 162) Mode Dial Use the mode dial to select settings (p. 25). Quick Shot Mode Special Scene Mode Use the viewfinder to take (p. 61). P, Tv, Av, M, C1, C2 Mode You can leave it to the camera to change the Shooting mode.
...Lamp (p. 68) / AF Assist Beam (p. 152) / Red-Eye Reduction Lamp (p. 153)) Lens Zoom Lever Shooting: i (Telephoto) / j (Wide Angle) (p. 25) Playback: k (Magnify) / g (Index) (p. 122) Shutter Button (p. 24) Mode Dial Hot Shoe (p. 167) Flash (pp. 63, 73) Exposure Compensation Lamp (p. 73) Exposure Compensation Dial ...Battery Cover (p. 16) DC Coupler Cable Cover (p. 162) Mode Dial Use the mode dial to select settings (p. 25). Quick Shot Mode Special Scene Mode Use the viewfinder to take (p. 61). P, Tv, Av, M, C1, C2 Mode You can leave it to the camera to change the Shooting mode.
PowerShot G11 Camera User Guide
Page 44
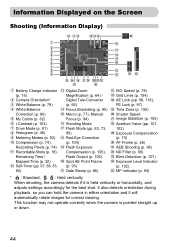
Information Displayed on the Screen Shooting (Information Display) Battery Charge Indicator (p. 15) Camera Orientation* White Balance (p. 79) White Balance Correction (p. 80) My Colors (p. 82) i-Contrast (p. 103) Drive Mode (p. 81) Histogram (p. 46) Metering Modes (p. 93) Compression (p. 74), Recording Pixels (p. 74) ...84) Digital Zoom Magnification (p. 64) / Digital Tele-Converter (p. 65) Focus Bracketing (p. 95) Macro (p. 77), Manual Focus (p. 94) Shooting Mode Flash Mode (pp. 63, 73, 99) Red-Eye Correction (p. 104) Flash Exposure Compensation (p. 105), Flash Output (p. 106) Spot AE Point ...
Information Displayed on the Screen Shooting (Information Display) Battery Charge Indicator (p. 15) Camera Orientation* White Balance (p. 79) White Balance Correction (p. 80) My Colors (p. 82) i-Contrast (p. 103) Drive Mode (p. 81) Histogram (p. 46) Metering Modes (p. 93) Compression (p. 74), Recording Pixels (p. 74) ...84) Digital Zoom Magnification (p. 64) / Digital Tele-Converter (p. 65) Focus Bracketing (p. 95) Macro (p. 77), Manual Focus (p. 94) Shooting Mode Flash Mode (pp. 63, 73, 99) Red-Eye Correction (p. 104) Flash Exposure Compensation (p. 105), Flash Output (p. 106) Spot AE Point ...
PowerShot G11 Camera User Guide
Page 45
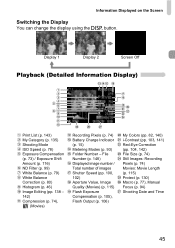
...) Still Images: Recording Pixels (p. 74) Movies: Movie Length (p. 115) Protect (p. 130) Macro (p. 77), Manual Focus (p. 94) Shooting Date and Time 45 Display 1 Display 2 Screen Off Playback (Detailed Information Display) Print List (p. 143) My Category (p. 135) Shooting Mode ISO Speed (p. 78) Exposure Compensation (p. 73) / Exposure Shift Amount (p. 116) ND Filter (p. 99) White Balance (p. 79...
...) Still Images: Recording Pixels (p. 74) Movies: Movie Length (p. 115) Protect (p. 130) Macro (p. 77), Manual Focus (p. 94) Shooting Date and Time 45 Display 1 Display 2 Screen Off Playback (Detailed Information Display) Print List (p. 143) My Category (p. 135) Shooting Mode ISO Speed (p. 78) Exposure Compensation (p. 73) / Exposure Shift Amount (p. 116) ND Filter (p. 99) White Balance (p. 79...

PowerShot G11 Camera User Guide
Page 48
.... ● Press the op buttons to the desired shooting mode. Basic Operations Commonly used shooting functions can also choose settings by pressing the l button on options that display . X The available options for the menu item appear in the lower part of the screen. X The shooting screen will reappear and the setting you chose will.... The menu items and options differ depending on the screen. 48 Make the setting. ● Press the m button. FUNC. menu. ● Press the m button. Choose a shooting mode. ● Set the mode dial to choose a menu item.
.... ● Press the op buttons to the desired shooting mode. Basic Operations Commonly used shooting functions can also choose settings by pressing the l button on options that display . X The available options for the menu item appear in the lower part of the screen. X The shooting screen will reappear and the setting you chose will.... The menu items and options differ depending on the screen. 48 Make the setting. ● Press the m button. FUNC. menu. ● Press the m button. Choose a shooting mode. ● Set the mode dial to choose a menu item.

PowerShot G11 Camera User Guide
Page 55
... Flash Off" (p. 63) to take an optimized picture. • This chapter assumes the mode dial is press the shutter button to "Using the Face Self-Timer" (p. 68). All you choose a Shooting mode that mode (pp. 180 - 183). 55 When shooting in a scene mode, check which functions are available in different conditions, as well as how to...
... Flash Off" (p. 63) to take an optimized picture. • This chapter assumes the mode dial is press the shutter button to "Using the Face Self-Timer" (p. 68). All you choose a Shooting mode that mode (pp. 180 - 183). 55 When shooting in a scene mode, check which functions are available in different conditions, as well as how to...

PowerShot G11 Camera User Guide
Page 56
... Conditions The camera will select the necessary settings for the conditions in which you wish to choose a shooting mode. Shoot. F Take snapshots at night (Night Snapshot) ● Lets you take pictures with reduced camera shake, even without a tripod. 56 I Take portraits (Portrait) ● Produces a soft... (Landscape) ● Lets you can take beautiful snapshots of people against city nightscapes or night backgrounds. ● If you hold the camera firmly, you shoot majestic landscapes. Choose a Shooting mode. ● Set the mode dial to K. ● Turn the  dial to...
... Conditions The camera will select the necessary settings for the conditions in which you wish to choose a shooting mode. Shoot. F Take snapshots at night (Night Snapshot) ● Lets you take pictures with reduced camera shake, even without a tripod. 56 I Take portraits (Portrait) ● Produces a soft... (Landscape) ● Lets you can take beautiful snapshots of people against city nightscapes or night backgrounds. ● If you hold the camera firmly, you shoot majestic landscapes. Choose a Shooting mode. ● Set the mode dial to K. ● Turn the  dial to...

PowerShot G11 Camera User Guide
Page 60
Set the camera to ● Set the mode dial to M size (1824 x 1368). 60 In Low Light mode, recording pixels are fixed to Shoot. mode. . Recommended for shooting in dark places with reduced camera shake and subject blur. Shooting in Mode (Low Light Mode) The ISO speed will be set higher and the shutter speed faster than in A mode so that you can shoot in candlelight or similarly lit scenes. Depending on the scene, the ISO speed will be set automatically between ISO320 and ISO12800.
Set the camera to ● Set the mode dial to M size (1824 x 1368). 60 In Low Light mode, recording pixels are fixed to Shoot. mode. . Recommended for shooting in dark places with reduced camera shake and subject blur. Shooting in Mode (Low Light Mode) The ISO speed will be set higher and the shutter speed faster than in A mode so that you can shoot in candlelight or similarly lit scenes. Depending on the scene, the ISO speed will be set automatically between ISO320 and ISO12800.

PowerShot G11 Camera User Guide
Page 73
... choose h, then press the m button. X Once set by the camera in 1/3-stop increments in AEB, (p. 98), the AEB exposure compensation range will appear. 73 X In shooting modes that allow exposure correction the exposure compensation lamp lights orange. Adjusting the Brightness (Exposure Compensation) You can make the flash fire every time you...
... choose h, then press the m button. X Once set by the camera in 1/3-stop increments in AEB, (p. 98), the AEB exposure compensation range will appear. 73 X In shooting modes that allow exposure correction the exposure compensation lamp lights orange. Adjusting the Brightness (Exposure Compensation) You can make the flash fire every time you...

PowerShot G11 Camera User Guide
Page 77
...it. Choose e. ● Press the q button to the maximum j). The edges of the image may darken if the flash fires. 77 How can shoot an object at the same time. Be sure to use the supplied software to transfer both the RAW images and the JPEG images that were... recorded at a close -ups? • You are recommended to attach the camera to a tripod and shoot in . - 1.6 ft.) from the end of the lens (when the zoom lever is pushed to choose e. X The shooting mode will appear. Shooting Close-ups (Macro) Choose [Record + ]. ● Press the n button, choose [Record + ] from the 4...
...it. Choose e. ● Press the q button to the maximum j). The edges of the image may darken if the flash fires. 77 How can shoot an object at the same time. Be sure to use the supplied software to transfer both the RAW images and the JPEG images that were... recorded at a close -ups? • You are recommended to attach the camera to a tripod and shoot in . - 1.6 ft.) from the end of the lens (when the zoom lever is pushed to choose e. X The shooting mode will appear. Shooting Close-ups (Macro) Choose [Record + ]. ● Press the n button, choose [Record + ] from the 4...

PowerShot G11 Camera User Guide
Page 78
...the ISO speed results in sharper images, but there may be automatically selected (in D, will display on the shooting scene. (p. 60) 78 If is insufficient to reduce blurring, you are recommended to use mode (p. 60). • When the camera is not available, the ISO speed lamp will not light, and ...will be an increased chance of image blurring in certain shooting conditions. • Raising the ISO speed results in A mode, depending on the screen. X If the chosen ISO setting is set to , you chose will be set ISO speed. •...
...the ISO speed results in sharper images, but there may be automatically selected (in D, will display on the shooting scene. (p. 60) 78 If is insufficient to reduce blurring, you are recommended to use mode (p. 60). • When the camera is not available, the ISO speed lamp will not light, and ...will be an increased chance of image blurring in certain shooting conditions. • Raising the ISO speed results in A mode, depending on the screen. X If the chosen ISO setting is set to , you chose will be set ISO speed. •...

PowerShot G11 Camera User Guide
Page 108
...saved. Settings that usually cancel (self timer, etc.) will not be reflected in the shooting menu • Zoom position • Manual focus position (p. 94) • My Menu items (p. 157) Enter the Shooting mode you want to or and choose [Reset All] (p. 52). 108 These settings will ...be Registered • Shooting modes (G, M, B or D) • Items set in G, M, B or D (pp. 73 - 102) • Items in other Shooting modes. • To return contents registered to or to the default settings, turn the  dial to...
...saved. Settings that usually cancel (self timer, etc.) will not be reflected in the shooting menu • Zoom position • Manual focus position (p. 94) • My Menu items (p. 157) Enter the Shooting mode you want to or and choose [Reset All] (p. 52). 108 These settings will ...be Registered • Shooting modes (G, M, B or D) • Items set in G, M, B or D (pp. 73 - 102) • Items in other Shooting modes. • To return contents registered to or to the default settings, turn the  dial to...

PowerShot G11 Camera User Guide
Page 114
E Standard > Color Accent z Color Swap Normal mode. See "Changing the Color and Shooting" (p. 109) for another color, when shooting. Choose a Movie mode. ● Turn the  dial to black and white, or exchange the chosen color for details. These Shooting modes let you change all colors except the chosen color to choose a Shooting mode. Under some conditions, colors may not turn out as expected in the > and z mode. 114 Set the mode dial to E. Changing the Movie Mode You can choose between three Movie modes.
E Standard > Color Accent z Color Swap Normal mode. See "Changing the Color and Shooting" (p. 109) for another color, when shooting. Choose a Movie mode. ● Turn the  dial to black and white, or exchange the chosen color for details. These Shooting modes let you change all colors except the chosen color to choose a Shooting mode. Under some conditions, colors may not turn out as expected in the > and z mode. 114 Set the mode dial to E. Changing the Movie Mode You can choose between three Movie modes.

PowerShot G11 Camera User Guide
Page 149
... Retract Time For safety reasons, the lens retracts about 1 minute after use. 149 Turning off the camera after pressing the 1 button when in a Shooting mode (p. 28). You can set the retraction time to [0 sec.]. ● Choose [Lens Retract], then press the qr buttons to [Off]. Setting it ... [Create Folder] and press the qr buttons to choose [Daily]. ● Images will be saved into folders created each shooting date. Changing Functions Creating Folders by Shooting Date Images are saved into folders created on each month, however, you set the power saving function to [Off], be ...
... Retract Time For safety reasons, the lens retracts about 1 minute after use. 149 Turning off the camera after pressing the 1 button when in a Shooting mode (p. 28). You can set the retraction time to [0 sec.]. ● Choose [Lens Retract], then press the qr buttons to [Off]. Setting it ... [Create Folder] and press the qr buttons to choose [Daily]. ● Images will be saved into folders created each shooting date. Changing Functions Creating Folders by Shooting Date Images are saved into folders created on each month, however, you set the power saving function to [Off], be ...

PowerShot G11 Camera User Guide
Page 155
... does not work when the camera is only active at the moment of shooting. This area will not print when printing on the Shooting mode. Gray items can confirm the result directly on . You can also be saved. Shooting Info Displays shooting information (p. 44). Continuous Image stabilization is recommended to a tripod. It is always on...
... does not work when the camera is only active at the moment of shooting. This area will not print when printing on the Shooting mode. Gray items can confirm the result directly on . You can also be saved. Shooting Info Displays shooting information (p. 44). Continuous Image stabilization is recommended to a tripod. It is always on...

PowerShot G11 Camera User Guide
Page 156
...the bottom right of an icon, the function cannot be used in , the screen will • If you press the button in the current Shooting mode or function setting. • In and , each press of the button records white balance data (p. 79), and the white balance settings change ... button], then press the m button. ● Press the opqr buttons or turn off. Perform one of the appear on the screen. Changing Shooting Functions Registering Functions to solve the problem. • Press any button other than the power button • Change the camera's vertical or horizontal orientation...
...the bottom right of an icon, the function cannot be used in , the screen will • If you press the button in the current Shooting mode or function setting. • In and , each press of the button records white balance data (p. 79), and the white balance settings change ... button], then press the m button. ● Press the opqr buttons or turn off. Perform one of the appear on the screen. Changing Shooting Functions Registering Functions to solve the problem. • Press any button other than the power button • Change the camera's vertical or horizontal orientation...

PowerShot G11 Camera User Guide
Page 158
... Displays in Playback ● Choose [Resume], then press the qr buttons to choose [Yes]. My Menu can now be available depending on the Shooting mode. • Choose [Set default view] and press the qr buttons to choose an option. Last seen Last shot Resumes with the most recently ...shot image. 158 Changing Playback Functions You can adjust the settings in the 1 tab by pressing the n button when in a shooting mode. Resumes with the image last viewed. Changing Playback Functions • Gray items in Step 2 can also be set, however, they may not be ...
... Displays in Playback ● Choose [Resume], then press the qr buttons to choose [Yes]. My Menu can now be available depending on the Shooting mode. • Choose [Set default view] and press the qr buttons to choose an option. Last seen Last shot Resumes with the most recently ...shot image. 158 Changing Playback Functions You can adjust the settings in the 1 tab by pressing the n button when in a shooting mode. Resumes with the image last viewed. Changing Playback Functions • Gray items in Step 2 can also be set, however, they may not be ...


