
ZoomBrowser EX 5.6 Software User Guide
Page 15
...button, the (Print/ Share) button will blink and a Direct Transfer menu, like the one shown below right, will appear on the camera's LCD monitor. IMPORTANT • Check to the computer that support the direct transfer function. ■ Downloading Images with cameras that were recorded using camera ...that displays. This method can use this method to download images with Computer Commands This method uses commands entered on the camera's LCD monitor, you cannot download images using the Sound Recorder feature. If your camera supports the direct transfer function or not. Chapter ...
...button, the (Print/ Share) button will blink and a Direct Transfer menu, like the one shown below right, will appear on the camera's LCD monitor. IMPORTANT • Check to the computer that support the direct transfer function. ■ Downloading Images with cameras that were recorded using camera ...that displays. This method can use this method to download images with Computer Commands This method uses commands entered on the camera's LCD monitor, you cannot download images using the Sound Recorder feature. If your camera supports the direct transfer function or not. Chapter ...

ZoomBrowser EX 5.6 Software User Guide
Page 16
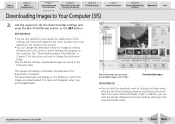
... newly downloaded images in the (Show Information) menu. Table of the settings and commands related to the Direct Transfer menu that appears on the camera's LCD monitor. • You can change the destination folder for instructions on how to change the destination folder. • By the default settings, downloaded images are... you can hide the download mark by selecting [Clear Download Marks]. 16 Back Next REFERENCE • See the user guides for your camera model or [Canon Camera] is selected and click [OK].
... newly downloaded images in the (Show Information) menu. Table of the settings and commands related to the Direct Transfer menu that appears on the camera's LCD monitor. • You can change the destination folder for instructions on how to change the destination folder. • By the default settings, downloaded images are... you can hide the download mark by selecting [Clear Download Marks]. 16 Back Next REFERENCE • See the user guides for your camera model or [Canon Camera] is selected and click [OK].

ZoomBrowser EX 5.6 Software User Guide
Page 24
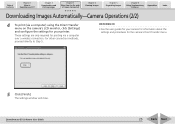
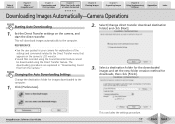
... Chapter 5 Organizing Images Chapter 6 Using Supplementary Features Appendices Index Downloading Images Automatically-Camera Operations (1/2) Starting Auto Downloading 1. Set the Direct Transfer settings on the camera's LCD monitor. • Sound files recorded using the Sound Recorder feature cannot be downloaded using the Direct Transfer feature. Proceed to the computer.
... Chapter 5 Organizing Images Chapter 6 Using Supplementary Features Appendices Index Downloading Images Automatically-Camera Operations (1/2) Starting Auto Downloading 1. Set the Direct Transfer settings on the camera's LCD monitor. • Sound files recorded using the Sound Recorder feature cannot be downloaded using the Direct Transfer feature. Proceed to the computer.
ZoomBrowser EX 5.6 Software User Guide
Page 25
... 5. ZoomBrowser EX Software User Guide 25 Back Next These settings are only required for printing via a computer) using the Direct Transfer menu on the camera's LCD monitor, click [Settings] and configure the settings for your camera for information about the settings and procedures for your printer.
... 5. ZoomBrowser EX Software User Guide 25 Back Next These settings are only required for printing via a computer) using the Direct Transfer menu on the camera's LCD monitor, click [Settings] and configure the settings for your camera for information about the settings and procedures for your printer.
ZoomBrowser EX 5.6 Software User Guide
Page 53
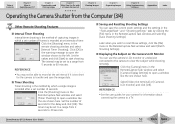
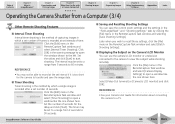
...camera to 30 seconds. ■ Saving and Recalling Shooting Settings You can use the camera's LCD monitor or a television connected to the camera to start shooting. Select [Video Out terminal] or [Camera's LCD monitor] and click [OK]. Click the [Shooting] menu in the warning message to open a..., click the [File] menu in the RemoteCapture Task window and select [Batch Shooting Settings]. ■ Displaying the Subject on the Camera's LCD Monitor You can save the image data. ■ Timer Shooting Timer shooting is ZoomBrowser EX? ZoomBrowser EX Software User Guide 53 Back Next ...
...camera to 30 seconds. ■ Saving and Recalling Shooting Settings You can use the camera's LCD monitor or a television connected to the camera to start shooting. Select [Video Out terminal] or [Camera's LCD monitor] and click [OK]. Click the [Shooting] menu in the warning message to open a..., click the [File] menu in the RemoteCapture Task window and select [Batch Shooting Settings]. ■ Displaying the Subject on the Camera's LCD Monitor You can save the image data. ■ Timer Shooting Timer shooting is ZoomBrowser EX? ZoomBrowser EX Software User Guide 53 Back Next ...

ImageBrowser 5.6 Software User Guide
Page 9
...Please see your camera features a (Print/Share) button, it will appear on the camera's LCD monitor. Camera Control Window REFERENCE • If the Direct Transfer menu does not appear on the camera's LCD monitor, you do not wish the Camera Control Window to the lower right one will blink and...) if the Camera Control Window does not display. • If you cannot download images using camera procedures. • The content on the LCD monitor and the method for information on how to connect the camera to select between camera models. ImageBrowser Software User Guide • If a ...
...Please see your camera features a (Print/Share) button, it will appear on the camera's LCD monitor. Camera Control Window REFERENCE • If the Direct Transfer menu does not appear on the camera's LCD monitor, you do not wish the Camera Control Window to the lower right one will blink and...) if the Camera Control Window does not display. • If you cannot download images using camera procedures. • The content on the LCD monitor and the method for information on how to connect the camera to select between camera models. ImageBrowser Software User Guide • If a ...
ImageBrowser 5.6 Software User Guide
Page 10
.... In addition, you quit ImageBrowser. ImageBrowser Software User Guide 10 Back Next Use the camera to Your Computer (3/5) 2. The mark will display on the camera's LCD monitor. • You can clear the already displayed download marks by clicking the [View] menu, selecting the [View Settings] submenu and clearing the check mark...
.... In addition, you quit ImageBrowser. ImageBrowser Software User Guide 10 Back Next Use the camera to Your Computer (3/5) 2. The mark will display on the camera's LCD monitor. • You can clear the already displayed download marks by clicking the [View] menu, selecting the [View Settings] submenu and clearing the check mark...
ImageBrowser 5.6 Software User Guide
Page 17
... commands related to the Direct Transfer menu that appears on the camera, and start the direct transfer. Set the Direct Transfer settings on the camera's LCD monitor. • Sound files recorded using the Sound Recorder feature cannot be downloaded using the Direct Transfer feature. REFERENCE • See the user guides for...
... commands related to the Direct Transfer menu that appears on the camera, and start the direct transfer. Set the Direct Transfer settings on the camera's LCD monitor. • Sound files recorded using the Sound Recorder feature cannot be downloaded using the Direct Transfer feature. REFERENCE • See the user guides for...
ImageBrowser 5.6 Software User Guide
Page 44
...recorded at the set interval if it is ImageBrowser? ImageBrowser Software User Guide ■ Saving and Recalling Shooting Settings You can use the camera's LCD monitor or a television connected to the camera to start shooting. Click [OK] in the warning message to open a window like the one ...settings, click the [File] menu in the RemoteCapture Task window and select [Batch Shooting Settings]. ■ Displaying the Subject on the Camera's LCD Monitor You can save the image data. ■ Timer Shooting Timer shooting is the method by clicking the [File] menu in the RemoteCapture Task...
...recorded at the set interval if it is ImageBrowser? ImageBrowser Software User Guide ■ Saving and Recalling Shooting Settings You can use the camera's LCD monitor or a television connected to the camera to start shooting. Click [OK] in the warning message to open a window like the one ...settings, click the [File] menu in the RemoteCapture Task window and select [Batch Shooting Settings]. ■ Displaying the Subject on the Camera's LCD Monitor You can save the image data. ■ Timer Shooting Timer shooting is the method by clicking the [File] menu in the RemoteCapture Task...
ImageBrowser 5.6 Software User Guide
Page 130
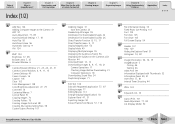
... Area 7, 47 Browser Window 6 C Camera Browser Window 21, 23, 24, 27, 31 Camera Control Window 6, 9, 11, 15 Camera Settings 40 Canon Camera 16 Caption 105 Clear 103 Color Management 128 Color/Brightness Adjustment 77, 79 Comment 74 Contextual Menus 7 Control Panel 51 Copying Images 70 Creating... menu 9, 17 Display Magnification 54 Display Mode 49 Displaying Multiple Images 55 Displaying the Autofocus Frame 56 Displaying the Subject on the Camera's LCD Monitor 44 Download Mark 10, 12 Downloading Images 8, 9, 17, 18, 21 Camera Operations 17 Checking Images before Downloading 21 Computer Operations ...
... Area 7, 47 Browser Window 6 C Camera Browser Window 21, 23, 24, 27, 31 Camera Control Window 6, 9, 11, 15 Camera Settings 40 Canon Camera 16 Caption 105 Clear 103 Color Management 128 Color/Brightness Adjustment 77, 79 Comment 74 Contextual Menus 7 Control Panel 51 Copying Images 70 Creating... menu 9, 17 Display Magnification 54 Display Mode 49 Displaying Multiple Images 55 Displaying the Autofocus Frame 56 Displaying the Subject on the Camera's LCD Monitor 44 Download Mark 10, 12 Downloading Images 8, 9, 17, 18, 21 Camera Operations 17 Checking Images before Downloading 21 Computer Operations ...

Direct Print User Guide
Page 2
... The button blinks during printing. Connect the camera to the printer with an appropriate cable and confirm the icon displayed in the camera's LCD monitor. • For instructions on camera and printer connection methods, please refer to the procedure below, confirm the section and page you •... cannot be used. • When the printer is ready for printing, the button lights in blue. Icons displayed in the camera's LCD monitor Confirming the section that Applies to You Operations differ according to you should read in this user guide. ENGLISH Introduction -Confirm Your Printer...
... The button blinks during printing. Connect the camera to the printer with an appropriate cable and confirm the icon displayed in the camera's LCD monitor. • For instructions on camera and printer connection methods, please refer to the procedure below, confirm the section and page you •... cannot be used. • When the printer is ready for printing, the button lights in blue. Icons displayed in the camera's LCD monitor Confirming the section that Applies to You Operations differ according to you should read in this user guide. ENGLISH Introduction -Confirm Your Printer...

Direct Print User Guide
Page 12
Printing with SELPHY CP Series Printers using PictBridge Printing Easy Print You can print images by pressing only one button after connecting the camera to change the print settings, see Print after Changing the Print Settings (p. 11). 10 If you wish to print and press the 2 button. Make sure that displays in the upper left corner of the LCD monitor. 1 Display the images you wish to the printer.
Printing with SELPHY CP Series Printers using PictBridge Printing Easy Print You can print images by pressing only one button after connecting the camera to change the print settings, see Print after Changing the Print Settings (p. 11). 10 If you wish to print and press the 2 button. Make sure that displays in the upper left corner of the LCD monitor. 1 Display the images you wish to the printer.

Direct Print User Guide
Page 13
... order screen appears. Select [Print] and press the SET button. • The image will start to Printing with SELPHY CP Series Printers using Canon Direct Print (p. 53). Make sure that displays in the upper left corner of copies (p. 14) Sets the trimming portion (p. 15) Sets the... Starts the printing process Print Order Screen 3 Select print settings as needed. and the file number for printing (p. 13) 2 Depending on the LCD monitor, please refer to print and, when it is completely 4 finished, the display will not take place. 11 Print after Changing the Print ...
... order screen appears. Select [Print] and press the SET button. • The image will start to Printing with SELPHY CP Series Printers using Canon Direct Print (p. 53). Make sure that displays in the upper left corner of copies (p. 14) Sets the trimming portion (p. 15) Sets the... Starts the printing process Print Order Screen 3 Select print settings as needed. and the file number for printing (p. 13) 2 Depending on the LCD monitor, please refer to print and, when it is completely 4 finished, the display will not take place. 11 Print after Changing the Print ...

Direct Print User Guide
Page 20
... properly depending on the trimming setting. • The paper size and page layout settings determine the shape of the trimming frame. • Please use the LCD monitor to one image. • The trimming setting is canceled with the following operations. • When you set the trimming settings for another image. •...
... properly depending on the trimming setting. • The paper size and page layout settings determine the shape of the trimming frame. • Please use the LCD monitor to one image. • The trimming setting is canceled with the following operations. • When you set the trimming settings for another image. •...

Direct Print User Guide
Page 25
... that displays on your camera. • The shape of Setting the Printing Area (Trimming) (p. 16 and p. 17) on the specified print size. • Use the LCD monitor to specify the print size settings. Trimming Frame The trimming setting screen differs depending on a TV screen. 23 The trimming frame may not display...
... that displays on your camera. • The shape of Setting the Printing Area (Trimming) (p. 16 and p. 17) on the specified print size. • Use the LCD monitor to specify the print size settings. Trimming Frame The trimming setting screen differs depending on a TV screen. 23 The trimming frame may not display...

Direct Print User Guide
Page 27
Select and choose [Single]. 3 Select and set . 4 25 Refer to Viewing Movies section of the Camera User Guide on how to display the movie frame you wish to print on a sheet of prints. 1 to 99 copies can choose a single frame from a movie and print it on the LCD monitor, select (Print), then press the SET button. Single-frame You can be set the number of paper. 2 Movie Control Panel Display the frame you wish to print, then press the SET 1 button. Printing Movies (Movie Print) Select the movie you want to print. The movie control panel appears.
Select and choose [Single]. 3 Select and set . 4 25 Refer to Viewing Movies section of the Camera User Guide on how to display the movie frame you wish to print on a sheet of prints. 1 to 99 copies can choose a single frame from a movie and print it on the LCD monitor, select (Print), then press the SET button. Single-frame You can be set the number of paper. 2 Movie Control Panel Display the frame you wish to print, then press the SET 1 button. Printing Movies (Movie Print) Select the movie you want to print. The movie control panel appears.
Direct Print User Guide
Page 33
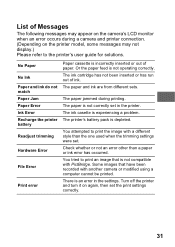
... that is not compatible with another camera or modified using a computer cannot be printed. List of Messages The following messages may appear on the camera's LCD monitor when an error occurs during printing. Check whether or not an error other than the one used when the trimming settings were set the...
... that is not compatible with another camera or modified using a computer cannot be printed. List of Messages The following messages may appear on the camera's LCD monitor when an error occurs during printing. Check whether or not an error other than the one used when the trimming settings were set the...

Direct Print User Guide
Page 34
If you wish to the printer. Make sure that displays in the upper left corner of the LCD monitor. 1 Display the images you wish to change the print settings, see Print after connecting the camera to print and press the 2 button. Printing with Bubble Jet Printers (PIXMA series/ SELPHY DS series) using PictBridge Printing Easy Print You can print images by pressing only one button after Changing the Print Settings (p. 33). 32
If you wish to the printer. Make sure that displays in the upper left corner of the LCD monitor. 1 Display the images you wish to change the print settings, see Print after connecting the camera to print and press the 2 button. Printing with Bubble Jet Printers (PIXMA series/ SELPHY DS series) using PictBridge Printing Easy Print You can print images by pressing only one button after Changing the Print Settings (p. 33). 32

Direct Print User Guide
Page 35
... 42) Starts the printing process Print Order Screen 3 Select print settings as needed. the file number for printing (p. 35) 2 Depending on the LCD monitor, please refer to the standard playback mode and printing will revert to Printing with Bubble Jet Printers using Bubble Jet Direct (p. 71). Select [Print...to print and press the SET effect (p. 36) button. Sets the date and The print order screen appears. Sets the number of the LCD monitor. 1 If displays on the printer model, some setting options may not display. Display the images you press the MENU button, the ...
... 42) Starts the printing process Print Order Screen 3 Select print settings as needed. the file number for printing (p. 35) 2 Depending on the LCD monitor, please refer to the standard playback mode and printing will revert to Printing with Bubble Jet Printers using Bubble Jet Direct (p. 71). Select [Print...to print and press the SET effect (p. 36) button. Sets the date and The print order screen appears. Sets the number of the LCD monitor. 1 If displays on the printer model, some setting options may not display. Display the images you press the MENU button, the ...

Direct Print User Guide
Page 43
... properly depending on the trimming setting. • The paper size and page layout settings determine the shape of the trimming frame. • Please use the LCD monitor to one image. • The trimming setting is canceled with the following operations. • When you set the trimming settings for another image. •...
... properly depending on the trimming setting. • The paper size and page layout settings determine the shape of the trimming frame. • Please use the LCD monitor to one image. • The trimming setting is canceled with the following operations. • When you set the trimming settings for another image. •...


