User Guide
Page 1
... you can access topics by clicking their titles. 1 Camera Basics 2 Smart Auto Mode 3 Other Shooting Modes 4 P Mode 5 Playback Mode 6 Setting Menu 7 Accessories 8 Appendix Index ©CANON INC. 2013 CDD-E525-010 1 From chapter title pages, you clicked a link • To jump to access other pages. : Next page : Previous page : Page before...
... you can access topics by clicking their titles. 1 Camera Basics 2 Smart Auto Mode 3 Other Shooting Modes 4 P Mode 5 Playback Mode 6 Setting Menu 7 Accessories 8 Appendix Index ©CANON INC. 2013 CDD-E525-010 1 From chapter title pages, you clicked a link • To jump to access other pages. : Next page : Previous page : Page before...
User Guide
Page 2
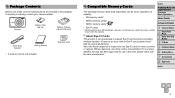
Warranty Card Compatible Memory Cards The following items are included in the package. Camera Battery Pack NB-11L Battery Charger CB-2LF/CB-2LFE Wrist Strap WS-800 Getting Started • A memory card is missing, contact your camera retailer. If it is unclear whether the card has been approved for use of the card is not permitted. If anything is not included. About Eye-Fi Cards This product is required to use Eye-Fi cards in the area, please check with the card manufacturer. Cover Preliminary Notes and Legal Information Contents: Basic Operations Basic Guide ...
Warranty Card Compatible Memory Cards The following items are included in the package. Camera Battery Pack NB-11L Battery Charger CB-2LF/CB-2LFE Wrist Strap WS-800 Getting Started • A memory card is missing, contact your camera retailer. If it is unclear whether the card has been approved for use of the card is not permitted. If anything is not included. About Eye-Fi Cards This product is required to use Eye-Fi cards in the area, please check with the card manufacturer. Cover Preliminary Notes and Legal Information Contents: Basic Operations Basic Guide ...
User Guide
Page 3
..., it may contravene copyright or other legal rights at some performances or exhibitions, or in some pixels may appear as red or black dots. Cover Preliminary Notes and Legal Information Contents: Basic Operations Basic Guide Advanced Guide 1 Camera Basics 2 Smart Auto Mode 3 ...Other Shooting Modes 4 P Mode 5 Playback Mode 6 Setting Menu 7 Accessories 8 Appendix Index 3 If covered, remove the film before contacting a Canon Customer Support Help Desk. • Although the LCD monitor is machine readable. • Images recorded by the camera are not liable for any malfunction...
..., it may contravene copyright or other legal rights at some performances or exhibitions, or in some pixels may appear as red or black dots. Cover Preliminary Notes and Legal Information Contents: Basic Operations Basic Guide Advanced Guide 1 Camera Basics 2 Smart Auto Mode 3 ...Other Shooting Modes 4 P Mode 5 Playback Mode 6 Setting Menu 7 Accessories 8 Appendix Index 3 If covered, remove the film before contacting a Canon Customer Support Help Desk. • Although the LCD monitor is machine readable. • Images recorded by the camera are not liable for any malfunction...
User Guide
Page 4
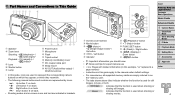
Screen (LCD monitor) Movie button / / Up button < > / Left button Indicator button < (Help)> button FUNC./SET button / Right button / Down button button • : Important information you should know • : Notes and tips for expert camera use • =xx: Pages with related information (in this guide apply to the camera under default settings. • For convenience, all supported memory cards are represented by icons. Up button on back Left button on back Right button on back Down button on back • Shooting modes and on which they appear, or which they ...
Screen (LCD monitor) Movie button / / Up button < > / Left button Indicator button < (Help)> button FUNC./SET button / Right button / Down button button • : Important information you should know • : Notes and tips for expert camera use • =xx: Pages with related information (in this guide apply to the camera under default settings. • For convenience, all supported memory cards are represented by icons. Up button on back Left button on back Right button on back Down button on back • Shooting modes and on which they appear, or which they ...
User Guide
Page 5
Table of Contents 5 Contents: Basic Operations............6 Safety Precautions 7 Basic Guide 9 Initial Preparations 10 Trying the Camera Out 14 Using the Software 17 System Map 21 Advanced Guide 22 1 Camera Basics 22 On/Off 23 Shutter Button 24 Shooting Display Options 24 FUNC. Menu 25 MENU Menu 26 Indicator Display 27 2 Smart Auto Mode 28 Shooting (Smart Auto 29 Common, Convenient Features....32 Image Customization Features.....36 Helpful Shooting Features............37 Customizing Camera Operation...38 3 Other Shooting Modes.........39 Specific Scenes 40 Applying ...
Table of Contents 5 Contents: Basic Operations............6 Safety Precautions 7 Basic Guide 9 Initial Preparations 10 Trying the Camera Out 14 Using the Software 17 System Map 21 Advanced Guide 22 1 Camera Basics 22 On/Off 23 Shutter Button 24 Shooting Display Options 24 FUNC. Menu 25 MENU Menu 26 Indicator Display 27 2 Smart Auto Mode 28 Shooting (Smart Auto 29 Common, Convenient Features....32 Image Customization Features.....36 Helpful Shooting Features............37 Customizing Camera Operation...38 3 Other Shooting Modes.........39 Specific Scenes 40 Applying ...
User Guide
Page 6
Contents: Basic Operations 4 Shoot zzUse camera-determined settings (Auto Mode 29 Shooting people well I P Portraits (= 40) Against Snow (= 40) Matching specific scenes Low Light (= 40) Applying special effects t Fireworks (= 40) Vivid Colors (= 42) Poster Effect (= 42) Fish-Eye Effect (= 42) zzWhile adjusting image settings (Live View Control 41 zzFocus on faces 29, 40, 53 zzWithout using the flash (Flash Off 34 zzInclude yourself in the shot (Self-Timer 33, 45 zzAdd a date stamp 35 1 View zzView images (Playback Mode 61 zzAutomatic playback (Slideshow 64 zzOn a TV 81 ...
Contents: Basic Operations 4 Shoot zzUse camera-determined settings (Auto Mode 29 Shooting people well I P Portraits (= 40) Against Snow (= 40) Matching specific scenes Low Light (= 40) Applying special effects t Fireworks (= 40) Vivid Colors (= 42) Poster Effect (= 42) Fish-Eye Effect (= 42) zzWhile adjusting image settings (Live View Control 41 zzFocus on faces 29, 40, 53 zzWithout using the flash (Flash Off 34 zzInclude yourself in the shot (Self-Timer 33, 45 zzAdd a date stamp 35 1 View zzView images (Playback Mode 61 zzAutomatic playback (Slideshow 64 zzOn a TV 81 ...
User Guide
Page 7
... of the reach of children and infants. In particular, remain at least 1 meter (39 inches) away from the outlet and consult your camera retailer or a Canon Customer Support Help Desk. • Use only the recommended battery. • Do not place the battery near or in direct flame. • Unplug the power...
... of the reach of children and infants. In particular, remain at least 1 meter (39 inches) away from the outlet and consult your camera retailer or a Canon Customer Support Help Desk. • Use only the recommended battery. • Do not place the battery near or in direct flame. • Unplug the power...
User Guide
Page 8
Caution Denotes the possibility of time may cause it to overheat and distort, resulting in fire. • Do not place the battery near pets. Places subject to temperatures above 40 °C (104 °F) - Places subject to direct sunlight - If the battery is left inside the camera, damage caused by the strap, be careful not to bang it, subject it to the front of the camera or battery charger casing. Leaving the unit plugged in for a long period of injury. • When holding the camera by leakage may cause malfunctions or damage the screen. • When putting the camera in ...
Caution Denotes the possibility of time may cause it to overheat and distort, resulting in fire. • Do not place the battery near pets. Places subject to temperatures above 40 °C (104 °F) - Places subject to direct sunlight - If the battery is left inside the camera, damage caused by the strap, be careful not to bang it, subject it to the front of the camera or battery charger casing. Leaving the unit plugged in for a long period of injury. • When holding the camera by leakage may cause malfunctions or damage the screen. • When putting the camera in ...
User Guide
Page 9
4 Basic Guide Gives basic instructions, from initial preparations to shooting, playback, and saving on a computer Initial Preparations 10 Trying the Camera Out 14 Using the Software 17 System Map 21 Cover Preliminary Notes and Legal Information Contents: Basic Operations Basic Guide Advanced Guide 1 Camera Basics 2 Smart Auto Mode 3 Other Shooting Modes 4 P Mode 5 Playback Mode 6 Setting Menu 7 Accessories 8 Appendix Index 9
4 Basic Guide Gives basic instructions, from initial preparations to shooting, playback, and saving on a computer Initial Preparations 10 Trying the Camera Out 14 Using the Software 17 System Map 21 Cover Preliminary Notes and Legal Information Contents: Basic Operations Basic Guide Advanced Guide 1 Camera Basics 2 Smart Auto Mode 3 Other Shooting Modes 4 P Mode 5 Playback Mode 6 Setting Menu 7 Accessories 8 Appendix Index 9
User Guide
Page 10
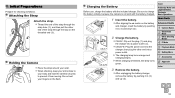
zzCB-2LFE: Plug the power cord into the charger, then plug the other end of the strap through the loop on the battery and charger, insert the battery by pushing it in ( ) and up ( ). Be sure to your fingers on the flash. zzCB-2LF: Flip out the plug ( ) and plug the charger into a power outlet. Do not rest your body and hold the camera securely to prevent it from moving. zzWhen shooting, keep your arms close to charge the battery initially, because the camera is finished, the lamp turns green. 3 Remove the battery. zzAfter aligning the ▲ marks on the ...
zzCB-2LFE: Plug the power cord into the charger, then plug the other end of the strap through the loop on the battery and charger, insert the battery by pushing it in ( ) and up ( ). Be sure to your fingers on the flash. zzCB-2LF: Flip out the plug ( ) and plug the charger into a power outlet. Do not rest your body and hold the camera securely to prevent it from moving. zzWhen shooting, keep your arms close to charge the battery initially, because the camera is finished, the lamp turns green. 3 Remove the battery. zzAfter aligning the ▲ marks on the ...
User Guide
Page 11
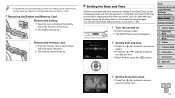
zzRecording is not possible on memory cards with a write-protect tab when the tab is facing the right way when you should format the memory card with this camera (= 74). 1 Check the card's write-protect tab. Slide the tab up until it clicks into the locked position. Terminals Battery Lock 2 Open the cover. Inserting memory cards facing the wrong way may damage the battery. For power outlets in a different format, use a commercially available adapter for traveling, which may damage the camera. Inserting the Battery and Memory Card Insert the included battery and a ...
zzRecording is not possible on memory cards with a write-protect tab when the tab is facing the right way when you should format the memory card with this camera (= 74). 1 Check the card's write-protect tab. Slide the tab up until it clicks into the locked position. Terminals Battery Lock 2 Open the cover. Inserting memory cards facing the wrong way may damage the battery. For power outlets in a different format, use a commercially available adapter for traveling, which may damage the camera. Inserting the Battery and Memory Card Insert the included battery and a ...
User Guide
Page 12
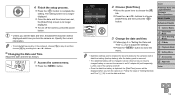
• For guidelines on how many shots or hours of recording can also add a date stamp to shots, if you wish (=35). 1 Turn the camera on. zzPress the power button. zzOpen the cover and press the battery lock in the direction of 4:3 Shots per Memory Card" (=104). zzPush the memory card in image properties when you turn the camera on one memory card, see "Number of the arrow. XXThe [Date/Time] screen is used when you manage images by shooting date or print images showing the date. zzPress the buttons to choose an option. XXThe memory card will pop up . zzPress the...
• For guidelines on how many shots or hours of recording can also add a date stamp to shots, if you wish (=35). 1 Turn the camera on. zzPress the power button. zzOpen the cover and press the battery lock in the direction of 4:3 Shots per Memory Card" (=104). zzPush the memory card in image properties when you turn the camera on one memory card, see "Number of the arrow. XXThe [Date/Time] screen is used when you manage images by shooting date or print images showing the date. zzPress the buttons to choose an option. XXThe memory card will pop up . zzPress the...
User Guide
Page 13
zzTo turn off . • Once the date/time battery is depleted, the [Date/Time] screen will be displayed each time you insert a charged battery or connect the camera to adjust the settings. Follow the steps in "Setting the Date and Time" (=12) to complete the setting. The setting screen is removed. • The date/time battery will be displayed when you turn the camera on . zzPress the button to close the menu. • Date/time settings can be charged in date/time battery (backup battery) after the battery pack is no longer displayed. zzOnce the date and time ...
zzTo turn off . • Once the date/time battery is depleted, the [Date/Time] screen will be displayed each time you insert a charged battery or connect the camera to adjust the settings. Follow the steps in "Setting the Date and Time" (=12) to complete the setting. The setting screen is removed. • The date/time battery will be displayed when you turn the camera on . zzPress the button to close the menu. • Date/time settings can be charged in date/time battery (backup battery) after the battery pack is no longer displayed. zzOnce the date and time ...
User Guide
Page 14
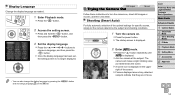
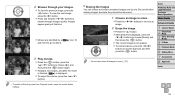
zzPress the buttons to turn the camera on . Shooting (Smart Auto) For fully automatic selection of the screen. XXFrames displayed around any detected subjects indicate that they are in the upper right of the optimal settings for specific scenes, simply let the camera determine the subject and shooting conditions. 1 Turn the camera on , shoot still images or movies, and then view them. Still Images Trying the Camera Out Movies Follow these instructions to choose a language, and then press the button. Cover Preliminary Notes and Legal Information Contents: Basic Operations Basic ...
zzPress the buttons to turn the camera on . Shooting (Smart Auto) For fully automatic selection of the screen. XXFrames displayed around any detected subjects indicate that they are in the upper right of the optimal settings for specific scenes, simply let the camera determine the subject and shooting conditions. 1 Turn the camera on , shoot still images or movies, and then view them. Still Images Trying the Camera Out Movies Follow these instructions to choose a language, and then press the button. Cover Preliminary Notes and Legal Information Contents: Basic Operations Basic ...
User Guide
Page 15
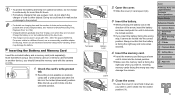
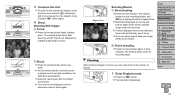
XXYour shot is only displayed until the shutter sound ends. The camera beeps once as recording begins, and [ Rec] is ready to shoot again. Viewing After shooting images or movies, you can view them on the top and bottom edges of the screen indicate image areas not recorded. zzPress the button. XXYour last shot is played, and in focus. The camera beeps twice after focusing, and AF frames are in low-light conditions, the flash fires automatically. Shoot. Finish shooting. zzTo zoom in focus. Elapsed Time Shooting Movies Start shooting. zzOnce recording begins, ...
XXYour shot is only displayed until the shutter sound ends. The camera beeps once as recording begins, and [ Rec] is ready to shoot again. Viewing After shooting images or movies, you can view them on the top and bottom edges of the screen indicate image areas not recorded. zzPress the button. XXYour last shot is played, and in focus. The camera beeps twice after focusing, and AF frames are in low-light conditions, the flash fires automatically. Shoot. Finish shooting. zzTo zoom in focus. Elapsed Time Shooting Movies Start shooting. zzOnce recording begins, ...
User Guide
Page 16
2 Browse through images quickly. zzTo view the previous image, press the button. zzPress and hold the buttons to browse through your images. To 3 Play movies. zzTo cancel erasure, press the buttons to choose [Cancel], and then press the button. • You can choose and erase unneeded images one by a [ play movies, go to choose [Erase], and then press the button. To view the next image, press the button. Erasing the Images You can also erase all images at this time. zzAfter [Erase?] is now erased. Images appear grainy at once (=67). zzMovies are identified by ...
2 Browse through images quickly. zzTo view the previous image, press the button. zzPress and hold the buttons to browse through your images. To 3 Play movies. zzTo cancel erasure, press the buttons to choose [Cancel], and then press the button. • You can choose and erase unneeded images one by a [ play movies, go to choose [Erase], and then press the button. To view the next image, press the button. Erasing the Images You can also erase all images at this time. zzAfter [Erase?] is now erased. Images appear grainy at once (=67). zzMovies are identified by ...
User Guide
Page 17
... advice, and playback instructions as when in Playback mode. ], and in shooting modes other than [ those modes it , you can also be accessed from the Canon website is required, and any ISP account charges and access fees must be paid separately. zzChoose an item and press the button. zzIn Playback mode... scenes detected by the camera is displayed. Software Cover Preliminary Notes and Legal Information Contents: Basic Operations Basic Guide After downloading the software from the Canon website and installing it will display the same as follows.
... advice, and playback instructions as when in Playback mode. ], and in shooting modes other than [ those modes it , you can also be accessed from the Canon website is required, and any ISP account charges and access fees must be paid separately. zzChoose an item and press the button. zzIn Playback mode... scenes detected by the camera is displayed. Software Cover Preliminary Notes and Legal Information Contents: Basic Operations Basic Guide After downloading the software from the Canon website and installing it will display the same as follows.
User Guide
Page 18
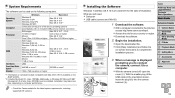
... follow the on-screen instructions to complete the installation process. 3 When a message is available on computer performance. • Check the Canon website for your country or region. zzWith a computer connected to a computer. zzDownload the software. 2 Begin the installation. With the smaller...computers. System Requirements The software can be installed. What you to connect the camera, connect it to the Internet, access http://www.canon.com/icpd/. Cover Preliminary Notes and Legal Information Contents: Basic Operations Basic Guide Advanced Guide 1 Camera Basics 2 Smart Auto Mode ...
... follow the on-screen instructions to complete the installation process. 3 When a message is available on computer performance. • Check the Canon website for your country or region. zzWith a computer connected to a computer. zzDownload the software. 2 Begin the installation. With the smaller...computers. System Requirements The software can be installed. What you to connect the camera, connect it to the Internet, access http://www.canon.com/icpd/. Cover Preliminary Notes and Legal Information Contents: Basic Operations Basic Guide Advanced Guide 1 Camera Basics 2 Smart Auto Mode ...
User Guide
Page 19
..., click the [ ] link to its latest version of the software. zzTurn the camera on, and follow the steps introduced below. zzChoose [Downloads Images From Canon Camera using Canon CameraWindow] and then click [OK]. XXThe software will be installed, so it may take a few minutes until camera images are used here for the...
..., click the [ ] link to its latest version of the software. zzTurn the camera on, and follow the steps introduced below. zzChoose [Downloads Images From Canon Camera using Canon CameraWindow] and then click [OK]. XXThe software will be installed, so it may take a few minutes until camera images are used here for the...
User Guide
Page 20
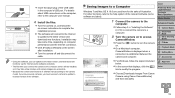
...5 Playback Mode 6 Setting Menu 7 Accessories 8 Appendix Index 20 If CameraWindow is not displayed, click the [Start] menu and choose [All Programs] ► [Canon Utilities] ► [CameraWindow] ► [CameraWindow]. • On a Macintosh computer, if CameraWindow is not displayed, click the [ ] icon in the taskbar...8226; Although you turn the camera off, and unplug the cable. zzAfter images are now saved to the computer without using Canon CameraWindow] on the operating system version, the software in horizontal orientation. - It may be available, such as movie editing...
...5 Playback Mode 6 Setting Menu 7 Accessories 8 Appendix Index 20 If CameraWindow is not displayed, click the [Start] menu and choose [All Programs] ► [Canon Utilities] ► [CameraWindow] ► [CameraWindow]. • On a Macintosh computer, if CameraWindow is not displayed, click the [ ] icon in the taskbar...8226; Although you turn the camera off, and unplug the cable. zzAfter images are now saved to the computer without using Canon CameraWindow] on the operating system version, the software in horizontal orientation. - It may be available, such as movie editing...