Photo Printing Guide
Page 5
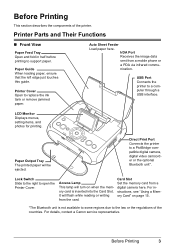
Auto Sheet Feeder Load paper here. Paper Output Tray The printed paper will turn on page 15. *The Bluetooth unit is inserted into the Card Slot. Before Printing 3 For details, contact a Canon service representative. Printer Cover Open to open the Printer Cover. IrDA Port Receives the image ...data sent from the card. Lock Switch Slide to the right to replace the ink tank or remove jammed paper. It will flash while reading ...
Auto Sheet Feeder Load paper here. Paper Output Tray The printed paper will turn on page 15. *The Bluetooth unit is inserted into the Card Slot. Before Printing 3 For details, contact a Canon service representative. Printer Cover Open to open the Printer Cover. IrDA Port Receives the image ...data sent from the card. Lock Switch Slide to the right to replace the ink tank or remove jammed paper. It will flash while reading ...

Photo Printing Guide
Page 6
Print Head Lock Lever Locks the Print Head into the Print Head Holder. See "The Paper Thickness Lever position is stained. AC Adapter Connector Connector used to the left if ink smudges or the printed surface is incorrect." Interior Print Head ...Holder Install the Print Head here. Move to connect the supplied AC Adapter plug. Paper Thickness Lever Move to the manual provided with the Portable Kit. Rear View Battery Connector Cover Removes this lever after installing the Print Head. Important...
Print Head Lock Lever Locks the Print Head into the Print Head Holder. See "The Paper Thickness Lever position is stained. AC Adapter Connector Connector used to the left if ink smudges or the printed surface is incorrect." Interior Print Head ...Holder Install the Print Head here. Move to connect the supplied AC Adapter plug. Paper Thickness Lever Move to the manual provided with the Portable Kit. Rear View Battery Connector Cover Removes this lever after installing the Print Head. Important...
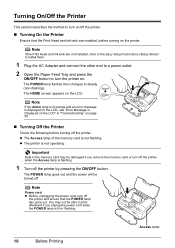
Photo Printing Guide
Page 12
..., refer to the Easy Setup Instructions (Setup Sheet) to install them. 1 Plug the AC Adapter and connect the other end to a power outlet. 2 Open the Paper Feed Tray and press the ON/OFF button to steady (non-flashing). You may be damaged if you unplug the power cord when the POWER...
..., refer to the Easy Setup Instructions (Setup Sheet) to install them. 1 Plug the AC Adapter and connect the other end to a power outlet. 2 Open the Paper Feed Tray and press the ON/OFF button to steady (non-flashing). You may be damaged if you unplug the power cord when the POWER...

Photo Printing Guide
Page 13
... can also cause the printer to load paper. Also, do not use the following types of paper with holes Paper that is not rectangle Paper bound with staples or glue Paper with adhesives Paper decorated with glitter, etc * Non-Canon genuine paper Before Printing 11 Loading Printing Paper This section describes the available paper size and media type, and how...
... can also cause the printer to load paper. Also, do not use the following types of paper with holes Paper that is not rectangle Paper bound with staples or glue Paper with adhesives Paper decorated with glitter, etc * Non-Canon genuine paper Before Printing 11 Loading Printing Paper This section describes the available paper size and media type, and how...

Photo Printing Guide
Page 14
Note Set the Paper Thickness Lever to the left, only if ink smudges or the printed surface is set to the right. See "Turning On the Printer" on the printer. (1) Open the Paper Feed Tray and fold it . Note If paper is curled, gently bend the corners in half. (2) Press the ON/OFF button. Loading Paper 1 Turn on page 10. 2 Flatten the four corners of the paper before loading it in the opposite direction until the paper becomes completely flat. 3 Ensure that the Paper Thickness Lever is stained. 12 Before Printing
Note Set the Paper Thickness Lever to the left, only if ink smudges or the printed surface is set to the right. See "Turning On the Printer" on the printer. (1) Open the Paper Feed Tray and fold it . Note If paper is curled, gently bend the corners in half. (2) Press the ON/OFF button. Loading Paper 1 Turn on page 10. 2 Flatten the four corners of the paper before loading it in the opposite direction until the paper becomes completely flat. 3 Ensure that the Paper Thickness Lever is stained. 12 Before Printing

Photo Printing Guide
Page 15
Photo stickers Card Shorter margin Note Do not touch the printed surface until it is fully inserted. 4 Load the paper. (1) Insert the paper into the Auto Sheet Feeder with your media. For specific drying times, refer to the instructions packaged with print side facing up. Before Printing 13 When loading the credit card sized paper, load sheets in the portrait position (feed from the short side). (3) Slide the Paper Guide against the left side of the stack of paper. (2) Align the paper with the right edge of the Auto Sheet Feeder and insert the paper until the ink dries.
Photo stickers Card Shorter margin Note Do not touch the printed surface until it is fully inserted. 4 Load the paper. (1) Insert the paper into the Auto Sheet Feeder with your media. For specific drying times, refer to the instructions packaged with print side facing up. Before Printing 13 When loading the credit card sized paper, load sheets in the portrait position (feed from the short side). (3) Slide the Paper Guide against the left side of the stack of paper. (2) Align the paper with the right edge of the Auto Sheet Feeder and insert the paper until the ink dries.

Photo Printing Guide
Page 16
...printing photos in a mobile phone or a PDA on sticker paper, see "Printing Photographs from a Wireless Communication Device" on your country. 14 Before Printing Note You may cause the print side to be able to purchase some Canon genuine papers depending on page 36. In this case, load one sheet... at a time. *2 When printing on sticker paper, select Sticker print. Using Genuine Media Media Type Paper Support Load Limit Photo Paper Pro*1 101.6×152.4 mm/ 4"×6":...
...printing photos in a mobile phone or a PDA on sticker paper, see "Printing Photographs from a Wireless Communication Device" on your country. 14 Before Printing Note You may cause the print side to be able to purchase some Canon genuine papers depending on page 36. In this case, load one sheet... at a time. *2 When printing on sticker paper, select Sticker print. Using Genuine Media Media Type Paper Support Load Limit Photo Paper Pro*1 101.6×152.4 mm/ 4"×6":...

Photo Printing Guide
Page 20
... sleep mode. See "Turning On the Printer" on page 11. (3) Insert the memory card into the Card Slot. See "Loading Printing Paper" on page 10. (2) Load the paper. Note If you took and stored in the memory card on the LCD and print them. 1 Prepare to print. Selecting Photographs to resume...the Printer Settings" on page 16. 2 Select Select and print, and then press the OK button. See "Inserting a Memory Card" on page 52. 3 Confirm the paper size, media type, and other settings, then select Next, and then press the OK button. Press the OK button to Print-Select and print You...
... sleep mode. See "Turning On the Printer" on page 11. (3) Insert the memory card into the Card Slot. See "Loading Printing Paper" on page 10. (2) Load the paper. Note If you took and stored in the memory card on the LCD and print them. 1 Prepare to print. Selecting Photographs to resume...the Printer Settings" on page 16. 2 Select Select and print, and then press the OK button. See "Inserting a Memory Card" on page 52. 3 Confirm the paper size, media type, and other settings, then select Next, and then press the OK button. Press the OK button to Print-Select and print You...
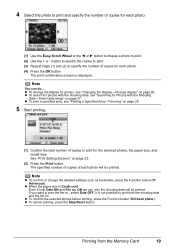
Photo Printing Guide
Page 21
... 26. Note To confirm or change the display for photos, see "Searching for the selected photos, the paper size, and media type. It is displayed. Printing from the Memory Card 19 When the paper size is Credit card: Even if both the shooting date and the file no ., select Date OFF. To...
... 26. Note To confirm or change the display for photos, see "Searching for the selected photos, the paper size, and media type. It is displayed. Printing from the Memory Card 19 When the paper size is Credit card: Even if both the shooting date and the file no ., select Date OFF. To...
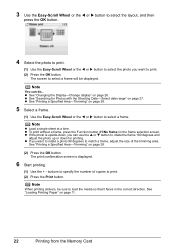
Photo Printing Guide
Page 24
... + - The print confirmation screen is upside-down, you want to load the media so that it faces in the frame selection screen. See "Loading Printing Paper" on page 27. Note Load a single sheet at a time. See "Searching for printing. If you can do...
... + - The print confirmation screen is upside-down, you want to load the media so that it faces in the frame selection screen. See "Loading Printing Paper" on page 27. Note Load a single sheet at a time. See "Searching for printing. If you can do...
Photo Printing Guide
Page 25
The setting screen for the selected item will be displayed. 2 Select the paper size and the media type, and then press the OK button. Print Setting Screens This section describes about the print setting screen and the print ... button. Printing from the Memory Card 23 Note For the print setting screen, select Next to proceed to print photos on a memory card. (1) (1) (2) (3) (2) (3) (1) Specify the paper size. For the print confirmation screen, select the Print button to start printing. Credit card/4"x6" (101.6x152.4)/Wide 4x7.1 (101x180) (2) Specify the media type...
The setting screen for the selected item will be displayed. 2 Select the paper size and the media type, and then press the OK button. Print Setting Screens This section describes about the print setting screen and the print ... button. Printing from the Memory Card 23 Note For the print setting screen, select Next to proceed to print photos on a memory card. (1) (1) (2) (3) (2) (3) (1) Specify the paper size. For the print confirmation screen, select the Print button to start printing. Credit card/4"x6" (101.6x152.4)/Wide 4x7.1 (101x180) (2) Specify the media type...

Photo Printing Guide
Page 26
...the DPOF function (numbers of all photos saved in the memory card. Printing a Photo Index-Photo index print You can enjoy various printouts of paper depends on a single sheet of photos in the memory card. 1 Prepare to the index print layout. - Photos to Print-Select and print... page 16. See "Inserting a Memory Card" on the size of comments, trimming/rotation, etc.) are printed. - Other functions (addition of the paper you to those settings. Photos are printed automatically according to make the following DPOF settings: - Using Useful Functions You can print a list of copies...
...the DPOF function (numbers of all photos saved in the memory card. Printing a Photo Index-Photo index print You can enjoy various printouts of paper depends on a single sheet of photos in the memory card. 1 Prepare to the index print layout. - Photos to Print-Select and print... page 16. See "Inserting a Memory Card" on the size of comments, trimming/rotation, etc.) are printed. - Other functions (addition of the paper you to those settings. Photos are printed automatically according to make the following DPOF settings: - Using Useful Functions You can print a list of copies...
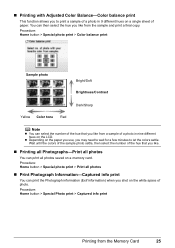
Photo Printing Guide
Page 27
...print > Color balance print Sample photo Bright/Soft Brightness/Contrast Yellow Color tone Red Dark/Sharp Note You can select the number of paper. Printing all Photographs-Print all photos You can print all photos Print Photograph Information-Captured info print You can then select the hue ... final copy. Procedure: Home button > Special Photo print > Captured info print Printing from a sample of a photo in 9 different hues on the paper you use, you may need to wait for a few minutes to print a sample of photo. Printing with Adjusted Color Balance-Color balance print This function...
...print > Color balance print Sample photo Bright/Soft Brightness/Contrast Yellow Color tone Red Dark/Sharp Note You can select the number of paper. Printing all Photographs-Print all photos You can print all photos Print Photograph Information-Captured info print You can then select the hue ... final copy. Procedure: Home button > Special Photo print > Captured info print Printing from a sample of a photo in 9 different hues on the paper you use, you may need to wait for a few minutes to print a sample of photo. Printing with Adjusted Color Balance-Color balance print This function...
Photo Printing Guide
Page 31
... the OK button. Changing Print Settings-Advanced You can enlarge or reduce the trimming frame. ON Prints the image No. (DCF No.) on the whole paper without a border. File no . OFF Does not print the image No. (DCF No.) on Edit/menu displayed screen, select Cancel Trimming, then press the OK...
... the OK button. Changing Print Settings-Advanced You can enlarge or reduce the trimming frame. ON Prints the image No. (DCF No.) on the whole paper without a border. File no . OFF Does not print the image No. (DCF No.) on Edit/menu displayed screen, select Cancel Trimming, then press the OK...
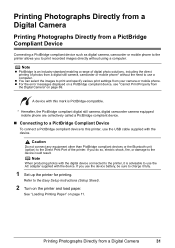
Photo Printing Guide
Page 33
...Hereafter, the PictBridge compliant digital still camera, digital camcorder camera equipped mobile phone are collectively called a PictBridge compliant device. See "Loading Printing Paper" on page 69. Note When producing photos with this printer, use a computer. Printing Photographs Directly from your camera or mobile phone. ...electric shock, fire, or damage to the Easy Setup Instructions (Setup Sheet). 2 Turn on the printer and load paper. Refer to the device could result. You can select the images to print and specify various print settings from a Digital Camera 31
...Hereafter, the PictBridge compliant digital still camera, digital camcorder camera equipped mobile phone are collectively called a PictBridge compliant device. See "Loading Printing Paper" on page 69. Note When producing photos with this printer, use a computer. Printing Photographs Directly from your camera or mobile phone. ...electric shock, fire, or damage to the Easy Setup Instructions (Setup Sheet). 2 Turn on the printer and load paper. Refer to the device could result. You can select the images to print and specify various print settings from a Digital Camera 31
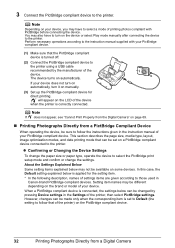
Photo Printing Guide
Page 34
You may have to turn it on a PictBridge compliant device connected to those used in Canon-brand PictBridge compliant devices. Perform necessary operations according to the instruction manual supplied with your device, you may also have to select a mode ... the device, be changed by the manufacturer of the printer, then select PictBridge settings. Confirming or Changing the Device Settings To change the paper size or paper type, operate the device to the printer. 3 Connect the PictBridge compliant device to select the PictBridge print setup mode and confirm or change...
You may have to turn it on a PictBridge compliant device connected to those used in Canon-brand PictBridge compliant devices. Perform necessary operations according to the instruction manual supplied with your device, you may also have to select a mode ... the device, be changed by the manufacturer of the printer, then select PictBridge settings. Confirming or Changing the Device Settings To change the paper size or paper type, operate the device to the printer. 3 Connect the PictBridge compliant device to select the PictBridge print setup mode and confirm or change...
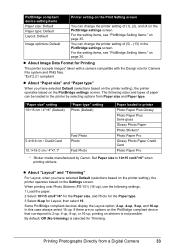
Photo Printing Guide
Page 35
...paper. 2 Select 10×15 cm/4"×6" for the Paper size, and Photo for the Paper...Paper Plus Glossy Photo Paper Plus Semi-gloss Glossy Photo Paper Photo Stickers* Photo Paper Pro Glossy Photo Paper Credit Card Photo Paper...Paper size to 2-up, 4-up, 9-up, or 16-up ), use the following sizes and types of paper...2.21 compliant About "Paper size" and "Paper type" When you ... Paper size and Paper type. "Paper size" setting 10×15 cm / 4"×6" (Default) "Paper ...Paper loaded in the PictBridge settings screen. PictBridge compliant device setting items Paper size: Default Paper...
...paper. 2 Select 10×15 cm/4"×6" for the Paper size, and Photo for the Paper...Paper Plus Glossy Photo Paper Plus Semi-gloss Glossy Photo Paper Photo Stickers* Photo Paper Pro Glossy Photo Paper Credit Card Photo Paper...Paper size to 2-up, 4-up, 9-up, or 16-up ), use the following sizes and types of paper...2.21 compliant About "Paper size" and "Paper type" When you ... Paper size and Paper type. "Paper size" setting 10×15 cm / 4"×6" (Default) "Paper ...Paper loaded in the PictBridge settings screen. PictBridge compliant device setting items Paper size: Default Paper...
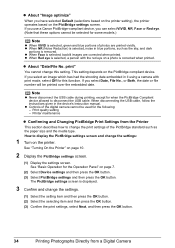
Photo Printing Guide
Page 36
...or file number will be printed over the embedded date. When disconnecting the USB cable, follow the instructions given in blue portions, such as the paper size and the media type. About "Image optimize" When you can select VIVID, NR, Face or Red eye. (Note that these options ...cannot be selected for some models.) Note When VIVID is selected, green and blue portions of photos are corrected when printed. If you use a Canon PictBridge-compliant device, you have selected Default (selections based on the printer setting), the printer operates based on a photo is corrected when printed. ...
...or file number will be printed over the embedded date. When disconnecting the USB cable, follow the instructions given in blue portions, such as the paper size and the media type. About "Image optimize" When you can select VIVID, NR, Face or Red eye. (Note that these options ...cannot be selected for some models.) Note When VIVID is selected, green and blue portions of photos are corrected when printed. If you use a Canon PictBridge-compliant device, you have selected Default (selections based on the printer setting), the printer operates based on a photo is corrected when printed. ...
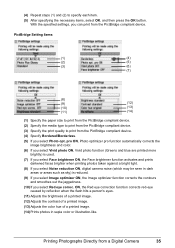
Photo Printing Guide
Page 37
.... (10) If you select Red eye correc. Printing Photographs Directly from the PictBridge compliant device. PictBridge Setting Items: (1) (4) (2) (5) (3) (6) (7) (8) (9) (12) (10) (13) (11) (14) (1) Specify the paper size to print from the PictBridge compliant device. (2) Specify the media type to print from the PictBridge compliant device. (3) Specify the print quality to specify...
.... (10) If you select Red eye correc. Printing Photographs Directly from the PictBridge compliant device. PictBridge Setting Items: (1) (4) (2) (5) (3) (6) (7) (8) (9) (12) (10) (13) (11) (14) (1) Specify the paper size to print from the PictBridge compliant device. (2) Specify the media type to print from the PictBridge compliant device. (3) Specify the print quality to specify...

Photo Printing Guide
Page 38
... an IrDA port and be compatible with image data transfer using infrared communication. - If the optional Bluetooth unit BU-20 is borderless printing on 4" x 6" Photo Paper Plus Glossy. 1 Turn on each setting screen and then press the OK button. (2) After confirming or changing the settings, select OK and press the OK...
... an IrDA port and be compatible with image data transfer using infrared communication. - If the optional Bluetooth unit BU-20 is borderless printing on 4" x 6" Photo Paper Plus Glossy. 1 Turn on each setting screen and then press the OK button. (2) After confirming or changing the settings, select OK and press the OK...


