
User Manual
Page 4
...Screen 150 WPA2 Details Screen 151 Authentication Type Confirmation Screen 152 PSK: Passphrase and Dynamic Encryption Setup Screen 153 Setup Information Confirmation Screen 154 Wired LAN Sheet 155 Admin Password Sheet 156 Network Information Screen 157 ...Access Control Sheet 158 Edit Accessible MAC Address Screen/Add Accessible MAC Address Screen 162 Edit Accessible IP Address Screen/Add Accessible IP Address Screen 163 Other Screens of IJ Network Tool 164 Canon...
...Screen 150 WPA2 Details Screen 151 Authentication Type Confirmation Screen 152 PSK: Passphrase and Dynamic Encryption Setup Screen 153 Setup Information Confirmation Screen 154 Wired LAN Sheet 155 Admin Password Sheet 156 Network Information Screen 157 ...Access Control Sheet 158 Edit Accessible MAC Address Screen/Add Accessible MAC Address Screen 162 Edit Accessible IP Address Screen/Add Accessible IP Address Screen 163 Other Screens of IJ Network Tool 164 Canon...

User Manual
Page 5
Status Screen 168 Connection Performance Measurement Screen 169 Maintenance Screen 171 Network Setup of the Card Slot Screen 172 Associate Port Screen 174 Network Information Screen 175 Appendix for Network Communication 176 Using the Card Slot over a Network ...
Status Screen 168 Connection Performance Measurement Screen 169 Maintenance Screen 171 Network Setup of the Card Slot Screen 172 Associate Port Screen 174 Network Information Screen 175 Appendix for Network Communication 176 Using the Card Slot over a Network ...

User Manual
Page 6
Select (Tools) > Print > Page setup.... 2. Canon shall not be liable for any damage suffered by ...Explorer 8 1. Press the Alt key to print background colors and images, follow the steps below. Select Page Setup... To set to display the menus. Alternatively, click Firefox, then select Menu Bar from the File menu. ... of information in this guide. Select the Print Background Colors and Images checkbox. • In Mozilla Firefox 1. Select Page Setup... Select the Print Background (colors & images) checkbox in the desktop version. • In Internet Explorer 9 or 10 ...
Select (Tools) > Print > Page setup.... 2. Canon shall not be liable for any damage suffered by ...Explorer 8 1. Press the Alt key to print background colors and images, follow the steps below. Select Page Setup... To set to display the menus. Alternatively, click Firefox, then select Menu Bar from the File menu. ... of information in this guide. Select the Print Background Colors and Images checkbox. • In Mozilla Firefox 1. Select Page Setup... Select the Print Background (colors & images) checkbox in the desktop version. • In Internet Explorer 9 or 10 ...

User Manual
Page 20
... of Google Cloud Print. When the message that the authentication URL is displayed on -screen instructions. Select Setup. 4. When the confirmation message to re-register the machine is printed. 8. Select Google Cloud Print setup -> Register with Google Cloud Print. Load A4 or Letter-sized plain paper, then select OK. When ...URL is displayed. 5. If your Google account which you can print the data with your printer does not have a LCD monitor 2. Select Web service setup -> Web service connection setup -> Google Cloud Print setup -> Register with Google Cloud Print 20
... of Google Cloud Print. When the message that the authentication URL is displayed on -screen instructions. Select Setup. 4. When the confirmation message to re-register the machine is printed. 8. Select Google Cloud Print setup -> Register with Google Cloud Print. Load A4 or Letter-sized plain paper, then select OK. When ...URL is displayed. 5. If your Google account which you can print the data with your printer does not have a LCD monitor 2. Select Web service setup -> Web service connection setup -> Google Cloud Print setup -> Register with Google Cloud Print 20

User Manual
Page 21
... the Machine from Google Cloud Print If the machine's owner changes or if you have a LCD monitor 2. Select Web service setup -> Web service connection setup -> Google Cloud Print setup -> Delete from Google Cloud Print. 5. When the confirmation screen to register the machine is displayed, select Yes. When the ... the machine with Google Cloud Print, the confirmation message to delete the machine is turned on. In the print setup for Google Cloud Print, select the display language, and then select Authentication. 6. When the registration completion message appears, select OK. Select...
... the Machine from Google Cloud Print If the machine's owner changes or if you have a LCD monitor 2. Select Web service setup -> Web service connection setup -> Google Cloud Print setup -> Delete from Google Cloud Print. 5. When the confirmation screen to register the machine is displayed, select Yes. When the ... the machine with Google Cloud Print, the confirmation message to delete the machine is turned on. In the print setup for Google Cloud Print, select the display language, and then select Authentication. 6. When the registration completion message appears, select OK. Select...

User Manual
Page 23
... and start printing manually. When you may differ from the print image depending on the print data. • Depending on . 2. Follow the steps below. Select Setup. 4.
... and start printing manually. When you may differ from the print image depending on the print data. • Depending on . 2. Follow the steps below. Select Setup. 4.

User Manual
Page 24
...connection fees. 1. Note • To print the IP address, load one sheet of this machine or use the convenient web services presented by Canon. Then from your printer has a LCD monitor 2. Using Remote UI This service allows you check the IP address of this machine from the ...displayed window, check the IP address. Check that the machine is connected to the Internet. From the home window, select Setup -> Device settings -> LAN settings -> Confirm LAN settings -> WLAN setting list or LAN setting list. Then from the operation panel of the machine....
...connection fees. 1. Note • To print the IP address, load one sheet of this machine or use the convenient web services presented by Canon. Then from your printer has a LCD monitor 2. Using Remote UI This service allows you check the IP address of this machine from the ...displayed window, check the IP address. Check that the machine is connected to the Internet. From the home window, select Setup -> Device settings -> LAN settings -> Confirm LAN settings -> WLAN setting list or LAN setting list. Then from the operation panel of the machine....

User Manual
Page 25
... have a LCD monitor 2. Remote UI startup In the Web browser, directly enter the IPv4 address that you checked from the LCD monitor of the network setup information starts. Load one sheet of A4 size or Letter size plain paper 3.
... have a LCD monitor 2. Remote UI startup In the Web browser, directly enter the IPv4 address that you checked from the LCD monitor of the network setup information starts. Load one sheet of A4 size or Letter size plain paper 3.

User Manual
Page 26
Firmware update This function allows you to specify the Apple AirPrint settings, such as position information. Network Configuration This function displays the network settings. 26 AirPrint settings This function allows you to update the firmware and check version information. Google Cloud Print setup This function allows you to register this machine to Google Cloud Print or delete the machine. Manual (Online) This function displays the Online Manual.
Firmware update This function allows you to specify the Apple AirPrint settings, such as position information. Network Configuration This function displays the network settings. 26 AirPrint settings This function allows you to update the firmware and check version information. Google Cloud Print setup This function allows you to register this machine to Google Cloud Print or delete the machine. Manual (Online) This function displays the Online Manual.

User Manual
Page 87
... up clogged print head nozzle. Execute cleaning Make sure that the printer is enough ink. Consequently, perform cleaning only when necessary. Open the printer driver setup window 2. Click Cleaning on the Maintenance tab 87 Important • Cleaning consumes a small amount of ink. Deep Cleaning Deep Cleaning is to be performed. To... cleaning starts. 4. If cleaning the head once does not resolve the print head problem, clean it once more thorough than cleaning. Open the printer driver setup window 2.
... up clogged print head nozzle. Execute cleaning Make sure that the printer is enough ink. Consequently, perform cleaning only when necessary. Open the printer driver setup window 2. Click Cleaning on the Maintenance tab 87 Important • Cleaning consumes a small amount of ink. Deep Cleaning Deep Cleaning is to be performed. To... cleaning starts. 4. If cleaning the head once does not resolve the print head problem, clean it once more thorough than cleaning. Open the printer driver setup window 2.

User Manual
Page 89
.... 4. Paper will be ejected and feed roller cleaning will be completed. 89 Cleaning the Paper Feed Rollers from the rear tray. 2. Open the printer driver setup window 3.
.... 4. Paper will be ejected and feed roller cleaning will be completed. 89 Cleaning the Paper Feed Rollers from the rear tray. 2. Open the printer driver setup window 3.

User Manual
Page 91
Open the printer driver setup window 2. Printing takes about 2 to 3 minutes to be used differs when you select the manual head alignment. 4. Aligning the Print Head Position from Your Computer ...
Open the printer driver setup window 2. Printing takes about 2 to 3 minutes to be used differs when you select the manual head alignment. 4. Aligning the Print Head Position from Your Computer ...

User Manual
Page 92
.... 6. Switch head alignment to display the most recent settings specified on and click Align Print Head. Load paper in the message. Open the printer driver setup window 2. Normally, the printer is set for performing manual print head alignment is on your computer. 3. Note • If the printer is off or if...
.... 6. Switch head alignment to display the most recent settings specified on and click Align Print Head. Load paper in the message. Open the printer driver setup window 2. Normally, the printer is set for performing manual print head alignment is on your computer. 3. Note • If the printer is off or if...

User Manual
Page 96
... need to clean the print head. The procedure for printing a nozzle check pattern is working properly by printing a nozzle check pattern. Open the printer driver setup window 2. Click OK when the confirmation message appears. Check the print result Check the print result.
... need to clean the print head. The procedure for printing a nozzle check pattern is working properly by printing a nozzle check pattern. Open the printer driver setup window 2. Click OK when the confirmation message appears. Check the print result Check the print result.

User Manual
Page 97
... dialog box, fold the A4 size or Letter size plain paper in the landscape orientation with the crest of the paper. Open the printer driver setup window 2. Load the paper into the rear tray in half lengthwise, and then unfold the sheet. The procedure for performing bottom plate cleaning is on...
... dialog box, fold the A4 size or Letter size plain paper in the landscape orientation with the crest of the paper. Open the printer driver setup window 2. Load the paper into the rear tray in half lengthwise, and then unfold the sheet. The procedure for performing bottom plate cleaning is on...
User Manual
Page 104
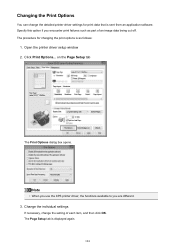
... an application software. Changing the Print Options You can change the setting of an image data being cut off. Open the printer driver setup window 2. on the Page Setup tab The Print Options dialog box opens. Note • When you use the XPS printer driver, the functions available to you encounter print...
... an application software. Changing the Print Options You can change the setting of an image data being cut off. Open the printer driver setup window 2. on the Page Setup tab The Print Options dialog box opens. Note • When you use the XPS printer driver, the functions available to you encounter print...

User Manual
Page 105
.... The procedure for registering a printing profile is as follows: Registering a Printing Profile 1. Open the printer driver setup window 2. You can also register necessary items on the Quick Setup tab, select the printing profile to be deleted at any time. Set the necessary items From Commonly Used Settings ... In the Save Commonly Used Settings dialog box, click OK to save the print settings and return to Commonly Used Settings on the Quick Setup tab. Click Save... The name and icon are displayed in the Name field. Registering a Frequently Used Printing Profile You can register the ...
.... The procedure for registering a printing profile is as follows: Registering a Printing Profile 1. Open the printer driver setup window 2. You can also register necessary items on the Quick Setup tab, select the printing profile to be deleted at any time. Set the necessary items From Commonly Used Settings ... In the Save Commonly Used Settings dialog box, click OK to save the print settings and return to Commonly Used Settings on the Quick Setup tab. Click Save... The name and icon are displayed in the Name field. Registering a Frequently Used Printing Profile You can register the ...

User Manual
Page 106
If a profile is deleted from the Commonly Used Settings list on the Quick Setup tab. 2. Deleting Unnecessary Printing Profile 1. Delete the printing profile Click Delete. Registered print settings cannot be deleted from Commonly Used Settings. The selected printing profile ...
If a profile is deleted from the Commonly Used Settings list on the Quick Setup tab. 2. Deleting Unnecessary Printing Profile 1. Delete the printing profile Click Delete. Registered print settings cannot be deleted from Commonly Used Settings. The selected printing profile ...

User Manual
Page 107
... on your computer. 3. When you use this happens, click OK to turn the printer on from the printer driver. Open the printer driver setup window 2. Open the printer driver setup window 2. Note • If the printer is received. If necessary, complete the following settings: Auto Power On Specifying Enable from the list...
... on your computer. 3. When you use this happens, click OK to turn the printer on from the printer driver. Open the printer driver setup window 2. Open the printer driver setup window 2. Note • If the printer is received. If necessary, complete the following settings: Auto Power On Specifying Enable from the list...

User Manual
Page 109
.... 3. Reducing the Printer Noise The silent function allows you wish to reduce the operating noise of the printer at night, etc. Open the printer driver setup window 2. Always use to set the quiet mode, the mode is applied when you perform operations from the printer or printing from the computer. •...
.... 3. Reducing the Printer Noise The silent function allows you wish to reduce the operating noise of the printer at night, etc. Open the printer driver setup window 2. Always use to set the quiet mode, the mode is applied when you perform operations from the printer or printing from the computer. •...


