
User Manual
Page 4
... at Factory (Network 130 Connecting the Printer to the Computer Using a USB Cable 131 When Detecting the Printers Have the Same Name during Setup 132 Connecting to Other Computer with LAN/Changing the Connection Method from USB to LAN. . 133 Printing Out Network Setting Information 134 About ... 148 Initializing the Network Settings of the Machine 151 Viewing the Modified Settings 152 Screens for Network Connection of IJ Network Tool 153 Canon IJ Network Tool Screen 154 Configuration Screen 157 Wireless LAN Sheet 158 Search Screen 160 WEP Details Screen 162 WPA Details Screen 163 ...
... at Factory (Network 130 Connecting the Printer to the Computer Using a USB Cable 131 When Detecting the Printers Have the Same Name during Setup 132 Connecting to Other Computer with LAN/Changing the Connection Method from USB to LAN. . 133 Printing Out Network Setting Information 134 About ... 148 Initializing the Network Settings of the Machine 151 Viewing the Modified Settings 152 Screens for Network Connection of IJ Network Tool 153 Canon IJ Network Tool Screen 154 Configuration Screen 157 Wireless LAN Sheet 158 Search Screen 160 WEP Details Screen 162 WPA Details Screen 163 ...

User Manual
Page 5
... Accessible IP Address Screen/Add Accessible IP Address Screen 176 Other Screens of IJ Network Tool 177 Canon IJ Network Tool Screen 178 Status Screen 181 Connection Performance Measurement Screen 182 Maintenance Screen 184 Network Setup of the Card Slot Screen 185 Associate Port Screen 187 Network Information Screen 188 Appendix for...
... Accessible IP Address Screen/Add Accessible IP Address Screen 176 Other Screens of IJ Network Tool 177 Canon IJ Network Tool Screen 178 Status Screen 181 Connection Performance Measurement Screen 182 Maintenance Screen 184 Network Setup of the Card Slot Screen 185 Associate Port Screen 187 Network Information Screen 188 Appendix for...

User Manual
Page 6
...customers. from the File menu. 3. Press the Alt key to print background colors and images, follow the steps below. Select Page Setup... In addition, Canon may suspend or stop the disclosure of all the products sold by customers as "this guide"), in whole or in part, is ...• In Internet Explorer 8 1. Select (Tools) > Print > Page setup.... 2. To set to display the menus. See the manual supplied with utmost care, please contact the service center if you find any damage suffered by Canon. Canon shall not be liable for any incorrect or missing information. • In ...
...customers. from the File menu. 3. Press the Alt key to print background colors and images, follow the steps below. Select Page Setup... In addition, Canon may suspend or stop the disclosure of all the products sold by customers as "this guide"), in whole or in part, is ...• In Internet Explorer 8 1. Select (Tools) > Print > Page setup.... 2. To set to display the menus. See the manual supplied with utmost care, please contact the service center if you find any damage suffered by Canon. Canon shall not be liable for any incorrect or missing information. • In ...

User Manual
Page 21
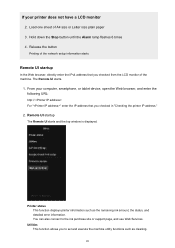
... displayed on the computer again. The authentication URL is displayed, select OK. Select Google Cloud Print setup -> Register with Google Cloud Print. Select Setup. 4. Remote UI startup 3. When authentication process is complete properly, the registration items are displayed. Select Web service... setup -> Web service connection setup -> Google Cloud Print setup -> Register with Google Cloud Print 21 Load A4 or Letter-sized plain paper, then select OK. ...
... displayed on the computer again. The authentication URL is displayed, select OK. Select Google Cloud Print setup -> Register with Google Cloud Print. Select Setup. 4. Remote UI startup 3. When authentication process is complete properly, the registration items are displayed. Select Web service... setup -> Web service connection setup -> Google Cloud Print setup -> Register with Google Cloud Print 21 Load A4 or Letter-sized plain paper, then select OK. ...

User Manual
Page 22
... monitor 2. Display the Home screen. 3. When the confirmation screen to delete the machine is turned on. Select Web service setup -> Web service connection setup -> Google Cloud Print setup -> Delete from Google Cloud Print. 4. Select Setup. 4. In the print setup for Google Cloud Print, select the display language, and then select Authentication. 6. Select Google Cloud Print...
... monitor 2. Display the Home screen. 3. When the confirmation screen to delete the machine is turned on. Select Web service setup -> Web service connection setup -> Google Cloud Print setup -> Delete from Google Cloud Print. 4. Select Setup. 4. In the print setup for Google Cloud Print, select the display language, and then select Authentication. 6. Select Google Cloud Print...

User Manual
Page 24
... from Google Cloud Print immediately When the machine cannot receive the print data, or you want to start printing manually. Display the Home screen. 3. Select Setup. 4. Follow the steps below. Make sure that the machine is displayed. 6. Select Web service inquiry. Select Print from the print image depending on the print...
... from Google Cloud Print immediately When the machine cannot receive the print data, or you want to start printing manually. Display the Home screen. 3. Select Setup. 4. Follow the steps below. Make sure that the machine is displayed. 6. Select Web service inquiry. Select Print from the print image depending on the print...

User Manual
Page 25
...8226; Before you to check printer information and execute utility functions from the operation panel of the machine. Then from the home window, select Setup -> Device settings -> LAN settings -> Confirm LAN settings -> Print LAN details, in sequence. 25 Then from the displayed window, check the...for paying all Internet connection fees. 1. You can also use the convenient web services presented by Canon. Note that the machine is connected to the Internet. From the home window, select Setup -> Device settings -> LAN settings -> Confirm LAN settings -> WLAN setting list or LAN setting...
...8226; Before you to check printer information and execute utility functions from the operation panel of the machine. Then from the home window, select Setup -> Device settings -> LAN settings -> Confirm LAN settings -> Print LAN details, in sequence. 25 Then from the displayed window, check the...for paying all Internet connection fees. 1. You can also use the convenient web services presented by Canon. Note that the machine is connected to the Internet. From the home window, select Setup -> Device settings -> LAN settings -> Confirm LAN settings -> WLAN setting list or LAN setting...
User Manual
Page 26
... set and execute the machine utility functions such as the remaining ink amount, the status, and detailed error information. Load one sheet of the network setup information starts. Hold down the Stop button until the Alarm lamp flashes 6 times 4. If your computer, smartphone, or tablet device, open the Web browser, and...
... set and execute the machine utility functions such as the remaining ink amount, the status, and detailed error information. Load one sheet of the network setup information starts. Hold down the Stop button until the Alarm lamp flashes 6 times 4. If your computer, smartphone, or tablet device, open the Web browser, and...

User Manual
Page 27
Manual (Online) This function displays the Online Manual. Network Configuration This function displays the network settings. 27 Firmware update This function allows you to specify the Apple AirPrint settings, such as position information. AirPrint settings This function allows you to update the firmware and check version information. Google Cloud Print setup This function allows you to register this machine to Google Cloud Print or delete the machine.
Manual (Online) This function displays the Online Manual. Network Configuration This function displays the network settings. 27 Firmware update This function allows you to specify the Apple AirPrint settings, such as position information. AirPrint settings This function allows you to update the firmware and check version information. Google Cloud Print setup This function allows you to register this machine to Google Cloud Print or delete the machine.

User Manual
Page 101
... confirmation message. 5. Deep Cleaning Deep Cleaning is to clear up clogged print head nozzle. Print head cleaning starts. 4. Open the printer driver setup window 2. To cancel the check process, click Cancel. Click Deep Cleaning on the Maintenance tab When the Print Head Cleaning dialog box opens, ...select the ink group for cleaning the print head is on and then click Execute. Open the printer driver setup window 2. Important • Cleaning consumes a small amount of ink. If cleaning the head once does not resolve the print head problem,...
... confirmation message. 5. Deep Cleaning Deep Cleaning is to clear up clogged print head nozzle. Print head cleaning starts. 4. Open the printer driver setup window 2. To cancel the check process, click Cancel. Click Deep Cleaning on the Maintenance tab When the Print Head Cleaning dialog box opens, ...select the ink group for cleaning the print head is on and then click Execute. Open the printer driver setup window 2. Important • Cleaning consumes a small amount of ink. If cleaning the head once does not resolve the print head problem,...

User Manual
Page 103
... have stopped, follow the instruction in the message, load three sheets of paper from Your Computer Cleans the paper feed rollers. Open the printer driver setup window 3. Paper feed roller cleaning starts. 5. Paper will be ejected and feed roller cleaning will be completed. 103 Cleaning the Paper Feed Rollers from the...
... have stopped, follow the instruction in the message, load three sheets of paper from Your Computer Cleans the paper feed rollers. Open the printer driver setup window 3. Paper feed roller cleaning starts. 5. Paper will be ejected and feed roller cleaning will be completed. 103 Cleaning the Paper Feed Rollers from the...

User Manual
Page 105
Normally, the printer is printed only in progress. Open the printer driver setup window 2. Execute head alignment Make sure that the printer is in black and blue. If the printing results of A4 size or Letter size plain ...
Normally, the printer is printed only in progress. Open the printer driver setup window 2. Execute head alignment Make sure that the printer is in black and blue. If the printing results of A4 size or Letter size plain ...

User Manual
Page 106
... the rear tray. 7. Normally, the printer is disabled, an error message may appear because the computer cannot collect the printer status. Open the printer driver setup window 2. If the printing results of automatic print head alignment are not satisfactory, perform manual head alignment. Print Head Alignment 1. Click Print Head Alignment on...
... the rear tray. 7. Normally, the printer is disabled, an error message may appear because the computer cannot collect the printer status. Open the printer driver setup window 2. If the printing results of automatic print head alignment are not satisfactory, perform manual head alignment. Print Head Alignment 1. Click Print Head Alignment on...

User Manual
Page 110
... 1. Related Topic Cleaning the Print Heads from Your Computer 110 The procedure for printing a nozzle check pattern is normal, click Exit. Open the printer driver setup window 2. Use Your Computer to Print a Nozzle Check Pattern The nozzle check function allows you need to check before printing the nozzle check pattern. 3. Load...
... 1. Related Topic Cleaning the Print Heads from Your Computer 110 The procedure for printing a nozzle check pattern is normal, click Exit. Open the printer driver setup window 2. Use Your Computer to Print a Nozzle Check Pattern The nozzle check function allows you need to check before printing the nozzle check pattern. 3. Load...

User Manual
Page 111
... ink smudges caused by something other than print data appear on the Maintenance tab The Bottom Plate Cleaning dialog box opens. 3. Open the printer driver setup window 2. Perform the bottom plate cleaning Make sure that the printer is as follows: Bottom Plate Cleaning 1. Cleaning Inside the Printer Perform bottom plate cleaning...
... ink smudges caused by something other than print data appear on the Maintenance tab The Bottom Plate Cleaning dialog box opens. 3. Open the printer driver setup window 2. Perform the bottom plate cleaning Make sure that the printer is as follows: Bottom Plate Cleaning 1. Cleaning Inside the Printer Perform bottom plate cleaning...
User Manual
Page 118
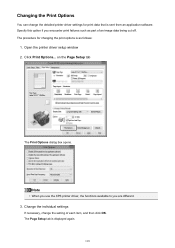
Specify this option if you are different. 3. on the Page Setup tab The Print Options dialog box opens. Note • When you use the XPS printer driver, the functions available to you encounter print failures such .... Changing the Print Options You can change the setting of an image data being cut off. Click Print Options... The Page Setup tab is displayed again. 118 Open the printer driver setup window 2. Change the individual settings If necessary, change the detailed printer driver settings for changing the print options is as...
Specify this option if you are different. 3. on the Page Setup tab The Print Options dialog box opens. Note • When you use the XPS printer driver, the functions available to you encounter print failures such .... Changing the Print Options You can change the setting of an image data being cut off. Click Print Options... The Page Setup tab is displayed again. 118 Open the printer driver setup window 2. Change the individual settings If necessary, change the detailed printer driver settings for changing the print options is as...

User Manual
Page 119
...Save Commonly Used Settings dialog box, click OK to save the print settings and return to Commonly Used Settings on the Quick Setup tab. The procedure for registering a printing profile is as follows: Registering a Printing Profile 1. Open the printer driver... setup window 2. You can also register necessary items on the Quick Setup tab, select the printing profile to be deleted at any time. Unnecessary printing profiles can register the frequently used and ...
...Save Commonly Used Settings dialog box, click OK to save the print settings and return to Commonly Used Settings on the Quick Setup tab. The procedure for registering a printing profile is as follows: Registering a Printing Profile 1. Open the printer driver... setup window 2. You can also register necessary items on the Quick Setup tab, select the printing profile to be deleted at any time. Unnecessary printing profiles can register the frequently used and ...

User Manual
Page 120
.... 120 The selected printing profile is deleted, register the print settings again. If a profile is deleted from the Commonly Used Settings list on the Quick Setup tab. 2. Select the printing profile to delete from the Commonly Used Settings list. Delete the printing profile Click Delete. Important • To save the page...
.... 120 The selected printing profile is deleted, register the print settings again. If a profile is deleted from the Commonly Used Settings list on the Quick Setup tab. 2. Select the printing profile to delete from the Commonly Used Settings list. Delete the printing profile Click Delete. Important • To save the page...

User Manual
Page 121
Managing the Printer Power This function allows you will turn the printer on from the printer driver. 1. Open the printer driver setup window 2. Execute power off or if communication between the printer and the computer is displayed again. When the confirmation message appears, click OK. The Auto ... lapses without any operations from the list. When this happens, click OK to set Auto Power On and Auto Power Off. Open the printer driver setup window 2. Auto Power Auto Power allows you to display the most recent settings specified on the Maintenance tab.
Managing the Printer Power This function allows you will turn the printer on from the printer driver. 1. Open the printer driver setup window 2. Execute power off or if communication between the printer and the computer is displayed again. When the confirmation message appears, click OK. The Auto ... lapses without any operations from the list. When this happens, click OK to set Auto Power On and Auto Power Off. Open the printer driver setup window 2. Auto Power Auto Power allows you to display the most recent settings specified on the Maintenance tab.

User Manual
Page 123
... is disabled, an error message may lower the print speed. The procedure for Use quiet mode during a specified period of time. Open the printer driver setup window 2. Apply the settings Make sure that the printer is not applied to the same time, the quiet mode will not function. Select when you...
... is disabled, an error message may lower the print speed. The procedure for Use quiet mode during a specified period of time. Open the printer driver setup window 2. Apply the settings Make sure that the printer is not applied to the same time, the quiet mode will not function. Select when you...


