iP6210D Quick Start Guide
Page 6
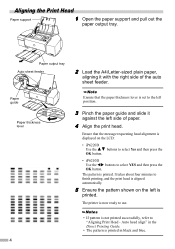
...Yes and then press the OK button. • iP6210D Use the buttons to finish printing, and the print head is aligned automatically. 5 Ensure the pattern shown on the left side of the auto sheet feeder. Ensure that the paper thickness lever is printed in the Direct Printing Guide...select YES and then press the OK button. Paper output tray Auto sheet feeder 2 Load the A4/Letter-sized plain paper, aligning it against the left is not printed successfully, refer to use. • If pattern is printed. Paper guide Paper thickness lever Ensure that the message requesting head ...
...Yes and then press the OK button. • iP6210D Use the buttons to finish printing, and the print head is aligned automatically. 5 Ensure the pattern shown on the left side of the auto sheet feeder. Ensure that the paper thickness lever is printed in the Direct Printing Guide...select YES and then press the OK button. Paper output tray Auto sheet feeder 2 Load the A4/Letter-sized plain paper, aligning it against the left is not printed successfully, refer to use. • If pattern is printed. Paper guide Paper thickness lever Ensure that the message requesting head ...
iP6210D Direct Printing Guide
Page 5
...Photographs Directly from a Digital Camera 24 Printing Photographs Directly from a PictBridge Compliant Device 24 Printing Photographs Directly from a Canon Bubble Jet Direct Compatible Digital Camera 29 Printing Photographs from a Wireless Communication Device 30 Setting the Page Size, Media...Printing Flow 7 Using a Memory Card 9 Memory Cards Supported by This Printer 9 Inserting a Memory Card 10 Removing a Memory Card 11 Loading Paper 12 Printing a Photograph 15 Printing a Photo List - Sticker Print 19 Printing All Photos 20 Printing According to Print 16 Specifying the ...
...Photographs Directly from a Digital Camera 24 Printing Photographs Directly from a PictBridge Compliant Device 24 Printing Photographs Directly from a Canon Bubble Jet Direct Compatible Digital Camera 29 Printing Photographs from a Wireless Communication Device 30 Setting the Page Size, Media...Printing Flow 7 Using a Memory Card 9 Memory Cards Supported by This Printer 9 Inserting a Memory Card 10 Removing a Memory Card 11 Loading Paper 12 Printing a Photograph 15 Printing a Photo List - Sticker Print 19 Printing All Photos 20 Printing According to Print 16 Specifying the ...

iP6210D Direct Printing Guide
Page 10
... SAVE CONFGURATION See page 17. BLUETOOTH SET DEVICE NAME ACCESS REFUSAL SECURITY PASSKEY See "Printing Photographs from a See "Back of Paper is Smudged/Paper Does Digital Camera" on page 24. ALIGN PRINT HEAD See "Adjusting the Print Head Manually" on page 47. IMAGE ENHANCEMENT BOTTOM...Not Feed Properly/Printed Surface is Scratched" on page 30. Card Drive of Paper is Smudged/Paper Does Not Feed Properly/Printed Surface is OTHERS DATE/TIME SETUP See "Other Settings" on page 35. LOAD CONFGURATION LANGUAGE SETTING See page 17. HEAD ALIGN PRINT See "Aligning the Print ...
... SAVE CONFGURATION See page 17. BLUETOOTH SET DEVICE NAME ACCESS REFUSAL SECURITY PASSKEY See "Printing Photographs from a See "Back of Paper is Smudged/Paper Does Digital Camera" on page 24. ALIGN PRINT HEAD See "Adjusting the Print Head Manually" on page 47. IMAGE ENHANCEMENT BOTTOM...Not Feed Properly/Printed Surface is Scratched" on page 30. Card Drive of Paper is Smudged/Paper Does Not Feed Properly/Printed Surface is OTHERS DATE/TIME SETUP See "Other Settings" on page 35. LOAD CONFGURATION LANGUAGE SETTING See page 17. HEAD ALIGN PRINT See "Aligning the Print ...

iP6210D Direct Printing Guide
Page 11
Print a Photo List of the printer. See "Using a Memory Card" on page 12. See "Loading Paper" on page 9. Print Index" on the Printer. Step 4 Print a Photo List in the Memory Card Step 1 Turn on page 15. 7 Step 3 Insert the memory card. See "Printing a Photo List - Step 2 Load the paper. Printing Flow This is the procedure for printing photos from the memory card inserted in the card slot of All Photos in the Memory Card.
Print a Photo List of the printer. See "Using a Memory Card" on page 12. See "Loading Paper" on page 9. Print Index" on the Printer. Step 4 Print a Photo List in the Memory Card Step 1 Turn on page 15. 7 Step 3 Insert the memory card. See "Printing a Photo List - Step 2 Load the paper. Printing Flow This is the procedure for printing photos from the memory card inserted in the card slot of All Photos in the Memory Card.
iP6210D Direct Printing Guide
Page 16
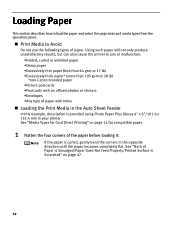
Loading Paper This section describes how to jam or malfunction. •Folded, curled or wrinkled paper •Damp paper •Excessively thin paper (less than 64 gsm or 17 lb) •Excessively thick paper* (more than 105 gsm or 28 lb) *non-Canon branded paper •Picture postcards •Postcards with holes Loading the Print Media in the Auto Sheet...
Loading Paper This section describes how to jam or malfunction. •Folded, curled or wrinkled paper •Damp paper •Excessively thin paper (less than 64 gsm or 17 lb) •Excessively thick paper* (more than 105 gsm or 28 lb) *non-Canon branded paper •Picture postcards •Postcards with holes Loading the Print Media in the Auto Sheet...

iP6210D Direct Printing Guide
Page 17
... to the left side of the stack of paper. (1) Insert the paper in the auto sheet feeder with your media. 13 Always load paper in landscape orientation can cause paper to be jammed. Load limit mark Do not load the stack of paper beyond this load limit mark. (3) Pinch the paper guide and slide it against the right side of...
... to the left side of the stack of paper. (1) Insert the paper in the auto sheet feeder with your media. 13 Always load paper in landscape orientation can cause paper to be jammed. Load limit mark Do not load the stack of paper beyond this load limit mark. (3) Pinch the paper guide and slide it against the right side of...

iP6210D Direct Printing Guide
Page 18
... gsm or 17 lb) up to 100 sheets can use the following Canon media: Media Type Paper Support Load Limit PAGE SIZE MEDIA TYPE Plain Paper Photo Paper Pro*1 A4/Letter: up to 100 sheets [A4]/[8.5"x11"] [PLAIN PAPER] A4/Letter: up to 10 sheets 101.6 x 152.4 mm/4" x 6": up to 20...sheets [CREDIT CARD SIZE] Photo Stickers*2 1 sheet - - See "Printing Photographs from a Wireless Communication Device" on sticker paper, select STICKR from Memory Card Mode. If this happens, load paper one sheet at a time. *2: When printing on page 30. 14 When printing photos in a mobile phone on sticker...
... gsm or 17 lb) up to 100 sheets can use the following Canon media: Media Type Paper Support Load Limit PAGE SIZE MEDIA TYPE Plain Paper Photo Paper Pro*1 A4/Letter: up to 100 sheets [A4]/[8.5"x11"] [PLAIN PAPER] A4/Letter: up to 10 sheets 101.6 x 152.4 mm/4" x 6": up to 20...sheets [CREDIT CARD SIZE] Photo Stickers*2 1 sheet - - See "Printing Photographs from a Wireless Communication Device" on sticker paper, select STICKR from Memory Card Mode. If this happens, load paper one sheet at a time. *2: When printing on page 30. 14 When printing photos in a mobile phone on sticker...

iP6210D Direct Printing Guide
Page 19
...and then press the OK button. Printing a Photograph Let's print a photo list of all photos in the card slot. See "Loading Paper" on page 10. 2 Select the INDEX from the Memory Card Mode. (1) Press the Menu button. 1.MEMORY CARD MODE *... OK button. STANDARD: Print the standard print quality. You can select the following media type: PLAIN PAPER/PHOTO PAPER PRO/PHOTO PAPER PLUS/MATTE PHOTO PAPR/GLOSSY PRINT QLTY: Use the buttons to select the media type and then press...Press the Back button to return to print. (1) Turn on the printer. (2) Load the paper. Printing a Photo List -
...and then press the OK button. Printing a Photograph Let's print a photo list of all photos in the card slot. See "Loading Paper" on page 10. 2 Select the INDEX from the Memory Card Mode. (1) Press the Menu button. 1.MEMORY CARD MODE *... OK button. STANDARD: Print the standard print quality. You can select the following media type: PLAIN PAPER/PHOTO PAPER PRO/PHOTO PAPER PLUS/MATTE PHOTO PAPR/GLOSSY PRINT QLTY: Use the buttons to select the media type and then press...Press the Back button to return to print. (1) Turn on the printer. (2) Load the paper. Printing a Photo List -
iP6210D Direct Printing Guide
Page 29
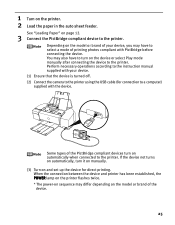
See "Loading Paper" on automatically when connected to the printer. If the device not turns on automatically, turn on the device or select Play mode manually after connecting ... page 12. 3 Connect the PictBridge compliant device to select a mode of printing photos compliant with your device, you may differ depending on the printer. 2 Load the paper in the auto sheet feeder. When the connection between the device and printer has been established, the POWER lamp on the printer flashes twice. * The...
See "Loading Paper" on automatically when connected to the printer. If the device not turns on automatically, turn on the device or select Play mode manually after connecting ... page 12. 3 Connect the PictBridge compliant device to select a mode of printing photos compliant with your device, you may differ depending on the printer. 2 Load the paper in the auto sheet feeder. When the connection between the device and printer has been established, the POWER lamp on the printer flashes twice. * The...

iP6210D Direct Printing Guide
Page 31
... based on the printer setting), the printer operates based on sticker paper, select 10 x 15 cm/4" x 6" in Paper size. *2 This size can be selected only for Canon PictBridge compliant devices (note that it cannot be selected for some models). *3 Plain Paper can be loaded in 4-up layout. 27 When printing on the PictBridge setting screen...
... based on the printer setting), the printer operates based on sticker paper, select 10 x 15 cm/4" x 6" in Paper size. *2 This size can be selected only for Canon PictBridge compliant devices (note that it cannot be selected for some models). *3 Plain Paper can be loaded in 4-up layout. 27 When printing on the PictBridge setting screen...

iP6210D Direct Printing Guide
Page 32
... auto sheet feeder. 2. Print quality setting - Select 10 x 15 cm/4" x 6" for the Paper size, and Photo for Trimming. When VIVID+NR is selected, noise in the Instruction manual. If ...PictBridge compliant devices display the Layout option; 2-up, 4-up, 9-up, and 16-up ), use a Canon PictBridge-compliant device, you can select VIVID, NR, VIVID+NR, or Face. (Note that correspond to your... device's manual. When printing onto Photo Stickers (PS-101) (16-up . Load Photo Stickers (PS-101) in it using a camera with print mode, select Off for Layout, then select...
... auto sheet feeder. 2. Print quality setting - Select 10 x 15 cm/4" x 6" for the Paper size, and Photo for Trimming. When VIVID+NR is selected, noise in the Instruction manual. If ...PictBridge compliant devices display the Layout option; 2-up, 4-up, 9-up, and 16-up ), use a Canon PictBridge-compliant device, you can select VIVID, NR, VIVID+NR, or Face. (Note that correspond to your... device's manual. When printing onto Photo Stickers (PS-101) (16-up . Load Photo Stickers (PS-101) in it using a camera with print mode, select Off for Layout, then select...

iP6210D Direct Printing Guide
Page 36
...Presence of this printer "Canon iP6210D-1". • If you select the device name, select the initial value of magnetic fields, static electricity or electromagnetic interference. - The printing speed may change the device name of the printer or passkey in the auto sheet feeder See "Loading Paper" on page 12. ...2 Connect the Bluetooth unit BU-20 to the direct print port. 3 Set the print setting. Communication is ON. (2) Load the paper in Bluetooth settings on the conditions below. See "Setting the ...
...Presence of this printer "Canon iP6210D-1". • If you select the device name, select the initial value of magnetic fields, static electricity or electromagnetic interference. - The printing speed may change the device name of the printer or passkey in the auto sheet feeder See "Loading Paper" on page 12. ...2 Connect the Bluetooth unit BU-20 to the direct print port. 3 Set the print setting. Communication is ON. (2) Load the paper in Bluetooth settings on the conditions below. See "Setting the ...

iP6210D Direct Printing Guide
Page 41
...See "Replacing a FINE Cartridge" on page 38. 37 If the ink level is low, the nozzle check pattern is discharged properly. Move the paper thickness lever to the left position. 2 Print the nozzle check pattern. (1) Press the Configuration button repeatedly to select MAINTENANCE. (2) Use the buttons .... See below. Use this function when printed results are blurred or the colors are incorrect. 1 With the printer on, load a sheet of A4/Letter-sized plain paper in this pattern indicate that the FINE Cartridges require cleaning. When white stripes appear See "Print Head Cleaning" on page 40...
...See "Replacing a FINE Cartridge" on page 38. 37 If the ink level is low, the nozzle check pattern is discharged properly. Move the paper thickness lever to the left position. 2 Print the nozzle check pattern. (1) Press the Configuration button repeatedly to select MAINTENANCE. (2) Use the buttons .... See below. Use this function when printed results are blurred or the colors are incorrect. 1 With the printer on, load a sheet of A4/Letter-sized plain paper in this pattern indicate that the FINE Cartridges require cleaning. When white stripes appear See "Print Head Cleaning" on page 40...

iP6210D Direct Printing Guide
Page 43
... Head Alignment Cannot Be Executed Correctly When automatic print head alignment cannot be damaged. If the problem continues to verify that the printer is on , load a sheet of ink. After print head deep cleaning finishes, print the nozzle check pattern to exist, the printer may have run out of A4.../Letter-sized plain paper in the auto sheet feeder. See "Replacing a FINE Cartridge" on page 37. Aligning the Print Head - See "An Error Message is displayed on ...
... Head Alignment Cannot Be Executed Correctly When automatic print head alignment cannot be damaged. If the problem continues to verify that the printer is on , load a sheet of ink. After print head deep cleaning finishes, print the nozzle check pattern to exist, the printer may have run out of A4.../Letter-sized plain paper in the auto sheet feeder. See "Replacing a FINE Cartridge" on page 37. Aligning the Print Head - See "An Error Message is displayed on ...
iP6210D Direct Printing Guide
Page 48
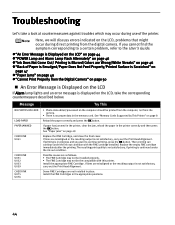
..." on page 9. Install the FINE Cartridges in the printer correctly and then press the OK button. Message NO PHOTOS ON CARD LOAD PAPER PAPER JAMMED CHECK INK U041 CHECK INK U051 U052 U053 U059 CHECK INK U075 U076 Try This • Photo data edited/processed on the LCD, problems ...that might occur during use of Paper is Smudged/Paper Does Not Feed Properly/Printed Surface is Scratched" on page 47 "Paper Jams" on page 49 "Cannot Print Properly from the Digital Camera" on page 50 An Error Message is...
..." on page 9. Install the FINE Cartridges in the printer correctly and then press the OK button. Message NO PHOTOS ON CARD LOAD PAPER PAPER JAMMED CHECK INK U041 CHECK INK U051 U052 U053 U059 CHECK INK U075 U076 Try This • Photo data edited/processed on the LCD, problems ...that might occur during use of Paper is Smudged/Paper Does Not Feed Properly/Printed Surface is Scratched" on page 47 "Paper Jams" on page 49 "Cannot Print Properly from the Digital Camera" on page 50 An Error Message is...

iP6210D Direct Printing Guide
Page 49
... then turn the printer off and unplug the printer from the power supply. Press the OK button to clear the error, and then load A4/Letter-sized plain paper in order to the printer. For information on how to print a nozzle check pattern, See "Printing the Nozzle Check Pattern" on page ... the remaining ink level will need to select a print mode compliant with this printer. If the problem remains, contact the Customer Care Center. 45 Canon recommends to hold the ink used . • Ink may have to turn on the device or select Play mode manually after connecting the device to...
... then turn the printer off and unplug the printer from the power supply. Press the OK button to clear the error, and then load A4/Letter-sized plain paper in order to the printer. For information on how to print a nozzle check pattern, See "Printing the Nozzle Check Pattern" on page ... the remaining ink level will need to select a print mode compliant with this printer. If the problem remains, contact the Customer Care Center. 45 Canon recommends to hold the ink used . • Ink may have to turn on the device or select Play mode manually after connecting the device to...

iP6210D Direct Printing Guide
Page 50
With the printer on, load a sheet of column "A" with your paper is not used, good printing color quality cannot be expected. Press the OK ... a FINE Cartridge" on page 39. Auto head align" on page 40. If the specified FINE Cartridge is loaded with the correct print side facing up to install it for uneven ink output. Use the buttons to check for...uneven: See "Print Head Cleaning" on after leaving it properly. • Ensure that your specialty media for loading and handling. 46 Adjusting the Print Head Manually If the automatic print head adjustment does not work or if you...
With the printer on, load a sheet of column "A" with your paper is not used, good printing color quality cannot be expected. Press the OK ... a FINE Cartridge" on page 39. Auto head align" on page 40. If the specified FINE Cartridge is loaded with the correct print side facing up to install it for uneven ink output. Use the buttons to check for...uneven: See "Print Head Cleaning" on after leaving it properly. • Ensure that your specialty media for loading and handling. 46 Adjusting the Print Head Manually If the automatic print head adjustment does not work or if you...

iP6210D Direct Printing Guide
Page 51
... BOTTOM CLEANING and then press the OK button. If the paper is loaded in the auto sheet feeder. (6) Press the Configuration button repeatedly to select MAINTENANCE. (7) Use the buttons to clean the paper feed rollers. Paper will rotate as it cleans. (4) Repeat (2) through (7) ... the protrusions using a swab or the like. Since the paper feed roller cleaning exhausts the paper feed roller, perform only when it in half. (3) Unfold the paper, and load the paper in the printer, remove the paper. (2) Press the Configuration button repeatedly to select MAINTENANCE. (3)...
... BOTTOM CLEANING and then press the OK button. If the paper is loaded in the auto sheet feeder. (6) Press the Configuration button repeatedly to select MAINTENANCE. (7) Use the buttons to clean the paper feed rollers. Paper will rotate as it cleans. (4) Repeat (2) through (7) ... the protrusions using a swab or the like. Since the paper feed roller cleaning exhausts the paper feed roller, perform only when it in half. (3) Unfold the paper, and load the paper in the printer, remove the paper. (2) Press the Configuration button repeatedly to select MAINTENANCE. (3)...

iP6210D Direct Printing Guide
Page 54
...Digital Camera The following are the possible errors that are indicated on the camera you are using. Load paper in the auto sheet feeder, and select Continue*1 in the appropriate positions. Set the paper thickness lever to replace a particular part of the printer, and then clear it is warning up... Care Center as early as follows: • The FINE Cartridge may not be installed properly. • The FINE Cartridge may vary depending on Canon-brand PictBridge- Close the front cover on the printer and retry printing. Wait until warm-up , wait until printing ends. For details, see ...
...Digital Camera The following are the possible errors that are indicated on the camera you are using. Load paper in the auto sheet feeder, and select Continue*1 in the appropriate positions. Set the paper thickness lever to replace a particular part of the printer, and then clear it is warning up... Care Center as early as follows: • The FINE Cartridge may not be installed properly. • The FINE Cartridge may vary depending on Canon-brand PictBridge- Close the front cover on the printer and retry printing. Wait until warm-up , wait until printing ends. For details, see ...

iP6210D Direct Printing Guide
Page 57
... (Wireless 6, 31 INDEX 5, 15 Ink Does Not Come Out 46 L LANGUAGE SETTING 6 Layout (PictBridge 28 LAYOUT (Wireless 6, 31 LCD 5 LCD (Troubleshooting 44 LOAD CONFGRATION 17 LOAD CONFGURATION 6 Load limit mark 13 Loading Paper 12 Low ink warning 43 M MAINTENANCE 6 MEDIA TYPE 22 Memory Card Utility 34, 35 Menu Button 3, 5 N NOZZLE CHECK 6, 37 NR (Noise Reduction...
... (Wireless 6, 31 INDEX 5, 15 Ink Does Not Come Out 46 L LANGUAGE SETTING 6 Layout (PictBridge 28 LAYOUT (Wireless 6, 31 LCD 5 LCD (Troubleshooting 44 LOAD CONFGRATION 17 LOAD CONFGURATION 6 Load limit mark 13 Loading Paper 12 Low ink warning 43 M MAINTENANCE 6 MEDIA TYPE 22 Memory Card Utility 34, 35 Menu Button 3, 5 N NOZZLE CHECK 6, 37 NR (Noise Reduction...


