iP5200R Quick Start Guide
Page 5
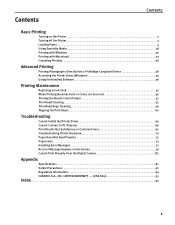
... Advanced Printing Printing Photographs Directly from a PictBridge Compliant Device 28 Accessing the Printer Driver (Windows 35 Using the Bundled Software 36 Printing Maintenance Replacing an Ink Tank 37 When Printing Becomes Faint or Colors are Incorrect 46 Printing the Nozzle Check Pattern 47 Print Head Cleaning 52 Print Head Deep Cleaning... An Error Message Appears on the Screen 79 Cannot Print Properly from the Digital Camera 82 Appendix Specifications 87 Safety Precautions 92 Regulatory Information 94 CANON U.S.A., INC. LIMITED WARRANTY --- (USA Only 95 Index 97 1
... Advanced Printing Printing Photographs Directly from a PictBridge Compliant Device 28 Accessing the Printer Driver (Windows 35 Using the Bundled Software 36 Printing Maintenance Replacing an Ink Tank 37 When Printing Becomes Faint or Colors are Incorrect 46 Printing the Nozzle Check Pattern 47 Print Head Cleaning 52 Print Head Deep Cleaning... An Error Message Appears on the Screen 79 Cannot Print Properly from the Digital Camera 82 Appendix Specifications 87 Safety Precautions 92 Regulatory Information 94 CANON U.S.A., INC. LIMITED WARRANTY --- (USA Only 95 Index 97 1
iP5200R Quick Start Guide
Page 12
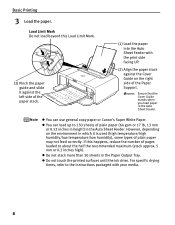
... the Paper Output Tray. However, depending on the right side of plain paper may not feed correctly. z Do not touch the printed surfaces until the ink dries. For specific drying times, refer to about the half the recommended maximum (stack approx. 5 mm or 0.2 inches high). If this Load Limit Mark. (3) Pinch... stack against the Cover Guide on the environment in the Auto Sheet Feeder. Basic Printing 3 Load the paper. z You can use general copy paper or Canon's Super White Paper.
... the Paper Output Tray. However, depending on the right side of plain paper may not feed correctly. z Do not touch the printed surfaces until the ink dries. For specific drying times, refer to about the half the recommended maximum (stack approx. 5 mm or 0.2 inches high). If this Load Limit Mark. (3) Pinch... stack against the Cover Guide on the environment in the Auto Sheet Feeder. Basic Printing 3 Load the paper. z You can use general copy paper or Canon's Super White Paper.

iP5200R Quick Start Guide
Page 18
z Do not touch the printed surfaces until the ink dries. For specific drying times, refer to the instructions packaged with the printer driver. Basic Printing 5 Insert the Cassette into the printer. (1) Set the Cover ...
z Do not touch the printed surfaces until the ink dries. For specific drying times, refer to the instructions packaged with the printer driver. Basic Printing 5 Insert the Cassette into the printer. (1) Set the Cover ...
iP5200R Quick Start Guide
Page 41
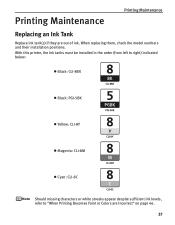
When replacing them, check the model numbers and their installation positions. Printing Maintenance Printing Maintenance Replacing an Ink Tank Replace ink tank(s) if they are Incorrect" on page 46. 37 With this printer, the ink tanks must be installed in the order (from left to right) indicated below: z Black: CLI-8BK z Black: PGI-5BK z Yellow: CLI-8Y z Magenta: CLI-8M z Cyan: CLI-8C Should missing characters or white streaks appear despite sufficient ink levels, refer to "When Printing Becomes Faint or Colors are out of ink.
When replacing them, check the model numbers and their installation positions. Printing Maintenance Printing Maintenance Replacing an Ink Tank Replace ink tank(s) if they are Incorrect" on page 46. 37 With this printer, the ink tanks must be installed in the order (from left to right) indicated below: z Black: CLI-8BK z Black: PGI-5BK z Yellow: CLI-8Y z Magenta: CLI-8M z Cyan: CLI-8C Should missing characters or white streaks appear despite sufficient ink levels, refer to "When Printing Becomes Faint or Colors are out of ink.
iP5200R Quick Start Guide
Page 42
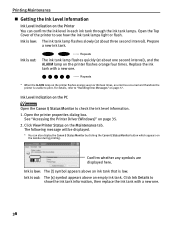
... Canon IJ Status Monitor to see how the ink tank lamps light or flash. Ink is low. Click Ink Details to show the ink tank information, then replace the ink tank with a new one. Ink is low: The [!] symbol appears above an ink tank that is out: The [x] symbol appears above an empty ink tank. Ink ... following message will be displayed. * You can also display the Canon IJ Status Monitor by clicking the Canon IJ Status Monitor button which appears on the Printer You can confirm the ink level in each ink tank through the ink tank lamps. Open the Top Cover of the printer to check the...
... Canon IJ Status Monitor to see how the ink tank lamps light or flash. Ink is low. Click Ink Details to show the ink tank information, then replace the ink tank with a new one. Ink is low: The [!] symbol appears above an ink tank that is out: The [x] symbol appears above an empty ink tank. Ink ... following message will be displayed. * You can also display the Canon IJ Status Monitor by clicking the Canon IJ Status Monitor button which appears on the Printer You can confirm the ink level in each ink tank through the ink tank lamps. Open the Top Cover of the printer to check the...
iP5200R Quick Start Guide
Page 43
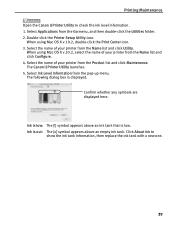
... the Go menu, and then double-click the Utilities folder. 2. Ink is low: The [!] symbol appears above an empty ink tank. Printing Maintenance Open the Canon IJ Printer Utility to show the ink tank information, then replace the ink tank with a new one. 39 When using Mac OS X v.10....2, double-click the Print Center icon. 3. The Canon IJ Printer Utility launches. 5. Confirm...
... the Go menu, and then double-click the Utilities folder. 2. Ink is low: The [!] symbol appears above an empty ink tank. Printing Maintenance Open the Canon IJ Printer Utility to show the ink tank information, then replace the ink tank with a new one. 39 When using Mac OS X v.10....2, double-click the Print Center icon. 3. The Canon IJ Printer Utility launches. 5. Confirm...
iP5200R Quick Start Guide
Page 44
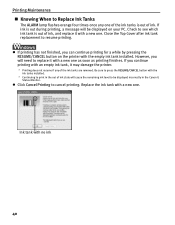
...new one . Be sure to press the RESUME/CANCEL button with a new one of the ink tanks is out of ink state will be displayed incorrectly in the Canon IJ Status Monitor. Printing Maintenance „ Knowing When to Replace Ink Tanks The ALARM lamp flashes orange four times once any of the... ink tanks are removed. z Click Cancel Printing to resume printing. Check to print in the out of ink, and replace it may...
...new one . Be sure to press the RESUME/CANCEL button with a new one of the ink tanks is out of ink state will be displayed incorrectly in the Canon IJ Status Monitor. Printing Maintenance „ Knowing When to Replace Ink Tanks The ALARM lamp flashes orange four times once any of the... ink tanks are removed. z Click Cancel Printing to resume printing. Check to print in the out of ink, and replace it may...
iP5200R Quick Start Guide
Page 45
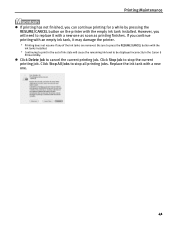
... will cause the remaining ink level to be displayed incorrectly in the Canon IJ Printer Utility. z Click Delete Job to stop all printing jobs. If you can continue printing for a while by pressing the RESUME/CANCEL button on the printer with the empty ink tank installed. Replace the ink tank with a new ... replace it may damage the printer. * Printing does not resume if any of ink state will need to stop the current printing job. Printing Maintenance z If printing has not finished, you continue printing with an empty ink tank, it with a new one . 41 Click Stop Job to cancel the ...
... will cause the remaining ink level to be displayed incorrectly in the Canon IJ Printer Utility. z Click Delete Job to stop all printing jobs. If you can continue printing for a while by pressing the RESUME/CANCEL button on the printer with the empty ink tank installed. Replace the ink tank with a new ... replace it may damage the printer. * Printing does not resume if any of ink state will need to stop the current printing job. Printing Maintenance z If printing has not finished, you continue printing with an empty ink tank, it with a new one . 41 Click Stop Job to cancel the ...
iP5200R Quick Start Guide
Page 46
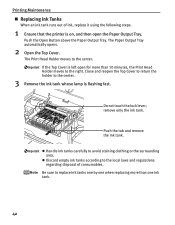
...moves to the right. Push the Open Button above the Paper Output Tray. z Discard empty ink tanks according to avoid staining clothing or the surrounding area. Printing Maintenance „ Replacing Ink Tanks When an ink tank runs out of consumables. If the Top Cover is flashing fast. Push the tab ...and remove the ink tank. Close and reopen the Top Cover to return the holder to the center...
...moves to the right. Push the Open Button above the Paper Output Tray. z Discard empty ink tanks according to avoid staining clothing or the surrounding area. Printing Maintenance „ Replacing Ink Tanks When an ink tank runs out of consumables. If the Top Cover is flashing fast. Push the tab ...and remove the ink tank. Close and reopen the Top Cover to return the holder to the center...
iP5200R Quick Start Guide
Page 47
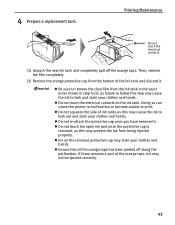
... tape. z Be sure to leak and stain your clothes and hands. z Do not squeeze the side of ink tanks as this may prevent the ink from being ejected properly. If there remains a part of the ink tank and discard it . 4 Prepare a replacement tank. Printing Maintenance Do not touch the electrical contacts. (1) Unpack ...the new ink tank and completely pull off along the perforation. z Do not re-attach the protective cap once you have removed it . z Do not touch the ...
... tape. z Be sure to leak and stain your clothes and hands. z Do not squeeze the side of ink tanks as this may prevent the ink from being ejected properly. If there remains a part of the ink tank and discard it . 4 Prepare a replacement tank. Printing Maintenance Do not touch the electrical contacts. (1) Unpack ...the new ink tank and completely pull off along the perforation. z Do not re-attach the protective cap once you have removed it . z Do not touch the ...

iP5200R Quick Start Guide
Page 48
Lamp lights red (1) Insert the ink tank into the Print Head. (2) Press on the mark on the ink tank until the ink tank snaps firmly into place. (3) Ensure that all the ink tanks are installed in the order directed by the label. Ensure that the ink tank lamp lights red. Printing Maintenance 5 Insert the ink tank. The printer cannot be used unless all the ink tanks are installed. 44
Lamp lights red (1) Insert the ink tank into the Print Head. (2) Press on the mark on the ink tank until the ink tank snaps firmly into place. (3) Ensure that all the ink tanks are installed in the order directed by the label. Ensure that the ink tank lamp lights red. Printing Maintenance 5 Insert the ink tank. The printer cannot be used unless all the ink tanks are installed. 44
iP5200R Quick Start Guide
Page 49
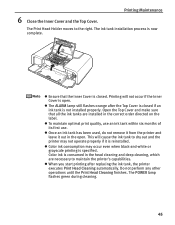
... Cover. Open the Top Cover and make sure that the Inner Cover is reinstalled. z Once an ink tank has been used, do not remove it from the printer and leave it is closed if an ink tank is open . z When you start printing after the Top Cover is closed . z Ensure that all... right. This will not occur if the Inner Cover is not installed properly. The POWER lamp flashes green during cleaning. 45 Printing will cause the ink tank to dry out and the printer may occur even when black-and-white or grayscale printing is specified. z The ALARM lamp still flashes orange...
... Cover. Open the Top Cover and make sure that the Inner Cover is reinstalled. z Once an ink tank has been used, do not remove it from the printer and leave it is closed if an ink tank is open . z When you start printing after the Top Cover is closed . z Ensure that all... right. This will not occur if the Inner Cover is not installed properly. The POWER lamp flashes green during cleaning. 45 Printing will cause the ink tank to dry out and the printer may occur even when black-and-white or grayscale printing is specified. z The ALARM lamp still flashes orange...
iP5200R Quick Start Guide
Page 50
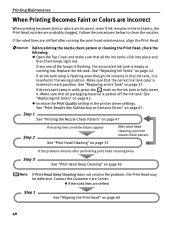
...42. Printing Maintenance When Printing Becomes Faint or Colors are Incorrect When printing becomes faint or colors are incorrect, even if ink remains in the printer driver settings. See "Replacing Ink Tanks" on page 67. Step 1 See "Printing the Nozzle Check Pattern" on page 47 Step 2 If missing ...after running low. z If the ruled lines are shifted after performing print head cleaning twice Step 3 See "Print Head Deep Cleaning" on the ink tank to clean the nozzles. If the ruled lines are shifted Step 1 See "Aligning the Print Head" on page 52 After print head cleaning,...
...42. Printing Maintenance When Printing Becomes Faint or Colors are Incorrect When printing becomes faint or colors are incorrect, even if ink remains in the printer driver settings. See "Replacing Ink Tanks" on page 67. Step 1 See "Printing the Nozzle Check Pattern" on page 47 Step 2 If missing ...after running low. z If the ruled lines are shifted after performing print head cleaning twice Step 3 See "Print Head Deep Cleaning" on the ink tank to clean the nozzles. If the ruled lines are shifted Step 1 See "Aligning the Print Head" on page 52 After print head cleaning,...
iP5200R Quick Start Guide
Page 51
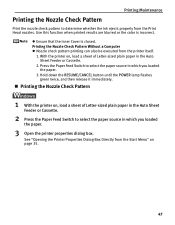
... Print the nozzle check pattern to select the paper source in which you loaded the paper. 3. Press the Paper Feed Switch to determine whether the ink ejects properly from the Print Head nozzles.
... Print the nozzle check pattern to select the paper source in which you loaded the paper. 3. Press the Paper Feed Switch to determine whether the ink ejects properly from the Print Head nozzles.
iP5200R Quick Start Guide
Page 54
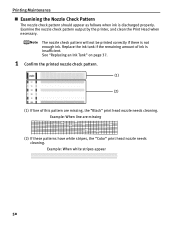
... check pattern output by the printer, and clean the Print Head when necessary. See "Replacing an Ink Tank" on page 37. 1 Confirm the printed nozzle check pattern. (1) (2) (1) If line of ink is not enough ink. Replace the ink tank if the remaining amount of this pattern are missing (2) If these patterns have white stripes...
... check pattern output by the printer, and clean the Print Head when necessary. See "Replacing an Ink Tank" on page 37. 1 Confirm the printed nozzle check pattern. (1) (2) (1) If line of ink is not enough ink. Replace the ink tank if the remaining amount of this pattern are missing (2) If these patterns have white stripes...
iP5200R Quick Start Guide
Page 56
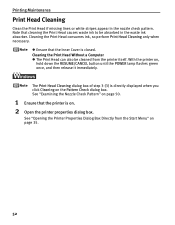
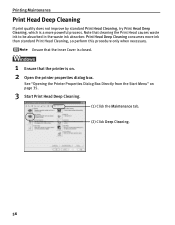
Printing Maintenance Print Head Cleaning Clean the Print Head if missing lines or white stripes appear in the waste ink absorber. Cleaning the Print Head consumes ink, so perform Print Head Cleaning only when necessary. Cleaning the Print Head Without a Computer z The Print Head can also be absorbed ...2 Open the printer properties dialog box. See "Examining the Nozzle Check Pattern" on page 50. 1 Ensure that cleaning the Print Head causes waste ink to be cleaned from the Start Menu" on , hold down the RESUME/CANCEL button until the POWER lamp flashes green once, and then release it...
Printing Maintenance Print Head Cleaning Clean the Print Head if missing lines or white stripes appear in the waste ink absorber. Cleaning the Print Head consumes ink, so perform Print Head Cleaning only when necessary. Cleaning the Print Head Without a Computer z The Print Head can also be absorbed ...2 Open the printer properties dialog box. See "Examining the Nozzle Check Pattern" on page 50. 1 Ensure that cleaning the Print Head causes waste ink to be cleaned from the Start Menu" on , hold down the RESUME/CANCEL button until the POWER lamp flashes green once, and then release it...
iP5200R Quick Start Guide
Page 57
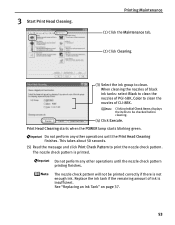
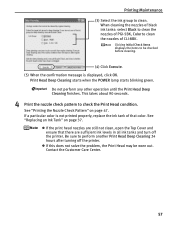
... check pattern is insufficient. 3 Start Print Head Cleaning. Printing Maintenance (1) Click the Maintenance tab. (2) Click Cleaning. (3) Select the ink group to print the nozzle check pattern. Print Head Cleaning starts when the POWER lamp starts blinking green. Do not perform any other operations... until the nozzle check pattern printing finishes. See "Replacing an Ink Tank" on page 37. 53 When cleaning the nozzles of black ink tanks: select Black to clean the nozzles of PGI-5BK, Color to be printed correctly if there is ...
... check pattern is insufficient. 3 Start Print Head Cleaning. Printing Maintenance (1) Click the Maintenance tab. (2) Click Cleaning. (3) Select the ink group to print the nozzle check pattern. Print Head Cleaning starts when the POWER lamp starts blinking green. Do not perform any other operations... until the nozzle check pattern printing finishes. See "Replacing an Ink Tank" on page 37. 53 When cleaning the nozzles of black ink tanks: select Black to clean the nozzles of PGI-5BK, Color to be printed correctly if there is ...

iP5200R Quick Start Guide
Page 59
...Head Cleaning starts when the POWER lamp starts blinking green. See "Print Head Deep Cleaning" on page 50. When cleaning the nozzles of black ink tanks: select Black to clean the nozzles of PGI-5BK, Color to be printed correctly if there is insufficient. If the problem remains after... any other operations until the nozzle check pattern printing finishes. See "Examining the Nozzle Check Pattern" on page 56. 55 See "Replacing an Ink Tank" on page 37. 4 Check the Print Head condition with the printed nozzle check pattern. Clicking Initial Check Items displays the items to ...
...Head Cleaning starts when the POWER lamp starts blinking green. See "Print Head Deep Cleaning" on page 50. When cleaning the nozzles of black ink tanks: select Black to clean the nozzles of PGI-5BK, Color to be printed correctly if there is insufficient. If the problem remains after... any other operations until the nozzle check pattern printing finishes. See "Examining the Nozzle Check Pattern" on page 56. 55 See "Replacing an Ink Tank" on page 37. 4 Check the Print Head condition with the printed nozzle check pattern. Clicking Initial Check Items displays the items to ...
iP5200R Quick Start Guide
Page 60
... the Maintenance tab. (2) Click Deep Cleaning. 56 Ensure that the Inner Cover is closed. 1 Ensure that cleaning the Print Head causes waste ink to be absorbed in the waste ink absorber. See "Opening the Printer Properties Dialog Box Directly from the Start Menu" on . 2 Open the printer properties dialog box. Note that...
... the Maintenance tab. (2) Click Deep Cleaning. 56 Ensure that the Inner Cover is closed. 1 Ensure that cleaning the Print Head causes waste ink to be absorbed in the waste ink absorber. See "Opening the Printer Properties Dialog Box Directly from the Start Menu" on . 2 Open the printer properties dialog box. Note that...
iP5200R Quick Start Guide
Page 61
...the Print Head condition. Print Head Deep Cleaning starts when the POWER lamp starts blinking green. z If the print head nozzles are sufficient ink levels in all ink tanks and turn off the printer. Do not perform any other operation until the Print Head Deep Cleaning finishes. If a particular color ... solve the problem, the Print Head may be checked before cleaning. (4) Click Execute. (5) When the confirmation message is not printed properly, replace the ink tank of CLI-8BK. This takes about 90 seconds. 4 Print the nozzle check pattern to clean. When cleaning the nozzles of black...
...the Print Head condition. Print Head Deep Cleaning starts when the POWER lamp starts blinking green. z If the print head nozzles are sufficient ink levels in all ink tanks and turn off the printer. Do not perform any other operation until the Print Head Deep Cleaning finishes. If a particular color ... solve the problem, the Print Head may be checked before cleaning. (4) Click Execute. (5) When the confirmation message is not printed properly, replace the ink tank of CLI-8BK. This takes about 90 seconds. 4 Print the nozzle check pattern to clean. When cleaning the nozzles of black...


